Customize CMiC's Provided Base Languages by Overriding Specific Translations Only
CMiC's provided base languages can be customized for when users want to override specific translations only for certain messages, menu items, program elements, etc. This can be done by updating object translations directly in Program Mode, Message Mode, and Menu Mode, which is described in detail below.
Alternatively, CMiC's provided base language translations can be used to create and customize country-specific variants by using the Copy From functionality in Program Mode. Please see Creating a Country Specific Variant from CMiC's Provided Base Languages for further details.
Note The process to customize a base language is different than creating a new translation for languages that don't have base language translations provided. When customizing, there is no need to enter translations for each object because the base language translation will be used if the country specific-translation is not provided.
Detailed Steps
-
Open the Translation Manager tool from the Launch page. By default, the tool will open in Program Mode.

-
In Program Mode, select a country-specific variant in the To field of the Translation section, as shown in the screenshot below.

-
Drill down the Treeview by clicking on the
 icon next to the associated object, or use the drop-down lists to find a specific object in the Treeview.
-
Click on the object's name to view the translation details for the selected object.

-
In the text box under the Name of Translated Language column, enter the translation for the term.

-
Once the translation has been checked for accuracy, check the Verified checkbox.
Note All data is saved automatically when navigating out of an edited field or if the Enter key is pressed.

-
For common terms, such as "Company", the propagate button can be used to propagate the translation for the term to selected programs, processes, applications, etc. Please see the Program Elements section of Program Mode for further details.

-
Repeat steps 3 to 7 to enter translations for others objects in the Treeview.
-
For detailed steps on translating messages and menus, please see Translating Messages and Menus.
-
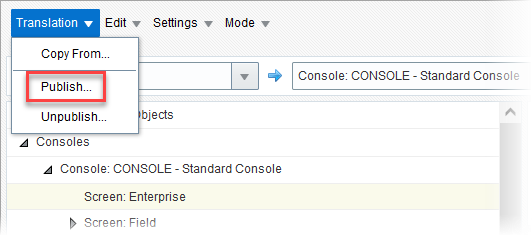
Once the translations have been verified, click on the Translation drop-down menu and select the "Publish" option.
-
In the Publish Translation pop-up window, select whether to include or exclude unverified translations in the language installation.

-
Click on the Install in this Environment button to install the language to the current environment, or enter a file name and click on the Download button to download the installation script. Please see the Publishing Translations section of Publishing and Unpublishing Translations for more details.

-
If the language has already been installed on the environment, the Install Translation pop-up window will appear to warn the user that the current installed translation will be uninstalled and the new translation will be installed and available to all users. Click the Install button to continue.

-
Once installation is complete, users will need to change their default language in either the User Settings pop-up window or the User Preferences screen. Further details can be found in Changing the Default Language for a User.