The User Maintenance screen is used to create users via CMiC Enterprise.
NOTE: The process described here is for creating Enterprise users. Cloud users should refer to System Data - Creating New Users for instructions on creating a new user.
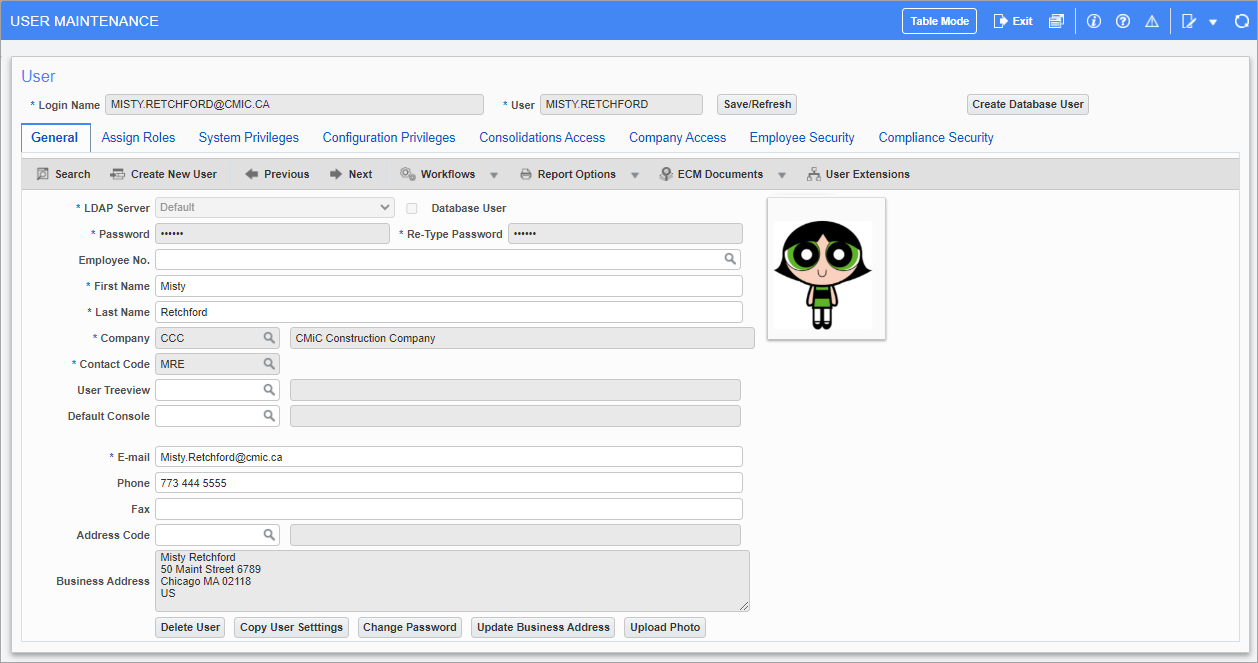
Pgm: SDUSRMNT – User Maintenance; standard Treeview path: System > Security > Users > User Maintenance - General tab
This screen creates both Database and LDAP users at the same time. This screen should be used to create Enterprise users. These users are your employees and are users who will access the Enterprise programs.
This screen is used to perform all the standard setup for a new user directly in one program. The screen allows for the creation of the user, then the assigning of security roles and privileges for accessing programs and functions and security groups for accessing data within Enterprise such as companies, jobs and employees.
NOTE: The user preferences set for user “DA” on the User Preferences screen for date formats and theme color will automatically default to all users (standard Treeview path: System > Preferences > User Preferences). Therefore, before any users other than “DA” are set up, it is best to ensure that “DA” has these corporate defaults set. For further information, refer to Defining User Preferences.
User
To insert a new User record, press the [Create New User] button on the Block Toolbar.
Login Name (Login ID)
Enter a login name for the user being created. An email address can be used in this field.
If the login name is 30 characters or less, the same name will default to the User field.
If the length of the login name is more than 30 characters and does not include the character "@" (i.e., not an email address), the first 30 characters of the login name will default to the User field. Otherwise, if the login name is an email address and contains more than 30 characters, the characters up to the "@" , or the first 30 characters will default to the User field.
For example:
If a long login name such as Ravichandran.Venkatachalam@cmic.ca was entered, then the user name in the User field would default to Ravichandran.Venkatachalam. If a shorter login name such as Maria.Cani@cmic.ca was entered, then the username in the User field would default to Maria.Cani@cmic.ca.
User (User ID)
User name for the user being created.
A variation of the login name from the Login Name field may have defaulted into this User field but can be updated as required.
If a new user name is being created, and there is an LDAP user with the same name, the system will ask if the user wants to link the LDAP user to this Enterprise user.
[Save/Refresh] – Button
This button is used to process the information entered. This includes setting up the LDAP user account if required.
[Create Database User] – Button
This button is only visible for saved user IDs with their ‘Database User’ box unchecked. The button is used to create a database user.
Quick Links
The User Maintenance screen contains the following tabs:
General – Tab
LDAP Server
This field will default to the LDAP server defined as the Primary LDAP server. If the user being created should not be created in the primary LDAP server, then select the correct one from the drop-down list. This is a mandatory field. (Field is disabled/display-only in cases where only one LDAP is defined.)
Database User – Checkbox
This checkbox is enabled when creating a new user. This checkbox is only available for Enterprise clients and is not displayed for Cloud clients. If checked, it allows the new user to be created as a Database user. Default value is unchecked.
NOTE: This checkbox is disabled for existing users.
Password
Enter the password this user will use to log in to the system. This password is the Single Sign-on password as well as the Enterprise database password. If the user already had an LDAP entry, this password will only be the Enterprise database password for the current environment.
Employee Number
Enter/select the appropriate employee number for this user if applicable. This is not a required field.
First, Last Name
If the employee number was entered, these fields will be populated from the Employee Profile. Otherwise, enter the first and last name for this user.
Company, Contact Code, E-Mail, Phone, Fax
These fields will be populated based on the Employee Profile if entered; otherwise, enter the appropriate values where applicable. The E-mail field is a required field.
User Treeview
This field sets the Treeview for the user. If the field is left blank, the user will by default get the full Treeview “CMIC_TRD”. If custom Treeviews have been created, then select the appropriate Treeview for this user.
Default Console
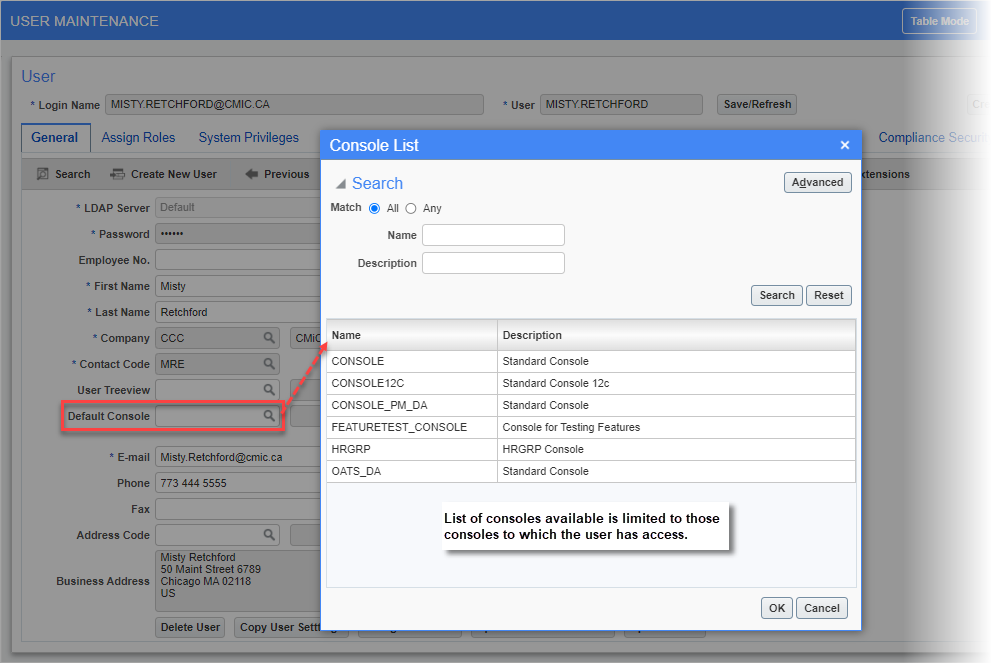
Pop-up window launched from Default Console LOV on the General tab of the User Maintenance screen (standard Treeview path: System > Security > Users > User Maintenance - General tab)
This field is used to set a user’s default console so that when the user logs into Enterprise, the default console loads automatically, skipping the console selection screen.
If a default console is not set (i.e., Default Console field is left empty), when the user logs into Enterprise, the console selection screen will appear, allowing the user to select a console from a list of available consoles to which the user has access.
A user’s access to a console is driven by two levels of security: User Interface Generator (UIG) Customization Levels and Role Security. If both levels of security requirements are not met, the user may not be able to access the console.
To set a default console for a user, ensure the following two security steps have been followed.
-
UIG Customization Levels: Click on the Default Console field’s LOV to select a console. The list of consoles available in the LOV is limited to only those consoles to which the user has access. For a user to gain access to a console, the console must be defined at the Standard level, Site (Client) level, Group (UIC) level the user belongs to, or at the User level. Access is defined on the Configuration Privileges tab of the User Maintenance screen (standard Treeview path: System > Security > Users > User Maintenance – Configuration Privileges tab).
-
Role Security: Since consoles (standard and custom-defined) can also be secured by security roles, verify that the user has access to the default console as per role security. Role security is assigned to a console on the Assign Roles to Programs screen in the System Data module, as shown in the screenshot below.

Pgm: FORMROLE – Assign Roles to Programs; standard Treeview path: System > Security > Roles > Assign Roles to Programs
In the Application Code field, select “UIG”. A list of available consoles will be displayed in the Programs section of the screen. Select a console in the Programs section of the screen to display the roles assigned to that console in the Roles section of the screen below. If the console has no roles assigned, then it is available to everyone. Otherwise, if a role is assigned to the console, the console will only be available to users that have the required role. In the example above, for a user to see the selected console, the user must have the required role displayed in the Roles section. Roles are assigned to users on the User Maintenance screen, as shown in the screenshot below.
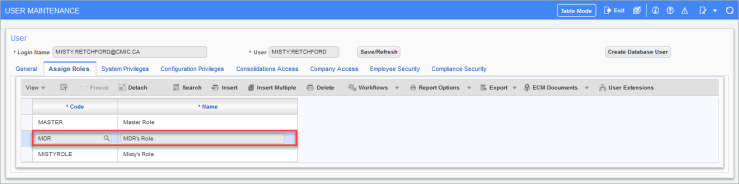
Pgm: SDUSRMNT – User Maintenance; standard Treeview path: System > Security > Users > User Maintenance – Assign Roles tab
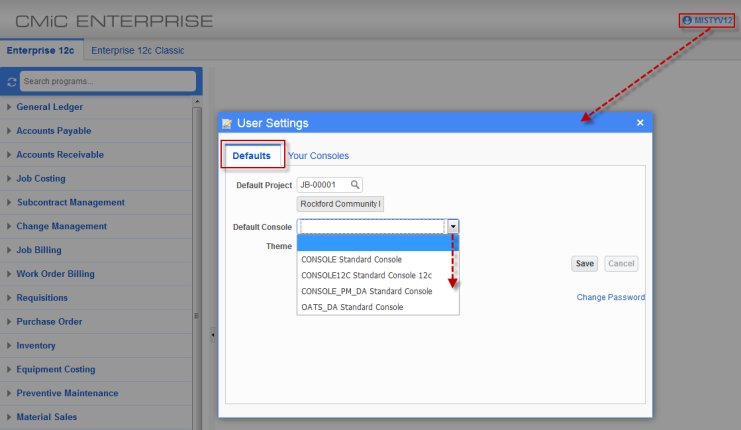
User Settings pop-up window launched from username link on UI Console – Defaults tab
A default console can also be defined in the Defaults tab of the User Settings pop-up window launched from the username link on the UI Console. If a default console was already set in the General tab of the User Maintenance screen for the user, then it will default here in this pop-up window if the user still has access to it as per role security. The drop-down menu in the Default Console field in this pop-up window follows the same security rules as the Default Console field on the General tab of the User Maintenance screen.
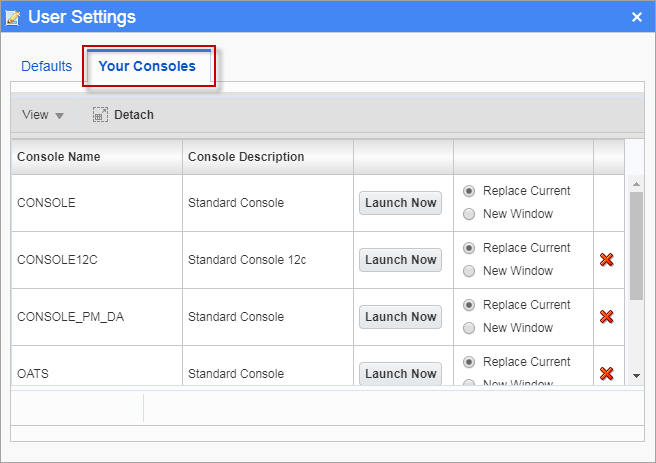
User Settings pop-up window launched from username link on UI Console – Your Consoles tab
The Your Consoles tab in the User Settings pop-up window only lists consoles to which the user has access. This tab is used to launch a different console or to delete a named console and all of its variants from the system.
For more information on the User Settings pop-up window, please refer to the R12 Console guide.
Default PM Console
The Default PM Console field is only available for Cloud users and can be used to set a user's default PM console. If a default PM console is not set (i.e., Default PM Console field is left empty), the system will run the CMiC Field (PMJSP) module instead. For more information, please refer to UI Console - Setting a Default Console.
[Delete User] – Button
![Screenshot of pop-up window launched from [Delete] button.](../../../../Resources/Images/SD_12c/SD_UserMaintenanceDeleteUser.png)
Pop-up window launched from [Delete User] button on User Maintenance screen
Clicking this option will prompt for a confirmation, and then allow deletion of the user account. The LDAP user can be deleted or left based on the selection made when confirming the delete.
This button is used to delete a user from the system. When pressed, a pop-up window appears with additional settings to complete before proceeding.
Delete LDAP User - Checkbox
Check the 'Delete LDAP User' box to delete the LDAP user along with the database user.
Contact Record Handling
Use the drop-down menu to choose how the Contact record is managed during deletion. The following options are available:
-
Inactivate Contact: Sets the status of the Contact record to inactive.
-
Delete Contact: Deletes the Contact record.
-
Contact Status remains unchanged: Leaves the Contact record unchanged.
NOTE: When removing a user, it is recommended to select "Inactivate Contact" rather than "Delete Contact". This approach preserves historical data and helps prevent potential system issues that may arise from permanently deleting contact records.
After configuring the settings, click the [Delete User] button to finalize the deletion and remove the user from the system. If the 'Delete LDAP User' box is checked, a message will appear to confirm deletion of both the LDAP user and database user.
[Copy User Settings] – Button
This button allows the new user to be created with all the privileges, roles, access groups, etc., of the user specified in the Source User field of the pop-up window. This streamlines the entry of similar user profiles, and of course any changes can be made after the copy is completed.
[Change Password] – Button

Pop-up launched from the [Change Password] button on the User Maintenance screen; standard Treeview path: System > Security > User Maintenance – General tab
The pop-up window launched from the [Change Password] button allows the LDAP password for the current user to be updated.
The change password function works in conjunction with the system privilege ‘CHGDBPSW - SD: Allows the user to change database password of other users’.
The program changes the database password and the associated RAD password for the current environment. This does not change the Single Sign-on Password of the user. Check the ‘Change Database Password’ checkbox to have the database password and the LDAP password to be the same.
NOTE: The 'Change Database Password' checkbox is only available for Enterprise clients and is not displayed for Cloud clients.
[Update Business Address] – Button
This button will cause the Business Address information for this user to be updated based on the entries made into the pop-up window displayed.
[Upload Photo] – Button
This button is used to upload an image of the employee and display it on the user profile, if desired. A photo uploaded here will also be displayed on the Employee Profile screen (standard Treeview path: US Payroll > Setup > Employees > Employee Profile – Personal tab) and the ESS Profile Information screen (standard Treeview path: Employee Self Service > Personal Information > Profile Information).
When a photo is uploaded here, it cannot be removed and can only be replaced. Only employees with an Employee Profile record can have their photos removed on the Employee Profile screen in the US Payroll module using the [Remove Photo] button.
Assign Roles – Tab

Pgm: SDUSRMNT – User Maintenance; standard Treeview path: System > Security > Users > User Maintenance – Assign Roles tab
A user must be assigned at least one role in order to have access to the applications in the system. (Remember that it is the role that defines application and screen access.) A user may belong to more than one role; access is defined by the inclusion of that role to a particular application or program. This means that if there is a conflict between roles, the system will allow access if any of the roles assigned allow access.
In addition to defining access to applications and screens, a security role can be further defined by assigning specific insert, update, and delete privileges on a screen. In fact, security can be defined right down to the block level, by applying specific insert, update, and delete access to certain blocks of the screen (this includes pop-ups and tabs). Refer to Assign Roles to Programs for more information.
As a role is assigned to a user, the privileges that belong to that role are assigned to the user. Once assigned, privileges of an individual user can be further customized on the tabs for System Privileges and Configuration Privileges.
NOTE: If no roles at all are defined, the system is totally open to all users.
Code, Name
Click on [Insert] in the Block Toolbar to enter a row. In the Code field, enter/select the appropriate security roles for this user profile. Keep in mind that a user can be assigned to more than one role. Apply the required roles and save the information when done. This screen can also be used to remove roles from a user.
System Privileges – Tab

Pgm: SDUSRMNT – User Maintenance; standard Treeview path: System > Security > User Maintenance – System Privileges tab
To assign a privilege to a user, simply check the box next to that privilege. To deactivate a privilege, simply uncheck the box. The user will have to exit the system to see any changes.
A user may be assigned to more than one role; privileges are defined by the inclusion of that privilege to a particular role. This means that if there is a conflict between roles, the system will turn on a privilege if any of the roles assigned allow access to the privilege.
Configuration Privileges – Tab

Pgm: SDUSRMNT – User Maintenance; standard Treeview path: System > Security > User Maintenance – Configuration Privileges tab
Configuration privileges are assigned to a user the same way system privileges are assigned to a user.
Note that with the configuration privileges, there is a secondary setup required for users that have been granted a privilege via the ‘Select’ checkbox. These options are in the lower section of the screen and detail the where/who type of access that the user is granted.
Levels Required – Checkbox
This field is read-only and displays whether the configuration setup requires customization levels. If checked, users can edit customization level(s) in the Edit Privilege Levels section. If unchecked, users will not be able to edit privilege levels.
The following level types are available in the Edit Privilege Levels section: Site, Configuration Group, and User.
In the screenshot above, the user can edit console definitions for the site (Site/Mine) and for the user only (User/Mine) for the selected 'CONSOLEDT' privilege.
Consolidations Access – Tab

Pgm: SDUSRMNT – User Maintenance; standard Treeview path: System > Security > User Maintenance – Consolidations Access tab
Access to the various companies in the system can be granted through consolidation security or through company security.
Consolidation security allows access to be granted to a group of companies at one time based on their company consolidation code. (See Company Consolidation Codes within the General Ledger guide for more details.) Company security allows access to be granted to individual companies.
If access has been granted to a user through consolidation codes security on the Consolidations Access tab of this screen, no additional setup is required for company security on the Company Access tab of this screen. Each user assigned a consolidation security code will automatically receive access to the companies within that group.
When the system is first being set up, a consolidation code may not be available to assign. This is not a concern, as consolidation code security can be assigned at any point.
When a company is created, the user who has set up the company will automatically have access rights to that company. All other users must then be given access rights in order to process information through that company.
To grant access to a user through consolidation security, enter the company consolidation code to which access is being assigned. More than one user can be assigned to the same consolidation code and a user can be assigned to more than one consolidation code.
Company Access – Tab

Pgm: SDUSRMNT – User Maintenance; standard Treeview path: System > Security > User Maintenance – Company Access tab
Company security allows user access to be granted to individual companies and as a time saver grant job cost security roles as well. If user access has been granted through consolidation codes security (standard Treeview path: System > User Maintenance – Consolidation Access tab), there is no setup required on the Company Access tab. Each user assigned a consolidation security code will automatically receive access to the companies within that group.
Rules for Granting Company Access
-
When a company is set up in this system, the user who set it up automatically gets access rights to it, and gets rights to grant other users access to it.
-
A user that does not have access to a given company may not grant access to this company to anybody, including themselves.
-
A user can be granted access to more than one company.
To grant a user access rights to a company, click [Insert] on the first section’s Block Toolbar, then using the new row, select the company to which to grant access. If no companies are available in the LOV, ensure the above rules have been followed.
Then, for the company selected in the first section, department and job/project access can be granted to the user via the lower section’s Department Access and Job/Project Access tabs by simply adding a security group that the user is in to the tables on these tabs.
NOTE: This can only be done if job cost security has already been defined. For more information, refer to System Data - Job/Project Security.
This screen also allows company access to be removed. Instead of adding a company code, just delete an existing company code. The user will no longer have access to that company.
Employee Security – Tab

Pgm: SDUSRMNT – User Maintenance; standard Treeview path: System > Security > User Maintenance – Company Access - Employee Security tab
Payroll security allows user access to be granted to payroll employee information. Users are assigned to payroll security groups and each employee belongs to one or more security groups.
All users are required to specify their default payroll security group when they log onto the Payroll application. New employees will automatically be assigned the employee security group of the user creating the employee.
Once the payroll security groups are defined, users can be assigned to the groups. A user must be assigned to at least one security group in order to have access to the employee data within the system. Users may belong to more than one group. For more information on defining payroll security groups, refer to Payroll Security.
Enter the user’s security group or remove previously assigned groups as required.
Compliance Security – Tab
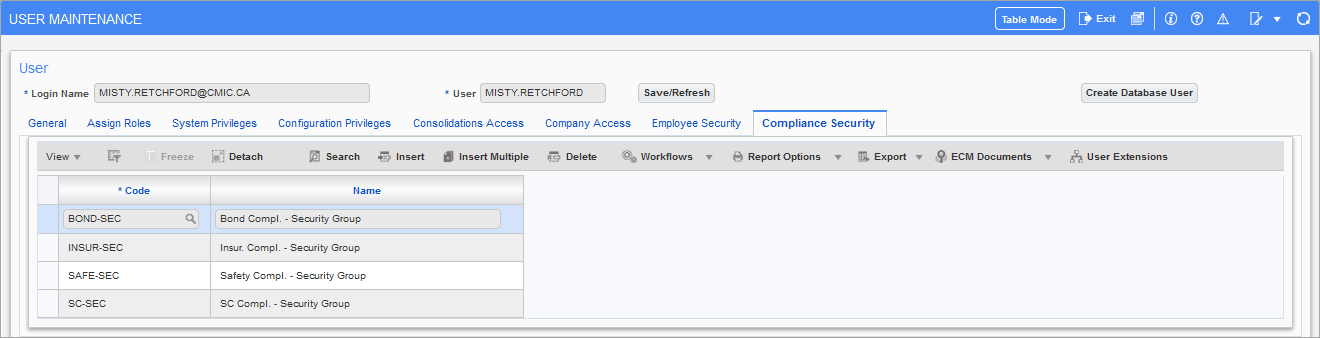
Pgm: SDUSRMNT – User Maintenance; standard Treeview path: System > Security > User Maintenance – Compliance Security tab
If compliance security groups are defined on the Compliance Groups screen (standard Treeview path: System > Security > Compliance Security > Create Security Groups), users can be assigned to the groups using the Compliance Security tab of the User Maintenance screen.
A user must be assigned to at least one security group in order to have access to modify compliance code data within the system if the compliance code is assigned to a compliance group. Users may belong to either no groups, one group or more than one group.
Compliance security groups are optional and are not required to be used, unlike employee/job security groups.
The next section provides details on setting up compliance security groups.
Compliance Security Groups
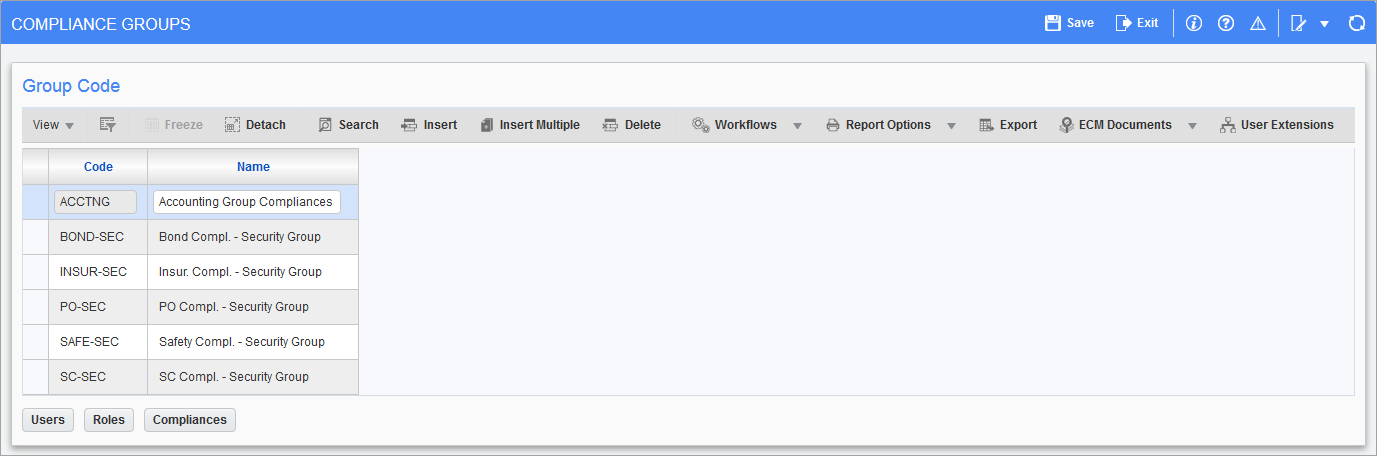
Pgm: INSGROUP – Compliance Groups; standard Treeview path: System > Security > Compliance Security > Create Security Groups
This screen is used to create compliance security groups, which are defined at the system level, and associated to users, security roles and compliance codes. If a compliance code is associated to a compliance security group, only the users belonging to the group will have access to the compliance code. If no compliance security group is associated to a compliance code, access to it is unrestricted. For more information about using this screen, refer to System Data - Compliance Security.
License Pools – Tab
The License Pools tab applies to multi-tenanted environments (standard Treeview path: System > Security > Users > User Maintenance – License Pools tab). It is used to specify which licenses a multi-tenant user has access to. This tab is only visible in a multi-tenanted environment.