Payroll processing should be done after completing timesheet entry for a particular pay run and before checks and posting occurs. Payroll processing calculates benefits, adjustments, pre-tax deductions, taxes, post-tax deductions, expenses, loan repayments, workers’ compensation, and public liability charges as well as any job allocations from said items. For this reason, payroll processing must take place after any adjustment or expense claim entry.
Check printing is only carried out after processing has been completed. The system warns the user if there is an attempt to print checks before any payroll processing.
This section contains the following subsections:
Processing
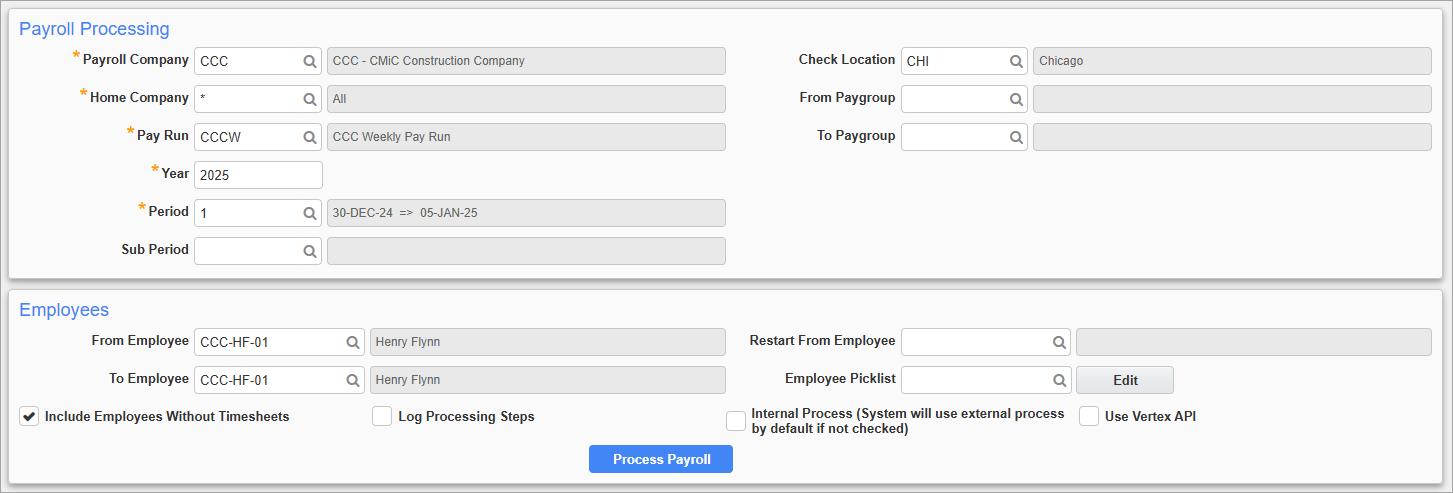
Pgm: PYPAYPRO – Payroll Processing; standard Treeview path: US Payroll > Processing > Payroll Processing
Payroll Processing calculates the amount of employee pay for a particular pay period in a pay run. Posting does not take place in this procedure, which may be run as often as desired prior to check printing and posting.
Payroll Company, Home Company
Enter/select the payroll and home company of the employees being processed.
Pay Run, Pay Year, Pay Period
Enter/select the pay run, pay year, and pay period for the payroll being calculated.
Sub Period
Enter/select the sub-period being processed. This feature is used to support companies that require a sub-payroll option and is not mandatory for payroll processing. For more information on sub-periods, please refer to US Payroll - Pay Periods.
The sub-payroll can be run at any time before or after the regular payroll processing. Users can continue to enter transactions in the sub-payroll in open periods and process them even after the regular period was completed. Once the regular period is closed, the sub-payroll will be available in the next open payroll.
NOTE: This field is only used in the UAE region and does not apply to standard users. It is hidden by default and can be displayed if the following system privilege is assigned: 'PYSUBPER - PY: Allows user to use sub period field in payroll processing screen'. To view sub-periods created by other users, the following additional system privilege must also be assigned: 'PYSUBPPRVW - PY: Allows User to access Sub Period created by other Users'.
Check Location
Enter/select the check location code. This field is mandatory if the ‘Check Location Processing’ box is enabled on the Employee Profile. If the option is not enabled, the field is not available.
From Pay Group, To Pay Group
Enter/select the range of pay groups being processed through Payroll. Leave these fields blank to process the payroll for all pay groups in the pay run selected in the previous field.
Employee Pick List, From Employee, To Employee
Enter/select the range of employees being processed through Payroll. To process amounts for a single employee, enter the same code in both the From and To fields. To process amounts for the full range of employees, leave both the From and To fields blank.
Alternatively, enter/select a pick list to process a specific group of employees.
Restart from Employee
If restarting a payroll processing that has been interrupted, enter/select the employee code from which to begin processing.
NOTE: The restart feature does not run sequentially by employee number. Rather, when specifying the employee code to restart, the system first checks to see the pay group in which the employee code resides. The system then recalculates the employees that follow sequentially from that employee in that pay group. Once done, the system moves on to the next sequential pay group and recalculates the employees in that group. Recalculation continues until all subsequent pay groups have been processed.
Include Employees Without Timesheets – Checkbox
Check this box to process employees with no timesheets. Leave this box blank if hourly employees must have a timesheet to be included in the processing of the pay run. The default state of this box is determined by the ‘Include Emp with no Timesheets In Processing’ box in the Rules tab of the Company Control screen.
Log Processing Steps – Checkbox
Check this box to insert detailed processing steps into the processing log. This log is used by programmers for technical analysis at the database level.
Internal Process (System will use external process by default if not checked) – Checkbox
Check this box to process payroll directly through Vertex and its associated libraries. Leave this box unchecked to process the payroll to an external file. The former is a quicker process than the latter.
[Process
After clicking the [Process
Use Vertex API – Checkbox
Check this box to process payroll using the Vertex API function. When checked, the tax settings and calculations are automatically handled by Vertex via API calls. This eliminates the use of manual tax setups (i.e., as set up in the US Payroll - Payroll Taxes - Overview submenu) and automates the application of tax rules across federal, state, and local levels.
NOTE: The 'Use Vertex API' checkbox is disabled by default. The "Alternative Feature – PYVERTEX_API" setting must be activated by a programmer (i.e., it is not enabled/disabled on the Processing screen).
NOTE: This feature is part of ongoing Vertex enhancements and is currently in Beta testing. There may be expected differences in calculations when comparing results to payroll processed via the internal process method (e.g., using the Deduct and CMP Array).
Vertex credentials and endpoints are configured in the External Web Servers pop-up launched from the [External Web Servers] button on the General tab of the System Options screen in the System Data module (standard Treeview path: System > Setup > System Options – General tab). For more information, please refer to System Data - System Options - General - Tab.
Check Processing

Pgm: PYCHKPROC – Payroll Check Processing; standard Treeview path: US Payroll > Processing > Check Processing
Similar to the Processing screen, this screen can be used to process checks which can then be printed on the Check Printing screen.
As well, the check printing program allows checks to be reprinted and renumbered (see the section below on re-printing checks). Be aware that when processing paychecks for employees after printing manual checks, the ‘Renumber’ box should be left unchecked. If the box is checked, the system renumbers the manual checks and reprints them.
FEIN, Company, Pay Run, Pay Year, Period
Enter/select the FEIN, company code, pay run, pay year, and period for the checks to be processed. If a company code is entered the FEIN field becomes unavailable. Conversely, if the FEIN is entered first, the Company field becomes unavailable.
Sub Period
Enter/select the sub-period for the checks to be processed. This feature is used to support companies that require a sub-payroll option and is not mandatory for check processing.
NOTE: This field is hidden by default and can be added using Lite Editor. To view sub-periods created by other users, the following system privilege must be assigned: PYSUBPPRVW - PY: Allows User to access Sub Period created by other Users.
Pay Date
Enter/select the date the checks being processed are to be paid.
From Pay Group, To Pay Group
Enter/select the range of pay groups being processed through Payroll. Leave these fields blank to process checks for all pay groups in the pay run selected above.
The signature and logo information on the check are derived from the employee’s pay group.
Check Location
Enter/select the check location code. This field is mandatory if the ‘Check Location Processing’ box is enabled on the Employee Profile. If the option is not enabled, the field is not available.
Loc’n Signature Pay Group
Enter the location of the pay group. This is the location that prints on the check.
Check Number For Reprint
Enter a check number to be printed for an employee or range of employees that usually have their checks split.
Bank, Branch, Account Number
Enter/select the banking information from which to pay the checks.
Last Check Number
The system keeps track of the last check number issued against this bank account and automatically uses the next number when processing the first check of this run. The system also automatically updates the value in this field so that it always uses the next highest number when producing checks against this bank account.
The system allows this check number to be changed to a number greater than the one displayed.
User Define Check For Print
Enter/select a user-defined check to print.
Employee Pick List, From Employee, To Employee
Enter/select the range of employees being processed through Payroll. To process amounts for a single employee, enter the same code in both the From and To fields. To process amounts for the full range of employees, leave both the From and To fields blank.
Alternatively, enter/select a pick list to process a specific group of employees.
Process Check, Language
Select the order and the language in which the checks are processed.
Check(s) Only – Checkbox
Check this box to ignore the direct deposit default settings and only print checks for this run. This is mostly used when processing bonus runs.
Check Printing

Pgm: PYCHKPRT – Payroll Check Printing; standard Treeview path: US Payroll > Processing > Check Printing
After the checks have been processed in the Check Processing screen they can be printed here. Checks are only produced for those employees who are paid directly via checks. No checks are produced for employees paid via electronic funds transfer (EFT), but their direct deposit files are updated. The Check Stub Printing screen can then be used to print the check stub detail for the specified run.
As many of the fields on this screen are similar to those in the Check Processing screen, please refer to that section in this guide for any further information.
NOTE: An employee’s pay can’t be re-processed once checks have been printed. In order to re-process an employee for a pay run in which a check was printed, the check must be voided.
Print Direct Deposit Stub – Checkbox, Deposit Type
Check this box to make the Deposit Type field available. The system allows for the choice between the following options:
-
Direct Deposit Employees Only: Prints the check stub for those employees paid entirely through direct deposit.
-
All Direct Deposit Stubs: Prints the check stub for all employees that paid somewhat through direct deposit.
-
All Stubs: Prints the check stubs for all employees regardless of whether they are paid through direct deposit, checks, or a split between the two.
Sort by Job – Checkbox
If this box is checked the check register is sorted by job order as opposed to the default sort by check number.
Exclude Manual Checks – Checkbox
If this box is checked manual checks processed in that period are not printed from this screen.
Reprinting Checks
Re-Print and Renumbering
It may be necessary to reprint the checks on a check run due to a paper jam or check error
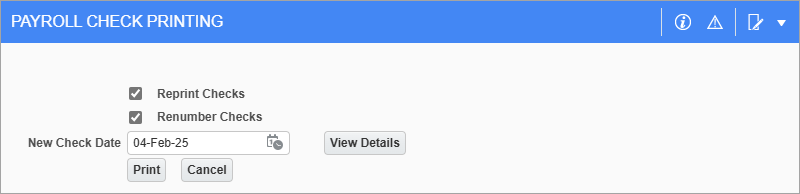
Payroll Check Printing screen launched from [Print] button
Reprint Checks – Checkbox
Check this box to reprint checks or a portion of the checks on a check run.
Renumber Checks – Checkbox
Check this box to reprint checks or a portion of the checks on a check run using the next set of check numbers. Leave this box unchecked to reprint checks or a portion of the checks on a check run using the same check numbers.
New Check Date
Select a new pay date to reprint and renumber checks.
[View Details] – Button
Press this button to view the current details for the checks.
NOTE: This feature is available for the following standard check formats: PYCHK01U, PYCHK01C, PYCHK02U, PYCHK02U_NB, PYCHK04C, PYCHK07U_3P, PYCHK08C, PYCHK08U, PYCHK09U, PYCHK10U, PYCHK_CA, and PY_UK.
[Print] – Button
Press this button to reprint the checks.
Re-Print When Using Print Direct Deposit Stub
If the ‘Print Direct Deposit Stub’ checkbox is checked and the [Print] button is pressed, the Pay Stub Printing screen is launched as a pop-up window. The first time this printing process takes place (i.e., no stubs have been previously printed) for the company, pay run, year, period, pay group, and employee combination entered in the Payroll Check Printing screen, all pay stubs will be printed or emailed.
If the printing process is repeated a second time and some pay stubs have already been printed for that company criteria, the Payroll Check Printing screen will launch a pop-up Alert message to confirm if the user wants to “Reprint Checks?” If the [Yes] button is pressed, all pay stubs will be printed or emailed. If the [No] button is pressed, only unprinted stubs will be printed.
NOTE: The Alert message is only triggered on the Payroll Check Printing screen after the print process is repeated a second time. It will not appear again if the process is repeated three or more times. If the user wishes for the Alert message to continue to be triggered if the printing process is repeated when pay stubs have already been printed for specific company criteria, refer to US Payroll - Using Show Reprint Alert on Pay Stub Printing Screen to learn about an alternate re-print feature which can be enabled on the Pay Stub Printing screen.
Manual Check Printing

Pgm: PYMANPRO – Manual Check Entry; standard Treeview path: US Payroll > Processing > Manual Checks
The Manual Check Printing screen is used to process the payment of a manual check. The manual check program allows for the quick printing and manual manipulation of manual checks
The manipulation of the calculated values is useful if an employee was issued a manual check (usually due to termination) that was not processed through the system. The values used to determine the pay may not match the figures calculated by the system. In this case, users have the opportunity to record the manual check with the values used to produce the check through the Edit Values section of this screen.
Select Parameters
Company, Pay Run, Year, Period
Enter the company code, pay run, year, and period in which the manual check is processed.
Employee
Enter the code for the employee being issued the check.
Bank, Branch, Account No.
Enter the banking information from which the check is paid.
Current Chk. No.
Enter the current check number.
Assigned Check Number
If printing a specific user-defined check, enter the user-defined check number here.
[Process] – Button
Press this button to process payroll and calculate taxes.
[Go To Next Block] – Button
Press this button to go to the next block of checks to be printed and processed.
Edit Values
Once the calculations have been completed, the system displays all the values that make up the net pay for this employee. At this point there is the option to edit any of the values, proceed with the printing of the manual check, or to exit the process completely.
NOTE: If an amount is reduced to zero, that transaction does not display on the check stub as it no longer affects the net pay. Check stub information only displays values that are greater than or less than zero.
[Process to Print] – Button
If any of the manual check values have been edited, the system requires that the [Process to Print] button be pressed so that the system can recalculate the net pay with the changes made.
Print Check Only – Checkbox
Check this box to ignore the default setting for this employee in the Direct Deposit screen and print a check from the data in this screen.
Leave this field blank to issue this employee his/her pay based on the default setting for the employee in the Direct Deposit screen.
[Print Check] – Button
Press this button to print the manual check.
Void Checks

Pgm: PYVOIDCK – Payroll Void Checks; standard Treeview path: US Payroll > Processing > Void Checks
The Void Check screen is used to reverse payroll payments. The void checks program allows the voiding of automatic checks, manual check, and direct deposit payments.
Voiding a check reverses both the check/direct deposit entry and each benefit, deduction, tax, leave, or expense associated with the check payment. If the payroll in which the check was issued has been posted, the system also reverses the General Ledger and Job Cost entries associated with the payment. If the payroll has not been posted, the system reverses the entry in Payroll itself, without the need to interface with other modules. In either case, all to-date entries are recalculated to reflect the voided check. Once a check is reversed it can’t be re-instated under the same number.
The system provides the option to retain or remove the timesheet entries for correction (where applicable) and reprocessing. When the check associated with a crew timesheet or a mechanic timesheet is voided the timesheet status is changed to “Submitted”.
Pay Run
Select the pay run that the check was made for. Selecting a pay run code in this field brings up the Payroll Void Checks screen:
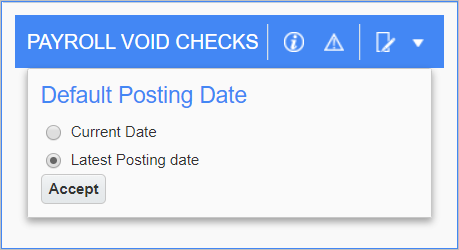
Select ‘Current Date’ to default the entry in the Posting Date field to the current system date. Select ‘Lasting Posting Date’ to default the entry to the date of the latest posted pay period. The dates for pay periods can be set in the Pay Period screen (standard Treeview path: US Payroll > Setup > Company > Pay Groups).
Sub Period
Enter/select the sub-period the check was processed for. Leave this field blank to void the regular period checks. This feature is used to support companies that require a sub-payroll option and is not mandatory for check processing. For more information on sub-periods, please refer to US Payroll - Pay Periods.
NOTE: This field is hidden by default and can be added using Lite Editor. To view sub-periods created by other users, the following system privilege must be assigned: PYSUBPPRVW - PY: Allows User to access Sub Period created by other Users.
Check Number
Enter/select the check number from the Check Number List. Check numbers are entered in the check processing screens (i.e., Payroll Check Processing screen, Manual Check Processing screen, etc.). The system will pull existing details from the check (e.g., pay group, employee, and banking details) to auto-fill the fields on this screen.
Journal
The system defaults the journal to which the General Ledger transaction should post the reversed entry of the void check.
Preview Posting – Checkbox
Check this box to review the checks before they are voided.
Print Reports Immediately – Checkbox
Check this box to print the posting report immediately after posting.
Delete Reports After Posting – Checkbox
Check this box to delete this posting report at the end of the posting process. Once deleted, posting reports cannot be posted at a later time.
If this box is blank, the posting report can be re-printed at a later time.
Retain Input Transactions– Checkbox
This box is checked by default, and allows the system to retain the timesheet entries associated with the void check and for the entries to be edited and reposted. If unchecked, the system will delete the timesheet entries entirely.
Retaining Sub Period
Select an open sub period to retain the transactions. This field is only enabled when the 'Retain Input Transactions' box is checked and the sub period selected in the Sub Period field is closed.
[Void Check] – Button
As mentioned previously, when voiding a check the system automatically posts the reversal of the timesheet as it was posted to the General Ledger and the Job Costing.
Posting
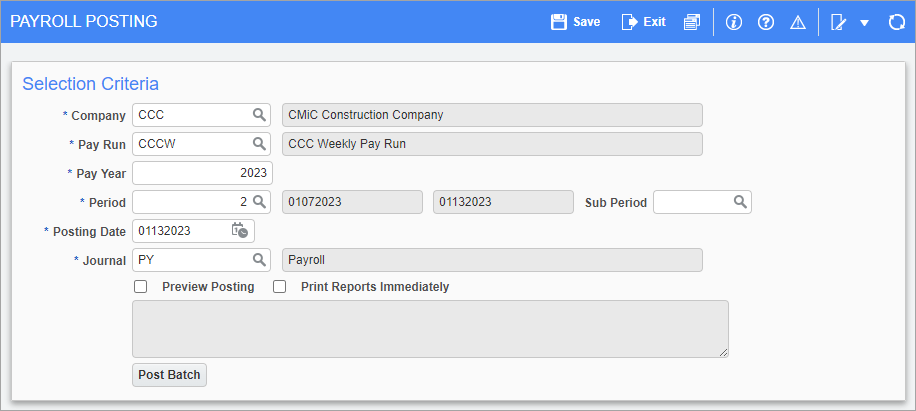
Pgm: PYPAYPST – Payroll Posting; standard Treeview path: US Payroll > Processing > Payroll Posting
Use this screen to complete the regular check run procedure by updating the files and posting payroll information to the Payroll, General Ledger, and Job Costing modules. Therefore, it is imperative that the processing steps have been completed for the period prior to posting.
Users can also post a sub-payroll by selecting a sub-period number in the Sub Period field. This will also close the sub-period and automatically generate a new number in the Pay Periods screen. This feature is used to support companies that require a sub-payroll option and is not mandatory for payroll posting. The Sub Period field is hidden by default and can be added using the Lite Editor. For more information on sub-periods, please refer to US Payroll - Pay Periods.
Once a pay run has been posted for a period
Payroll Posting – GL Interface
The Posting screen posts the employee calculated pay amounts for the specified pay period. These amounts include basic wages, benefits, deductions, taxes, leaves, expenses, loans principal, loans interest, public liability, and workers’ compensation.
When posting the payroll for the specified period the system posts the basic wage as the following transaction to the General Ledger:
DR Clearing Account DR XXX
CR Cash / Bank CR XXX
The posting of the other transactions is dependent on the system setup of these items. Payroll posting can only occur if the setup is such that total debits equal total credits.
This screen posts costs to a job when the ‘Job Allocation’ box is checked against a benefit, deduction, tax, workers’ compensation, or public liability calculated during the specified period. In any of these cases, the labor burden associated with the job allocation posts to the Job Costing module during payroll posting. The associated posting to the General Ledger results in the following transaction to the General Ledger:
DR Job / Phase / Category Cost DR XXX
CR Credit acct on burden item CR XXX
The manner in which payroll posting interfaces with the General Ledger is dependent on the ‘Subledger Summary’ box on the Account Maintenance screen in the General Ledger. Each account is flagged individually so that all or a portion of the interface may be sent.
NOTE: There is the potential to expose detailed information such as individual employee names and their specific wage related costs, if the ‘Subledger Summary’ box is unchecked. Ensure that these boxes are set properly to achieve the desired interface results.
General Ledger Interface – Subledger Summary Box unchecked:
Source Code: Employee Code
Source Desc: Employee Name
Reference: Pay run code / Year / Pay Period
Reference Desc: Pay run description
Post Date: Post Date
Reference Date: Post Date
WM: Hard coded as 'HR'
General Ledger Interface – Subledger Summary Box checked:
Source Code: Blank
Source Desc: Blank
Reference: Pay run code / Year / Pay Period
Reference Desc: Pay run description
Post Date: Post Date
Reference Date: Period End Date
WM: Hard coded as 'HR'
Payroll Posting – JC Interface
Payroll only posts a cost to a job when the ‘Job Allocation’ box is checked against a benefit, deduction, tax, workers’ compensation, or public liability. In any of these cases, the labor burden associated with the job allocation posts to the Job Costing module during payroll posting.
The manner in which the labor burden interfaces with the Job Costing is dependent on the Job Summary By option on the Company Profile. Job Cost information can be transferred by Job/Phase/Category, Job by Employee, Job by Date, or Employee by Date.
NOTE: As before, there is the potential to expose detailed employee information if the Job Summary By option is set to Job by Employee, Timesheet, or Employee by Date. Ensure that setup is completed properly to achieve the desired interface results.
Job Cost Interface – Job by Employee or Employee by Date
Source Code: Employee Code
Source Desc: Employee Name
Reference: Pay run code
Reference Desc: Pay run code / Year / Pay Period
Post Date: Post Date
Reference Date: Post Date
WM: 'HR' converted to WM on the Category
Job Cost Interface – Job/Phase/Category or Job by Date
Source Code: Blank
Source Desc: Blank
Reference: Pay run code
Reference Desc: Pay run code / Year / Pay Period
Post Date: Post Date
Reference Date: Period End Date
WM: 'HR' converted to WM on the Category
Payroll Posting Process When Salaried Employee Charges a Leave to Job