Pgm: PYPAYPRD – Pay Periods; standard Treeview path: US Payroll > Setup > Company > Pay Periods
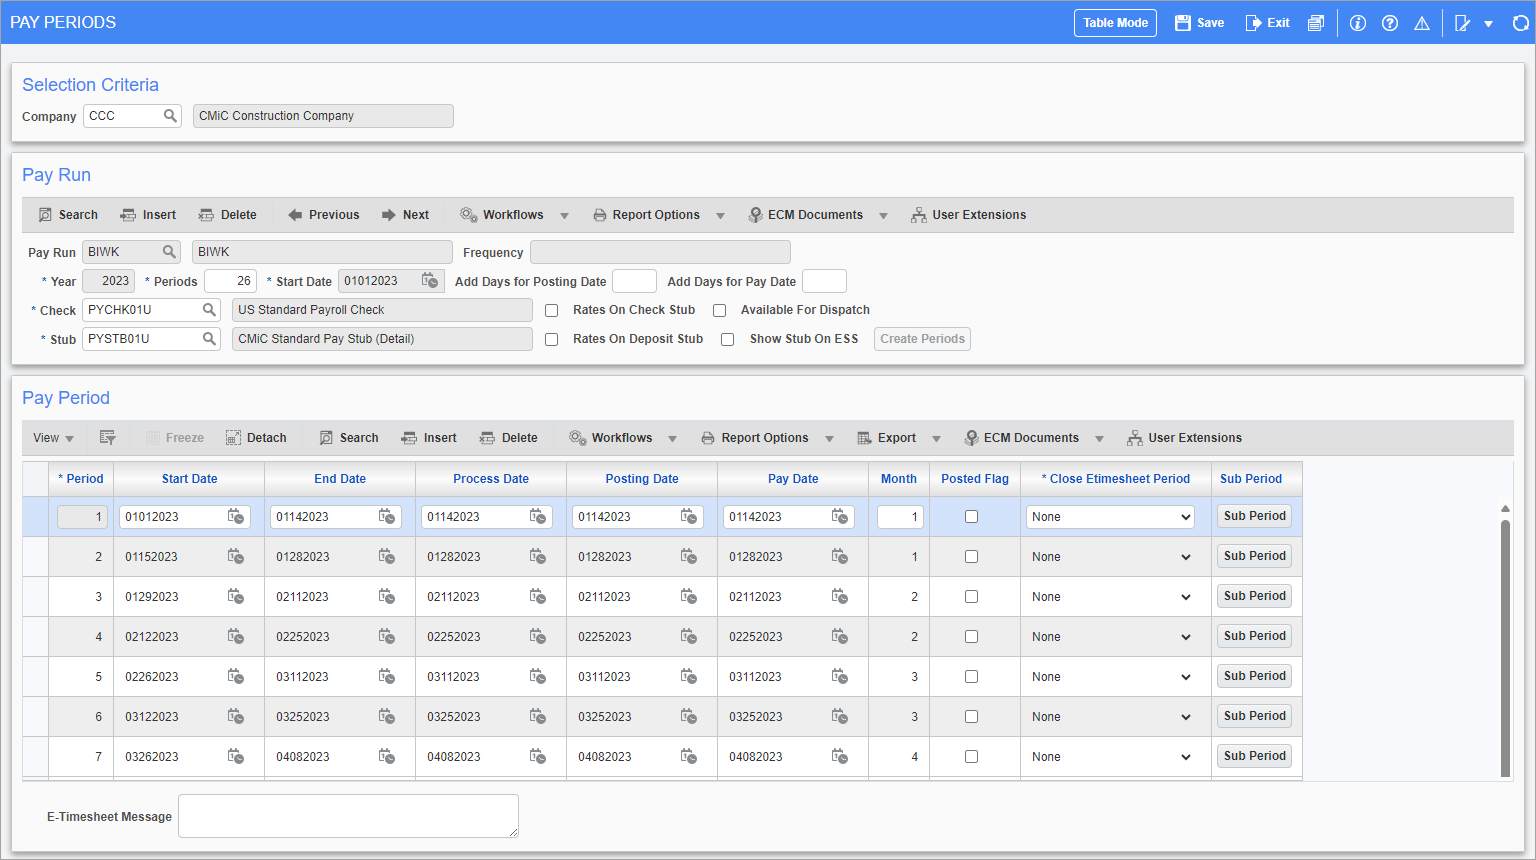
This screen is used to define the periods which make up the pay runs in a company for a specific year. Once the start date of the first pay period is entered, the system calculates all other dates automatically. To have the system automatically calculate these dates, press the [Insert] button to generate a new line for the following week, or press the [Create Periods] button to generate a year’s worth of pay periods. Continue this process until all the pay periods defined by the frequency of the pay run have been established.
Using the above example of a weekly pay run frequency, the system calculates each period based on a seven-day schedule. Once the start date has been entered in the header section, the system calculates the end date as seven calendar days later. The process date, post date, and pay date also default with this date. Although there is the option to change all other dates, access to the start date is not given. This is to ensure that there is no gap between the start and end date of one period and the start date of the next.
When reviewing an existing pay run schedule, previously defined periods and dates are displayed in the Pay Period section after the details of the company selection section are defined.
This screen is also used to determine the check and pay stub formats as well as reopening posted periods.
NOTE: When defining the pay periods for any given year, please note that even if the start date and end date of the first period are in the prior year, the posting date must be in the current year for the benefits, deductions, and taxes of that period to be included in the correct year.
Pay Run
Pay Run
Enter/select the pay run. The pay run can be set up in the Pay Run Maintenance screen. The name and frequency of the pay run appear in the PprPrnName and Frequency fields, respectively.
Year
Enter the year in which the pay periods fall. The current year is entered by default.
Periods
Enter the number of periods in this pay run. The default number of periods is based on the frequency of the pay run.
Start Date
Enter/select the first day work is performed and paid for the pay run. The current date is entered by default.
Add Days For Posting Date, Add Days For Pay Date
Enter the amount of days to add to the default posting and pay dates. These fields should be used for changing the dates for multiple periods rather than changing them manually. Entering values in these fields updates the Posting Date and Pay Date columns automatically. Please note that these fields should not contain the same value./
Check, Stub
Select the check and deposit stub formats to be used for this pay run. Canadian companies have the option of selecting Canadian pay stub and pay check formats (Check Code: PYCHK08C, Stub Code: PYSTB08C).
Rates on Check Stub, Rates On Deposit Stub – Checkbox
Check these boxes to print the pay rates on either the payroll check or the direct deposit stub.
NOTE: These boxes are only available if allowed by the check and pay stub formats chosen in the previous step. Not all check or stub layouts are capable of printing the rate.
Available For Dispatch – Checkbox
This field refers to custom functionality.
Show Stub on ESS – Checkbox
When the box is checked, stubs are printed for that year only. The module also considers the pay date for the current period. If the system date is equal or earlier than the check date then the stub is available on the Pay Stub Printing screen (standard Treeview path: US Payroll > Processing > Pay Stub Printing).
Pay Period
Start Date
Once the start date has been defined for the first pay period in the schedule, each subsequent start date is defined as the calendar day after the previous period's end date. This ensures that no gaps exist in the pay period schedule.
End Date
Select the end date. The end date is the last date for which work can be performed and paid for the period specified. Remember that since there can’t be any gaps in the schedule, the date used in this field determines the start date of the next period.
The system automatically calculates and displays the end date for this period as being seven days after the start date, but it can be changed here if desired.
Process Date
Select the date on which the checks are produced for the pay period. This date may not be the same date as the date printed on the checks themselves.
Posting Date
Select the post date. The post date is the date that the debits and credits associated with this pay period should be recorded in the General Ledger. Note that this may not be the same as the process date.
The system automatically calculates and displays this date for each period of the year, based on the end date for that period.
Pay Date
Select the pay date that appears on posted checks.
Month
This field determines in which month a pay period is reported to the Government.
For example the pay period posting date may be July 2, but for government earnings reports this is considered part of June. When creating a new pay period the system defaults the month number into this field but it may be changed if required.
Posted Box – Checkbox
If this box is checked then payroll posting has occurred for this pay period. This box is automatically checked after payroll is posted. If a pay period schedule is being set up for a year in which processing has already occurred, boxes may need to be checked for those periods that have passed.
NOTE: If payroll is only being run for timesheet posting, then after each pay period is complete the period should be marked as processed. This ensures that the correct year/period is defaulted into the payroll screens.
Close E-Timesheet Period
Select whether to close the timesheet period based on the E-Timesheet itself, the E-Timesheet and an approver, or not at all.
[Sub Period] – Button
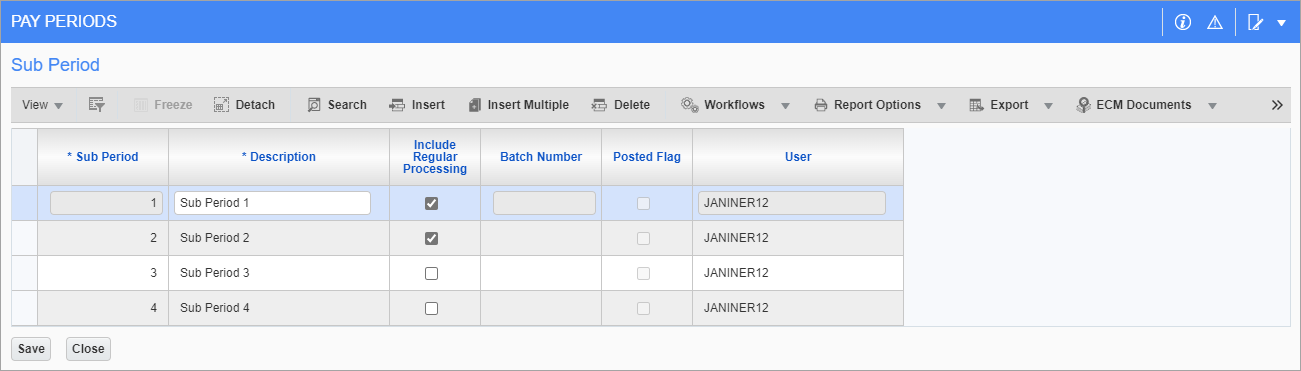
Pop-up launched from the [Sub Period] button
Press this button to display the Sub Period pop-up, which displays the sub-periods for the period, including processed sub-periods with their GL batch numbers. This feature is used to support companies that require a sub-payroll option and is not mandatory to define pay periods.
Sub-payroll allows users to process mini payrolls in an open period, such as leave settlements, bonuses, expenses, or missed payments. Once the sub-payroll is closed at the posting time, a new sub-payroll will automatically open and will be available for users within any given open period, pay run, and year.
NOTE: This button is hidden by default and can be added using Lite Editor. To view sub-periods created by other users, the following system privilege must be assigned: PYSUBPPRVW - PY: Allows User to access Sub Period created by other Users.
Sub Period
This field is read-only and is auto-numbered.
Description
Enter a description for the sub-period.
Include Regular Processing – Checkbox
Check this box to process the regular payroll in the sub-period. The sub-payroll will be treated as regular payroll processing and will calculate the regular salary, including any adjustments or additional payments made to the employee. Once the employee is processed in the sub-payroll, the regular payroll will not include this employee for further processing. If the employee requires any other payment, another sub-payroll will be processed.
Batch Number
This field is read-only and displays the GL batch number for processed sub-periods.
Posted Flag – Checkbox
This field is read-only and indicates whether the period has been posted.
User
This field is read-only and displays the name of the user who created the sub-period. This field is updated after pressing the [Save] button.
E-Timesheet Message
Enter a broadcast message for the selected period. This message will appear as a banner in the Timesheet Entry screen in the E-Time module for the selected period, as shown below.

Sample message in Timesheet Entry in E-Time
NOTE: If the period is closed for activity, a standard message will be displayed instead.