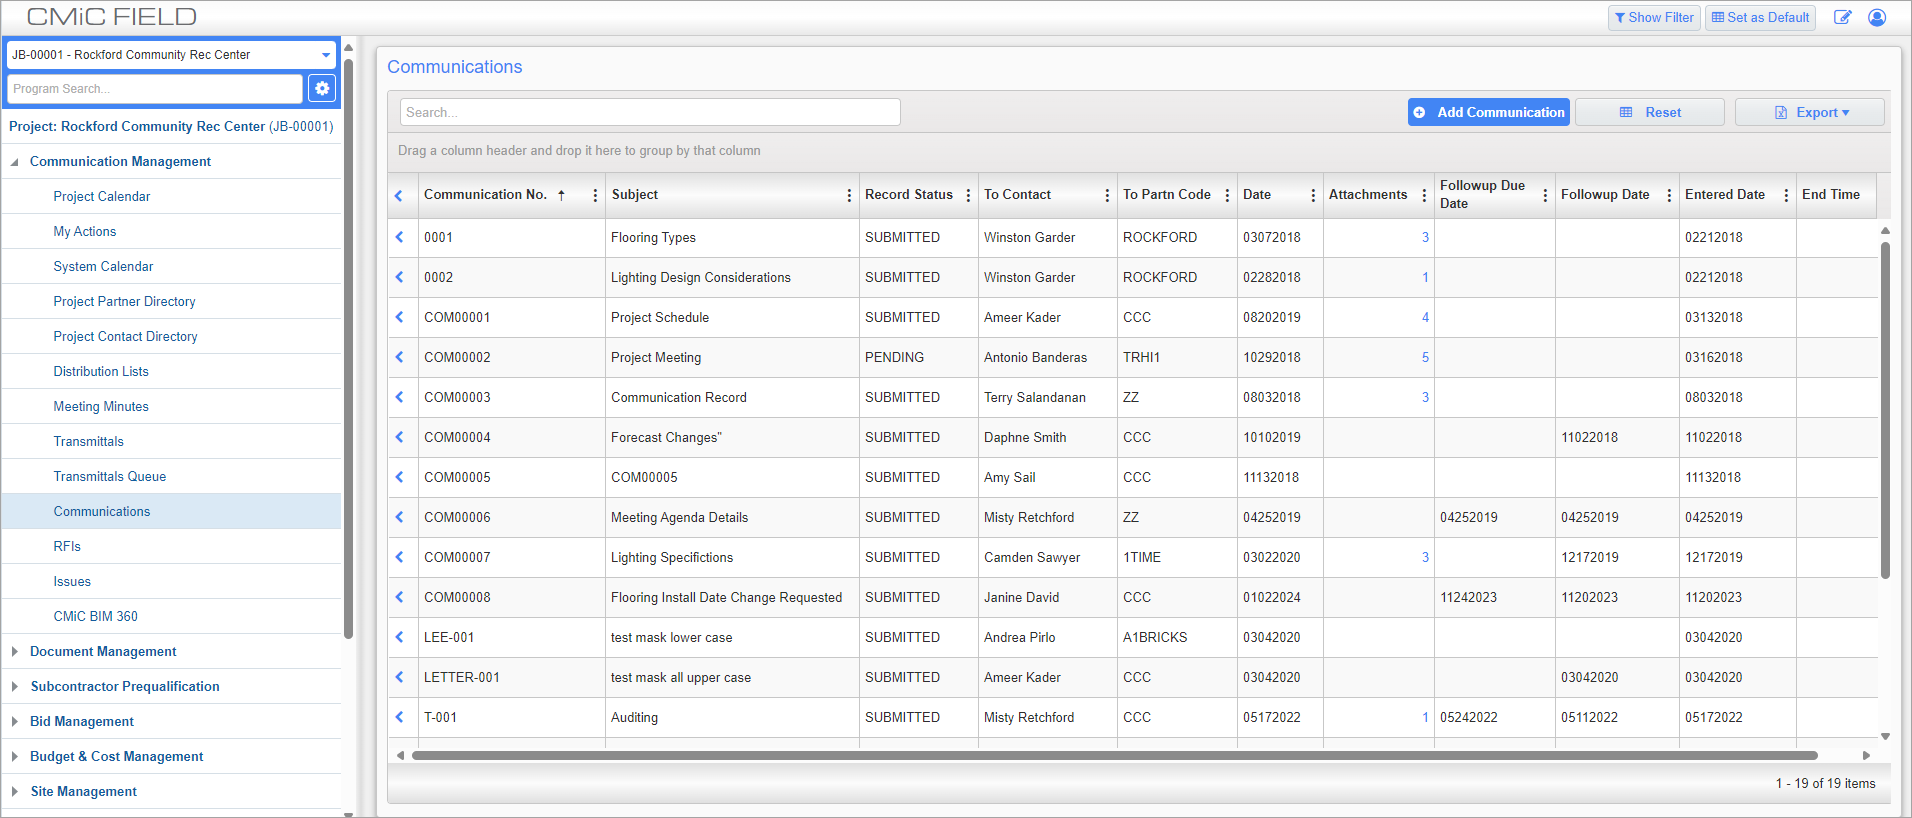
Communications; standard Treeview path: CMiC Field > Communication Management > Communications
The Communications screen can be used as a project log detailing, among other things, phone calls, e-mails, and faxes.
Communication Detail – Tab
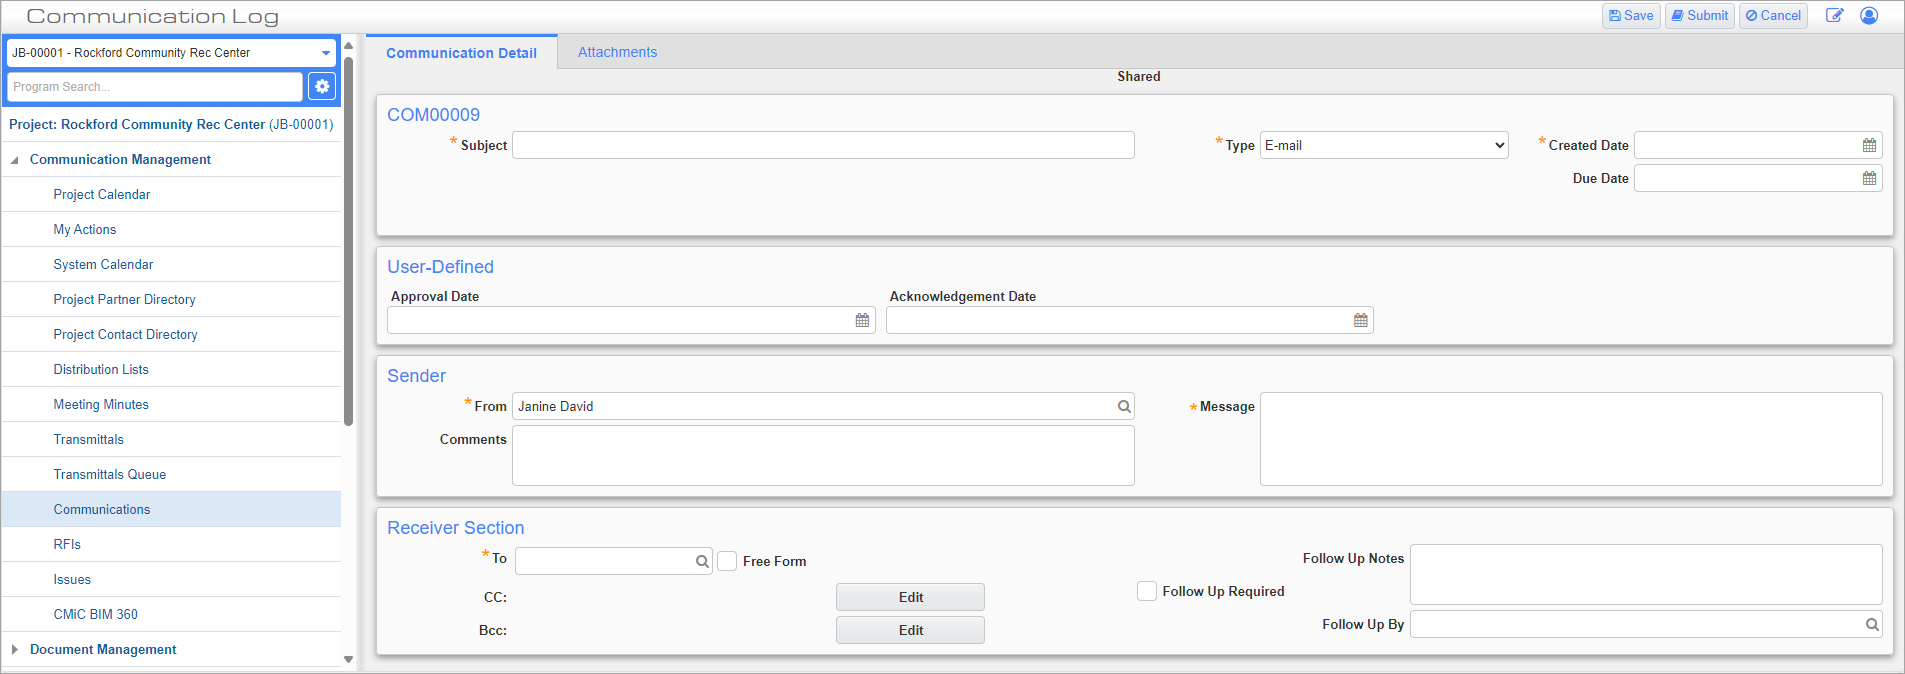
Communications; standard Treeview path: CMiC Field > Communication Management > Communications – Communication Detail tab
This tab can be used to enter all basic information about the communication. Until the record has been submitted, information in this tab may be edited without the employees entered in the To and CC fields being made aware.
Subject
Enter a summary of the communication.
Type
Select whether the communication is through e-mail, in person, or web collaboration.
Created Date
Enter/select the date the communication was sent.
Due Date
If the communication is time-sensitive, enter the date by which the user entered in the To field should respond to the communication.
Sender
From
Enter/select the employee sending the communication. This field will default to the logged-in user.
Comments
Enter any comments concerning the communication.
Message
Enter the content of the communication.
Receiver
To
Enter/select the recipient of the communication.
NOTE: If the user responds to an I/O email regarding a communication but they have not yet been assigned a security role, then any response they send will only be received if they are the "To" contact and not if they are the "CC" contact.
[CC], [BCC] – Buttons
Press these buttons to add employees to CC or BCC when the communication is submitted.
Follow Up Required – Checkbox
Check this box if this communication requires any subsequent messaging.
Follow Up Notes
If a follow up is required, enter any notes concerning that follow up here.
Follow Up By
Enter/select the employee in charge of any subsequent communication.
Once the issue record has been saved, the following objects appear on this tab:
Submitted – Checkbox
This box is checked if the issue has been submitted. This box is display only and can’t be checked or unchecked manually in this screen.
Change #
Press the Create Change link to open a pop-up of the Potential Change Item screen. Submitting a change item from this screen links it to the selected issue. For more information, please refer to CMiC Field - Potential Change Items.
Press the Link Change link to attach a pre-existing PCI to the issue record. Pressing this button updates the Source field for the PCI and adds the communication record to the PCI’s Related Objects tab.
Press the Add To Change link to just add the communication record to the PCI’s Related Object tab.
Received – Checkbox
This box is checked if the message has been received by the employee entered in the To field. This box is display-only and can’t be checked or unchecked manually in this screen.
Main Toolbar Buttons

Communications; standard Treeview path: CMiC Field > Communication Management > Communications – Communication Detail tab
These buttons, highlighted above, appear in the main toolbar of the Communication Detail tab once the record has been submitted.
[Close Comm.] – Button
Press this button to close the communication. This removes the ability to respond to and edit the communication. This action can be undone by pressing the [Reopen] button.
[Delete] – Button
Press this button to delete the communication. This button is not available for submitted communications created by other users unless the user has the 'Delete' privilege assigned to their project role. Users without the 'Delete' privilege can still delete their own communications and pending communications created by other users. For more information, please refer to CMiC Field - Project Roles.
[Forward] – Button
Press this button to forward the communication to another user. Only the person entered in the To field on the original communication can use this button. Pressing this button creates a new communication with information copied from the source communication. This information can be changed as required.
Attachments from the source communication are not automatically coped to the forwarded object so should added by the user forwarding the communication.
[Respond] – Button
Press this button to respond to the message of the communication record. When a response is sent and opened by the To party, the ‘Received’ box will be checked.
[Link To Issue] – Button
Press this button to link the communication with any issue records. Issues can be set in the Issues screen (standard Treeview path: Communication Management > Issues).
Attachments – Tab

Communications; standard Treeview path: CMiC Field > Communication Management > Communications – Attachments tab
This is one of many Attachments tabs throughout CMiC Field. Please refer to Notes, Attachments, and Documents for further details.
History – Tab

Communications; standard Treeview path: CMiC Field > Communication Management > Communications – History tab
This tab can be used to view all changes and edits made to a communication record. This tab is view-only and so changes must be made with the [Edit] button in the Communication Detail tab.
Linking/Creating a PCI from a Communication Record
The linking to or creation of a PCI from a communication record is limited to internal users only. Once a communication record has been [Submitted], there are three links that will display on the page next to the Change# field: Create Change, Link Change, and Add to Change.
The Create Change link will open the PCI screen where you can enter a new PCI. The default PCI type (Internal, External or Transfer) is determined from the PM Enterprise setting on the company control file.
Enter the PCI as per normal, then when you return to the communication screen, the PCI number will display as a link instead of Create Change and the Link Change link will have changed to Remove Link.
The Link Change link displays a list of all PCIs. Select the required PCI to link to the communication record.
The Add to Change link displays an LOV with all PCIs for the current project and allows the user to associate the communication record with the selected PCI. Multiple PCIs can be associated to a single communication record, although this should be done one at a time.