CMiC eXpense - Setup
NOTE: The CMiC eXpense app will be officially deprecated on December 12, 2025. We encourage you to begin transitioning to Construct ESS - Expenses to ensure a smooth changeover and to start benefiting from the upgraded features right away.
Enterprise Setup
Before the eXpense app can be used the user must have their profile correctly set up in Enterprise.

User Maintenance; standard Treeview path: System > Security > Users > User Maintenance
First, users should ensure that their username has been assigned an employee number in the User Maintenance screen.

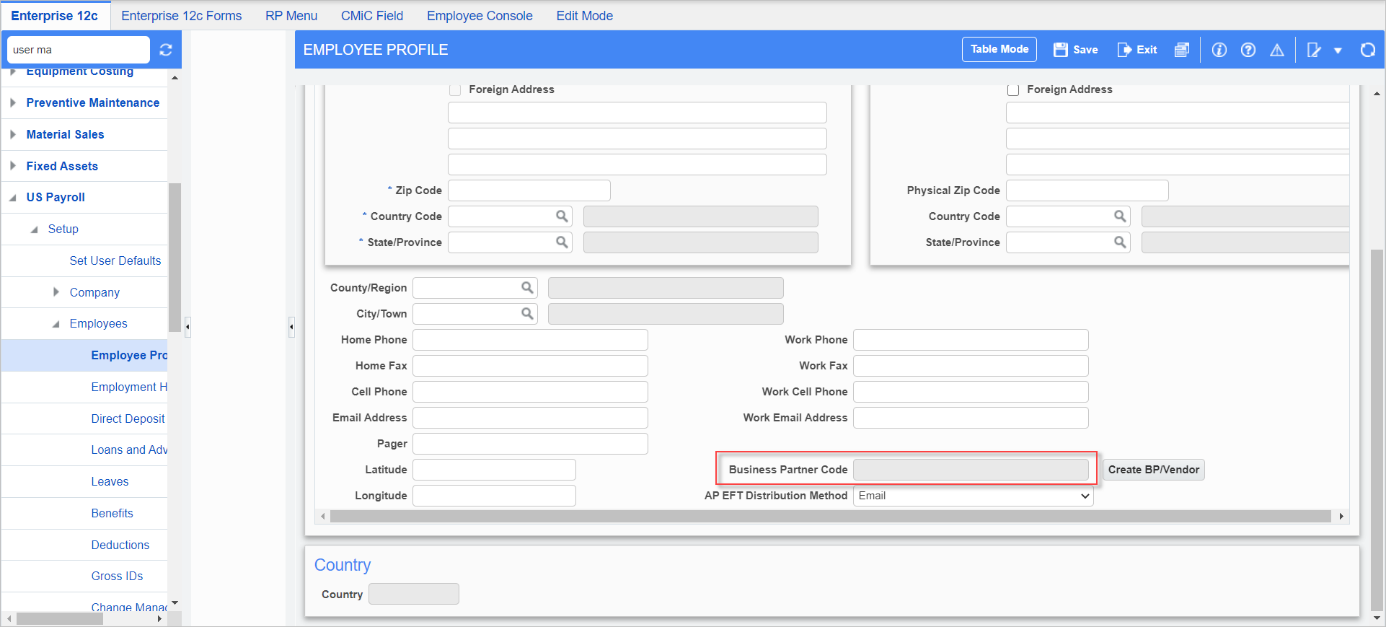
Employee Profile; standard Treeview path: US Payroll > Setup > Employees > Employee Profile – Address tab
Next, the user should be attached to a Business Partner Code. This can be done in the Address tab of the Employee Profile, as shown above.
Finally, the user should have the necessary security privileges in the Imaging module. For all sources and document types that the user wishes to see in the eXpense app, they should be assigned to those sources and document types in the Imaging module.
In the Imaging Control screen, depending on the sources and document type being used, fields must be completed in the following order:
-
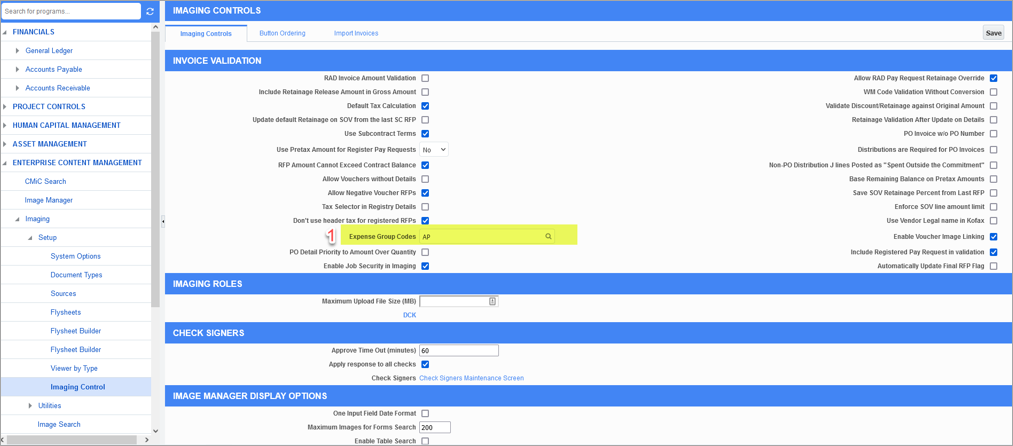
Select an expense group in the Expense Group Codes field.
-
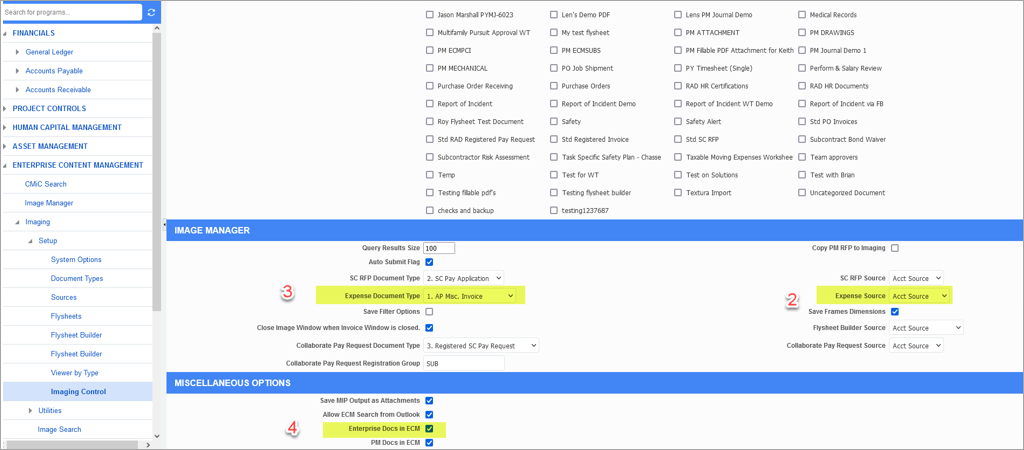
Select a source in the Expense Source field.
-
Select a document type in the Expense Document Type field.
-
Check the ‘Enterprise Docs in ECM’ checkbox.
The following screenshots show the location of these fields on the Imaging Controls screen, as well as the order in which they should be completed.
NOTE: If the source and document type fields are not completed in the exact order as indicated, the source code assigned will not be saved correctly and an error message will be issued. Also, if the ‘Enterprise Docs in ECM’ checkbox is not checked, then both Android and iOS users may experience errors when uploading documents to the app or when submitting uploaded documents to Imaging.

Imaging Control; standard Treeview path: Imaging > Setup > Imaging Control – Imaging Controls tab (Invoice Validation Section)

Imaging Control; standard Treeview path: Imaging > Setup > Imaging Control – Imaging Controls tab (Image Manager and Miscellaneous Options Sections)
To upload documents to the eXpense app the user should check the 'Enterprise Docs in ECM' checkbox in Enterprise, as shown above. This can be found in the Miscellaneous Options section of the Imaging - Imaging Control screen in the Imaging module. If this box is not checked then both Android and iOS users may experience errors when uploading documents to the app or when submitting uploaded documents to Imaging.
App Settings

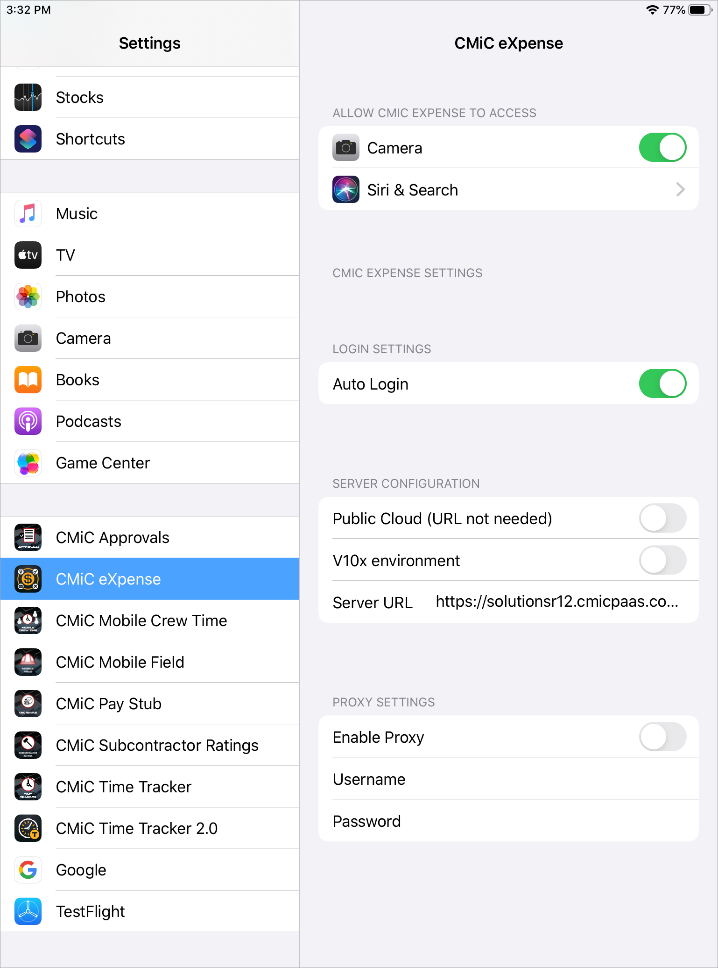
Settings – CMiC eXpense screen
This screen can be used to set various options for eXpense. Please also note that the app supports Dark Mode when it is enabled from the iOS device’s control centre.
This app can also be opened with Face ID. Please see the following link for more information about how to use and set-up Face ID for iPad and iPhone: https://support.apple.com/en-us/HT208109.
Allow CMiC Expense To Access
To take pictures of expense receipts, the eXpense app should have permission to access the device’s camera. The app will request access after pressing the Camera icon in the app, but access can also be granted or denied here with the Camera toggle.
Auto Login
Toggle this switch to allow automatic login without having to enter login credentials every time the app is opened.
Public Cloud (URL not needed)
Toggle this switch to use the public CMiC server. If this option is selected, then a URL need not be entered in the Server URL field.
V10x environment
Toggle this switch to open and run the app in the v10x environment, as opposed to the R12 environment.
Server URL
If data is to be stored on a server rather than on the public cloud, enter the server URL here.
NOTE: As with the Approvals app, this URL should point to an application server. Server URLs for all other apps should point to a BI or Mobile sever. See the Approval app section of the Mobile Workspace guide for further details.
Proxy Setting
To use a proxy server for the eXpense app, toggle the Enable Proxy switch and enter a username and password for the server.
MDM Setup for CMiC eXpense - iOS
For MDM portals, the CMiC eXpense app supports the following XML tags:
-
publicCloud - for public cloud URL
-
environmentURL - for server URL
-
v10xEnvironment - for v10x environment
For R12
<dict>
<key>publicCloud</key>
<false/>
<key>environmentUrl</key>
<string>https://solutionsr12.cmicpaas.com/cmictest</string>
<key>v10xEnvironment</key>
<false/>
</dict>
For V10x
<dict>
<key>publicCloud</key>
<false/>
<key>environmentUrl</key>
<string>https://v10xsandboxwls.cmicglobal.com/cmicprod</string>
<key>v10xEnvironment</key>
<true/>
</dict>