Pgm: POINVREC – Shipment Cost Receiving; standard Treeview path: Purchase Order > Receipt > Cost Receipt
After purchase orders have been entered, edited, approved, and printed, the Purchase Order module’s Receipt menu is used to update the purchase order items as they are received.
The expeditious receipt, identification and general inspection of incoming materials is critical before the receiving is posted against the purchase order. The quantity entered in this program is the quantity that was received in good condition and that users are willing to pay for. When unloading and checking the shipments against the carrier’s manifest (freight bill), ensure the full consignment has been delivered and no external damage is found. Any discrepancies between the user’s count and the freight bill should be clearly identified on the carrier’s manifest. All external damages should be relayed to the carrier’s representative and clearly written on the carrier’s manifest. When unpacking and inspecting the shipment, the material received should be checked against the vendor’s packing slip/invoice and the company’s purchase order to verify that the correct items and quantities have been shipped and no internal damage was incurred during shipment. Failure to do so relieves the carrier of all liability after accepting the shipment.
The cost and warehouse receipts are the only documents the company possesses which detail the material it has actually received. These documents are used as the basis for invoice payment. During the posting process, the system automatically updates across all applications directly to jobs, equipment or intermediary cost accounts. It also updates the inventory master files, average costs and adjusts the on-order and back-ordered quantities appropriately.
If the Automatic Receipt functionality has been enabled via the Purchase Order Control screen, the receipt was created when the purchase order was processed and a manual receipt is not necessary (standard Treeview path: Purchase Order > Setup > Local Tables > Control – Posting tab).
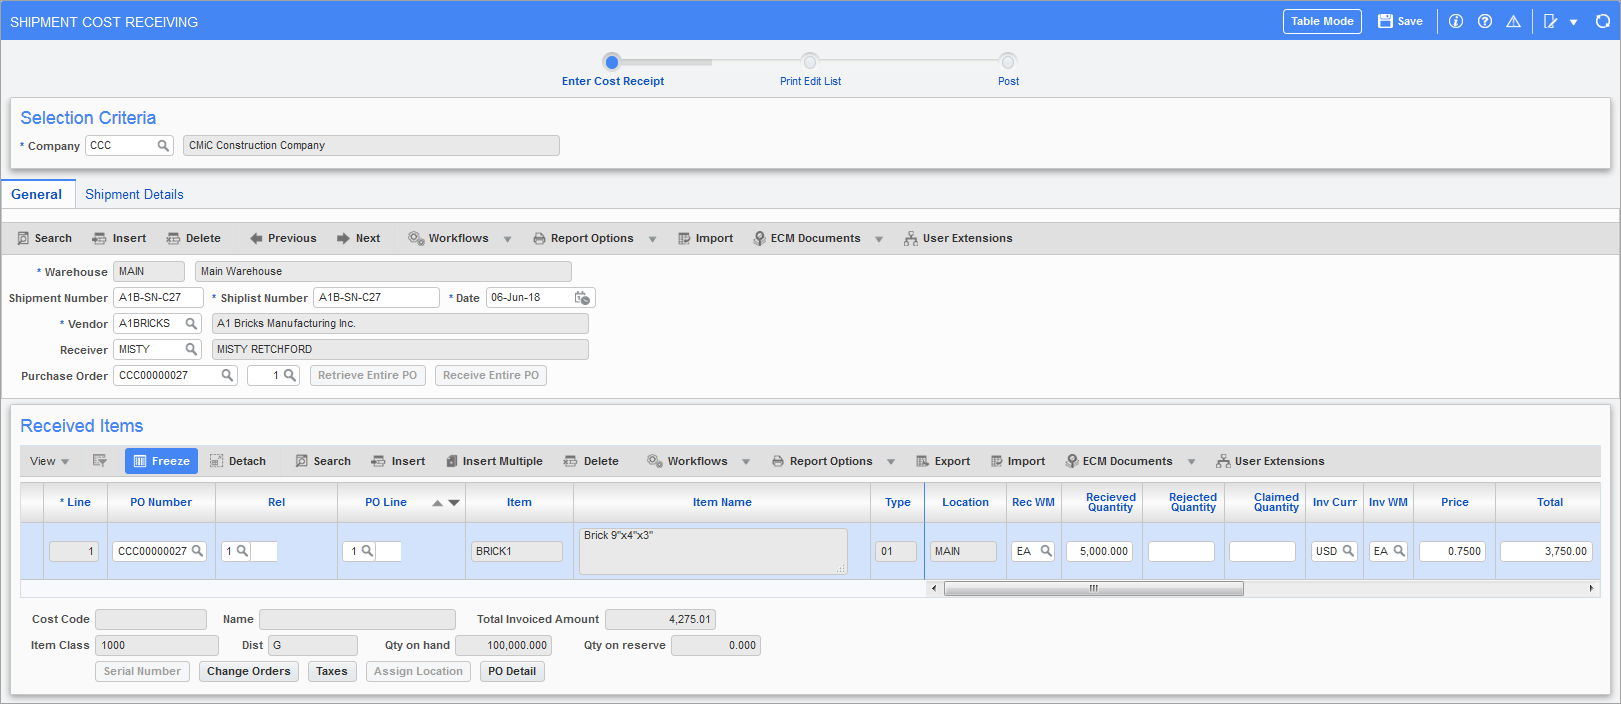
General – Tab
Warehouse
If the warehouse default was entered in the setup menu then it will default here. If there is no default, select a warehouse from the LOV. If the Inventory system is not being used, then this field will not be available. If inventory is being used, a warehouse must be entered even if the PO being received is not destined for the Inventory module.
Shipment Number
Enter a company-defined internal shipment number for the goods being received.
If the warning option was selected on the Purchase Order Control screen, the user will get a warning message should the same shipment number be entered more than once (standard Treeview path: Purchase Order > Setup > Local Tables > Control – Receipts tab).
Ship List Number
Enter the ship list number as it appears on the freight bill. The entry of a ship list number allows for the entry of single or multiple purchase orders against a specific ship list (freight bill).
Date (Receipt Date)
Enter the actual date the shipment was received. The system will default the current system date into this field.
Vendor
Enter/select the code for the purchase order vendor.
If the Vendor field is blank, the Purchase Order LOV will display purchase order(s) related to all the vendors. The Vendor field will automatically populate once a purchase order is selected.
If a vendor code is entered, the Purchase Order LOV will display purchase order(s) related to the selected vendor.
NOTE: The Vendor field is marked as mandatory and is required while using the import functionality.
Receiver (User ID)
Enter/select the name of the warehouse receiver.
The receiver must have already been set up using the Purchase Order Roles Maintenance screen (standard Treeview path: Purchase Order > Setup > Local Tables > Purchase Order Roles).
Purchase Order and Release Number
Select the purchase order number from the LOV that will be receiving the items on this ship list/freight bill. When entering a purchase order number into this field, the [Receive Entire PO] may be used to automatically retrieve all the line items associated with this purchase order into the Received Items section.
When receiving the entire details of more than one purchase order on this ship list/freight bill, return to the Purchase Order field in the shipment section, select another purchase order and retrieve the entire purchase order into the Received Items section. The system will add the new line items to the ones that have already been retrieved.
Leave the Purchase Order field blank when entering selected line items from various purchase orders. In this case, merely enter the desired purchase order number on a line-by-line basis directly into the Received Items section.
NOTE: The system will issue a warning if the 'Warning
Shipment Details – Tab
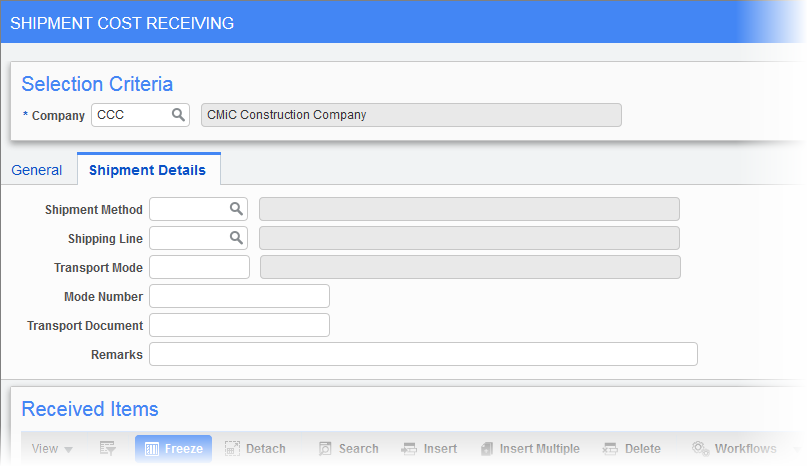
Pgm: POINVREC – Shipment Cost Receiving; standard Treeview path: Purchase Order > Receipt > Cost Receipt – Shipment Details tab
Shipping Method
Enter/select the code for the shipping method used (motor, rail, air, etc.) for this purchase order, if applicable.
Shipping Line (Carrier Code)
Enter/select the code for the carrier used to transport the items for this purchase order, if applicable.
Transport Mode
Enter the code for mode of transportation used, if applicable.
Mode Number
Enter the number for transport mode used, if applicable.
Transport Document
Enter details about transport documents, if applicable.
Remarks
Enter any additional shipping comments, if applicable.
Received Items
The detail section of this screen is where the specific details and allocations such as item type, item, quantity received, location, and remaining quantity are entered.
The system defaults the Line, Department Code, Item Type, Item Code, Weight/Measure, and Location Code from the detail lines of the specified purchase order. The Receipt Date defaults from the Receipt Date on the Purchase Order Receipt Header section. Lastly, the Close Line field is set by the operator/the system and Remaining Quantity field calculated by the system depending on the value entered in the Quantity Received field.
PO and PO Release Number
Enter/select the PO and PO release number for the line item being received.
If a purchase order number has been entered into the Shipment header and the entire PO has been received, then this field will default with each line item defined for the specified purchase order.
PO Line Number
If the lines have not defaulted from [Receive Entire PO] button, enter the line number of the item being received. The line number is the actual line number on the purchase/change order. Once entered, the associated item code, item type and item location will default from the purchase order.
Item Code
The system defaults the code for the Item associated with the specified purchase order.
Item Type
The system defaults the code for the item type of the inventory item.
Item Location
The system defaults the Item location code from the purchase/change order.
If receiving this item directly into the Job Costing or Equipment modules (‘Rec Inv’ checkbox was not checked on the purchase order), the system will clear the location default when moving past the location field.
Rec WM
Enter/select the code that represents the unit of measure in which this item will be received. The system will default the weight measure as specified on the purchase order.
This field is read-only and displays the sum of quantities from posted receipts. This field is hidden by default and can be added using Lite Editor.
Received Quantity
Enter the number of units actually received in satisfactory condition and for which payment will be authorized. This will normally be a number less than or equal to the actual ordered quantity (indicated in the PO Detail pop-up).
Rejected Quantity
Enter the number of units that have been rejected. Rejected units are differentiated from claimed units in that the vendor has agreed to replace these items at the vendor's expense.
NOTE: The PO will not be closed while a rejected quantity remains, allowing for the item to be replaced and received via another shipment. The PO status will be updated to "Received".
Claimed Quantity
Enter the units of this that are in dispute. These are units of the item that have been rejected and for which the supplier does not accept responsibility. If a number is entered in this field, when the receipts are posted the system will generate a General Ledger disposition using the account set aside for insurance claims on the control file in the Accounts Payable for the specified company.
Invoice Currency
The currency will default from the vendor.
Invoice WM
Enter/select the code that represents the unit of measure in which this item will be invoiced. The system will default the weight measure as specified on the purchase order.
Price (Per Unit)
The system defaults the price per unit from the purchase order/change order. If the amount is changed, the PO Control will be checked for the allowed variance. If this is exceeded, a privilege will be required to proceed.
Total
Invoice amount excluding taxes.
Invoiced Quantity
The system automatically calculates the units to be paid to the vendor upon receipt of an invoice. If the quantity is exceeded, the PO Control will be checked for the allowed variance. If variance is being used, a privilege will be required to proceed.
Rejected/Claimed Units
Rejected units are differentiated from claimed units in that the vendor has agreed to replace these items at the vendor's expense.
NOTE: DO NOT enter any units that were back-ordered in this field. Quantities not shipped because of a back-order or vendor error will be tracked automatically since the purchase order received, claimed, and rejected quantity will not add up to the total ordered quantity.
Tax Codes
Verify/modify the tax code for the first, second, and third level of taxes applicable to this line item purchase.
Comments
The Comments field displays the original item comment entered for a specific line item within a purchase order. This field is hidden by default and can be added using Lite Editor. For more information, please refer to Purchase Order - Enter Purchase Order - Purchase Order Detail.
A Special Note on the Qty on Hand and Qty on Reserve Fields
The Quantity on Hand and Quantity on Reserve fields are used to keep track of the inventory quantities received, as they will impact the actual physical inventory. For this reason, the Quantity on Hand amount will only be shown and updated by the entry of the quantity on the line being committed when the Inventory receipt is posted. As well, the Quantity on Reserve figure will display when these items will subsequently be issued to a job or a piece of equipment.
It is important to note that these quantities are the actual on-line physical quantities as entered into the receipt screens. The system will update these amounts as the inventory items are entered and committed. Only the ‘book’ quantities will be updated during the posting process.
[PO Detail] – Button

Pop-up window launched from the [PO Detail] button on the Shipment Cost Receiving screen
The [PO Detail] button displays the details of the line item as specified on the purchase order. Information on this screen includes the item detail, the pricing, the order quantity as well as the details on the received, claimed, rejected, invoiced and allocated quantities.
It is important to note that these quantities are the actual on-line physical quantities as entered into the receipt screens. The system will update these amounts as they are entered and commit each new received item. Only the ‘book’ quantities in the inventory module will be updated during the posting process.
Most of the fields in this screen are for display purposes only. The following fields can be modified:
Closed and Closed Reason Fields
The 'Closed?' checkbox is only used for the MANUAL conditional closing of a purchase order line. In conjunction with the checkbox, the user will also need to select a specific reason for closing which can currently be one of the following: “Not Available”, “Short Shipment”, or “Substitution”.
Check this box if the line is to be closed regardless of the quantities received. An item cannot be opened after it has been closed.
[Serial Number] – Button
If an item being received is a serialized Inventory Item, the [Serial Number] button will become enabled to allow the serial number to be entered. Serialized items are items where each instance of the item must be identified individually. An item flagged as ‘serialized’ will require the specification of a serial number during the receipt, issuance, transfer, write-off or physical count of that item.
Serialized items are set up in the Inventory module by checking the ‘Serialized’ checkbox on the Item Master screen (standard Treeview path: Inventory > Setup > Local Tables < Item Master), and by checking the ‘Serialized Flag’ checkbox on the Item Detail screen (standard Treeview path: Inventory > Setup > Item Detail – Item Header tab).
NOTE: A PO receipt can’t be posted if serial numbers are missing for a serialized item.
[Change Orders] – Button
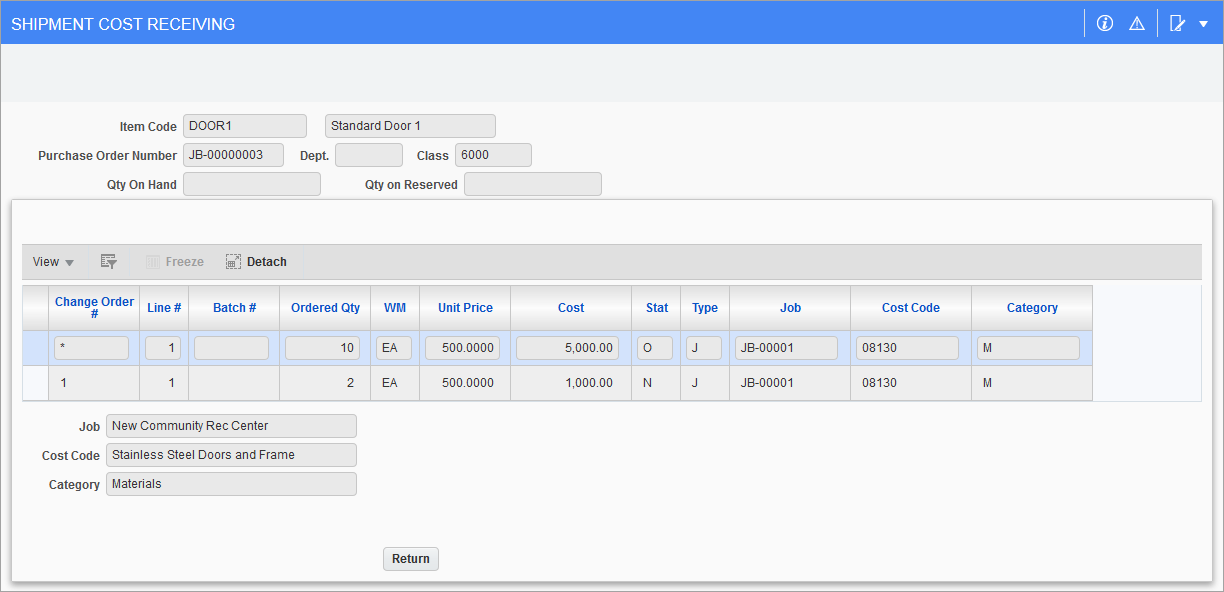
Pop-up window launched from the [Change Orders] button on the Shipment Cost Receiving screen
The [Change Orders] button opens a pop-up window which displays the breakdown of the line item where the item quantity is made up of an original purchase order and related change orders. Information in this pop-up window includes the item detail, the change order # (where applicable) or the code ‘*’ (Original) where the line represents the original purchase order, the order quantity, the unit price and the cost.
[Taxes] – Button
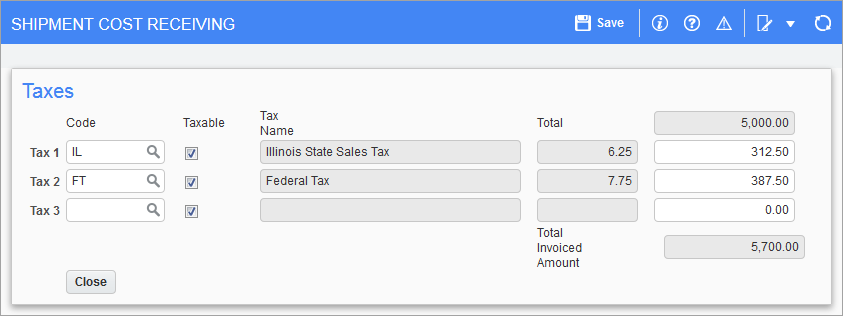
Pop-up window launched from the [Taxes] button on the Shipment Cost Receiving screen
The [Taxes] button opens a pop-up window which displays the summary of taxes on the line item, including the total invoiced amount for the line, the tax code applicable to the Tax fields, as well as the calculated tax amount for that line.