Line Item Details
Use this section to define the specific details and allocations such as material required, quantity and distribution. This section has a sliding screen containing additional columns to the right of the Extended field.
NOTE: Details must be entered and saved in the PO header (e.g. Header Detail and Distribution Detail sections of the General tab) before line item details can be entered in the Purchase Order Detail section. Once the PO header details are saved, the [Insert] and [Insert Multiple] buttons are available in the Purchase Order Detail section’s Block Toolbar for entering rows of line items.
Depending on the distribution type selected on the General tab of the PO, some of the fields (e.g. Job/Dept/Eqp/WO, Cost Code/Acc/Compon/WI, and Cat/Tran Code/Exp) will default into each new detail line of the PO, but can be changed if required. If a job code was entered on the General tab of the PO, only jobs that are related to this job code can be entered in the PO detail lines.
Lump Sum Line − Checkbox
Check this box if entering a lump sum line. If checked, the Item Type will default to "Free Form" and the WM field will default WM code selected in the WM Code to Receive in Dollars field on the PO Defaults tab of the Purchase Order Control screen.
Refer to Purchase Order - Using Lump Sum POs for more information on using this functionality.
Item Type
Select the item type from the drop-down list. The available options are “Free-Form”, “Inventory”, and “Non-Stock”.
Item, Description
An item code is required for all purchase order detail lines as follows:
When “Inventory” is selected in the Item Type field, an LOV is available listing the inventory items to be selected by the user.
When “Non-Stock” is selected in the Item Type field, an LOV is available listing the non-stock items to be selected by the user.
Free-form items can be manually defined and entered by the user.
Item Type, Inventory (Location)
Only inventory items require an item type code and inventory location. If an inventory item is being entered, select the item type and inventory location.
When entering a non-stock item or free-form item, these fields will be disabled.
While in the inventory Location field, the item can be assigned to a new location by accessing the LOV and selecting a location the inventory does not show as assigned. Press the [Assign Location] button. A message will be issued that the item will be assigned to location XXXX.
WM (Weight Measurement)
Enter/select weight measurement for the item to be purchased.
Quantity
Enter the quantity for the specified Item to be purchased.
Suggested Price
The Suggested Price column will display the suggested price for an item. If there is a discount, it is applied on the suggested price. The Price column is the derived final price (unit cost) after calculating the discount on the suggested price. Updating the Suggested Price column will update the Price and Total column. If the Price column is updated when a suggested price has been entered, the Discount % and Total columns will update to reflect the discount from the suggested price.
Discount %
The Discount % column will display the discount for an item. The Price column is the derived final price (unit cost) after calculating the discount on the suggested price. Updating the Discount % column will update the Price and Total column.
Expected Price
The system will display the price of the item as the default for the specified item. For an inventory item, the price will default from the inventory item’s market price on the specified location when there is no item last cost value available, otherwise Item last cost value will be defaulted. For a non-stock item, the price will default from the non-stock item file. The price can be changed according to the purchaser’s agreement with the vendor.
When entering a blanket purchase order, the price will have defaulted from the Blanket Purchase Order Entry screen (standard Treeview path: Purchase Order > Setup > Blanket Purchase Orders). The price may only be changed to equal to or less than the amount allowed on the blanket entry.
Extended (Price)
The extended price (Quantity x Expected Price) will automatically display here if the expected price is entered. If the expected price is not entered, the extended price can be entered and the expected price will automatically display for that item.
Dist (Distribution Type (DT) Code)
Select an applicable distribution line from the drop-down list. The headings and fields in this section will change according to the distribution code entered. The following options are available:
-
E: Equipment Line – Enter an “E” if the charges for this purchase order line should distribute to an equipment element.
-
G: General Ledger Line – Enter “G” if the charges for this purchase order line should distribute directly to a GL account.
-
I: Inventory Line – Enter an “I” if the charges for this purchase order line should update the inventory.
-
J: Job Line – Enter “J” if the charges for this purchase order line should distribute to a job element. When entering a “J” line, the [Create CostCode/Cat] button can be accessed by those with the privilege and a cost code or category can be created on the fly.
-
W: Work Order Line – Enter “W” if the charges for this purchase order line should update a work order in the Preventive Maintenance module. The work order can be an E, J or G type. When entering a “W” line, the [W Line Detail] button can be accessed for reporting of further information.
-
M: Multi Distribution – Enter “M” if the charges for this purchase order line should be allocated to multiple accounts. When entering an “M” line, the [Allocation] button can be used for entering multiple distributions, additional shipping information, and line comments.
Rec Inv – Checkbox
The ‘Rec Inv’ checkbox is only used when a “J”, “E” or an “I” has been specified in the previous field on a line detail. The checkbox tells the system if the item(s) on this line are to be received into inventory prior to them going to the specified job or equipment. The system will automatically default a check into the box when an “I” distribution type code has been selected in the previous field.
NOTE: This feature would be used when a markup to the price is required before going to the job or equipment. Only through a receipt and then issue through inventory can the markup be added to the cost.
Tax 1, 2 and 3 and Taxable – Checkboxes
Enter/select the applicable taxes for each tax field. All fields can be left blank or some fields entered and others null. If the tax is to be identified in the system, but not actually taxed, uncheck the ‘Taxable’ checkbox for that particular tax code and the rate will be zero. Some taxes may default with the inventory item or from PO Control screen.
NOTE: In order for the taxes to automatically populate, an item code must be entered first in the Item field.
The tax amount will show in the tax amount field and will be added to the line total.
Tax Amount
The total tax amounts entered for Tax 1, 2 and 3 fields will automatically be displayed here.
Total (Line Total)
The total line amount including total tax amounts entered will automatically display here.
Comments
The comments displayed here depend on the 'Populate Item Description To Line Comment' checkbox setting on the Purchase Order Defaults tab of the Purchase Order Control screen. If unchecked, the item description details for
[Allocation] – Button
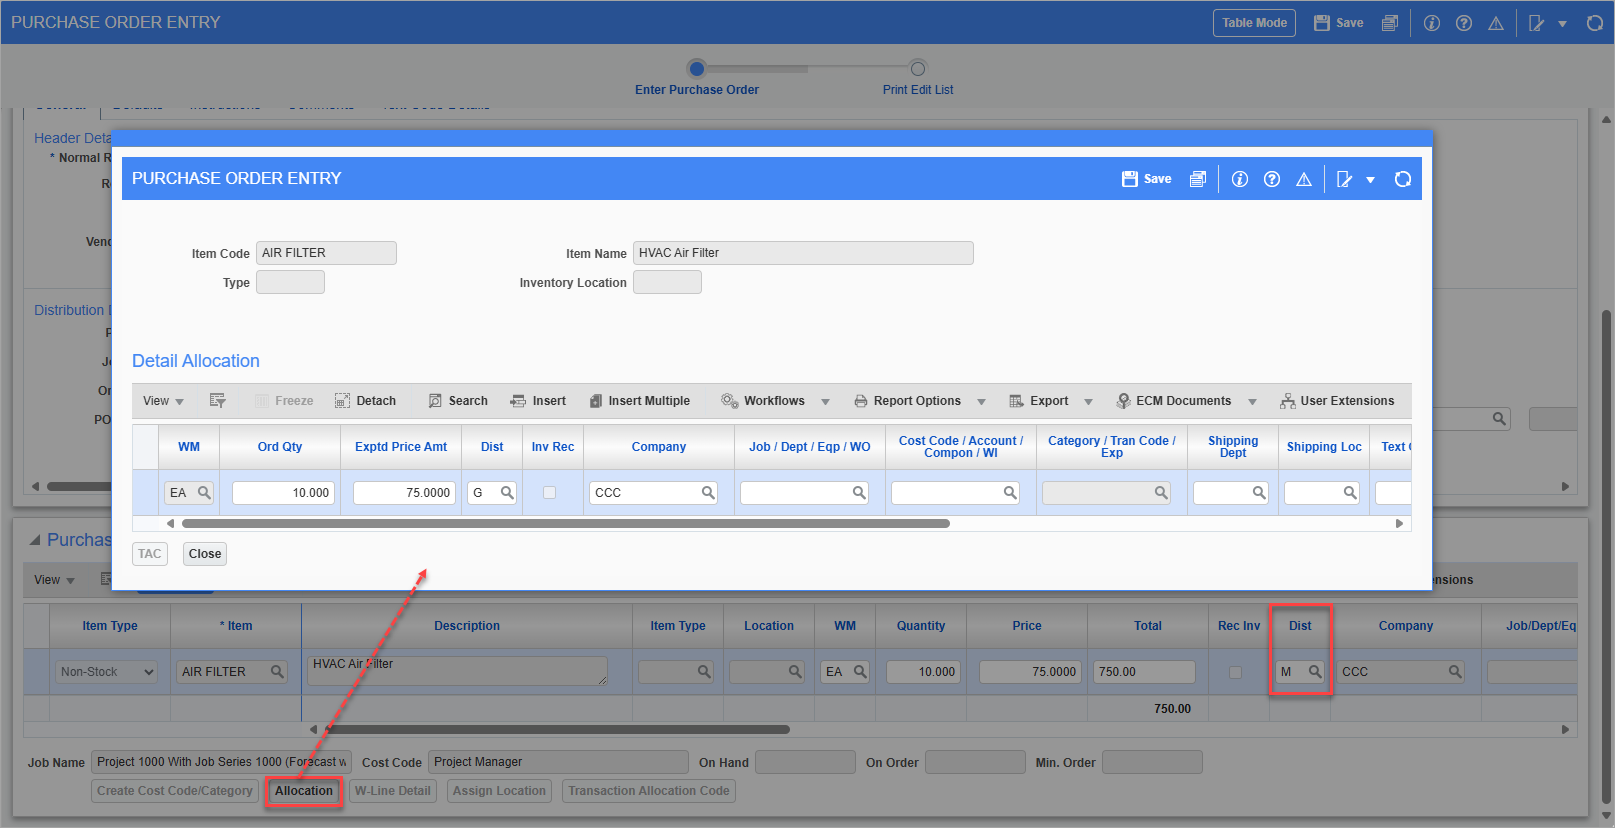
Pop-up window launched from the [Allocation] button on the Purchase Order Entry screen
The [Allocation] button becomes enabled when “M” (Multi Distribution) is selected in the Distribution Type field when entering a detail line in the PO. This function is used to distribute the cost of one item to multiple accounts. This pop-up window uses a scrollbar to access additional columns including Shipping Department, Shipping Location, Text Codes and Line Comments.
NOTE: If using lump sum POs, Item Type, Item, and Item Name fields will be available in the pop-up window. Order quantity will be the actual receiving quantity at the time of PO shipment receiving. The expected price amount will be "0" for the allocated items. Distribution type and other details are taken from the PO detail line and can't be modified. Refer to Purchase Order - Using Lump Sum POs for more information on using this functionality.
Shipping Department
The shipping department may be entered, if necessary, on a line-by-line basis.
Shipping Location
The shipping location code may be entered on a line-by-line basis as well. This is useful, when a particular item is to be shipped to a different location than that specified in the Instructions tab on the Purchase Order Entry screen. When a PO Document is printed, the shipping location for line items will be printed, if available.
Text Codes 1, 2 and 3
Text codes may be entered, if necessary, on a line-by-line basis. Only the text reference codes associated with the text type code defined on the Purchase Order Details tab in the Purchase Order Control screen can be entered.
Line Comment
If there is a unique comment required for this line, it may be entered here.
[Transaction Allocation Code] – Button
Transaction Allocation Codes (TACs) are associated to a chart code, and they provide a supplementary method to track and summarize dispositions posted to the various accounts in the General Ledger. If TAC codes are defined for the chart and company, use this button to access a pop-up window where default TAC values can be assigned/modified.
For further details, please refer to the section on Transaction Allocation Codes in the General Ledger guide.
[WBS] – Button
All Transaction Entry programs that allow “J” type transactions will validate data to ensure that all required WBS codes are assigned with valid WBS value codes whenever a “J” type transaction line is entered.
Use the [WBS] button to access the WBS (Work Breakdown Structures) pop-up window. WBS codes can be defined at the job level, or at the cost code (phase) level.
Please refer to the Job Costing guide for further clarification on WBS codes and WBS value codes.
Distribution Details
When using a “G” distribution
Enter the department and account code to be affected by this distribution. If the Item is a non-stock item, the GL account will default from the non-stock item definition.
When using a “J” distribution
Enter/select the job code, cost code and category combination that will have the cost applied against this disposition.
Enter the Category Code
Enter the category code for which to apply the cost against this disposition. The categories must be set as ‘Available in Procurement’ in Job Costing > Setup > Local Tables > Enter Category.
When using an “E” distribution
Enter/select the equipment, category and transaction code that will have the cost applied against this disposition.
Only equipment items with a ‘Commission Date’ on or after the purchase order transaction date can be entered.
At posting, the department will default from the equipment’s home location as entered on the Equipment Maintenance screen (standard Treeview path: Equipment Costing > Setup > Enter Equipment). The General Ledger account associated with this equipment item is derived from the transaction code.
When using an “I” distribution
All relevant posting information will come from the inventory item.
When using a “M” distribution
Use the [Allocation] button to distribute the cost of one item to multiple accounts.
When using a "W" distribution
Enter/select a work order number, a work item number and an expense code.
Purchase Order Contact Rules
If the contact is specified in the purchase order, then that contact name will appear on the purchase and change orders.
If the contact code is not specified, and the address code is specified, then the contact from that address code will be displayed.
If neither the contact nor address codes are specified, then the contact will be shown as entered in the Business Partner setup.
Free-Form Items
Free-form items are one-time items that will only be tracked for the purposes of this order and will not be tracked within the Inventory or Purchase Order modules.
In the Details section of the PO, enter a user-defined item code that can represent the free-form item. The item description allows for 3000 characters. The user has the option of entering the description directly on the item description line or accessing the Free-Form pop-up by pressing the [Free Form] button. The Free-Form Item pop-up window provides the ability to record descriptive text for merchandise ordered from a vendor on a one-time basis.