Overview – MIP Excel® Documents
The [Send To Spreadsheet] and [Export] buttons in CMiC Field allow users to export data as MIP Excel documents. MIP Excel documents use templates that are Microsoft Excel (XLSX or XLXM format) documents to specify the static text and dynamic data to be outputted. Excel templates for MIP Excel documents are created by inserting replacement fields into desired positions in the template, which the system replaces with data from the database when the MIP Excel document is generated.
The following outlines the steps required to create new document merge Excel templates (MIP Excel document), and how to print using a defined document merge template.
There are 5 steps in creating a Microsoft merge document:
-
Print relevant Excel document to use as a base (starting point) for a new template.
-
Create MIP Excel document template.
-
Upload new MIP Excel template for new MIP Excel document.
-
Restrict MIP Excel template availability by company and project.
-
Print Excel document using new Excel document template.
Step 1: Print Relevant Excel® Document to Use as Base for New Template
![Screenshot of [Export] button with drop-down highlighted.](../../../Resources/Images/MIP_12c/MIP_DocumentMergeExcel_Export.png)
Sample of screen with [Export] button
![Screenshot of [Send to Spreadsheet] button.](../../../Resources/Images/MIP_12c/MIP_DocumentMergeExcel_Export2.png)
Sample of screen with [Send to Spreadsheet] button
In generating a MIP Excel document, the system uses a MIP Excel document template. To create a new MIP Excel document, a new template is required. The easiest way to create a new template is to print an existing Excel document that can best be used as a base (starting point) for the new template. This is so because the replacement fields in the template that specify which columns the data is to come from use the exported column headers as the column identifier (see following screenshot).
Alternatively, an existing template can be downloaded in order to use it as a base for a new template (see step 3 for details).
To begin, from the relevant screen, click the [Send To Spreadsheet] or [Export] button to export its data to an Excel document to use as a base for the new template. The resulting Excel document (sample shown below) can now be used as a starting point for the creation of the new MIP Excel document template.
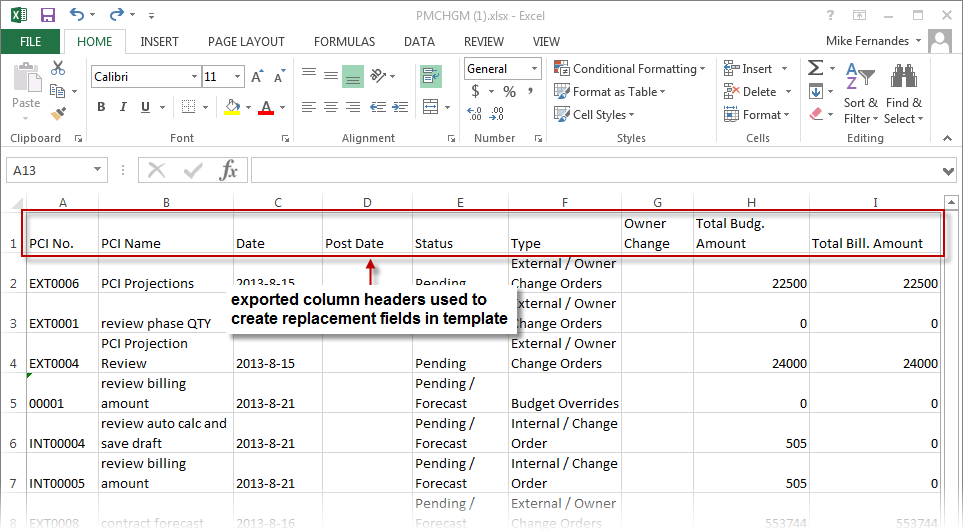
Sample of generated Excel document, which can be used as a starting point for the creation of a new Excel document template
Step 2: Create MIP Excel® Document Template (Merge Template)
MIP Excel document uses templates of the XLSX or XLSM format. The only difference between these formats is that XLSM allows macros and XLSX does not. If the user wants the output spreadsheet to automatically recalculate formulas when it loads, they must use the XLSM format and include a startup function as described below.
MIP Excel document templates are normal Excel spreadsheets containing static, formatted text and replacement fields that specify which columns in a screen’s table the data in columns of the MIP Excel document come from. In the template, a replacement field is put just under a column header (static, formatted text), and it is of the format {column header}. A replacement field will be replaced by the contents of the exported data from the specified column of the screen’s table. The column header values are specified in the Send To Spreadsheet setup in ADF screens (where they default to the prompt on the screen or the item name if there is no prompt) or the log definition in JSP screens.
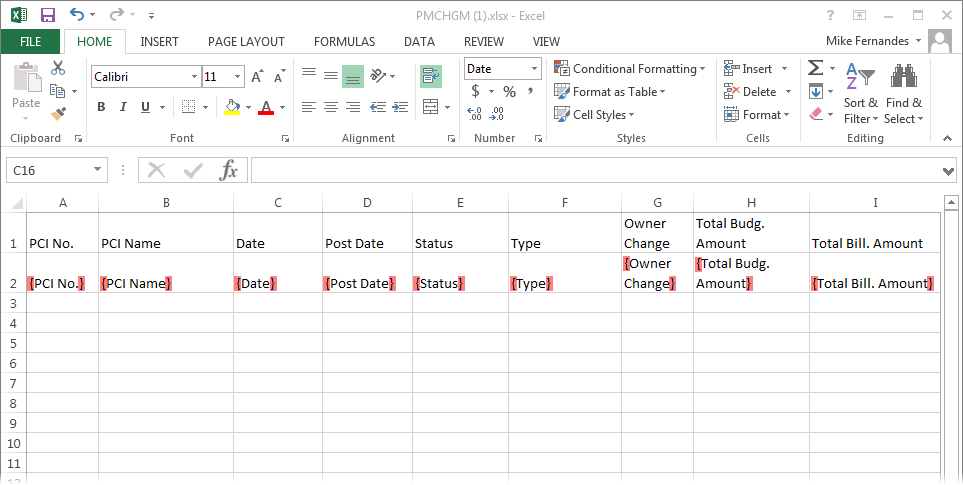
To begin creating the new MIP Excel document template, delete all data lines from the exported document in the previous step, leaving only the column headers.
NOTE: The first row of a MIP Excel document template cannot be blank.
Next, copy the column headers into the second row. Then, to convert the column headers into replacement fields, enclose the column headers with the { } brace brackets (highlighted in red in the above screenshot).
Now that the exported column headers have been used to create the replacement fields, the column headers in the first row, which are just static text, can be formatted in any desired manner.
To ensure that a replacement field results in a string, even though the exported data may be a number, place a single quote directly after the opening brace bracket of the replacement field. For example, if numeric vendor codes are being used, the replacement field would be formatted as follows: {'vendor code}.
If the top left cell (A1) of the template spreadsheet contains the string “<Form>”, the field definitions may be spread over multiple rows and each exported record will result in a complete page consisting of all of the rows in the template spreadsheet. If page breaks are desired to be between the generated pages, one must be included at the end of the template spreadsheet. Note that the row containing the <Form> tag is included in the output pages, but the tag is removed. Thus, the top left cell in the output pages cannot contain any information.
In the absence of the string “<Form>” in cell A1, all field definitions must appear in a single row, called the model row. This row will be replicated for each exported record, resulting in a tabular display of exported data.
Formulas will work in the output spreadsheet, although they may result in errors in the template because they depend on having numeric inputs and the field tags are strings. The sum of the rows define its range to be the column title of the field definition.
Normally, the user would need to force the spreadsheet to recalculate formulas, such as totals, using CTRL+SHIFT+ALT+F9 when it comes up in Excel. However, it is possible to make this recalculation happen automatically if the template is in XLSM format. To do this, define the required startup function in the spreadsheet using the Visual Basic Editor (Alt-F11).
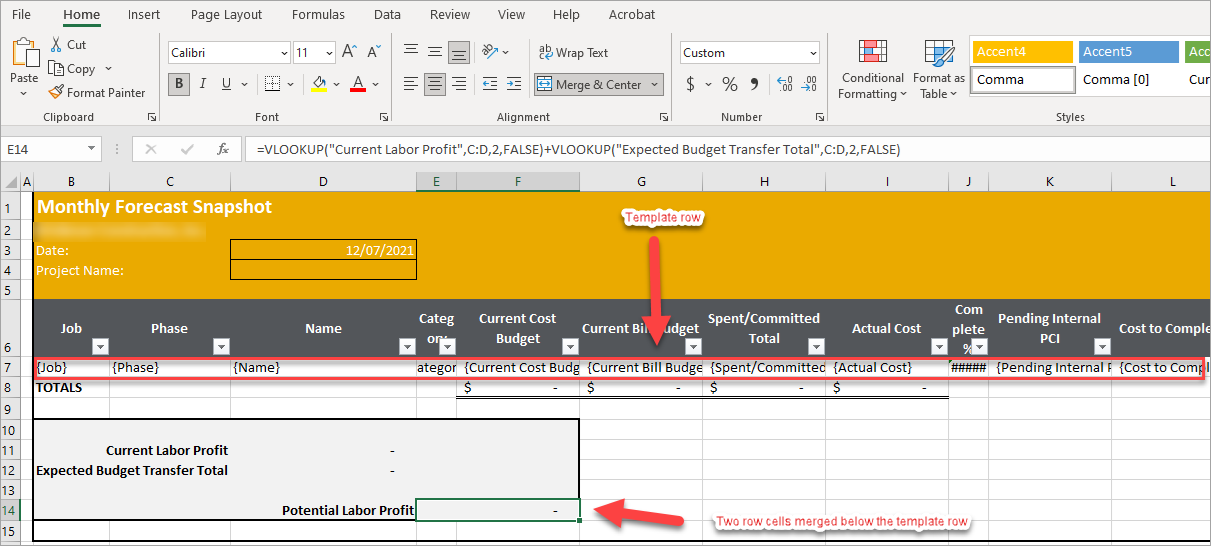
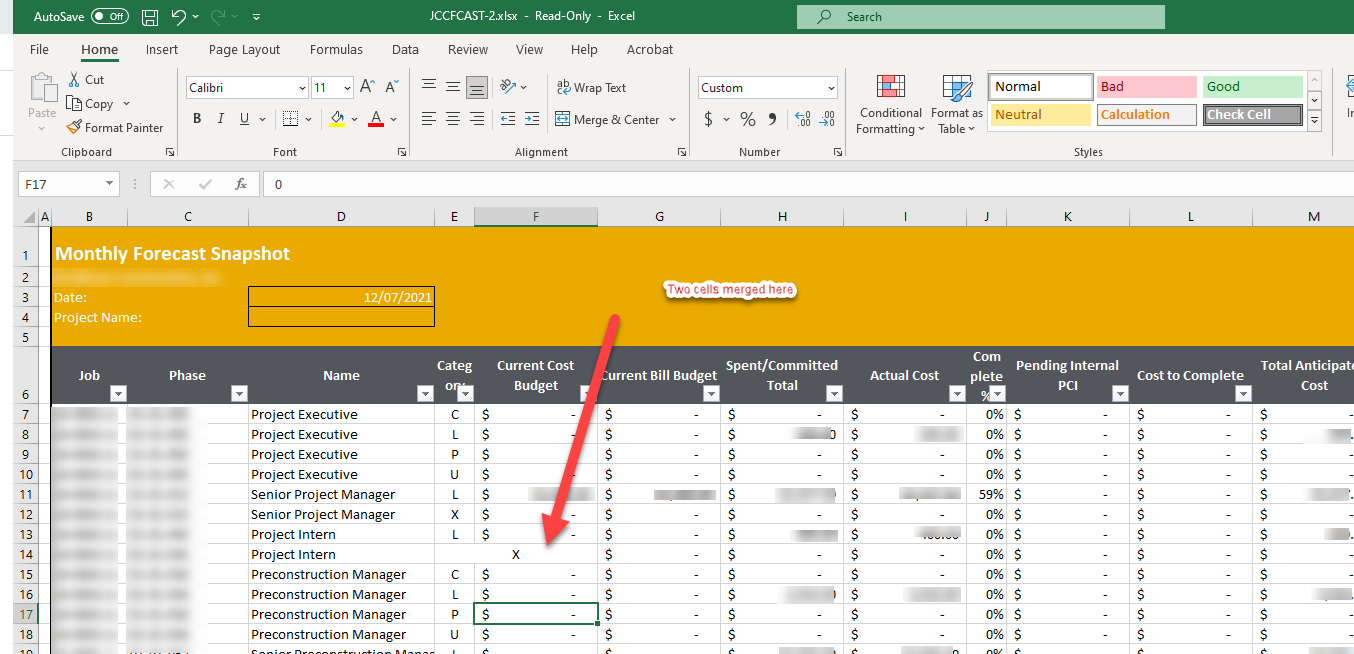
Note If fields are merged in a row below the template row (the row with the replacement fields in it) when the MIP spreadsheet is created, the corresponding cells in the row where the merged fields were originally located in the template will become merged. For this reason, fields should not be merged in the row below the template row.
Example when two cells are merged under the template row:
Add Totals to Dynamic Columns
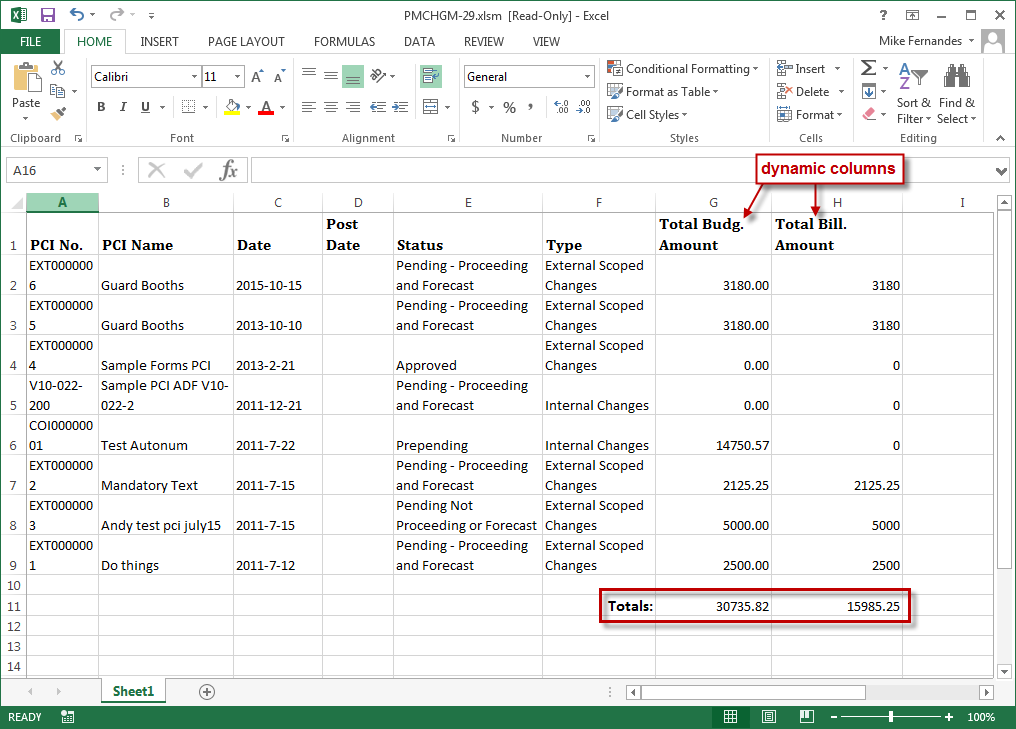
Sample of generated MIP Excel document with totals at the end of dynamic columns
Adding totals to the end of dynamic columns requires the creation and use of a macro, because no formulas can be in these columns to calculate the totals dynamically. Since dynamic columns must be clear of all entries in order to calculate the totals dynamically, a macro is needed to put the totals into these columns.
Creating the macro requires the use of VBA, which is launched from the MIP Excel template. For further details, please refer to the Add Totals to Dynamic Columns subsection under the Frequently Asked Questions section.
Step 3: Upload New MIP Excel® Template for New MIP Excel Document

Excel Merge Maintenance; standard Treeview path: Project Management > File Maintenance > Document Merge > Excel Merge Maintenance
Having saved the new MIP Excel document template created in the previous step, it can then be upload it into the system so that it can be used to generate the new MIP Excel document. This step links the MIP Excel template with the log/report type selected for the Log field.
For each log type, multiple MIP Excel template variants may be associated to it. When going to print the MIP document, the relevant template can then be selected. The paths to the screens to maintain log types and their data sources is provided below, under the section, Maintenance Screen for Log Types & Log Type’s Datasource.
This screen is also used to download a MIP template in order to use it as an alternative starting point (alternative to step 1) to create a new variant of the template. See the description for the [Download Template File] button in the below table.
The following provides details about the fields and buttons on this screen.
Log
Select the relevant log type for the new MIP Excel template to upload.
Description
This is a display-only field, displaying the description of the selected log type.
Template Name
This is a display-only field, displaying the file name of DOCX MIP Excel template file.
Template Description
This identifies the MIP Excel template in the system. After a template is uploaded, this field can be used to change the templates description.
[Upload Template File] – Button
This button is used to browse for and select the MIP Excel template to be uploaded. Once uploaded, the Template Description field, which identifies the template in the system, can be changed if desired.
[Download Template File] – Button
This button is used to download an Excel template in order to use it as a starting point for the creation of a variant version of it.
Associate/Disassociate – Icons ( )
)
Used to associate a new MIP Excel template to the selected log type, or to disassociate a template from the log type.
[Update] – Button
Click to update any changes.
Maintenance Screen for Log Types & Log Type’s Datasource
|
Maintenance |
Standard Treeview Path |
|---|---|
|
Log Types |
Project Management > File Maintenance > User-Defined Logs |
|
Log Type’s Datasource |
Project Management > File Maintenance > User-Defined Logs Types |
Step 4: Restrict MIP Template Availability by Company & Project
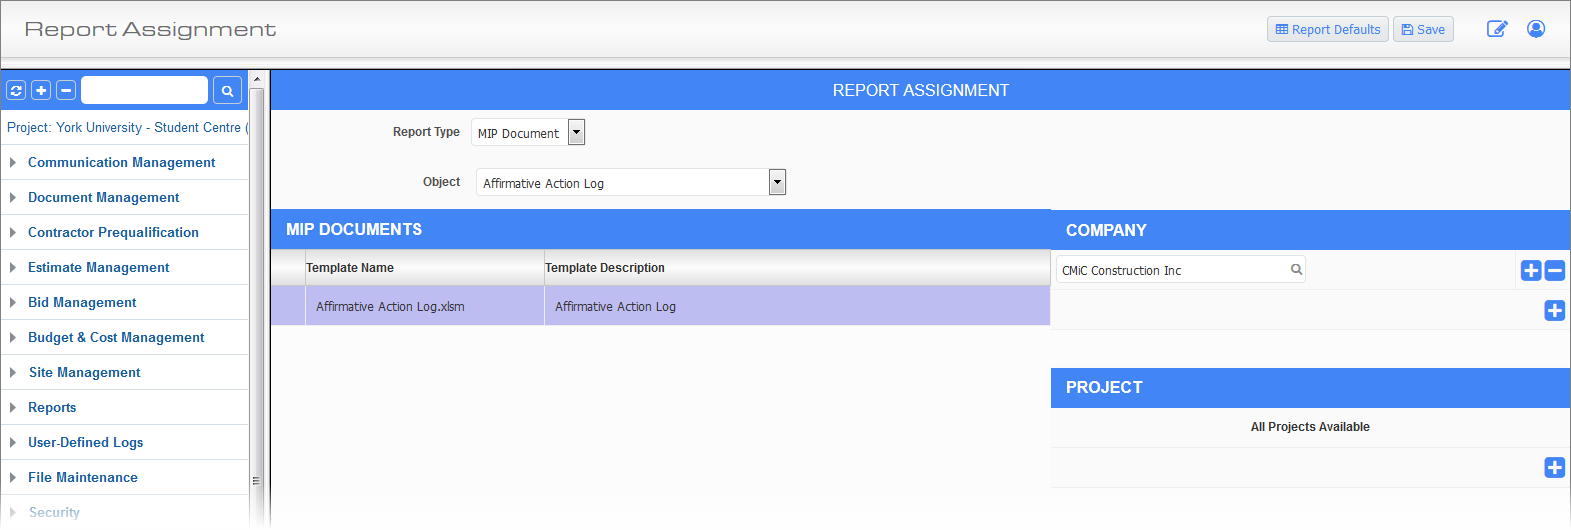
Report Assignment; standard Treeview path: Project Management > File Maintenance > Report Assignment
When a MIP Excel template is uploaded and associated to a particular log/report type, it is available to all companies in the system, for that log/report type. If necessary, the Report Assignment screen, shown above, can be used to restrict the availability of the MIP Excel template to particular companies, and optionally, to particular projects.
To restrict the availability of a MIP Excel template by company, for the Report Type field, select “MIP Document”, then using the Object field, select the log/report type of the MIP Excel document.
Under the MIP Documents section, the MIP document templates for the selected log/report type will be listed. Select the template to configure, and under the Company section, if the template is available to all companies, it will read “All Companies Available”, otherwise the companies which have access to the template will be listed. Click  to add a company to the list, or
  to remove a company from the list.
To further restrict the availability of the template, to particular projects, click the icon under the Project section to add desired projects.
NOTE: If the icon is unavailable, click the icon under the Company section, and it will appear.
Click to remove a project from the list.
Set Subject & Body Defaults for E-Mail
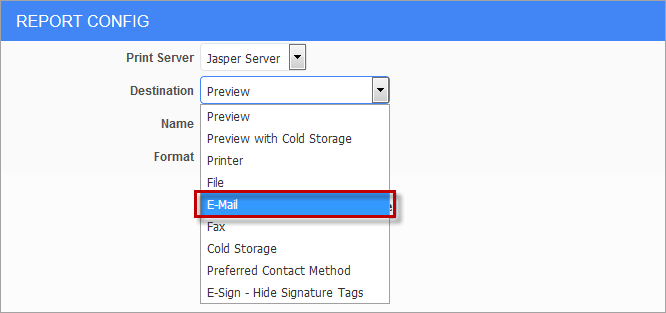
This screen is also used to set the defaults for an e-mail’s subject line and body, so that when printing a MIP document and using the E-Mail option from the pop-up window’s Destination field (shown above), the defaults are filled in. Please refer to the Email Replacement Parameters sub-section of the Reports and Form Letter Assignment section in the CMiC Field guide for further details.
Step 5: Printing Using MIP Excel® Template
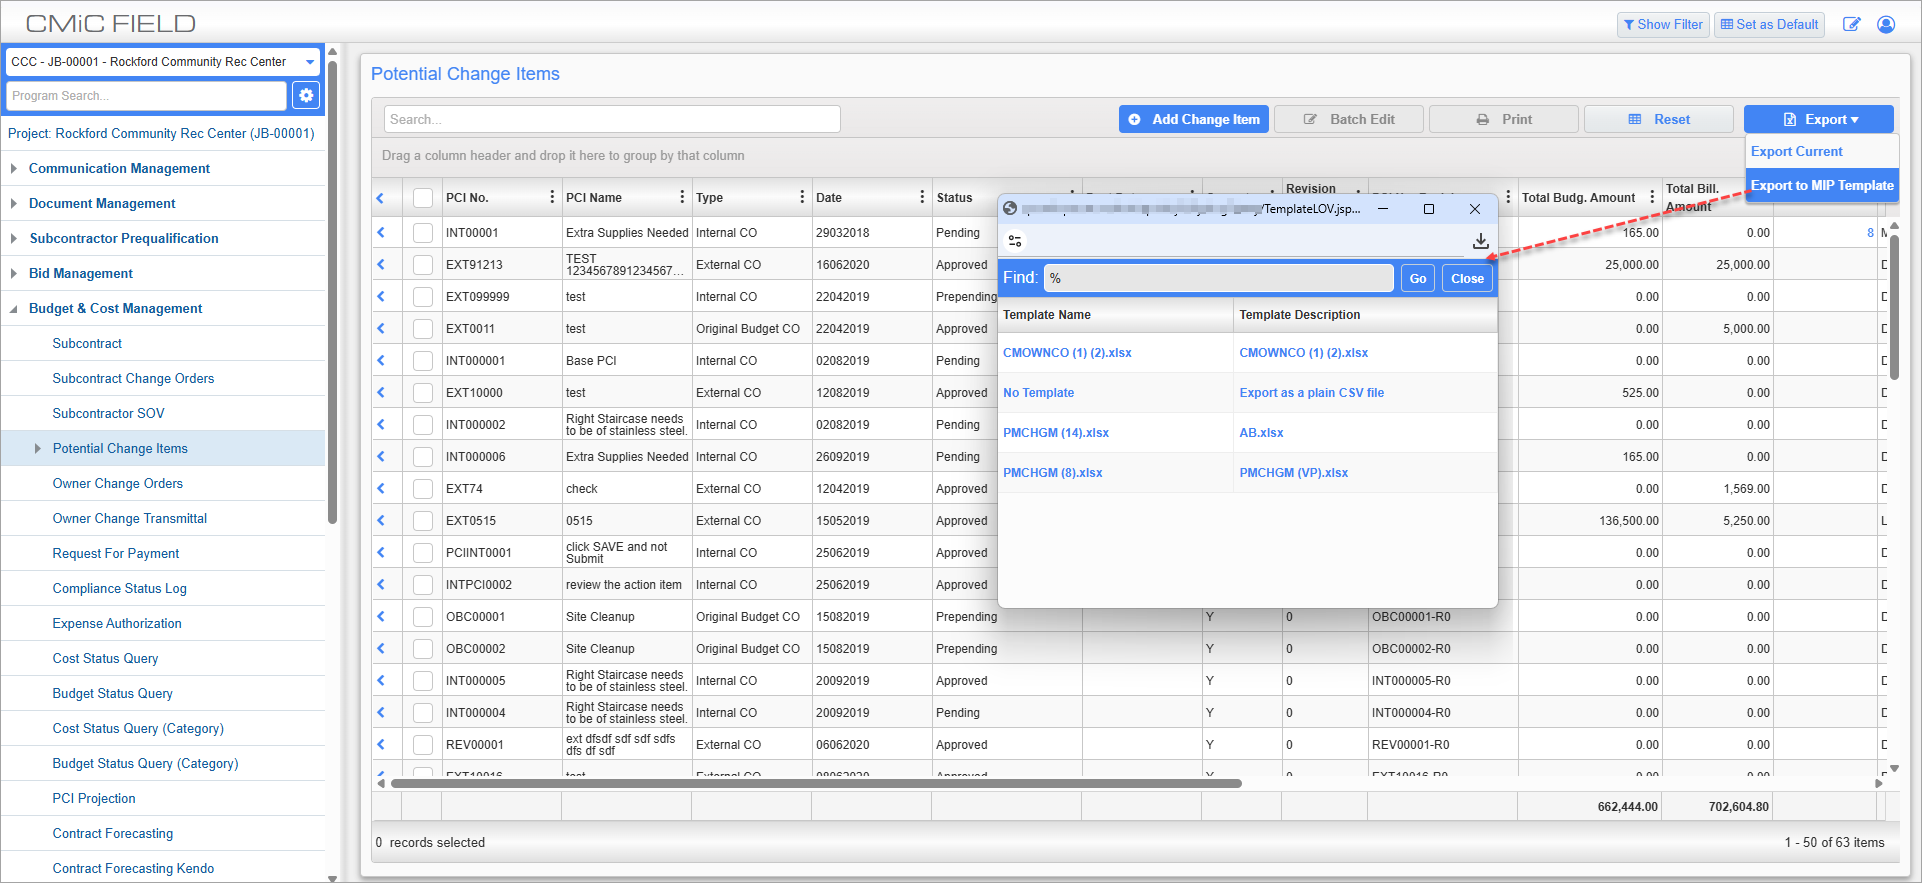
Potential Change Items; standard Treeview path: CMiC Field > Budget & Cost Management > Potential Change Items – [Export] button
After a MIP Excel template has been uploaded and associated to a log/report type, it can be used to print the new MIP Excel document from the screen used to print reports/logs for the associated log/report type. One such screen is the Potential Change Items screen, shown above, and when its [Export] button is clicked, a pop-up window is launched to select the template to use to generate the MIP Excel document.
The “No Template” option, under the Template Name column, is hidden or displayed using the ‘Hide No Template Option For Excel Merge’ checkbox on the Report tab of the System Options screen (standard Treeview Path: System > Setup > System Options).