Pgm: JBBILL2 – G/C Prepare Bill; standard Treeview path: Job Billing > Billing > G/C Prepare Billing
NOTE: It is not recommended to switch between the JBBILL and JBBILL2 screens when preparing a billing for a contract. Please see Job Billing - JBBILL vs JBBILL2 for further details.
Although this screen follows the same rules as the Prepare Billing screen, the General Contractor Prepare Bill screen allows for more flexibility in overwrites being allowed in total percent complete, total billed, group overrides by line, billing detail overrides by line either percentages or amounts. Changing the current draw or total to date percentages or amounts or retainage current draw or total to date, will automatically disperse the amount throughout the billing detail and group billing lines.
NOTE: When a closed contract is selected for the Contract Number field, an error message displays to notify the user that the contract is closed.
Billing type PCCO was introduced with this screen. Where there is a budget on the line it will be treated as percent complete. Where the billing line budget is null or zero it will be treated as cost.
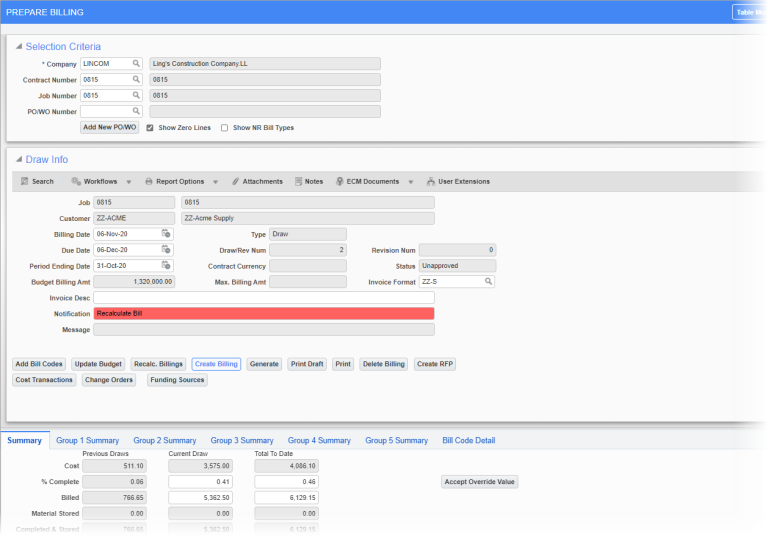
There are multiple ways to calculate the billing in the G/C Prepare Billing screen. Any amount that is overwritten will appear in red, as well as, the billing lines it has been disbursed to. The red color also applies to the Notification field in the Draw Info section for all messages.
When checked, the 'Show Zero Lines' checkbox restricts bill code lines with zero amounts in Budgeted Billing and Completed Cost Amount fields.
PO/WO Number
Select a PO/WO associated with the contract/job number. A PO/WO number will default in this field if it has been set to default in the PO/WO tab of the Job Setup screen in the Job Costing module (standard Treeview path: Job Costing > Job > Enter Job – PO/WO tab). Additional PO/WO numbers can be added using the [Add New PO/WO] button.
The PO number must be defined in the PO/WO Number field for the PO number to print on the billing invoice. A PO number will only print on free-form invoices and users may need to check the report code of the invoice format to determine if it's a free-form invoice or a progress billing invoice.
NOTE: There can only be one default PO/WO number at a time. If it is a revision, then the program will retrieve the previous PO/WO code from the previous draw. If it is a new draw, then the program will retrieve the default PO/WO code from JC Job.
[Add New PO/WO] – Button
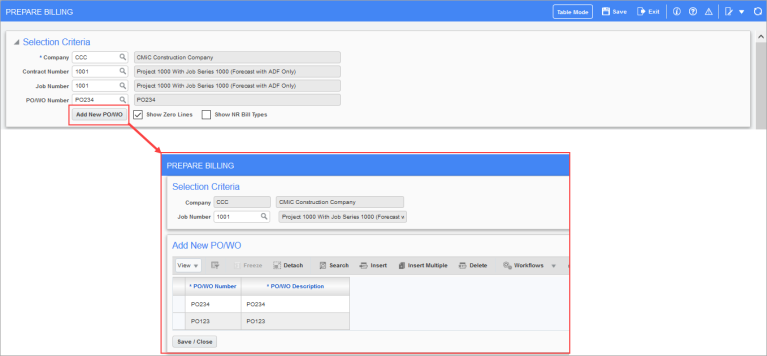
Pop-up window launched from [Add New PO/WO] button on the Prepare Billing screen (standard Treeview path: Job Billing > Billing > G/C Prepare Billing)
This button displays a pop-up window where the user can add Purchase Order/Work Order numbers, assigned to the job.
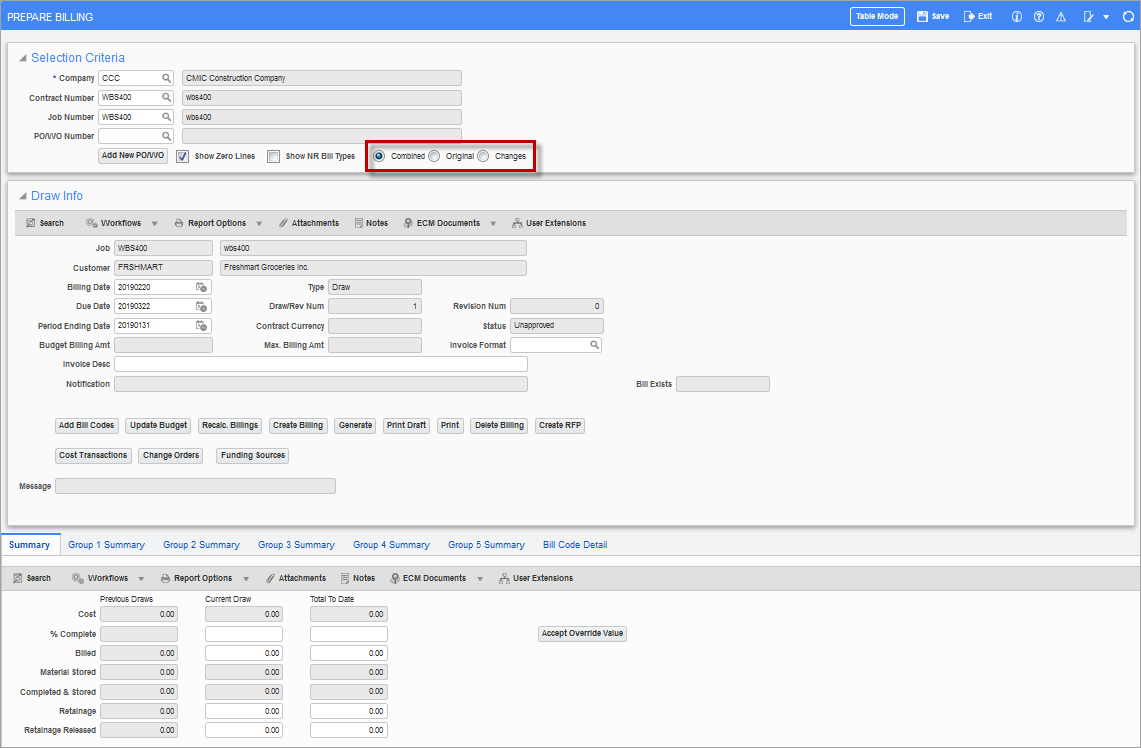
Combined/Original/Changes – Radio Buttons
The radio buttons are visible only when the billing contract is set to use PCI detail billing. The default value is combined when a new billing is created. Users may update as required. The radio buttons are also available in all Group Summary and Bill Code Details screens. The value set in the main screen when generating an invoice, will be reflected when navigating to the group level or bill code level pop-up windows. Users may update the value as required at any time. Updating the value of the radio buttons automatically triggers recalculation of the bill to keep the records. When a draw/revision is re-visited, then the last stored radio button value will be the starting value. All levels, such as groups or bill code levels, will maintain this value and display records accordingly, unless updated by the users. When deleting and re-creating a draw/revision, the radio button will be reset to the “Combined” option. The overrides performed will affect the selective records as per the option set by the users. This is applicable to both billed and retention amounts. Clear overrides is modified to follow the radio option selected and will perform selective clearing of overrides. There are no changes to any billing invoices or reports. The radio options provide a convenient way of performing selective filtering of bill codes either with original budgets or associated with posted changes, and performing selective overrides/review of the billing information selectively.
Using the Override Billing Screen
Job Billing Prepare Billing allows the user to bill by entering a percentage override or amount override in the Percent Complete field or Billed field of current draw or total to date. This will disburse the amount equally to each bill code that has a budget line and is being treated as a percent complete. This disbursement can be seen in each Group Summary screen and the Bill Code Detail screen. The user can recalculate, generate, and print the billing from the first entry screen by using the [Accept Override Value] button. To reverse the entry, use the [Clear Billed Amount Overrides] button.
A Group Override
Any billing line in a group summary can be overridden and recalculated in any of the group tabs. This billing information will default to both the bill code detail lines and to the Override Billing screen.
Bill Code Detail Override
Any billing line in the bill code detail can be overridden and recalculated. This billing information will default to both the Group Code Detail and the Override Billing screen.
An override of $4,000.00 in the Override Billing screen will affect the billing in any of the following ways:
|
Override Amount |
Line No |
Budget Amt |
Cost Amount |
Calculation |
|---|---|---|---|---|
|
$4,000.00 |
1 2 |
$300,000.00 $100,000.00 |
$10,000.00 $90,000.00 |
If both of the lines have a budget the system will prorate the $4000.00 between two lines based on the budgeted amount. Line 1 gets 75% of 4,000.00 = $3,000.00 Line 2 gets 25% of 4,000.00 = $1,000.00 |
|
$4,000.00 |
1 2 |
$300,000.00
|
$10,000.00 $90,000.00 |
If only line 1 has a budget the entire amount will go against line 1 Line 1 gets 100% = $4,000.00 |
|
$4,000.00 |
1 2 |
|
$10,000.00 $90,000.00 |
If both the lines have no budget or a sum of zero the system will prorate $4000.00 between the two lines based on the total cost if it is non-zero Line 1 gets 10% of $4,000.00 = $400.00 Line 2 gets 90% of $4,000.00 = $3,600.00 |
|
$4,000.00
|
1 2
|
|
$10,000.00 |
If both lines have a null or zero budget and only 1 line has a cost amount the entire amount will go against the line with costs Line 1 gets 100% of $4,000.00 = $4,000.00 |
|
$4,000.00 |
1 2 |
|
|
If both of the lines have a null or zero budget and total cost of zero the system will prorate the $4000.00 based on the line count Line 1 gets 50% of $4,000.00 = $2,000.00 Line 2 Gets 50% of $4,000.00 = $2,000.00 |
NOTE: The general contractor billing will not allow the use of free form invoices only AIA will be calculated.
[Update Budget] − Button
The [Update Budget] button is used when there is a change in the Budget Billing Amount field on the Contract Entry screen. If a billing has already been generated, no recalculation is required, and only a budget update is needed, regenerating the billing will not automatically update the budget in the bill code details. Users must explicitly click on the [Update Budget] button to reflect the new budgets in the bill code details.
[Recalc. Billings] − Button
![Screenshot of the [Recalc Billings] button pop-up](../../../../Resources/Images/JB_12c/Preparing_the_Billing_13.png)
This button opens the Billing Recalculation pop-up window. Click the [Select Criteria] button to open the Transaction Criteria pop-up window, as shown in the screenshot below.
Users can specify dates for the Temp Deferred From Date and Temp Deferred To Date fields. When dates are entered in these fields, transactions with a post date within that specific period will be marked as temporary deferred in the current draw. In the next draw, only those transactions that need to be billed and included in the draw can be filtered using the post date or reference date filters. To keep the transactions marked as temporary deferred in the next draw, both the From and To Temp Deferred Dates must be specified.
Transactions within the From and To Reference Date range will be included in the draw. If left blank, all transactions will be included as before.
Cost transactions falling within the From and To Transaction Date range will be included in the draw. If left blank, all transactions will be included.
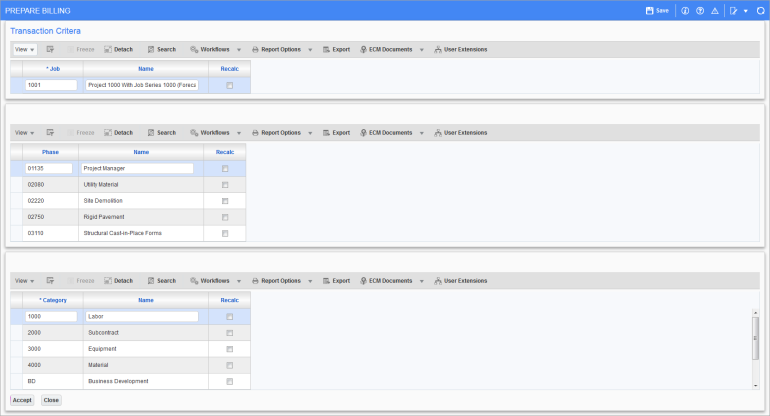
Pgm: JBBILL2 – Transaction Criteria; standard Treeview path: Job Billing > Billing > G/C Prepare Billing > [Recalc. Billings] button > [Select Criteria] button
In the Transaction Criteria pop-up window, there are three blocks of display records with a checkbox for user’s selection against each record. The default value for the ‘Recalc.’ checkboxes is unchecked.
[Create Billing] − Button
The [Create Billing] button is used to open a new draw for the contract. The reason the [Create Billing] button is available, even when the pop-up window is displayed to create a draw or revision, is because users may want to view the information on the draw before creating a new one with the recalculation. In such cases, the user can click the [Cancel] button from the pop-up window, view the information on the draw, then click on the [Create Billing] button to create a draw or revision. If there is an existing draw that has not been posted, clicking the [Create Billing] button will not have any effect.
[Generate] − Button
When a draw is created, users must generate the JB invoice for printing and posting the billing.
Job Code
The Job Code section displays all the jobs that share the same contract code. Users may select one or more jobs or leave as unselected for recalculation.
Phases
The Phase section displays all the phases including controlling phase codes that are assigned to any or all the jobs under this contract. The controlling phases/categories may be available only when transactional data exists against the same, otherwise they are excluded from the list. Users should understand that the explicit selection of the phase records is required to include a bill code for recalculation.
NOTE: Selecting a controlling phase alone does not mean that all the sub-phases are automatically included in the recalculation.
Categories
The Category section displays all categories including any controlling categories that are assigned to any or all the jobs. Users must explicitly select any category that needs to be included in recalculation.
[Accept] – Button, [Close] – Button
Clicking [Accept] saves the selection and [Close] closes the window. If users make selections and click [Close] without accepting the changes, a prompt will appear asking the user if they want to exit without saving the changes. If no selections were made, these buttons will close the pop-up window and return to the Billing Recalculation pop-up window. This is because when nothing is selected, the system assumes all is included in the selection criteria and no explicit confirmation is required.
When users do not open the Transaction Criteria pop-up window, the existing standard functionality applies. The recalculation is performed for all jobs/phases/categories after clicking the [Recalc. Billings] button in the Billing Recalculation pop-up window.
After recalculation, any further recalculation with the selection criteria of jobs/phases/categories controls specific bill codes for recalculation in addition to the already created draw.
In order to remove an already included cost transaction from the billing draw, users have to either manually defer as per the standard functionality or delete the entire draw and recreate with specific filters applied.
[Create RFP] – Button (Creating Pay Requests via JB Invoice)
The [Create RFP] button can be used to create a pay request. The button is only visible if the ‘Allow SC Request for Payment Creation From Billing Invoice’ box is checked on the Defaults tab of the JB Contract Entry screen. It will create an unposted SC pay request for each of the subcontracts being billed, so long as there is not already an unposted pay request entered (manually). The SC pay requests originally generated via this function will be deleted and recreated each time the [Create RFP] button is used.
For details about this functionality, please refer to:
Job Billing - Allow SC Request For Payment Creation From Billing Invoice
[Cost Transactions] – Button
This button opens the Cost Transactions pop-up window which displays a table of cost transactions.
NOTE: The Union Code, Union Name, and PCI Control Code columns are hidden by default and can be added through the Lite Editor if required.
[CPR Adjustment] – Button
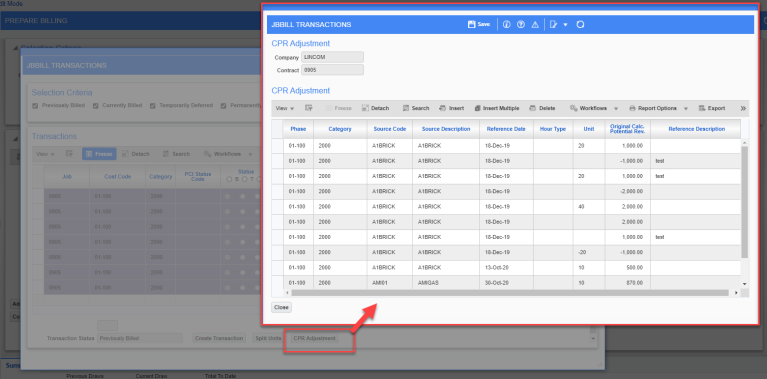
Pop-up window launched from [CPR Adjustment] button on the G/C Prepare Billing screen (standard Treeview path: Job Billing > Billing > G/C Prepare Billing>Cost Transaction>CPR Adjustment)
This button displays a pop-up window where the user can update Calculated Potential Revenue Amount and Reference Description of posted cost transactions that may or may not have been included in posted draws. All the other fields will be read-only.
The CPR Adjustment pop-up window will fetch cost transactions based upon the source of Cost Transactions button. So, if called from Bill Code level, it will show all cost transactions for the bill code. If called from contract summary level, it will display all cost transactions for the contract. If called from the group level, it will display cost transactions according to the group.
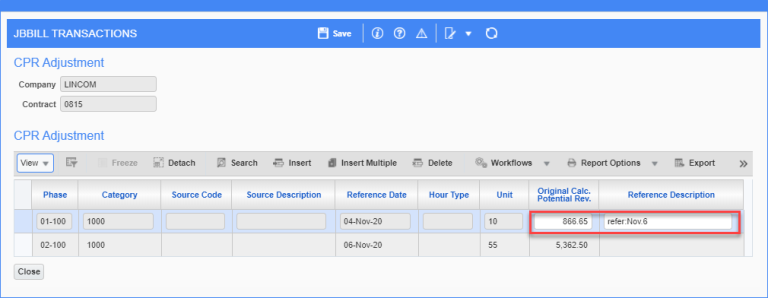
The pop-up window will save values when either Save or Close button is pressed on CPR Adjustment screen. Once Saved/Closed, "Recalculate Bill" notification is displayed on the main screen.
Adding Group Codes 1 to 5 to the Bill Code Detail Tab
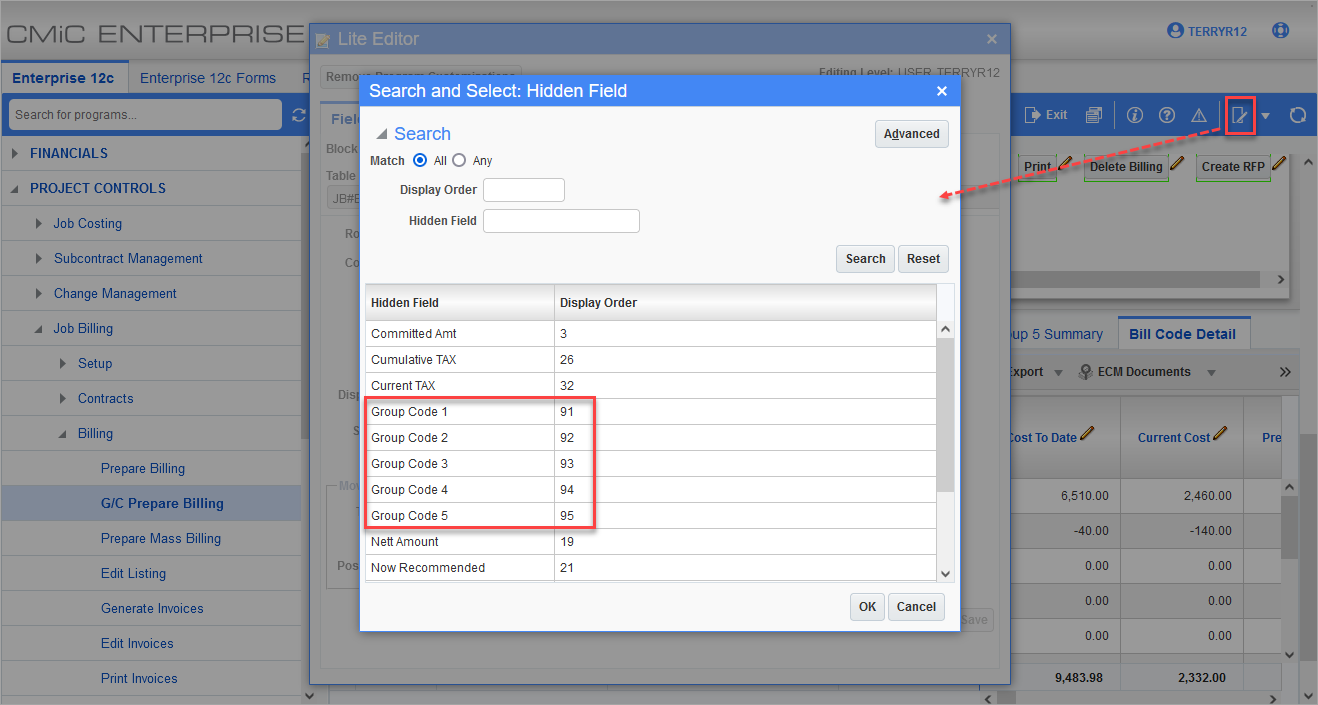
Users have the option to add the Group Codes 1 to 5 columns to the Bill Code Detail tab via the Lite Editor. By default, these columns are hidden.
[Mass Update] – Block Toolbar Button
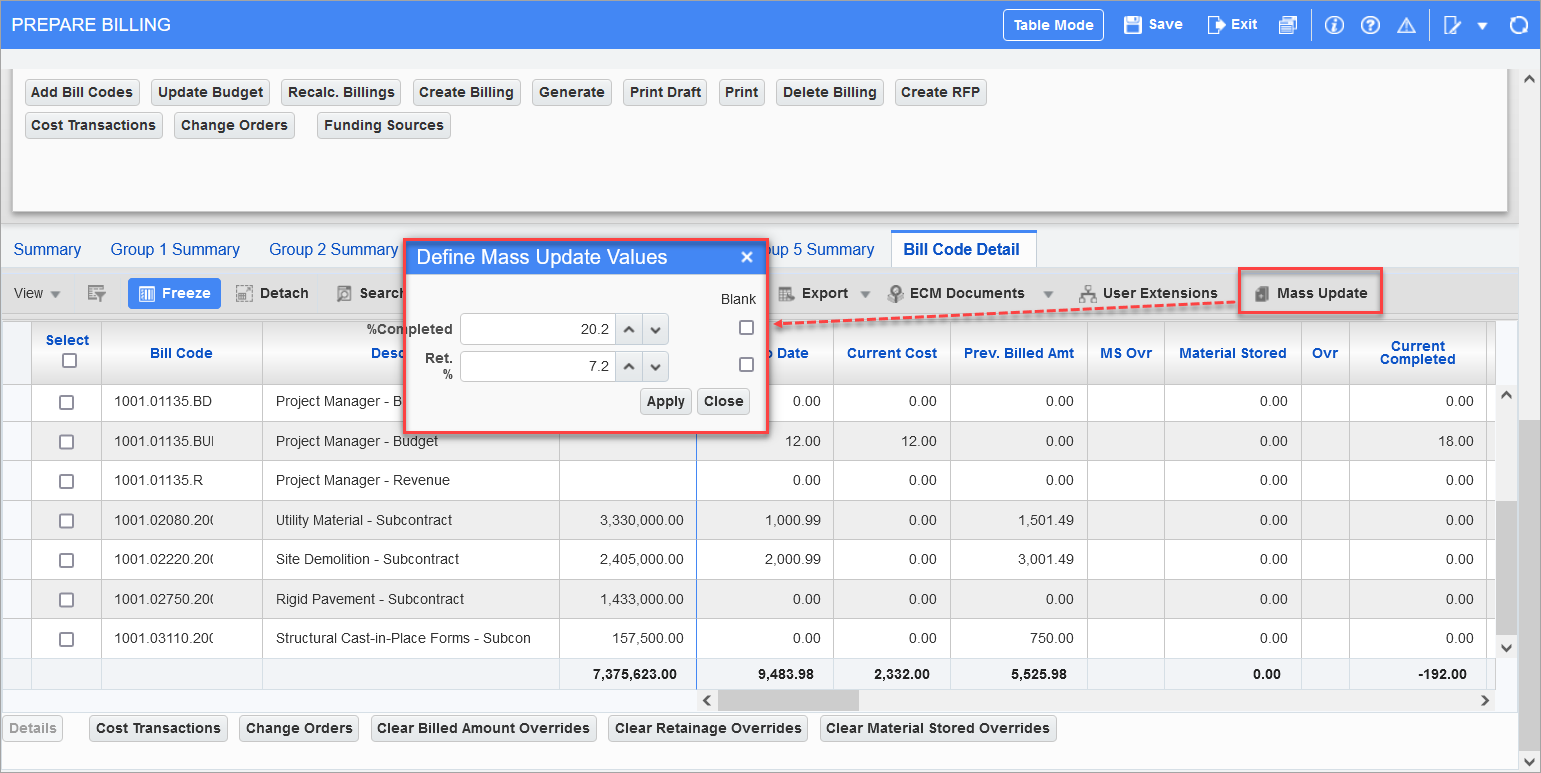
Pgm: JBBILL2 – G/C Prepare Billing; standard Treeview path: Job Billing > Billing > G/C Prepare Billing
As framed in red above, the G/C Prepare Billing screen has a [Mass Update] button on the Block Toolbar of the Group 1 Summary to Group 5 Summary tabs, and on the Bill Code Detail tab.
When clicked, the Define Mass Update Values pop-up window opens up with the following fields used to update the corresponding columns.
The following are the mass updateable columns in the G/C Prepare Billing screen:
|
Updateable Column |
Detail |
|---|---|
|
% Completed |
Completed Percentage |
|
Ret. % |
Retainage Percentage |
Users may enter numbers with decimal places for mass updating, but the process will round the same to two decimal places upon update of detail records.
Users may mass update the Ret. % and % Completed fields of the Group 1 to 5 and Bill Code Detail tabs if there is a negative amount on the budget. The Retainage column will be updated without errors and will take the absolute value.
Users may query/filter for specific set of records for mass update of values.
Also, users may enter values in either or both columns for mass update and press [Apply] to propagate the percent values to the queried set of records.
[Close] will close the pop-up window without updating the column values.
Once columns reflect the mass updated values, users must explicitly save the action to commit the updates to the database, and then perform the recalculate billings action to update the billing values. The program will validate the entries and adjust the retention percent, which may be different from the mass update value in some cases. This is due to the existing rules to validate and adjust the retention percent when recalculating billings.
[Clear Billed Amount Overrides] and [Clear Retainage Overrides] – Buttons

Pgm: JBBILL2 – G/C Prepare Billing
As framed in red above, the G/C Prepare Billing screen has a [Clear Billed Amount Overrides] button and a [Clear Retainage Overrides] button at the bottom of the Group 1 Summary to Group 5 Summary tabs, and on the Bill Code Detail tab.
Clicking the [Clear Billed Amount Overrides] button launches a pop-up window, where the user is given the option of clearing billed overrides of all records or of the current record of a particular tab.
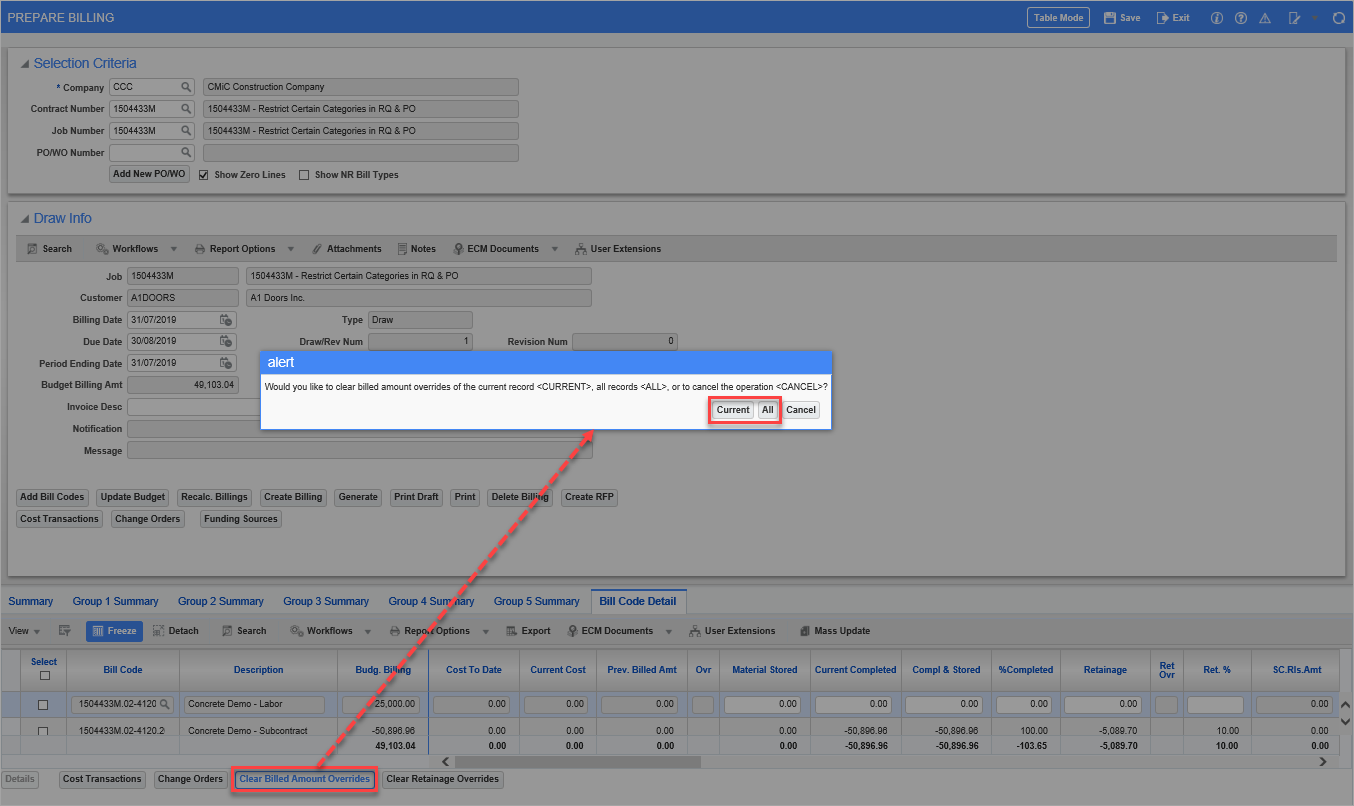
Pop-up window launched from [Clear Billed Amount Overrides] button on G/C Prepare Billing screen
Clicking on the [Clear Retainage Overrides] button launches a pop-up window, where the user is given the option of clearing retainage overrides of all records or of the current record of a particular tab.
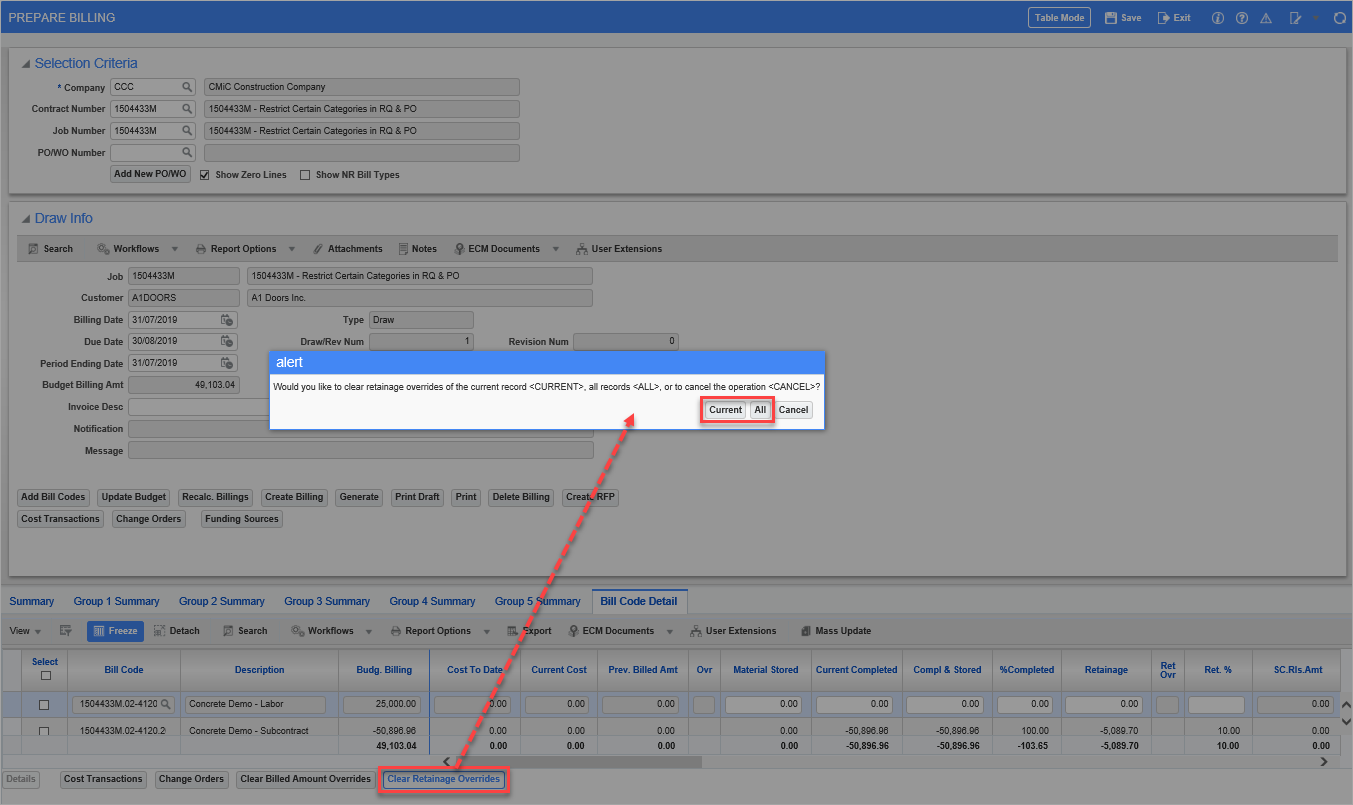
Pop-up window launched from [Clear Retainage Overrides] button on G/C Prepare Billing screen
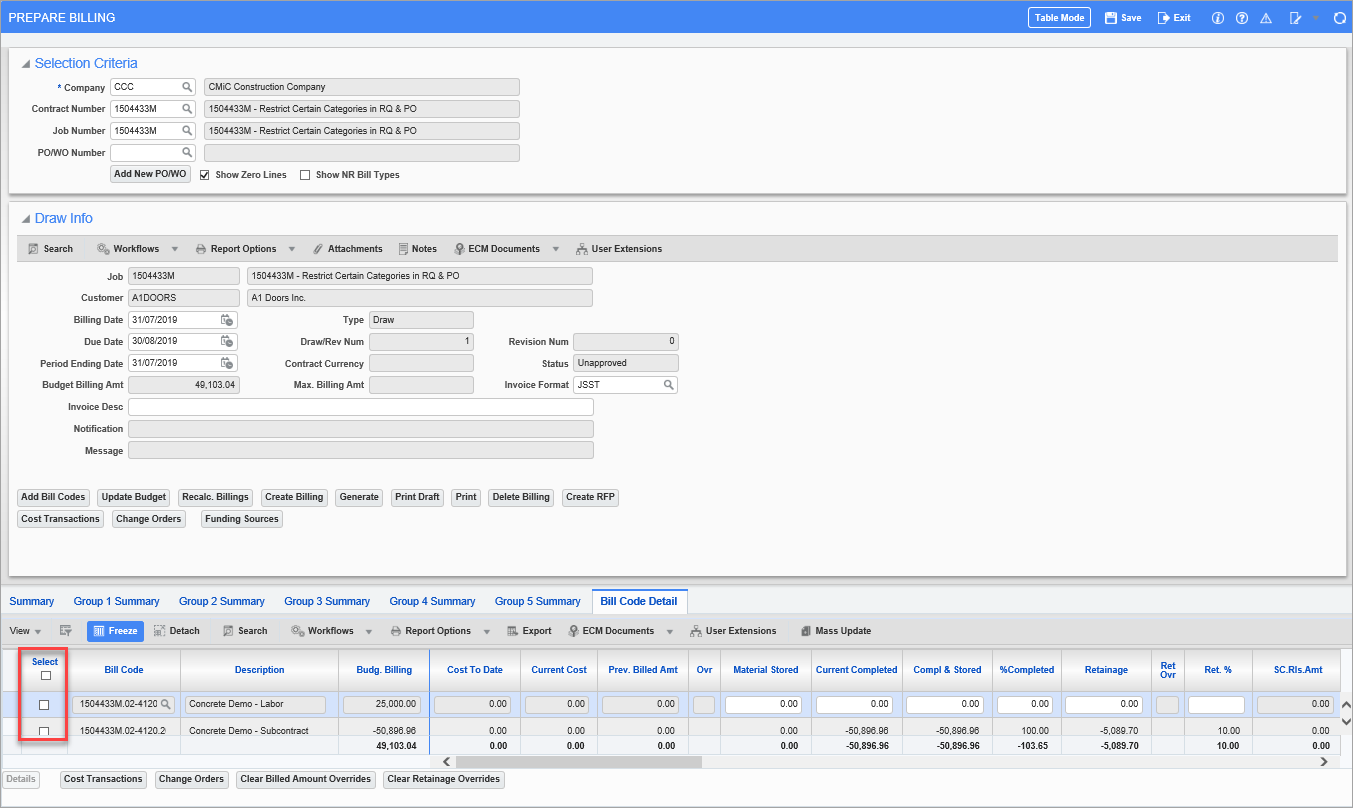
Checkboxes are also provided on the group code/bill code details. If the user selects group or bill code lines and then presses either the [Clear Billed Amount Overrides] button or the [Clear Retainage Overrides] button on the Group Summary/Bill Code Detail tabs, the overrides will be cleared only from the selected records. In this case, there will be no option given to the user to choose which lines they want to clear the overrides from.
The user must recalculate the bill once overrides are cleared at the group code/bill code level.
The PCI detail billing related options (combined, original, changes) will be respected when clearing overrides at these levels.
[Clear Material Stored Overrides] – Button
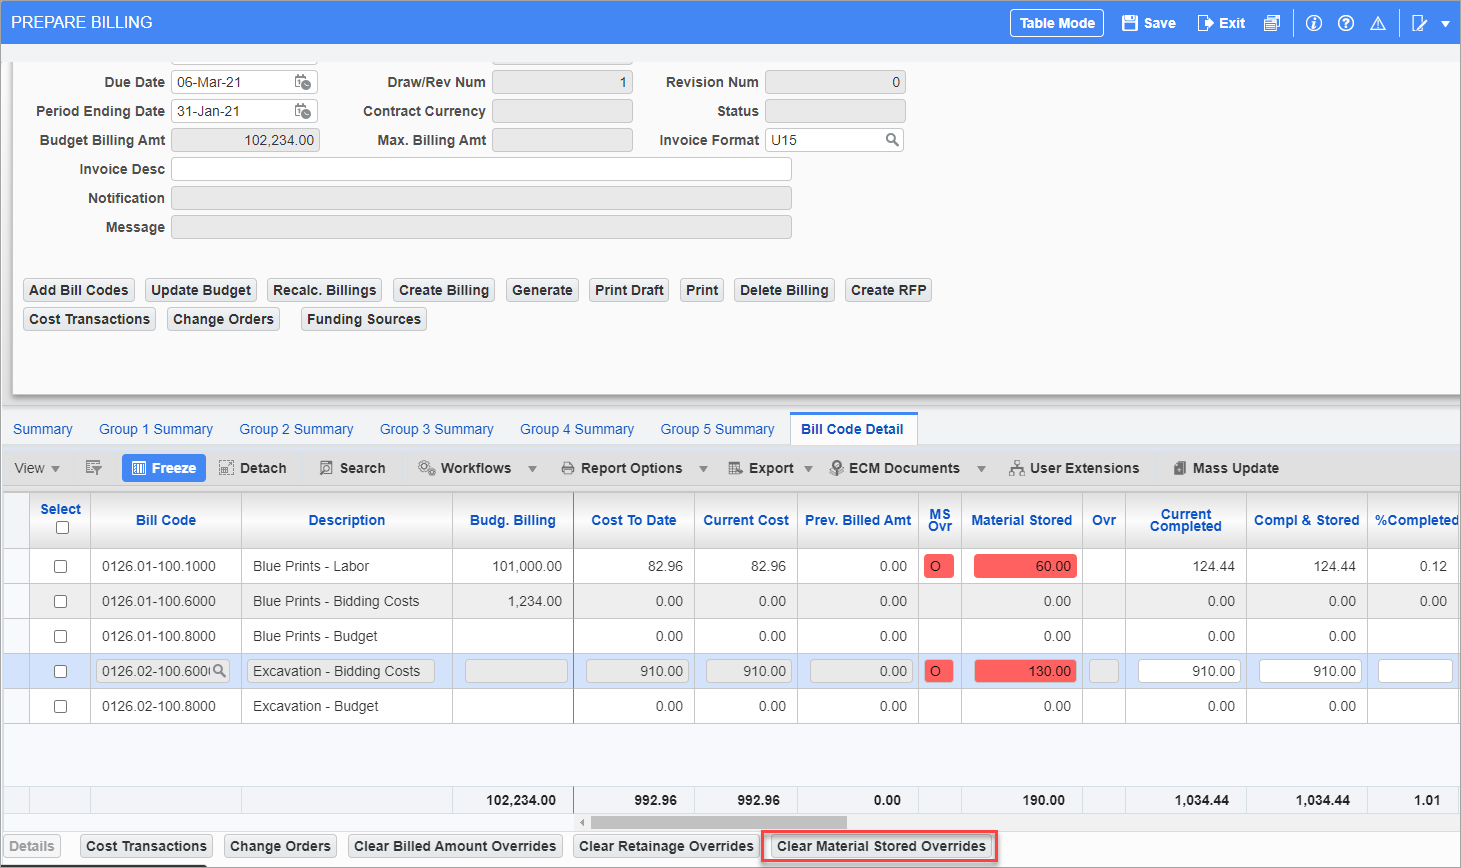
NOTE: Material stored is only applicable to subcontracts invoiced via SC.
In the Summary, Group 1 to Group 5 Summary and Bill Code Detail tabs, the Override Material Stored and MS Ovr columns display any override amounts. By default, the Override Material Stored column is hidden. When the [Clear Material Stored Overrides] button is clicked, it clears any Material Sale override amounts and restores the calculated ones. For more information on stored materials, please see Creation of Stored Materials in RFP.
In the Cost Transactions pop-up window of the Bill Code Detail tab, the
![]()
Retainage Columns in the Group Summary and Bill Code Detail Tabs
The following Retainage columns display previous/current retention amounts and release amounts.
FEATURE NOTE: For Patch 21, the retainage behavior was updated for two columns, Current Bill Ret Held and Current Bill Ret Rls.
Prev Bill Ret Held
This is a display-only column. This is the total retention held in the previous draw.
Current Bill Ret Held
The calculation for this column is
Current Bill Ret Held = Retainage − Prev Bill Retainage Held. This column is editable by the user and accepts an override value.
On a revision, this column will respect the value from the base draw or any prior revisions on the same draw.
Retainage
This column is for the retainage amount.
Prev Bill Total Ret Rls
This is a display only column. It is the total retainage release amount from the previous bills.
Current Bill Ret Rls
The calculation for this column is
Current Bill Ret Rls = Retainage Release - Prev Bill Total Retainage Release. This column is editable by the user and accepts an override value.
On a revision, this column will respect the value from the base draw or any prior revisions on the same draw.
SC.Rls.Amt
If the 'SC Retainage' box is checked in the Defaults tab of the Job Billing contract, this is the total release amount from the Subcontract Management.
Ret Release
This is the total release amount. If the 'SC Retainage' box is checked in the Defaults tab of the Job Billing contract, then the total release amount is from Subcontract Management.
The calculation is Prev Bill Total Ret rls + Curr Bill Ret Rls. This column is editable and accepts an override.
If the retention overrides are cleared, it will revert back to the Subcontract Management release amount (if the 'SC Retainage' box is checked). If the 'SC Retainage' box is unchecked, then clearing retention overrides will revert the column value back to the Prev Bill Total Ret Rls column value.
Ret Rel Ovr
This is a display only column. This indicates if the retainage release is overridden.
Prev Bill Total Ret
This column uses the calculation Prev Bill Ret Held - Prev Bill Total Ret Release.
Current Bill Ret Delta
This column uses the calculation Current Bill Ret Held - Current Bill Ret Release.
Total Retention
This calculation for this column is Retainage - Ret. Release. It is editable. When edited, if the value is greater than the Prev Bill Total Ret column, then the delta will be put in the Current Bill Ret Held column value. If the value is less than the Prev Bill Total Ret column, then the delta will be put in the Current Bill Ret Rls column value.
Total Ret %
This calculation for this column is Total Retention ÷ (Completed & Stored × 100). It is editable. When edited, if the value is greater than the Prev Bill Total Ret column, then the delta will be put in the Current Bill Ret Held column value. If the value is less than the Prev Bill Total Ret column, then the delta will be put in the Current Bill Ret Rls column value.
Current and Previous Material Stored Columns in the Group Summary and Bill Code Detail Tabs
NOTE: This feature is currently in Beta version.
In a given billing draw/revision, users can view both the Current Material Stored in the draw as well as the Previous Material Stored amounts from the prior draws in all the available Group Summary and Bill Code Detail tabs to give more detail on the breakdown of the stored amounts in each draws. Both the Current Material Stored Amount and Previous Material Stored Amount columns are hidden by default and will have to be added by the user to each available tab via the Lite Editor.
Previous Material Stored Amount
This column is read-only and displays the total Material Stored Amount across all the prior posted draws/revisions in each of the available Group Summary and Bill Code Detail tabs. The amounts from the bill codes will total into the Group Summary tabs’ Previous Material Stored Amount fields depending on the Job’s Mapping Code structure. This column will only update when the draw is posted.
Current Material Stored Amount
This column is editable at the bill code level in the Bill Code Detail tab and any overrides to it will automatically also update the Total Material Stored Amount for the corresponding bill code as the total is calculated as the sum of the Previous Material Stored Amount and the Current Material Stored Amount.
If overridden, the Override column will display the character "O", indicating an override to the Total Material Stored Amount.
NOTE: If the Material Stored Amounts are overridden in any billing draw/revision, then the amounts will be displayed as overridden (Override column displays "O") in all the subsequent draws unless the overrides are manually cleared.
Any overrides on the bill codes will automatically total into the Group Summary tabs’ Current Material Stored Amount fields depending on the Job’s Mapping Code structure, which will also update the Total Material Stored Amount in the tabs as per the formula described above.
Similar to the Bill Code Detail level, the Current Material Stored Amount can also be overridden at the Draw/Revision - Summary level for the Current Draw and when overridden, the override indicator displays the character "O", indicating updates to the Total To Date Material Stored Amount.
NOTE: By default, the Current Material Stored Amount field is disabled and read-only in all the Group (1-5) Summary tabs. However, if required the user can uncheck the 'Disabled' checkbox in the Lite Editor to make the field enabled for editing at each Group Summary tab.
If overridden at the Summary level, the amount flows down into each Group Summary and Bill Code Detail level with the following calculations:
-
Group Summary level = (Budget Billing Amount of the Group Code ÷ Total Budget Billing Amount across all Group Codes) × Material Stored Amount of the Current Draw in Summary
-
Bill Code Detail level = (Budget Billing Amount of the Bill Code ÷ Total Budget Billing Amount across all Bill Codes) × Material Stored Amount of the Current Draw in Summary
The overrides can be cleared by clicking on the [Clear Material Stored Overrides] which clears any overridden amounts in the current draw and reverses the overridden amounts in the prior posted draws.
NOTE: Clearing overridden amounts does not affect any amounts in already posted draws. Instead, the system calculates the negative of all the overridden amounts in prior draws and adds it to the current draw.
The state of the 'Material Stored Included in Calculated Billing Amount' checkbox in the JB Control File and defaulting to the Billing Contract determines whether the Material Stored Amount will be included as a surcharge to the Completed and Stored Amount in the billing draw. If the box is checked, then the Material Stored Amount will not be added as a Surcharge to the Completed and Stored Amount. As a result, any changes/overrides to the Current Material Stored Amount won’t also update the Completed and Stored Amount. For more information, see Job Billing - Contract Entry - Defaults - Tab.
NOTE: In this scenario, the Billing Amount and the Completed and Stored Amount will always be equal.
If the box is unchecked, which is the default state, then the Material Stored Amount will be added as a Surcharge to the Completed and Stored Amount. As a result, any changes/overrides to the Current Material Stored Amount will also update the Completed and Stored Amount as it is calculated as the sum of the Billing Amount and the Current Material Stored Amount.
The Current Material Stored Amount field also interacts with the Request For Payment screen. For more information, see Job Billing - Using the Current Material Stored Amount with RFP.