This step is intended to be completed by a payroll administrator.
Set Greenshades Installed Flag
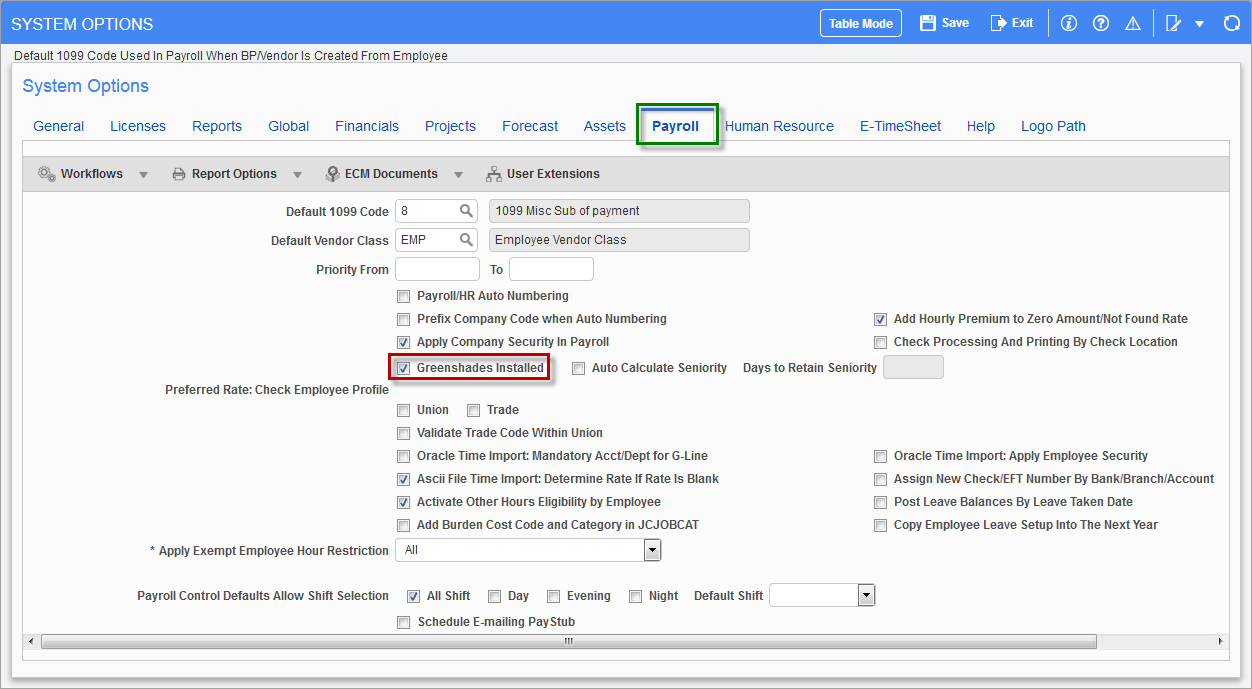
Pgm: SYSOPT – System Options; standard Treeview path: System > Setup > System Options - Payroll tab
To integrate CMiC software with Greenshades, CMiC exports year-end tax data, such as that for 1099 reporting, into an XML file for importing into Greenshades.
To enable this functionality, check the ‘Greenshades Installed’ box in System Options, as shown above.
NOTE: If the checkbox is disabled and does not allow user input, please contact CMiC for a script to enable this checkbox.
General Setup Procedures for Government Reporting (W-2, SUTA/SUI, New Hire, 401K)
Ensure State Employer Account IDs Entered for Each State
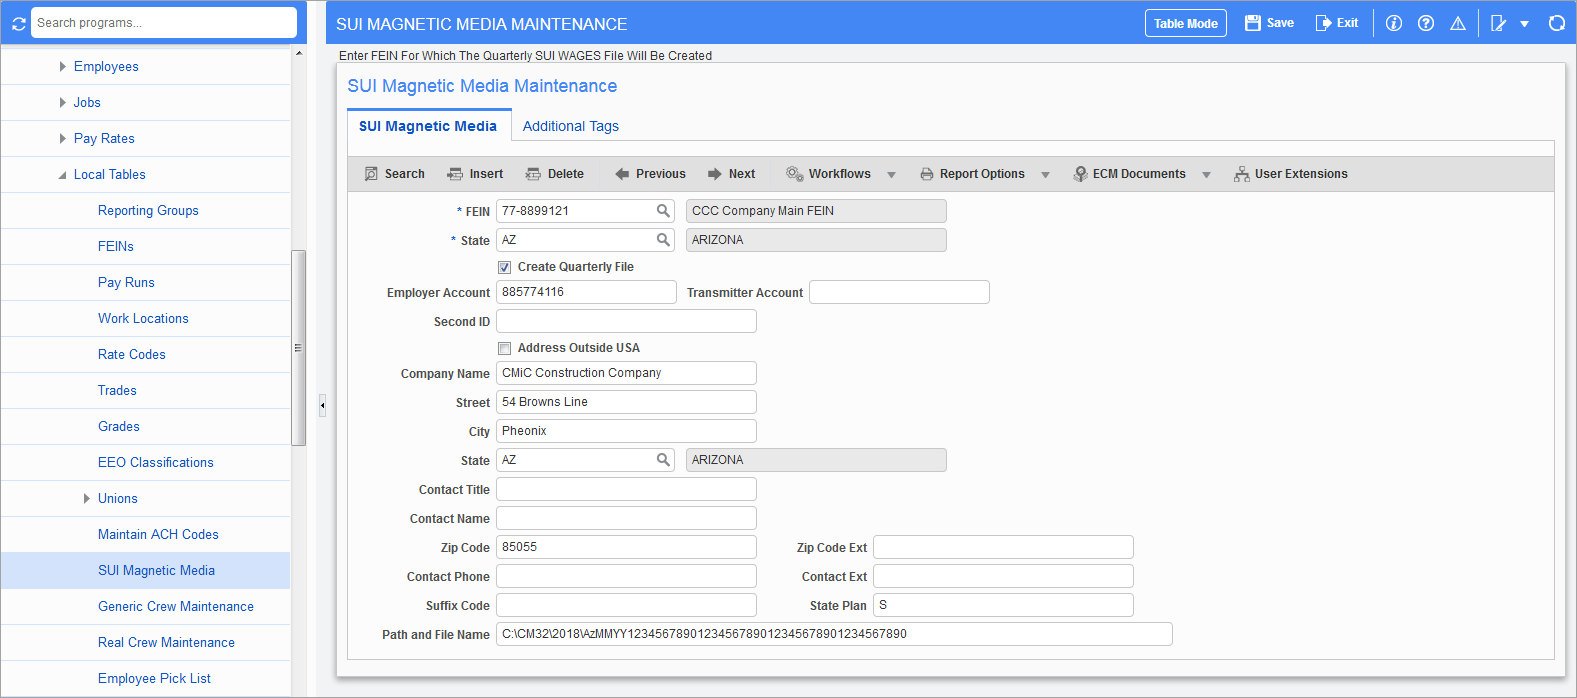
Pgm: PYMAGSUI – SUI Magnetic Media Maintenance; standard Treeview path: US Payroll > Setup > Local Tables > SUI Magnetic Media
Before creating a W-2, SUTA/SUI, New Hire, or 401K export file to be imported into Greenshades, ensure that the state-supplied Employer Account ID has been assigned to the company’s Federal Employer Identification Number (FEIN) for each state in which an employee works. This is done through the SUI Magnetic Media Maintenance screen (shown above, not to be confused with the SUI Magnetic Media Creation screen).
To generate the export file for Greenshades, the required fields on this screen are:
FEIN
Enter the company FEIN number.
State
Enter the code for the state in which the company is based.
Employer Account
Enter the company’s state-supplied employer account number.
W-2 Reporting Setup
W-2 Parameters Mapping

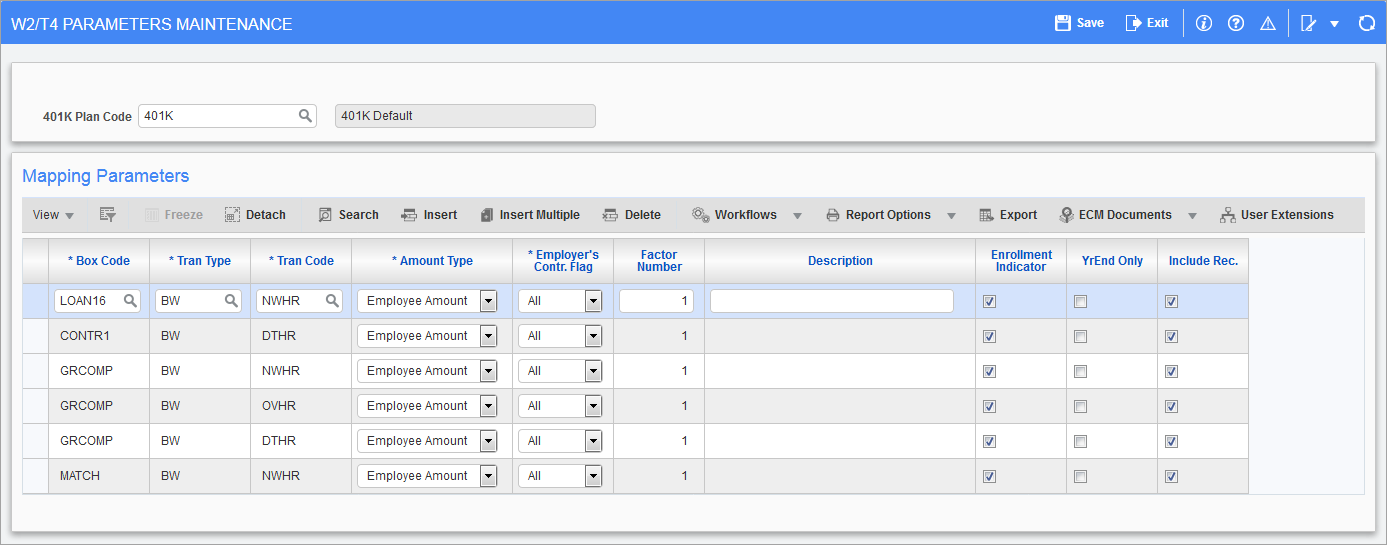
Pgm: PYW2MAP – W2/T4 Parameters Maintenance; standard Treeview path: US Payroll > Utilities > W2 Mapping Parameters
This screen is used to map fields from W-2 forms to details from CMiC’s Payroll system. It allows for the grouping of as many fields per W-2 box number as required. It is also used to select what information is printed on the W-2 forms.
[W2/ T4 Default Setup] – Button
If this form has not been set up, or the mapping setup is to be reset, click this button to recreate the mappings according to the rules defined for each of the transaction codes in the Payroll system. If the button is pressed again, the mappings are recreated based on the Payroll setup. Modifications and additions can then be made to any non-standard detail.
Mapping Parameters
Box Code
Enter the W-2 box code. The system allows for box codes 1 to 12. 13A to Z and 14 A to Z are allowed for federal returns. Each line entered against a box code, starting with 14, prints two lines on the W-2: one text line and one dollar value line.
For state returns, boxes 17, 18, 20, and 21 must be set up.
Tran Type
Select the required transaction type from the list of values, the list contains the following types: Basic Wages, Expenses, Leaves, Benefits, Deductions, Taxes, Loan Advances, Loan Interest, Workers Compensation, and Public Liability.
Tran Code
This field displays the available Transaction Codes for the Transaction Type entered in the previous field.
Amount Type
Select the required amount type from the following: Employee Amount, Calculated Amount, Gross Earnings, or Employer Amount.
NOTE: Do not select “Calculated Amount” unless advised otherwise by a CMiC Consultant.
Employer Contr. Flag
Select whether employer contributions are to be included in the amount reported.
NOTE: Set to “All” unless advised otherwise by a CMiC Consultant.
Factor Number
This field allows for the changing of a negative amount into a positive amount (where the Amount Type is “Employee Amount”) for reporting purposes. This should be used to change the sign on Employee Taxes Paid, Loan Payments, Loan Interest Payments, and Deductions.
ADP Tax Level
This field is not required for the definition of W-2 forms.
Description
This field is only used in conjunction with box 14; the description entered is printed on one line and the amount below it. If there is a need to sum amounts to create a box 14 amount, please ensure that the identical description is on each line being summed.
Include Rec. – Checkbox
If the transaction type shown is not to include the amount for this box code, uncheck this box.
Greenshades Locality Options
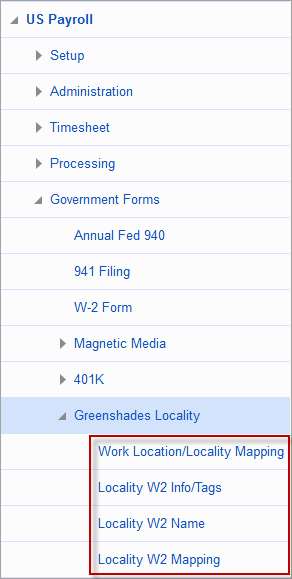
Greenshades Locality options: US Payroll > Government Forms > Greenshades Locality
The Greenshades Locality sub-menu offers four screens to customize fields on W-2 forms and establish relations and mappings between work locations, locality codes, and municipality codes already defined in the Payroll module. Framed by the above red rectangle, the four Greenshades Locality screens are:
Work Location/Locality Mapping
Local tax filing through Greenshades is set up in the Work Location to Greenshades Locality Mapping Maintenance screen, where work locations are mapped to locality codes and municipality codes already defined in Payroll.
Locality W2 Info/Tags
For a given FEIN, specify the state, locality code, municipality code, and then assign this relation a W-2 tag.
Locality W2 Name
For each state Locality Code, specify the name of its W-2 form. This overrides the default W-2 name printed on a state’s W-2 forms.
Locality W2 Mapping
For a state Locality Code, override its W-2 parameter mappings. This overrides the standard W-2 mappings for multi-localities.
Work Location/Locality Mapping

Pgm: PYGSHLOCMAP – Work Location to Greenshades Locality Mapping; standard Treeview path: US Payroll > Government Forms > Greenshades Locality >Work Location/Locality Mapping
Local tax filing through Greenshades can be set-up in the Work Location to Greenshades Locality Mapping Maintenance screen. Work locations are mapped to Locality Codes and Municipality Codes already defined in the Payroll module. Locality Codes represent the locality where the tax is reported. Localities are further broken down into segments and are represented by municipalities. Please note that not all Local Codes have associated municipalities.
W-2 Mapping Parameters should be set-up to include local taxes. When the W-2 is processed, the XML file generated will include the “Local W2” node with the State, Locality Code, and Municipality Code. The values in the Locality Name, Annual Local Wages, and Annual Local Tax Withheld fields are also printed.
Retrieve All Locations With Local Tax Defined – Checkbox
Check this box to query all locations with local tax defined, including those that do not have locality or municipality codes already defined.
Work Location
Enter/select a work location. Work locations are maintained in the Work Locations screen in the Payroll module (standard Treeview path: US Payroll > Setup > Local Tables > Work Locations).
Locality Code
Enter/select a Greenshades locality code (i.e., the locality where the tax is reported).
Tax Code
Enter/select a local tax code. These are tax codes with the tax level set to "Local" in the Payroll Taxes screen (standard Treeview path: US Payroll > Administration > Taxes > Taxes).
Municipality Code
Enter/select a Greenshades municipality code (may be null depending on the locality code).
Third Party Code
Enter an optional third-party tax code (e.g., for interfacing with another service provider like Ceridian).
Box#20 W2 Locality Name
Enter the locality name that will be mapped to Box 20 on the W-2 form (optional).
Locality W2 Info/Tags
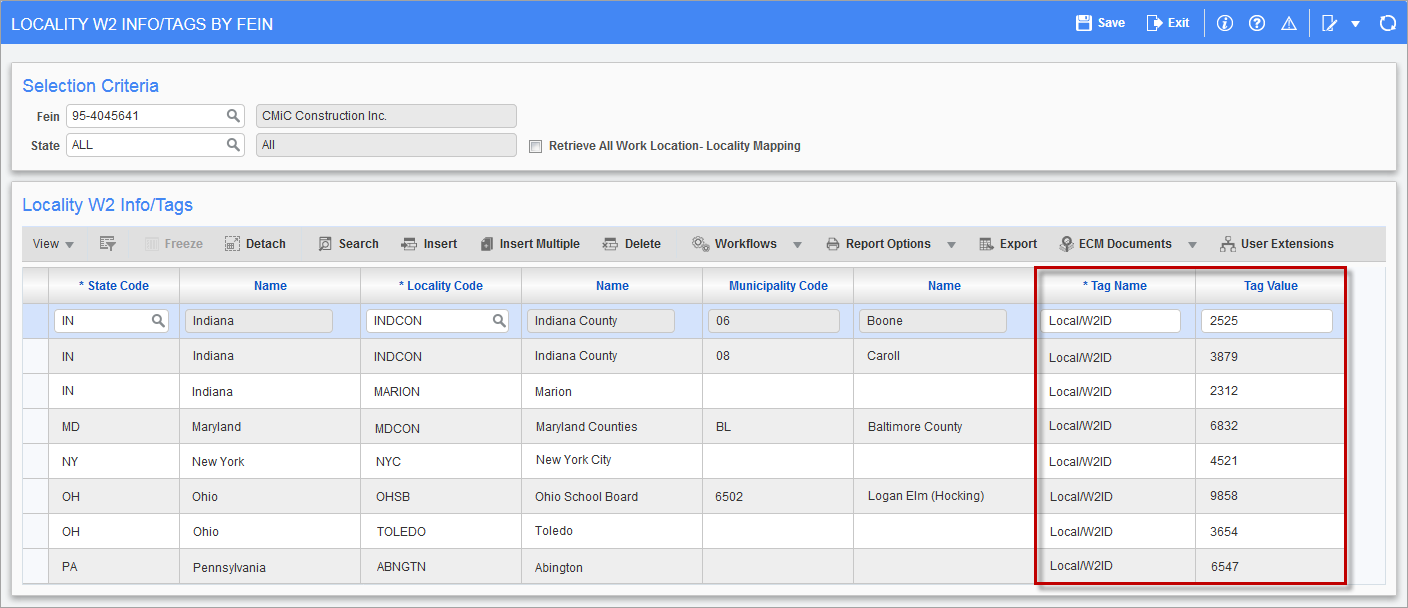
Pgm: PYGSHLOCINFO – Locality W2 Info/Tags by FEIN; standard Treeview path: US Payroll > Government Forms > Greenshades Locality > Locality W2 Info/Tags
For a specified FEIN, specify a mapping for each state and each location within the state requiring reporting on this screen. For each mapping, specify the state and its relevant Locality Code and Municipality Code, and then assign the relation to the relevant W-2 Tag, as shown in the above screenshot.
Locality W2 Name
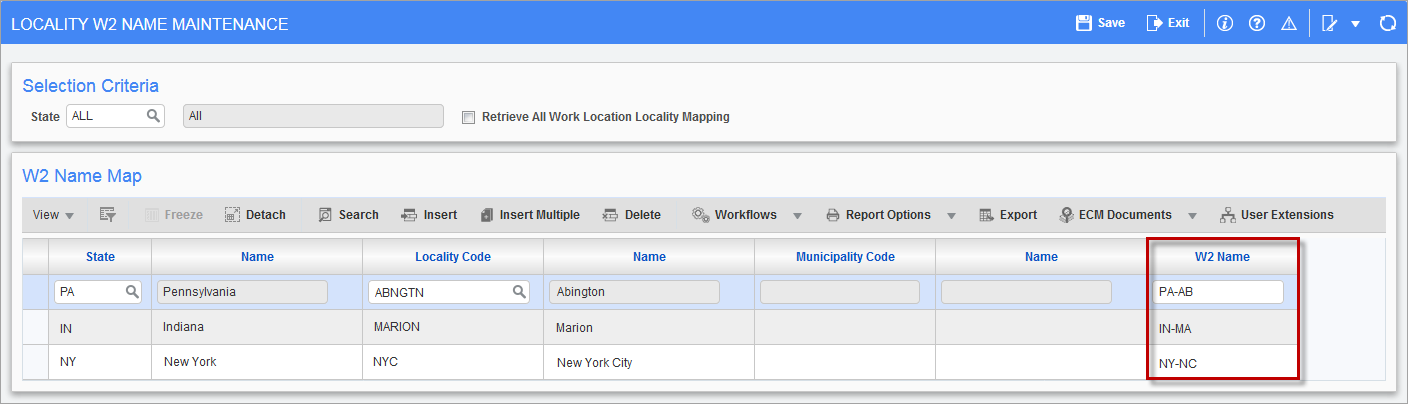
Pgm: PYGSHLOCNAME – Locality W2 Name Maintenance; standard Treeview path: US Payroll > Government Forms > Greenshades Locality > Locality W2 Name
For each state Locality Code, use this screen to specify the name of its W-2 form. This overrides the default W-2 name printed on a state’s W-2 forms.
Locality W2 Mapping

Pgm: PYGSHLOCW2MAP – Locality W2 Mapping Maintenance; standard Treeview path: US Payroll > Government Forms > Greenshades Locality > Locality W2 Mapping
For a state’s Locality Code, use this screen to override its W-2 parameters mappings. This overrides the standard W-2 mappings for multi-localities.
NOTE: A separate W-2 mapping may be required for each locality.
Create W-2 Export File for Greenshades
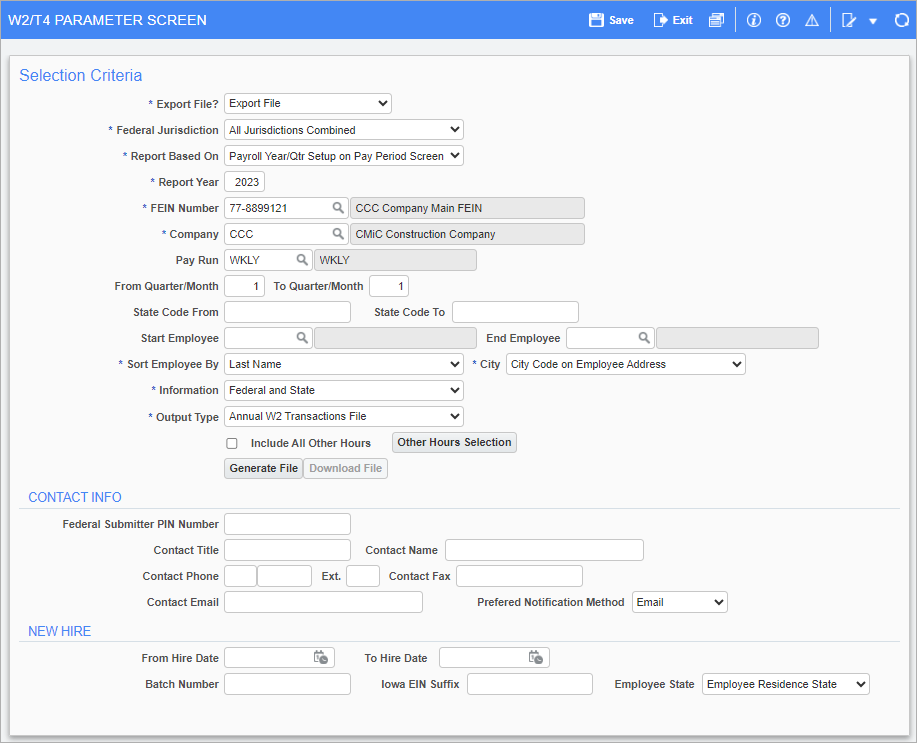
Pgm: PYW2PARM – W2/T4 Parameter Screen; standard Treeview path: US Payroll > Government Forms > W-2 Form
Export File?
Select the way the W-2 file is to be exported. There are four options available: Export File, Export File by State, State Wages Report by State, and State Wages Report by Employee.
Federal Jurisdiction
Select the federal jurisdiction in which the company is acting. The available options are: All Jurisdictions Combined, United States, Guam, and Puerto Rico.
Report Based On
Select the criteria on which the report is based. Selecting the “Calendar Year/Qtr of Check Date” option processes employee checks issued in that calendar year regardless of the payroll year. Selecting the “Payroll Year/Qtr Setup on Pay Period Screen” option processes checks issued in the payroll year specified.
Report Year
Enter the report year.
FEIN Number
Enter/select company FEIN.
Company
Enter/select the company name.
Pay Run
Enter/select the pay run.
From Quarter/Month, To Quarter/Month
Enter the range of quarters over which the report is run. If creating quarterly files for Greenshades, select only one quarter at a time.
State Code From, State Code To
Enter the range of states over which the report is run.
Start Employee, End Employee
Enter/select the range of employees over which the report is run.
Sort Employee By
Select the method for sorting employees when generating the output file.
City
Select from where to pull the city code from the W-2 forms.
Information
Select the information to be printed on the W-2 forms.
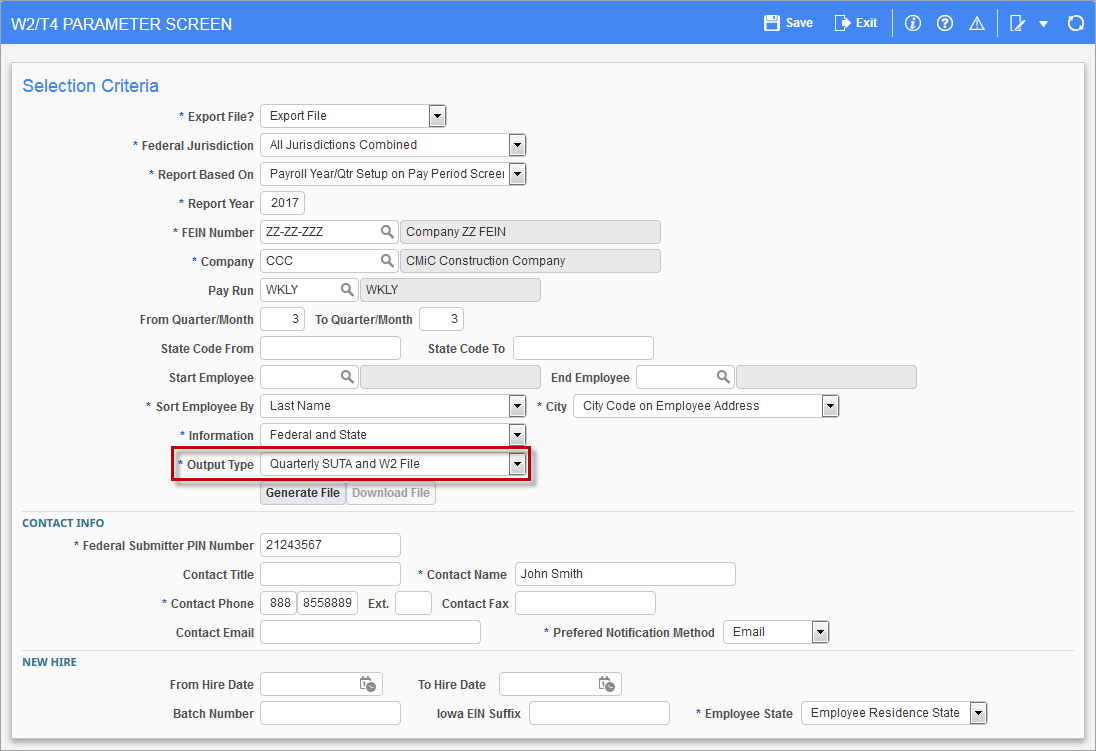
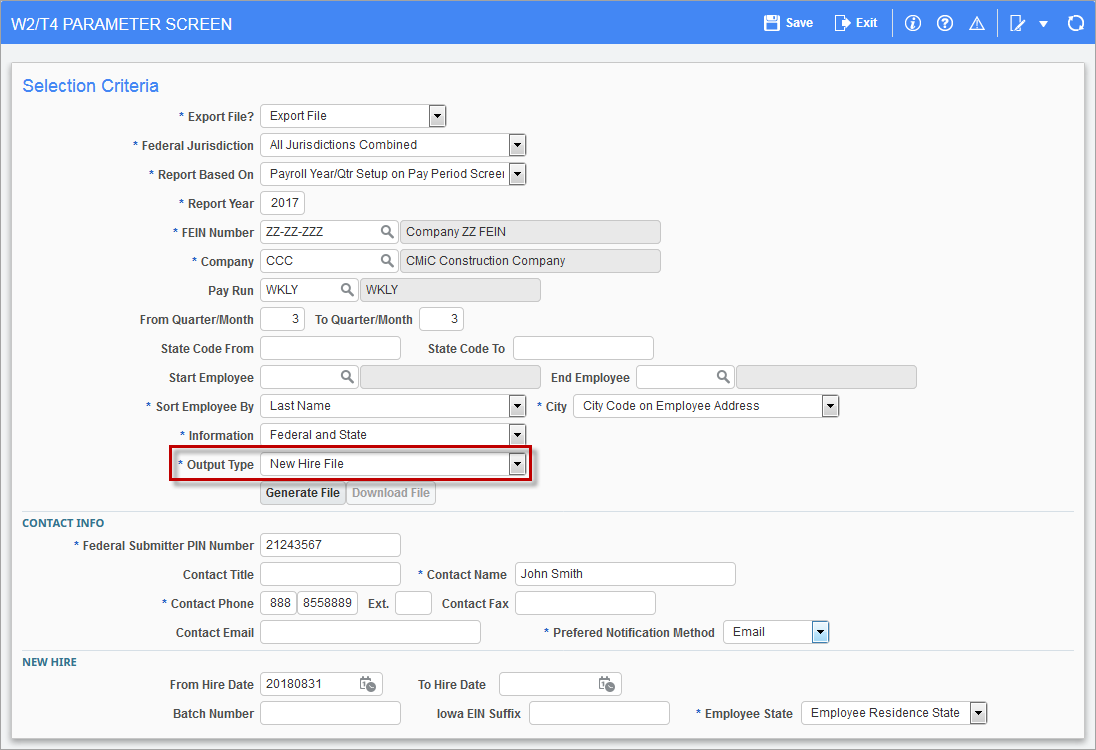
Output Type
Select the file output type. If using Greenshades, the user can generate an Annual W-2 Transactions file, Quarterly SUTA and W2 file, or New Hire file. If generating a New Hire file, the From Hire Date and To Hire Date fields are required.
When printing the New Hire File, there are three options for Employee State. The selection made determines the state in the “State Employed Value” node of the New Hire file. If the “Employee Residence State” option is selected, then the state of the mailing address on the employee profile is printed in the file. If the “Employee Work Location State” option is selected, then the state of the work location on the employee profile is printed. If the “Employee Company State” option is selected, then the state of the payroll company on the Employee Profile is printed.
Include All Other Hours– Checkbox
Check this box to include all non-standard hours types, or use the [Other Hours Selection] button to select which individual non-standard hour types to include in the W-2 export file. When this box is checked, the [Other Hours Selection] button will be disabled.
Other Hours Selection – Button
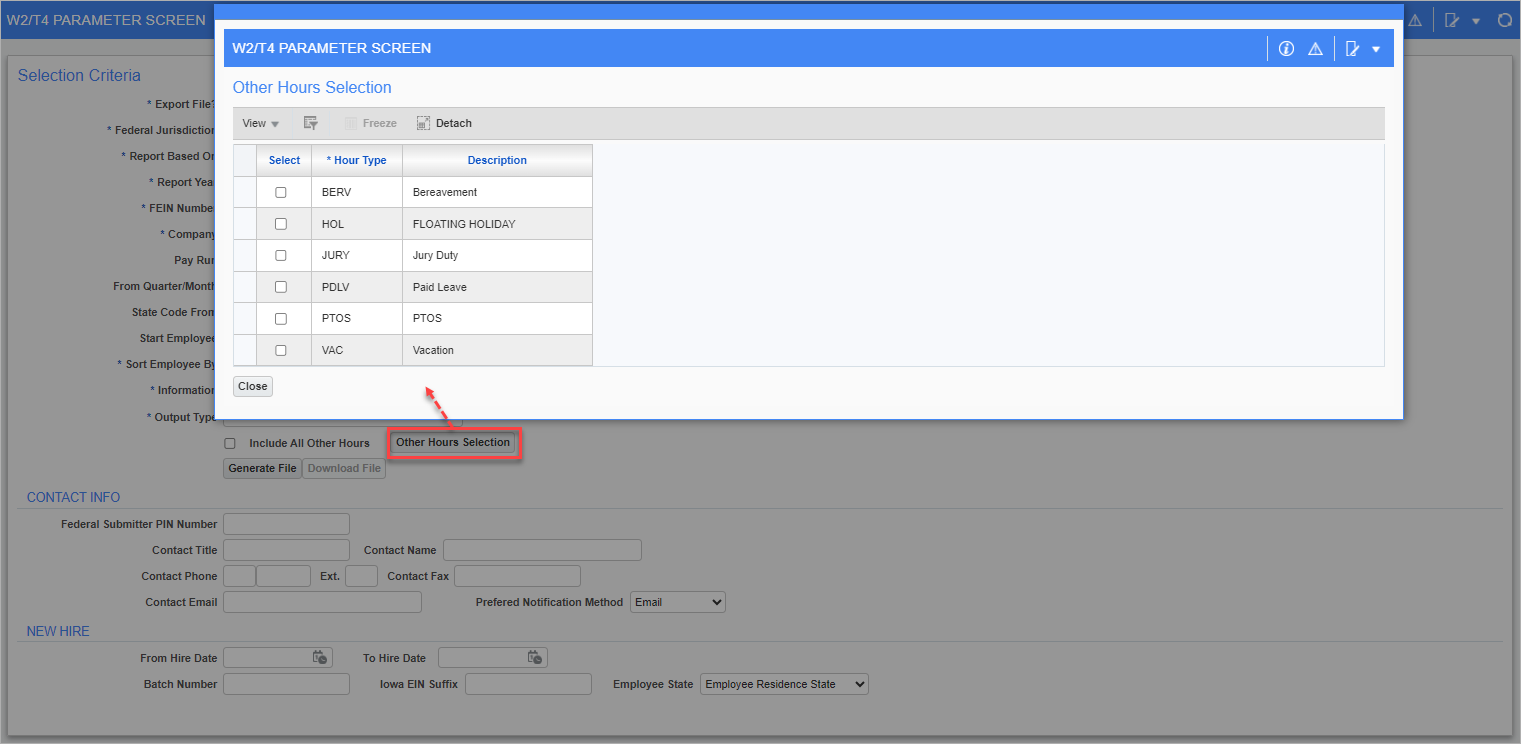
Pgm: PYW2PARM – Other Hours Selection pop-up; standard Treeview path: US Payroll > Government Forms > W-2 Form - [Other Hours Selection] button
Press this button to launch the Other Hours Selection pop-up window used to select non-standard hour types to be included in the W-2 export file. These hour types are maintained in the US Payroll - Hour Types screen in the US Payroll module.
Create W-2 Export File
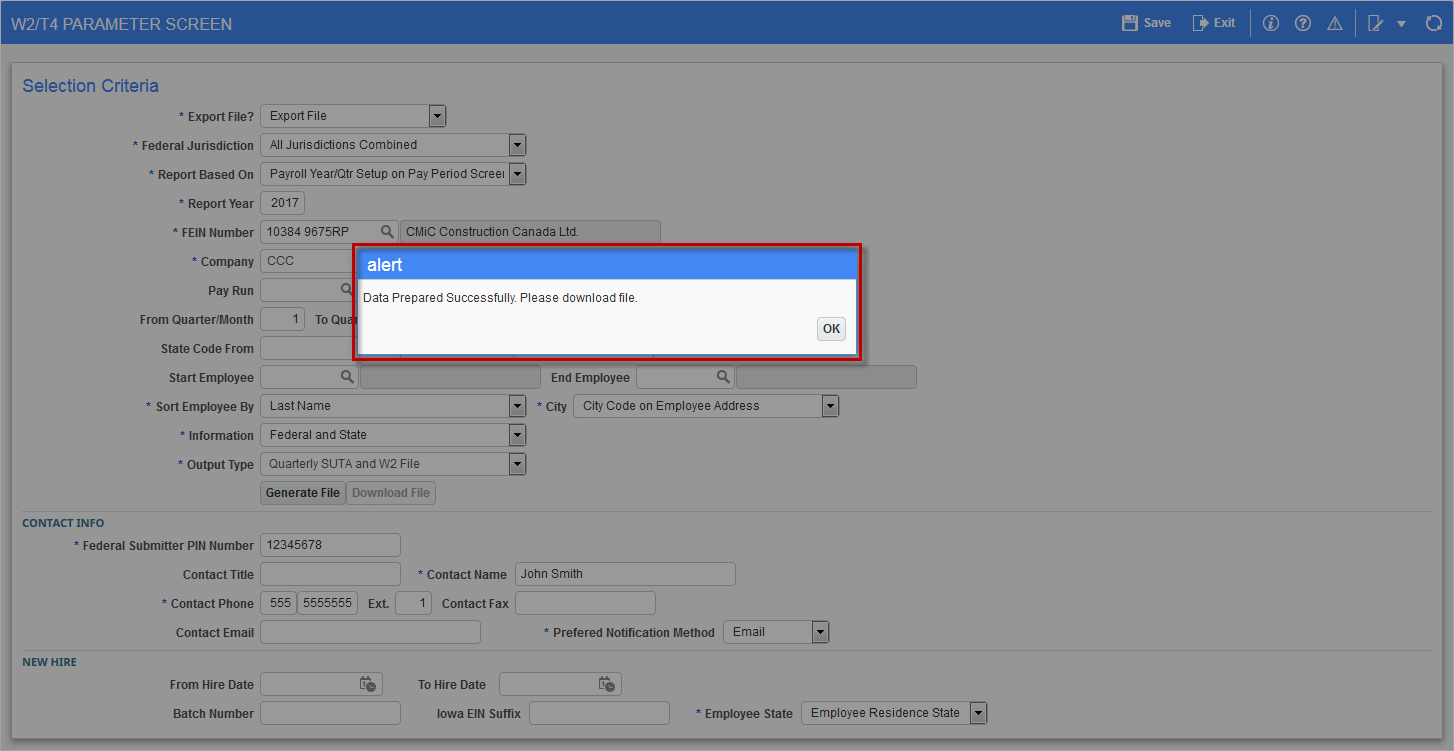
To create the W-2 export file as specified by the parameters above, click the [Generate File] button. A pop-up window appears indicating the file has been processed. To download the generated file, click the [Download File] button.
Now that the W-2 export file has been created through CMiC software, the next step is to specify the file name and location to Greenshades. This is done by passing the name and location of the exported file to Greenshades during its launch. This information is passed to Greenshades through the desktop icon used to launch Greenshades. For details, refer to Step 4: Icon Setup for Greenshades.
SUTA/SUI Reporting Setup
As with other types of reporting, before creating the SUTA/SUI export file for Greenshades, ensure that for each state in which an employee works, the state-supplied Employer Account ID (for SUI/SUTA reporting) has been assigned to the company FEIN.
Create SUTA Export File for Greenshades
Pgm: PYW2PARM – W2/T4 Parameter Screen; standard Treeview path: US Payroll > Government Forms > W-2 Form
This screen, detailed above, can also be used to create SUTA export files for Greenshades.
Export File
Of the four options available, select “Export File”.
Federal Jurisdiction
Select the “All Jurisdictions Combined” option.
Report Based On
Select the “Payroll Year/Qtr Setup on Pay Period Screen” option to process checks issued in the payroll year specified.
Report Year
Enter the report year.
FEIN Number
Enter/select the FEIN for the company.
Company
Enter/select the name of the company.
Pay Run
Enter/select the pay run.
From Quarter, To Quarter
Enter the range of quarters over which the report is run. If creating quarterly files for Greenshades, select one quarter at a time.
State Code From, State Code To
Enter the range of states over which the report is run.
Start Employee, End Employee
Enter/select the range of employees over which the report is run.
Sort Employees By
Select the method of sorting employees when generating the export file.
City
Select where to pull the text from that identifies the city on the forms.
Information
Select the information to be printed on forms.
Output Type
Select the “Quarterly SUTA and W2 File” option.
Create SUTA Export File
Pgm: PYW2PARM – W2/T4 Parameter Screen; standard Treeview path: US Payroll > Government Forms > W-2 Form – [Generate File] button
To create the SUTA export file, as specified by the parameters above, click the [Generate File] button. A pop-up window then appears indicating the file has been processed. To download the file, click the [Download File] button.
Now that the SUTA export file has been created, specify this file name and location to Greenshades. This is done by passing the name and location of the exported file to Greenshades during its launch. This information is passed to Greenshades through the desktop icon used to launch Greenshades. For details, refer to Step 4: Icon Setup for Greenshades.
New Hire Reporting Setup
New Hire Reporting uses the same screen used to create the export files for W-2 and SUTA/SUI data.
As with other types of reporting, before creating the New Hire export file for Greenshades, ensure that for each state in which an employee works, the state-supplied Employer Account ID (for SUI/SUTA reporting) has been assigned to the company FEIN. For details, refer to the Ensure State Employer Account IDs Entered for Each State subsection.
Create New Hire Export File for Greenshades
Pgm: PYW2PARM – W2/T4 Parameter Screen; standard Treeview path: US Payroll > Government Forms > W-2 Form
Export File
Of the four options available, select “Export File”.
Federal Jurisdiction
Select the “All Jurisdictions Combined” option.
Report Based On
Select the “Payroll Year/Qtr Setup on Pay Period Screen” option to process data in the payroll year specified.
Report Year
Enter the report year.
FEIN Number
Enter/select the company FEIN.
Company
Enter/select the full name of the company.
Pay Run
Enter/select the pay run.
From Quarter, To Quarter
Enter the range of quarters over which the report is run. If creating quarterly files for Greenshades, select one quarter at a time.
State Code From, State Code To
Enter the range of states over which the report is run.
Start Employee, End Employee
Enter/select the range of employees over which the report is run.
Sort Employees By
Select the method of sorting employees when generating the export file.
City
Select from where to pull the text that identifies the city on the forms.
Information
Select the information to be printed on forms.
Output Type
Select the “New Hire File” option.
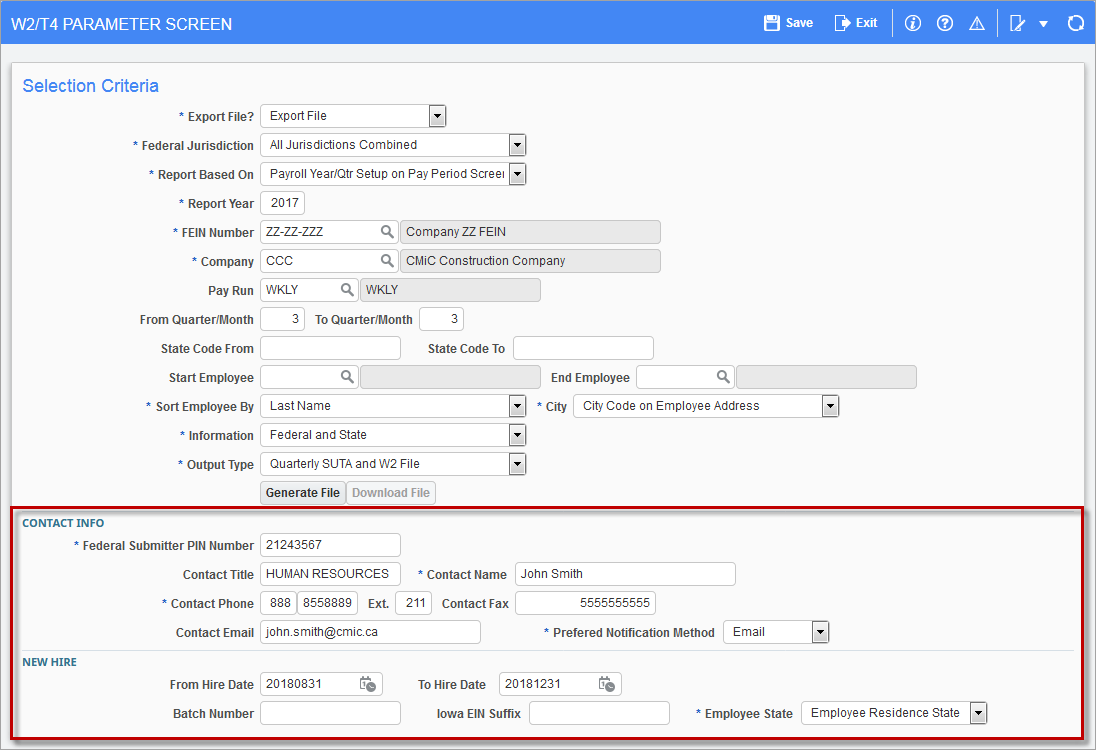
Contact Info, New Hire – Sections
Pgm: PYW2PARM – W2/T4 Parameter Screen; standard Treeview path: US Payroll > Government Forms > W-2 Form
Federal Submitter PIN Number
Enter the PIN number obtained from SSA for electronic filling.
Batch Number
Enter a sequential number to identify the file. This number can’t be reused and is required by some states.
Iowa EIN Suffix
If the hire is being made in the state of Iowa, enter the three-digit EIN suffix.
Employee State
Select which employee-location relation to report. The available options are: Employee Residence State, Employee Work Location State, and Employee Company State.
Click the [Generate File] button to create the XML export file. After the New Hire export file has been created, specify the file name and location to Greenshades. This is done by passing the name and location of the exported file to Greenshades during its launching. This information is passed to Greenshades through the desktop icon used to launch Greenshades. For details, refer to Step 4: Icon Setup for Greenshades.
401K Reporting Setup
There is the option to use Greenshades to upload a file to a 401k provider, along with the data from CMiC’s system. To use this function, please notify CMiC as it is required that a questionnaire about that 401k provider be filled out. CMIC will give that information to Greenshades so that they may build the proper format for your 401k provider.
As with other types of reporting, before creating the 401K export file for Greenshades, ensure that for each state in which an employee works, the state-supplied Employer Account has been assigned to the company FEIN. For details, refer to the Ensure State Employer Account IDs Entered for Each State subsection.
Ensure 401K Plans Details Entered for Each 401K Plan
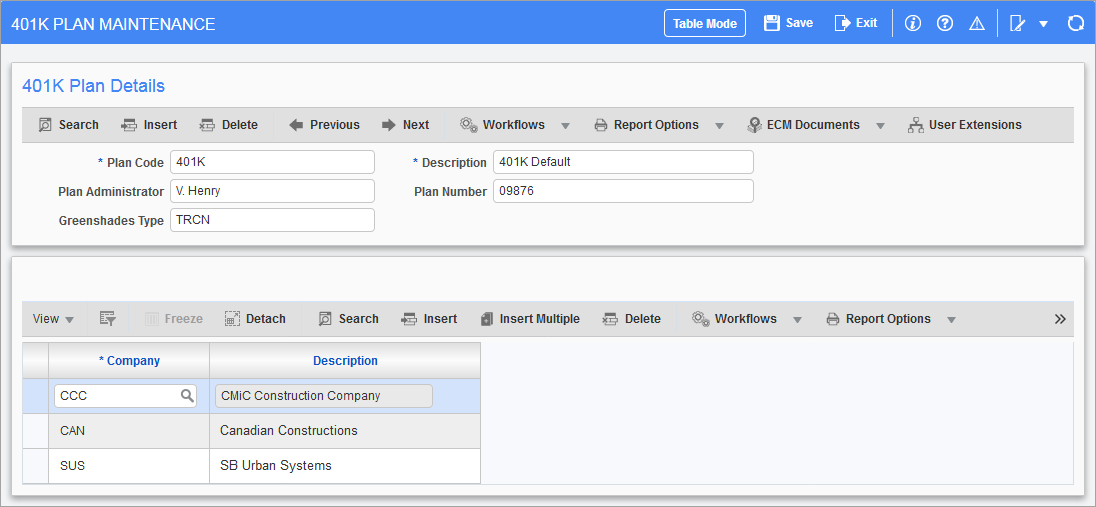
Pgm: PY401KPLAN – 401K Plan Maintenance; standard Treeview plan: US Payroll > Government Forms > 401K > 401K Plans
This screen can be used to set-up 401K plan codes. The code for the Greenshades Type field determines the layout of the 401K Plan file and is provided by Greenshades to the customer.
Ensure 401K Mapping
Pgm: PY401KMAP – W2/T4 Parameters Maintenance; standard Treeview path: US Payroll > Government Forms > 401K > 401K Mapping
The 401K Mapping Maintenance screen can be used to map a form’s Box Codes to CMiC’s Transaction Codes.
Enrollment Indicator – Checkbox
If checked, employees are included in the export file if there is a non-zero value in that category.
YrEnd Only – Checkbox
If checked, this category includes year-end results for the transaction if the ‘Year End Run’ box is checked in the 401K Filing screen.
Include Rec. – Checkbox
If checked, the row’s data is included in the 401K export file.
Create 401K Export File for Greenshades
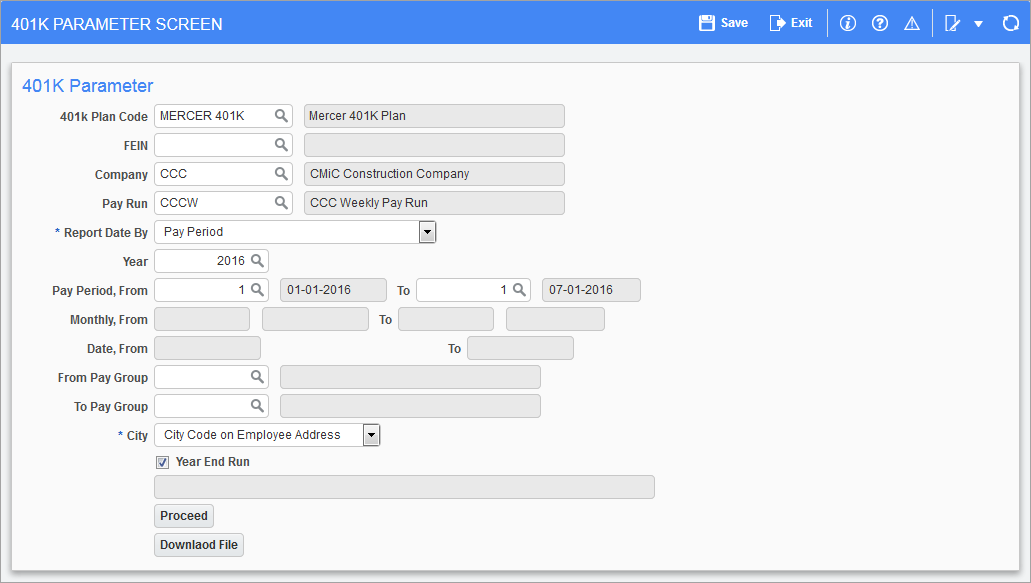
Pgm: PY401KPARM – 401K Parameter Screen; standard Treeview path: US Payroll > Government Forms > 401K > 401K Filing
The 401K Parameter screen can be used to create 401K files based on the pay run, year, period range, plan code, and pay group entered. To use this screen, Greenshades must be installed and the ‘Greenshades Installed’ flag must be checked in System Options (standard Treeview path: System > Setup > System Options).
FEIN
Enter/select the company FEIN.
Company
Enter/select the company code.
Report Date By
Select whether to sort the report by pay period or month.
Pay Run
Select the pay run to be used when generating the 401K file.
Year, From Pay Period, To Pay Period
Select the year and pay period range to be used when generating the 401K file.
From Month, To Month
If the Report Date By field is set to Monthly, then the fields these fields are made available to enter the range of months.
401K Plan Code
Select the 401K plan code for generating the 401K file.
From Pay Group, To Pay Group
Select the pay group range.
City
Select from where to pull the text that identifies the city on the forms.
Year End Run
Check this box if the file is being generated at year’s end.
To create the 401K export file, as specified by the parameters above, click the [Proceed] button. To download the file, click the [Download File] button.
After the 401K export file has been created, specify the file name and location to Greenshades. This is done by passing the name and location of the exported file to Greenshades during its launching. This information is passed to Greenshades through the desktop icon used to launch Greenshades. For details, refer to Step 4: Icon Setup for Greenshades.
1099 Reporting Setup
The 1099 Reporting system supports the creation of multiple different types of 1099 forms, but it only supports the printing of and media creation for Miscellaneous 1099s. This module is fully integrated with the Accounts Payable system and accumulates data each time a vendor payment is received.
For further information about setting up CMiC’s system for 1099 reporting, please refer to the 1099 Reporting guide or contact CMiC.
Create 1099 Export File
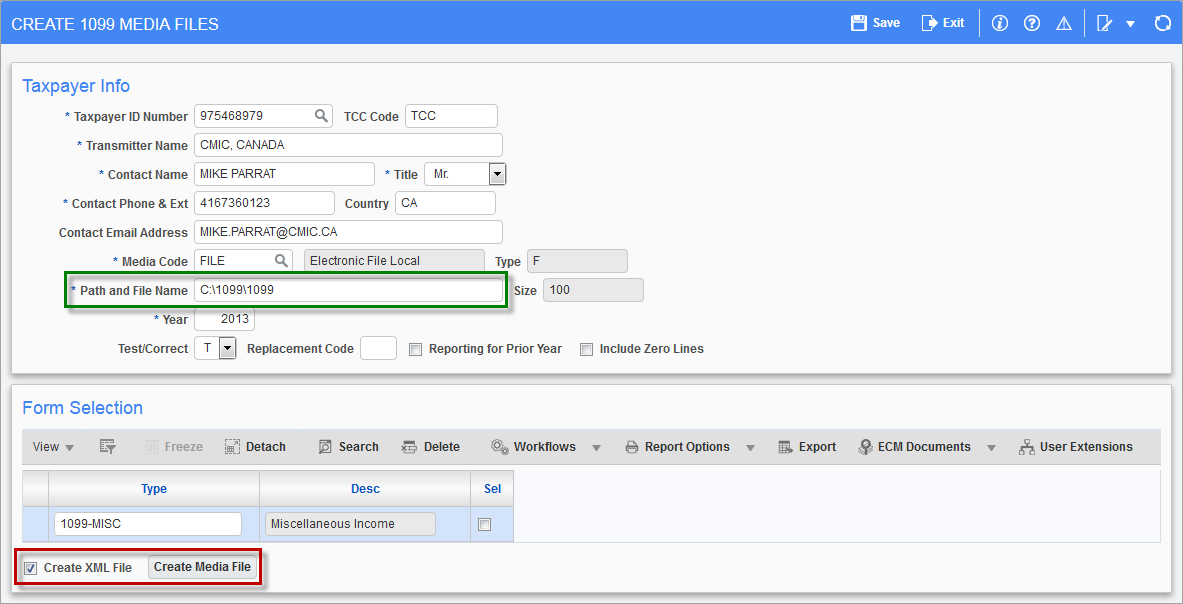
Pgm: N1099FIL – Create 1099 Media Files; standard Treeview path: 1099 > Create 1099 > Create 1099 Media Files
This screen is used to export 1099 data from CMiC’s system into an XML file for importing into Greenshades for further processing, formatting, printing, and governmental reporting. By default, the Create XML file box is un-checked. This box should be checked as Greenshades requires the 1099 data to be in an XML format.
After entering the required information, specify the 1099 export file’s name and path in the Path and File Name field (highlighted in green above). To create the export file, click the [Create Media File] button.
After the 1099 export file has been created, specify this file name and location to Greenshades. This is done by passing the name and location of the exported file to Greenshades during launch. This information is passed to Greenshades through the desktop icon used to launch Greenshades. For details, refer to Step 4: Icon Setup for Greenshades.
941 Reporting Setup
CMiC software does not print 941 forms; however, it can create an XML files for importing data into a third-party program such as Greenshades.
NOTE: Ensure proper W-2 mappings before creating the 941 XML export file, as the mappings are relevant to processing 941 data.
Create 941 Export File
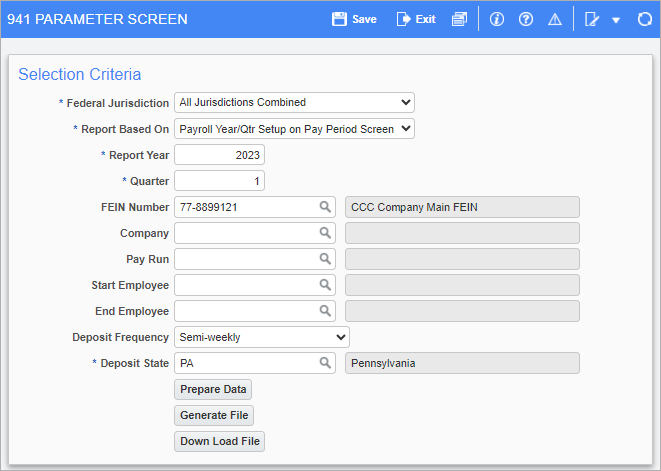
Pgm: PY941 – 941 Parameter Screen; standard Treeview path: US Payroll > Government Forms > 941 Filing
This screen allows the user to create 941 export files based on the parameters entered.
Federal Jurisdiction
Select Federal Jurisdiction from pull down list. The options are All Jurisdictions Combined, United States, Guam, and Puerto Rico.
Report Based On
Select the option by which the report is created. Choosing the “Calendar Year/Qtr of Check Date” option processes employees checks issued in that calendar year regardless of the payroll year. Selecting the “Payroll Year/Qtr Setup on Pay Period Screen” processes checks issued in the payroll year specified.
Report Year, Quarter
Enter the report year and quarter.
FEIN Number
Enter/select the company FEIN.
Company
Enter/select the company code.
Pay Run
Enter/select the pay run.
Start Employee, End Employee
Enter/select the employee range included in the report.
Deposit Frequency
Select how often deposits are made. Choose “Semi-weekly” for semi-weekly scheduled deposits or “Monthly” for monthly scheduled deposits.
Deposit State
Enter/select the state where the deposits were made or enter “MU” if the deposits were made in multiple states.
To create a 941 export file, as specified by the parameters, click the [Prepare Data] button to extract the data and then on the [Generate File] button to create the XML file. Once the file has successfully processed, click the [Down Load File] button to download the file.
After the 941 export file has been created, specify this file name and location to Greenshades. This is done by passing the name and location of the exported file to Greenshades during launch. This information is passed to Greenshades through the desktop icon used to launch Greenshades. For details, refer to Step 4: Icon Setup for Greenshades.
940 Reporting
The 940 Reporting screen is used to compile and export data for Federal Form 940 reporting. The raw exported data, in XML format, can then be uploaded to Greenshades for proper formatting and e-filing.
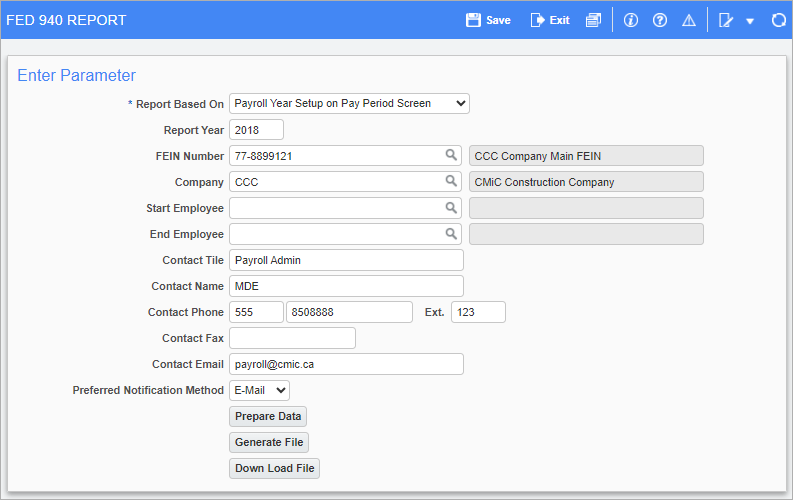
Pgm: PY940 – Fed 940 Report; standard Treeview path: US Payroll > Government Forms > Annual Fed 940
Enter the relevant parameters and provide a contact email and select a preferred notification method.
To create a 940 export file, as specified by the parameters, click the [Prepare Data] button to extract the data and then on the [Generate File] button to create the XML file. Once the file has successfully processed, click the [Down Load File] button to download the file.
After the 940 export file has been created, specify this file name and location to Greenshades. This is done by passing the name and location of the exported file to Greenshades during launch. This information is passed to Greenshades through the desktop icon used to launch Greenshades. For details, refer to Step 4: Icon Setup for Greenshades.
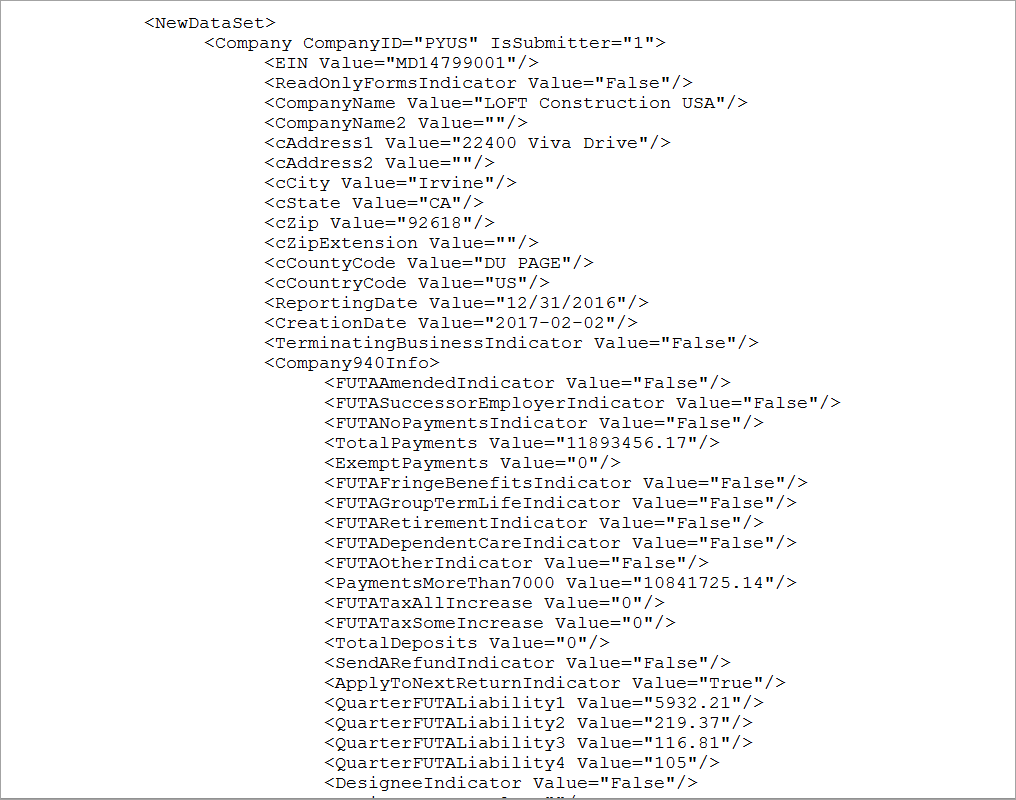
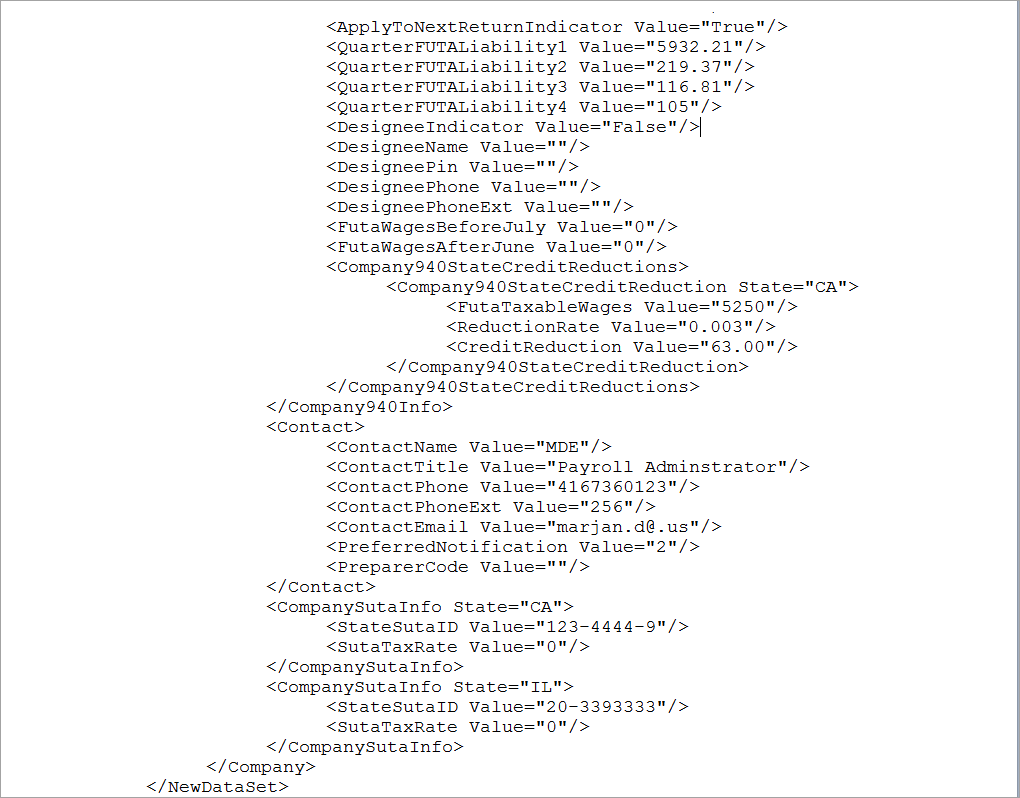
Sample XML File
NOTE: Tags with values are mapped to specific transactions in CMiC.
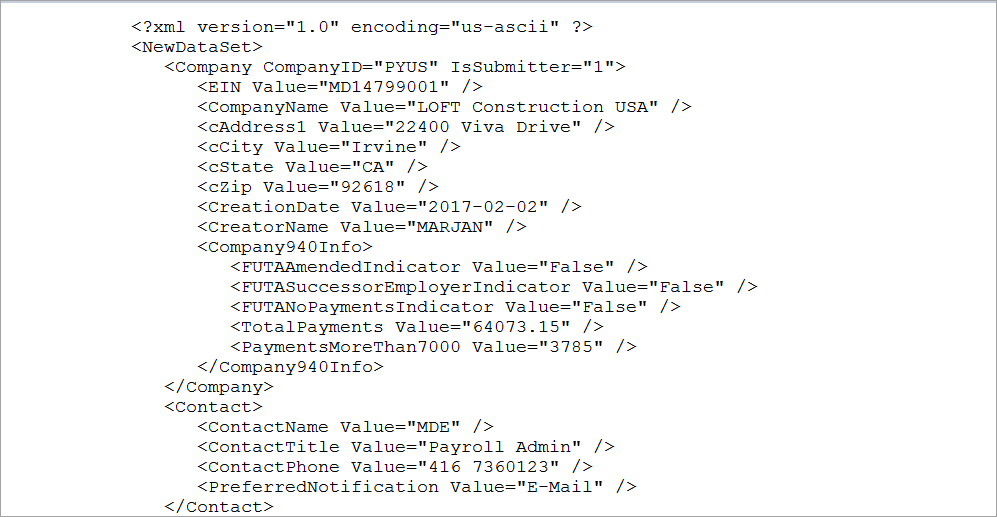
Sample of Fed 940 Report XML File with Complete Tags and Nodes:
ACA Compliance (1095-C, 1094-C) Reporting Setup
Overview – ACA Compliance Reporting
Form 1095-C is how employers should report employee-eligible benefits for the calendar year to the IRS. By January 31 of each year, employers must provide a Form 1095-C to each of their full-time employees. A full-time employee is defined by the IRS as:
Full-time employee: A full-time employee is an employee who, for a calendar month, is employed an average of at least 30 hours of service per week with the employer. For this purpose, 130 service hours in a calendar month is treated as the monthly equivalent of at least 30 hours per week. An employer must complete information for all twelve months of the calendar year for any of its employees who were full-time employees for one or more months of the calendar year. (www.irs.gov/instructions/i109495c/ar01.html):
A single Form 1094-C should also be filed, providing company totals to the IRS.
Security Setup
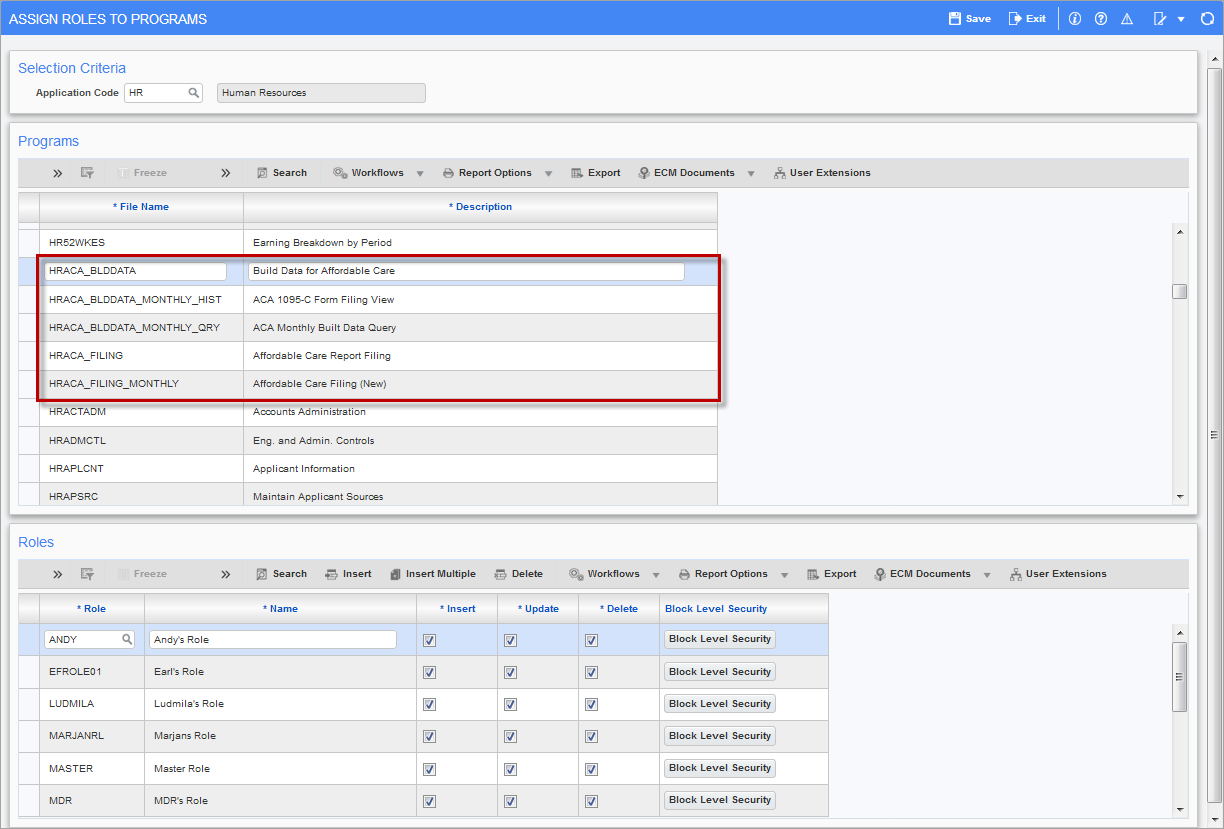
Pgm: FORMROLE – Assign Role to Programs; standard Treeview path: System > Security > Roles > Assign Roles to Programs
To set up user security rights for ACA related programs, use the Assign Role to Programs screen.
In the Application field, select “HR”. Then, in the Programs section, scroll down to the ACA related programs, framed in red in the above screenshot, and select a program. The Roles assigned to the program are listed under the Roles section. Next, navigate to the Roles section and click the [Insert] button in the menu bar. In the Role field of the new row, press the F9 keyboard key and select the user’s role via the pop-up window. Then, use the ‘Insert’, ‘Update’, and ‘Delete’ checkboxes to set the relevant user-privileges.
Required Employee Information for Lines 14, 15, and 16 of Form 1095-C
For the system to correctly produce ACA compliance data for lines 14 to 16, administrators should maintain the following information:
-
Health plan start and end dates each year.
-
Employee start and end dates within each year.
-
Employee hire, termination, and other dates relevant to ACA compliance, such as those related to spouses and dependents.
-
Union status and union status change dates.
-
Eligibility rules for benefits available in the HR module so the system can correctly generate monthly ACA compliance data for employees.
The system uses the above employee information to automatically generate monthly ACA compliance data for employees. For more detail, please refer to the Monthly Builds of ACA Compliance Data & Screens to View/Edit Data .
NOTE: Administrators should not change for plan rates without ending and re-starting the benefits.
Part 1 of Form 1095-C (Lines 1-13)

The first part of Form 1095-C concerns basic information about the employee and their employer. This information is already in the Enterprise system, so no modifications or additional data entry is required for these fields.
Part 2 of Form 1095-C (Lines 14-16)

The second part of the form requires companies to report information for every full-time employee, for each of the following lines:
Line 14 – Offer of Coverage
For each full-time employee, employers must designate, by month, whether coverage was offered. Please note that what is asked is not whether it was elected, but simply if the employee was eligible.
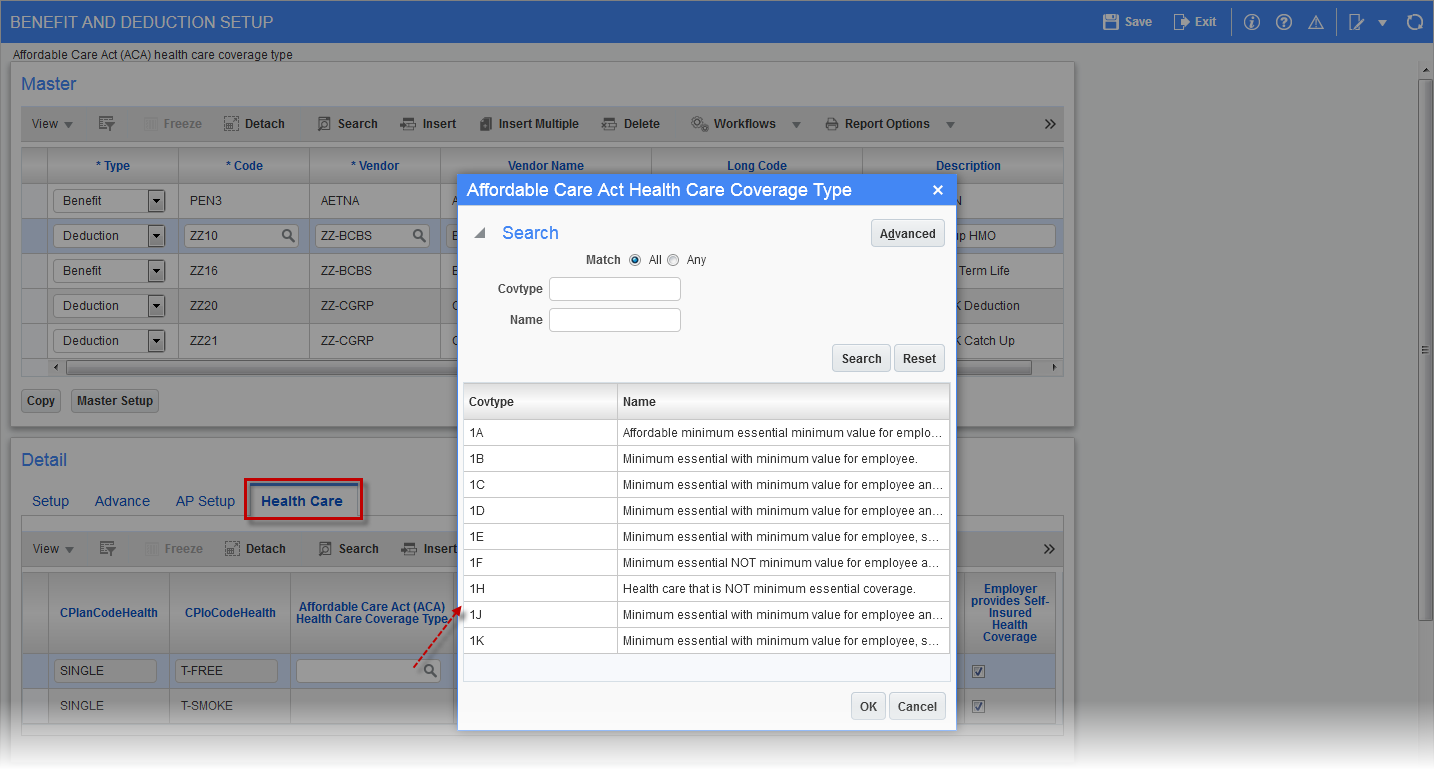
To report the offer of coverage for each month, the IRS provides a set of nine possible codes referred to as Code Series 1. These codes tell the IRS not only whether coverage was offered, but also if dependents were eligible, whether it met minimum coverage requirements, etc.
Code Series 1: Offer of Coverage
The Code Series 1 indicator codes specify the type of coverage, if any, offered to an employee, the employee’s spouse, and the employee’s dependents. In regards to an employee’s dependents, an offer of coverage is treated as having been made only if the offer of coverage is made to an unlimited number of dependents regardless of the actual number of dependents, if any, that an employee has during any particular calendar month.
The following URL lists the Code Series 1 indicator codes and their descriptions, as of 2018: www.irs.gov/instructions/i109495c/ar01.html#d0e365.
CMiC Modification for Affordable Care Act Reporting
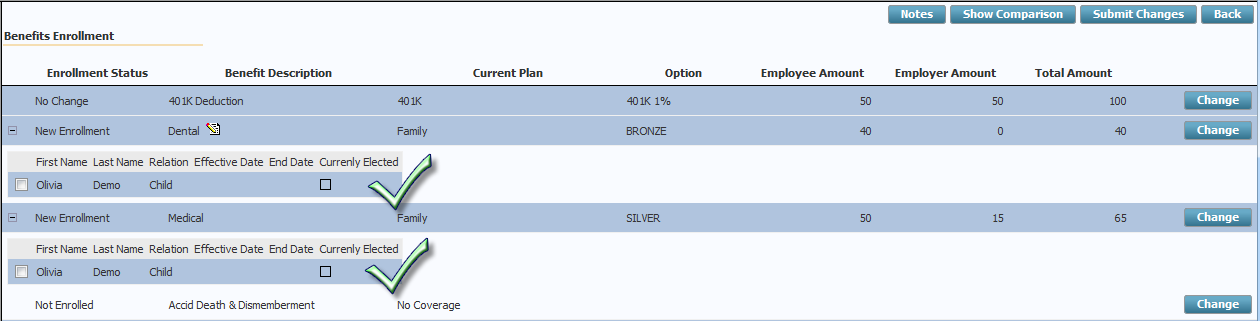
The Benefit And Deduction Setup screen has been modified to allow assigning of Code Series 1 codes to each plan option offered for health-care benefits.
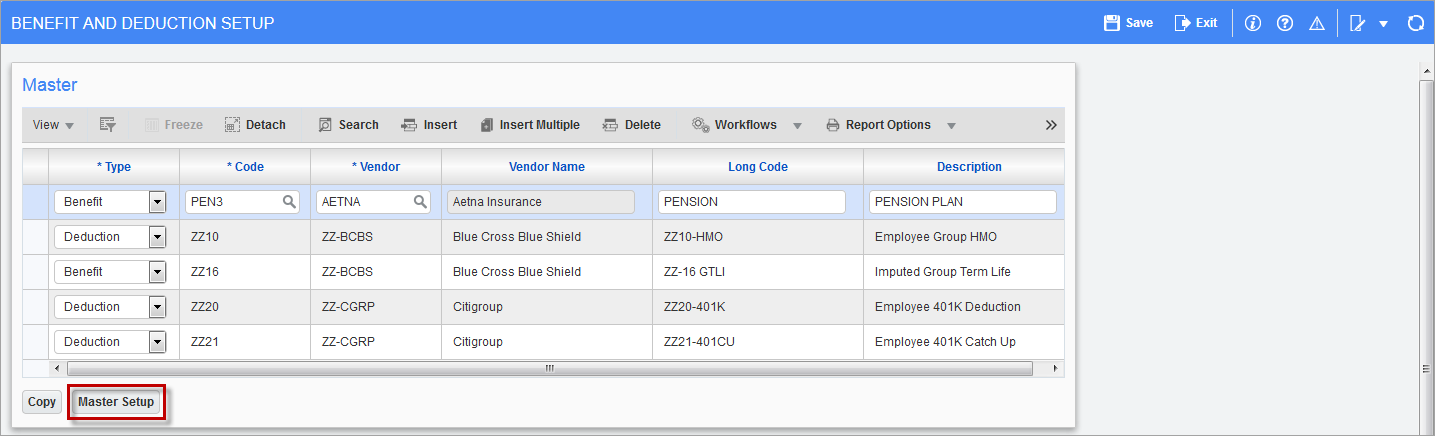
Pgm: HRBDADM – Benefit And Deduction Setup; standard Treeview path: Human Resourcs > Benefit Administration > Benefit/Deduction Administration > Benefit/Deduction
Pressing the [Master Setup] button, highlighted in red above, to launch the following screen:
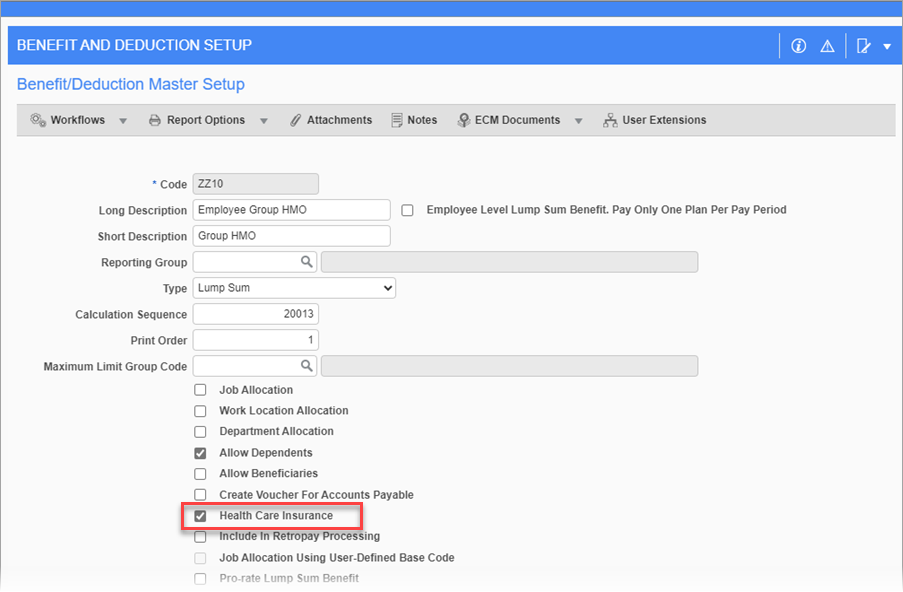
Pgm: HRBDADM – Benefit And Deduction Setup; standard Treeview path: Human Resourcs > Benefit Administration > Benefit/Deduction Administration > Benefit/Deduction – [Master Setup] button
Check the ‘Health Care Insurance’ checkbox, highlighted above. This causes the Health Care tab to appear in the Detail section of the Benefit And Deduction Setup screen. It is in this section that Code Series 1 codes can be assigned to the plan of a health-care benefit (as shown in the screenshot below). If the employer provides self-insured health coverage for a plan, then the ‘Employer Provides Self-Insured Health Coverage’ checkbox should be checked.
Pgm: HRBDADM – Benefit And Deduction Setup; standard Treeview path: Human Resourcs > Benefit Administration > Benefit/Deduction Administration > Benefit/Deduction
Line 15 – Employee Share of Lowest Cost Monthly Premium, for Self-Only Minimum Value Coverage
Line 15 should only be completed if any of the codes 1B, 1C, 1D, or 1E appear on line 14, either in the “All 12 Months” box or in any of the monthly boxes. This line is used to enter the amount of the employee share of the lowest-cost monthly premium for self-only minimum essential coverage providing minimum value that is offered to the employee. If the employee is offered coverage but is not required to contribute any amount towards the premium, “0.00” should be entered and the line should not be left blank.
Enterprise records an employee’s current and past eligibility for all benefits and produces data for Line 15 based on the employee’s eligibility for the entire year. No setup is required for Line 15, as the Enterprise system automatically defaults the dollar value based on CRA descriptions and information found in employee records.
For the system to correctly produced data for Line 15, administrators must maintain the correct start and end dates for an employee’s eligibility record, along with the other dates and information, as outlined in the previous section, Required Employee Information for Lines 14, 15, & 16 of Form 1095-C.
Line 16 – Applicable Section 4980H Safe Harbor
Line 16 is used to enter Code Series 2 indicator codes to report for one or more months of the calendar year for which one or more of the following situations applied to the employee:
-
The employee was not employed or in full-time employment.
-
The employee enrolled in the minimum essential coverage offered.
-
The employee was in a Limited Non-Assessment Period with respect to section 4980H(b).
-
Non-calendar year transition relief applied to the employee.
-
The employer met one of the section 4980H affordability safe harbors with respect to this employee, or the employer was eligible for multi-employer interim rule relief for this employee.
Be advised that more than one situation can apply to the same employee in the same month. For example, an employee could have been enrolled in health coverage for one month, during which they were not a full-time employee. However, only one code may be used in this line for each calendar month. For any month in which an employee enrolled in minimum essential coverage, indicator code 2C should be used. For an employee who did not enroll in health coverage, there are some specific ordering considerations. For details, consult the descriptions of the Code Series 2 indicator codes as given by the instructions from the IRS: www.irs.gov/instructions/i109495c/ar01.html#d0e365:
Line 16 also does not require a special setup, as the Enterprise system automatically determines the Code Series 2 code for each month, for each employee, based on each employee’s start and end dates of employment, number of hours worked per month, and health coverage information.
Part 3 of Form 1095-C (Lines 17-34)

The last section of ACA reporting is required for companies that are self-insured. Such companies should report information about their employees’ dependents that were covered by the plan.
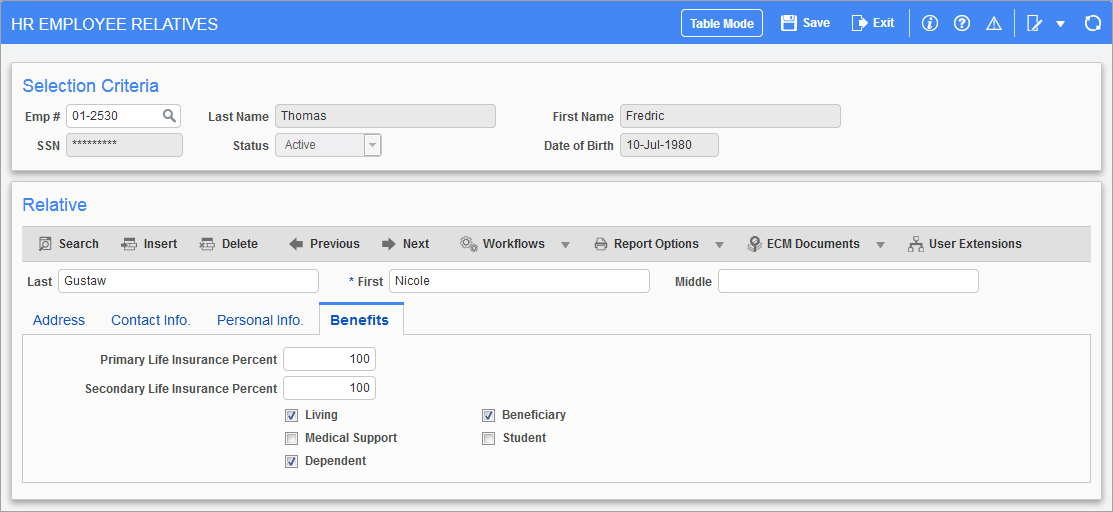
Pgm: HREMPREL – HR Employee Relatives; standard Treeview path: Human Resources > Personnel > Employee Relatives
Enterprise’s functionality allows administrators to track an employee’s relatives. For instance, the Employee Relatives screen, shown above, can store a relative’s address, contact information, personal information, and basic benefit information.
There are also screens which either administrators or employees can use to enroll employee dependents for specific plans. HR personnel can use either the Dependent Deductions/Benefits screen (shown below) to enroll dependents to specific plans, and Employee Self Service allows employees to enroll their dependents themselves.
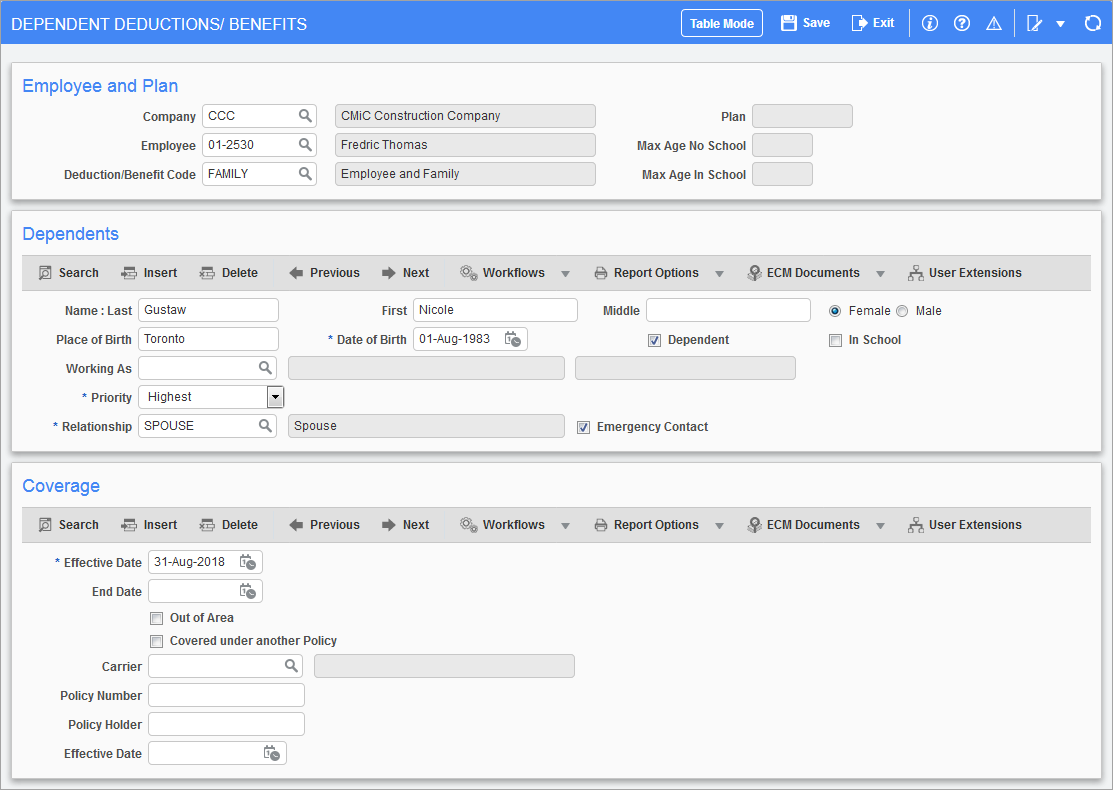
Pgm: HRDEPDED – Dependent Deductions/Benefits; standard Treeview path: Human Resources > Benefit Administration > Benefits > Dependent
HR personnel can also use the [Enroll Dependents] button on the Eligibility Administration screen for the same purpose.
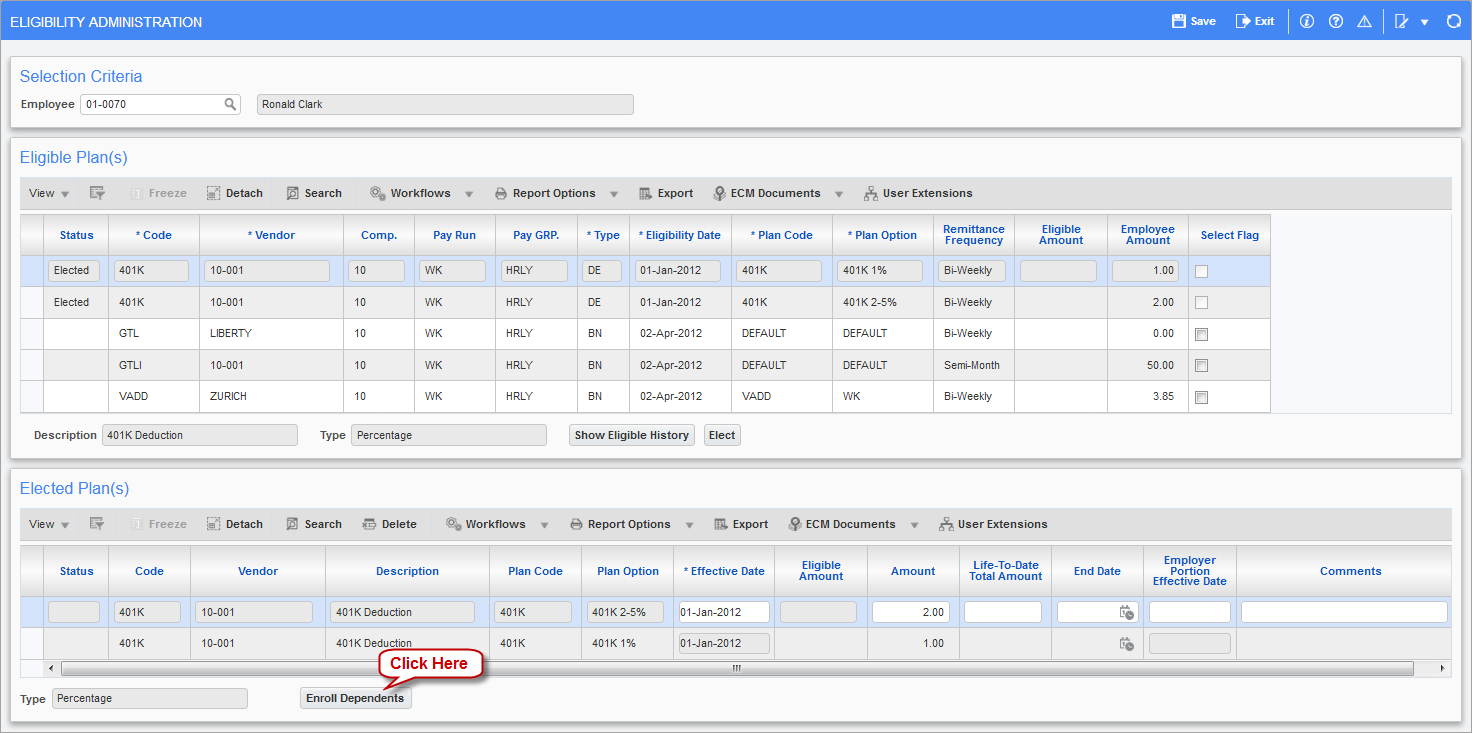
Pgm: HRELGADM – Eligibility Administration; standard Treeview path: Human Resources > Benefits Administration > Benefit/Deduction Administration > Election By Employee
Monthly Builds of ACA Compliance Data & Screens to View/Edit Data
An automatic process has been added to CMiC Enterprise to build ACA compliance data for each employee, for the previous month, using the employee information outlined in the Required Employee Information for Lines 14, 15, & 16 of Form 1095-C section of this guide.
To view or edit previously generated ACA compliance data, the ACA Monthly Build sub-menu has been added to the Human Resources module (standard Treeview path: Human Resources > Reports Affordable Care Act > ACA Monthly Build).
Enable Monthly ACA Process to Automatically Build ACA Compliance Data
To allow the system to automatically build ACA compliance data, launch the System Options screen, shown below, and on the General tab, click the [Job Queues] button.
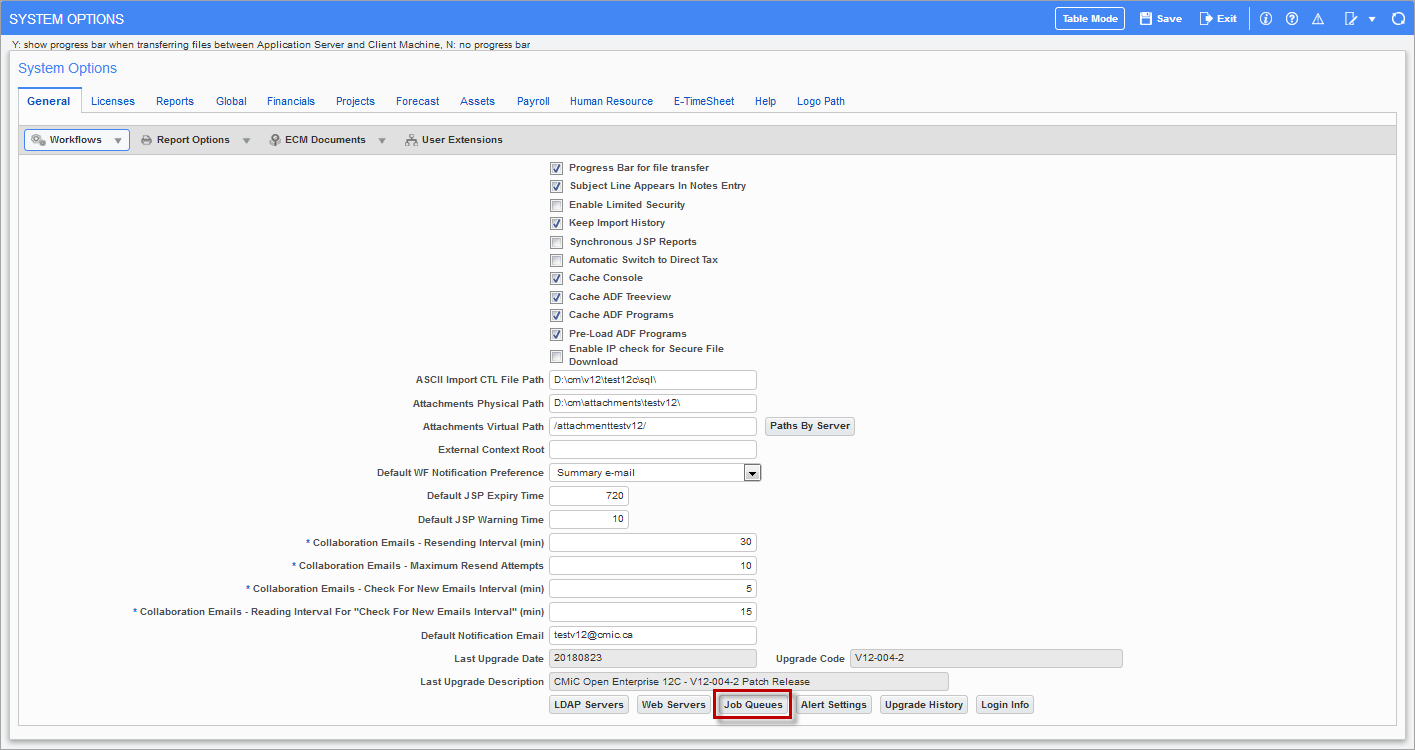
Pgm: SYSOPT – System Options; standard Treeview path: System > Setup > System Options – General tab
In the launched pop-up, shown below, search for the Payroll ACA Build Monthly Utility option (framed in red) and check the ‘Enabled’ box if it is not checked already.
![Screenshot of System Options – General Tab – [Job Queue] button.](../../../../Resources/Images/Greenshades_12c/Step_3_CMiC_Setup_for_Integration_33.png)
Pgm: SYSOPT – System Options; standard Treeview path: System > Setup > System Options – General Tab – [Job Queue] button
ACA Monthly Built Data Query
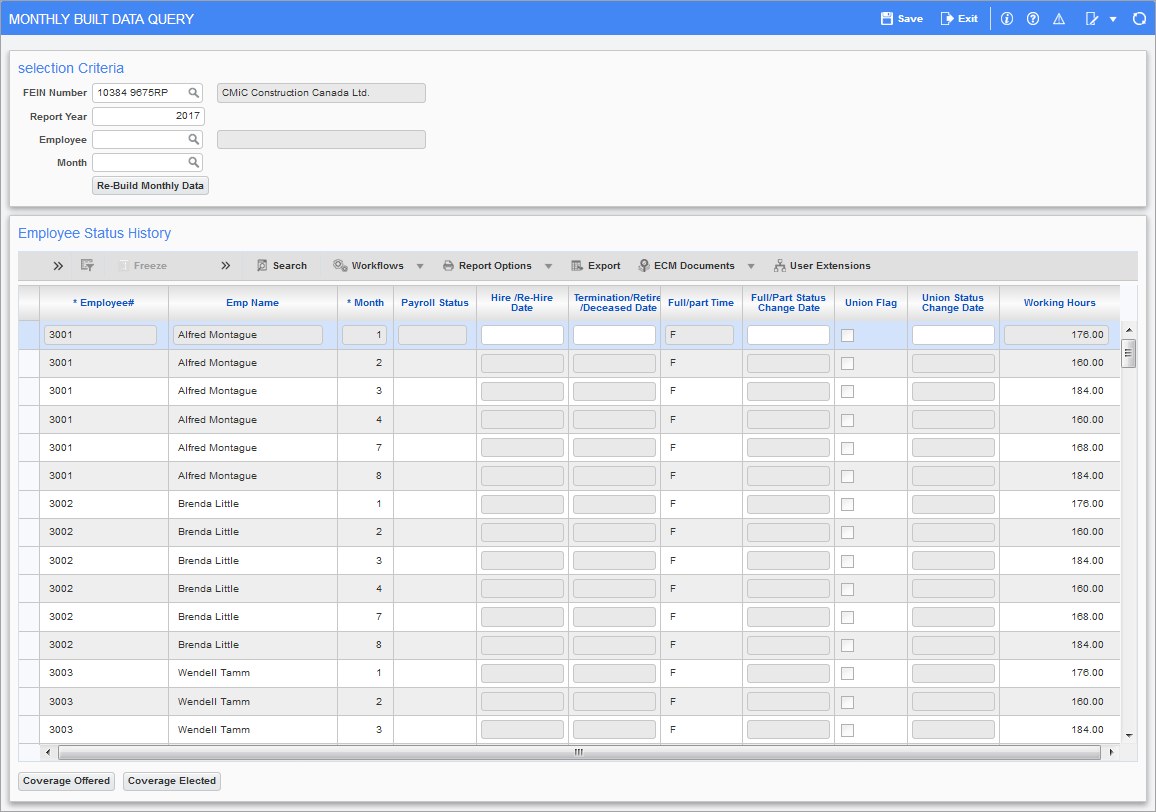
Program: HRACA_BLDDATA_MONTHLY_QRY – ACA Monthly Built Data Query; standard Treeview path: Human Resources > Reports > Affordable Care Act > ACA Monthly Build > ACA Data Query
This screen is used to view all changes made to employee information that are relevant to ACA compliance reporting, as this could impact what gets reported for the employee.
Selection Parameters – Section
FEIN
Enter/select the FEIN for the employee company.
Report Year
Enter the year for ACA compliance reporting.
Employee
Enter/select a particular employee or leave this field blank to run the report for all employees.
Month
Enter/select the month for which ACA compliance data has been built or leave this field blank to select all months with built data.
[Re-Build Monthly Data] – Button
Click this button to run the Payroll ACA Build Monthly utility to rebuild the ACA compliance data for the specified parameters. In the popup, enter the month to rebuild the data for and click the [Build Data] button.
Employee Status History – Section
This section displays relevant information for all months with ACA data. The following table provides details about the columns found in this section:
|
Column |
Description |
|---|---|
|
Employee# |
The employee number. |
|
Month |
The calendar month. |
|
Payroll Status |
Entries appear in this column only if the employee’s payroll status changed, in which case the new status is displayed. |
|
Hire/Re-Hire Date |
Entries appear in this column only if the employee was hired or re-hired. |
|
Termination/Retire/ Deceased Date |
Entries appear in this column only if the employee was terminated, retired, or deceased. |
|
Full/Part Time |
This column indicates whether the employee was full-time (F) or part-time (P) for the month. |
|
Full/Part Status Change Date |
Entries appear in this column only if the employee’s full-time or part-time status changed, in which case the date of the change is displayed. |
|
Union Flag |
This column indicates whether the ‘Union’ box for the employee was checked or not for the month. |
|
Union Status Change Date |
Entries appear in this column only if the employee’s union status changed, in which case the date of the change is displayed. |
|
Working Hours |
Hourly Employees: displays the number of all wage hours worked for the corresponding month, as per the employee’s timesheets. Salaried Employees: the system does not include any timesheet hours posted against Normal hours worked. |
[Coverage Offered] – Button
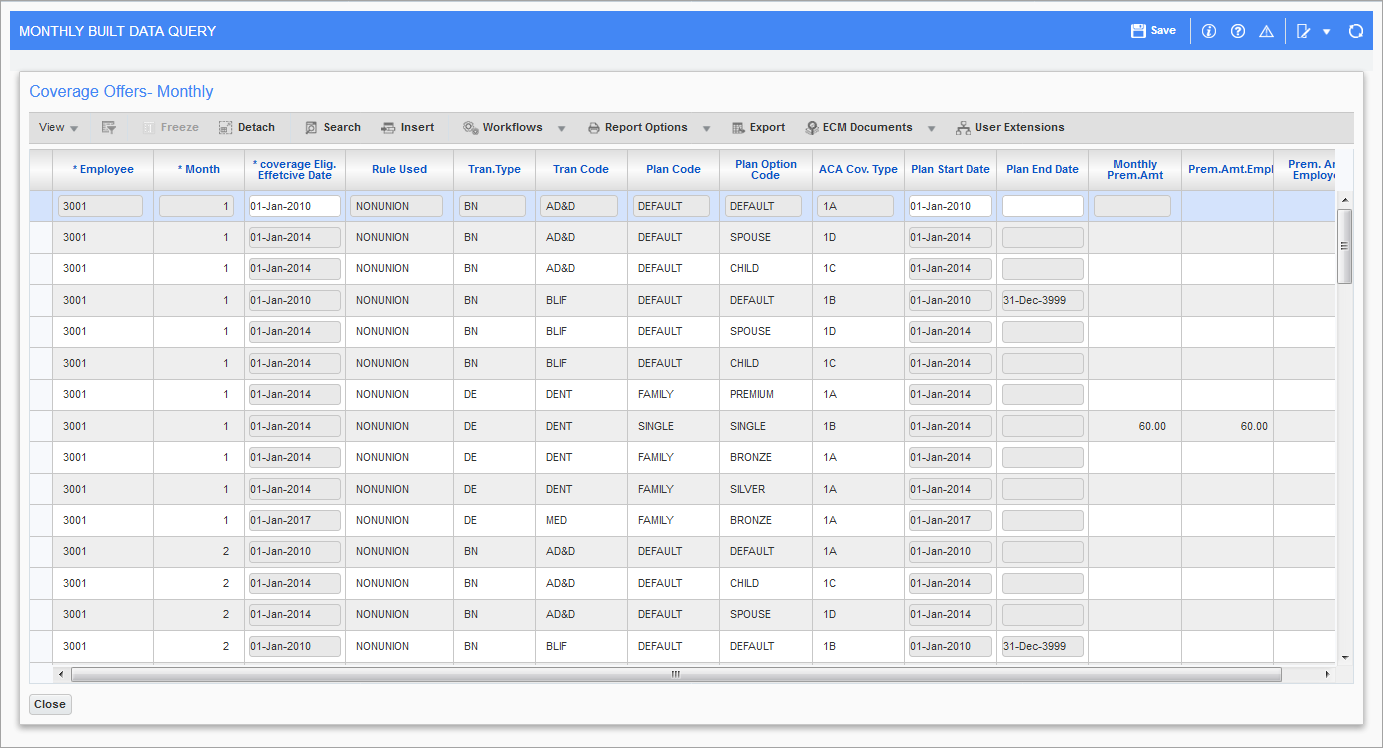
Program: HRACA_BLDDATA_MONTHLY_QRY – ACA Monthly Built Data Query; standard Treeview path: Human Resources > Reports > Affordable Care Act > ACA Monthly Build > ACA Data Query – [Coverage Offered] button
This button launches the Coverage Offered pop-up which displays all of the plans the Employee was eligible for, for each month, as automatically determined by the Payroll ACA Build Monthly utility.
[Coverage Elected] – Button

Program: HRACA_BLDDATA_MONTHLY_QRY – ACA Monthly Built Data Query; standard Treeview path: Human Resources > Reports > Affordable Care Act > ACA Monthly Build > ACA Data Query – [Coverage Elected] button
This button launches the Coverage Elected pop-up which displays information, such as effective coverage start and end dates, about the elected plans for the employee and their dependents, by month.
ACA 1095C Query (Yearly)
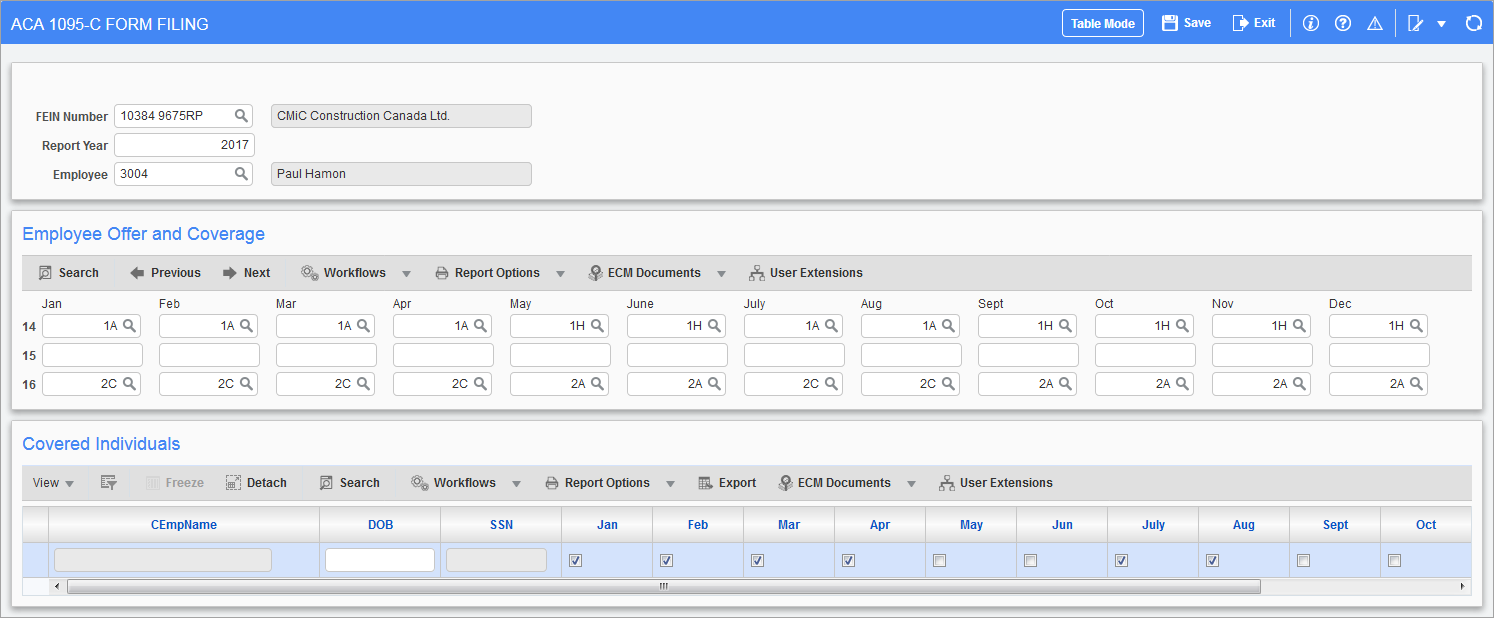
Pgm: HRACA_BLDDATA_MONTHLY – ACA 1095-C Form Filing; standard Treeview path: Human Resources > Reports > Affordable Care Act > ACA Monthly Build > 1095C Query (Yearly)
This screen is used to view and edit generated ACA compliance data for lines 14 to 16, under the Employee Offer and Coverage section. Only data from previous months is available to edit.
This screen is also used to view and edit ACA compliance data for the covered individuals under the Employee’s plan, under the Covered Individuals section. Again, only data from previous months is available to edit.
Employee Self Service – Enrolling Dependents
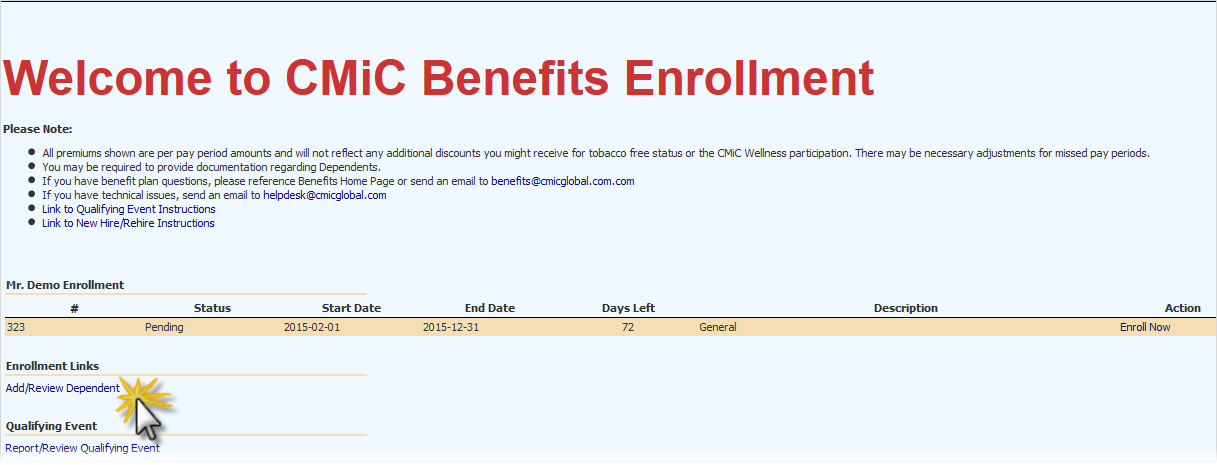
Employees can use the Employee Self Service module to enroll their dependents themselves. On the main Employee Self Service screen, click the Add/Review Dependent link, as shown above, and then enroll dependents through the following screen:
Convert Health Care Plan from Payroll to HR
Enterprise can convert benefits and deductions set up in Payroll to the Human Resources module. To achieve this, the following should be completed:
-
Existing payroll data for HR should be prepared prior to running utility.
-
All plans requiring conversion should have a vendor code set up at the company level, using the Company Benefits Maintenance screen:
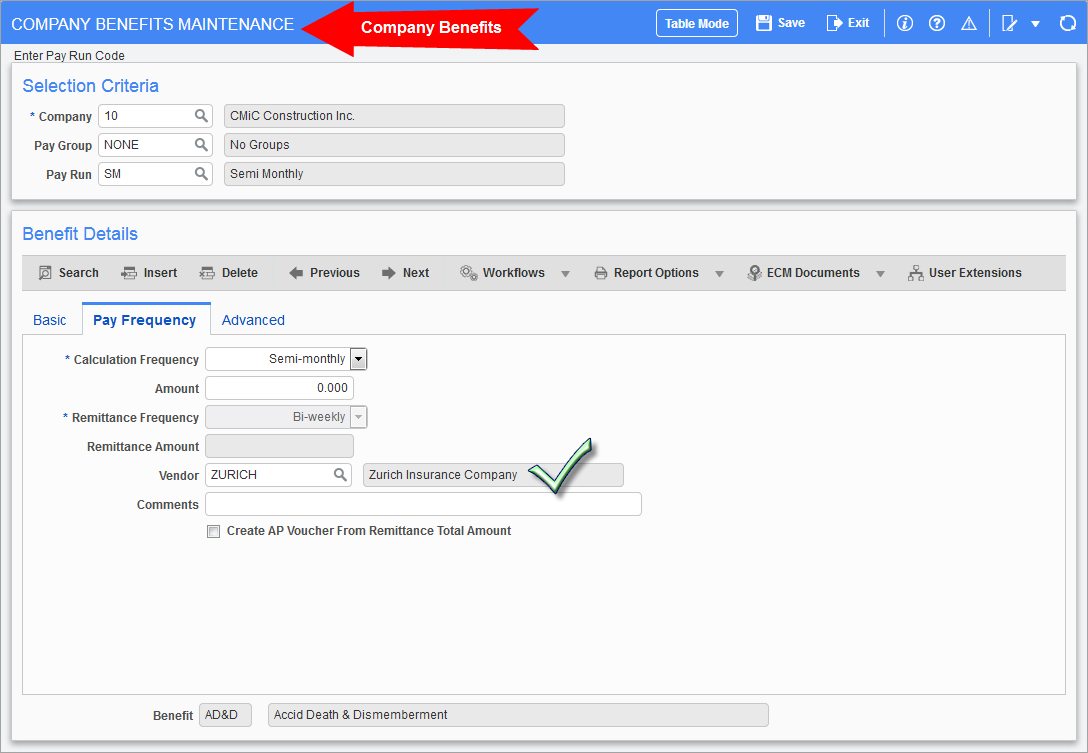
Pgm: PYCOMBEN – Company Benefits Maintenance; standard Treeview path: Human Resources > Benefit
Administration > Benefits > Company
-
Rule ID for plans should be set up using the Rules Administration screen:
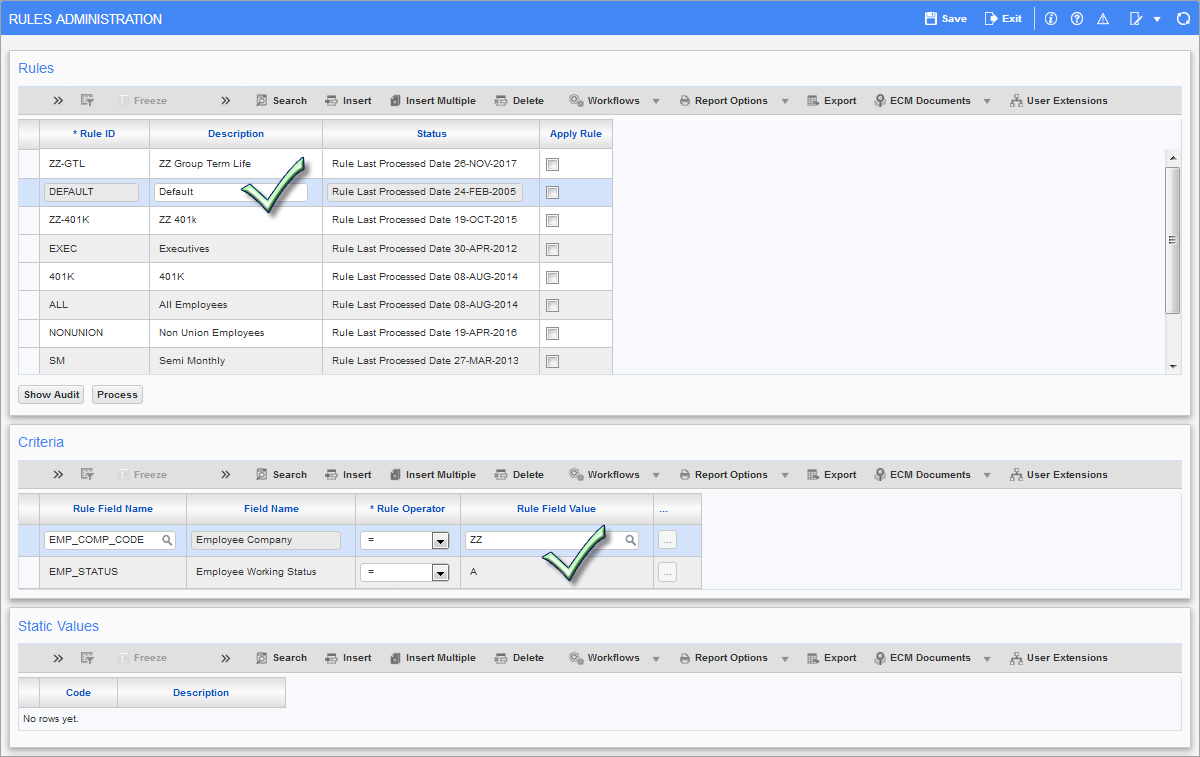
Pgm: HRRULADM – Rules Administration; standard Treeview path: Human Resources > Benefit Administration > Benefit/Deduction Administration > Rules
-
Eligible IDs should be set up for plans using the Benefit/Deduction Table Base screen:
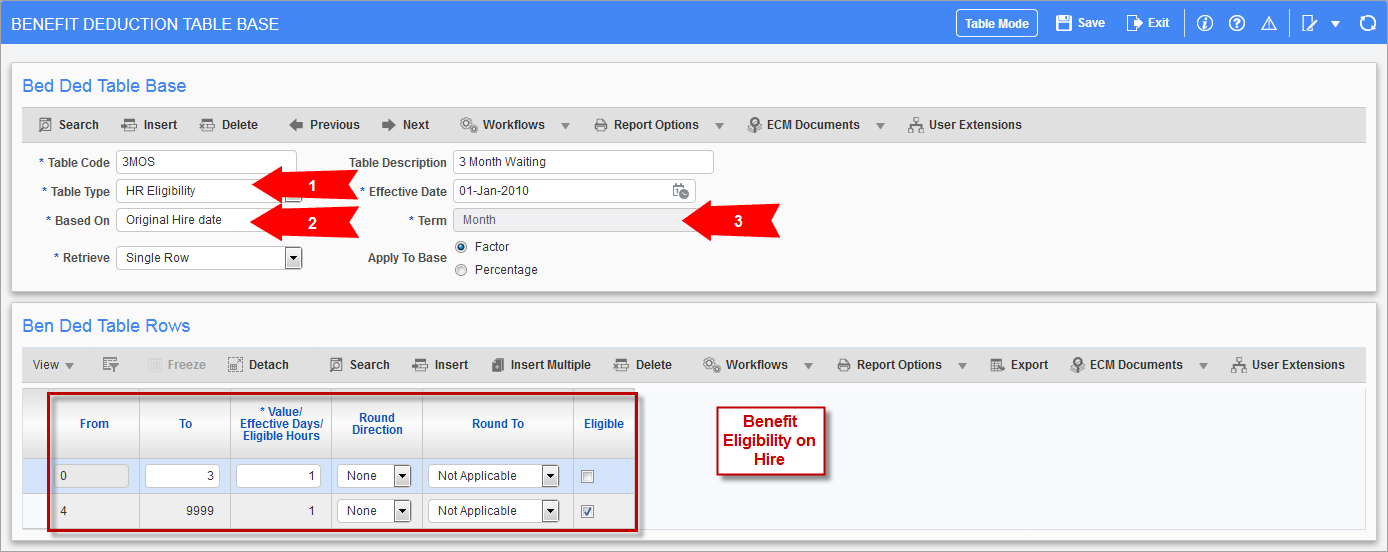
Pgm: PYBDTAB – Benefit Deduction Table Base; standard Treeview path: Human Resources > Benefit Administration > Benefit/Deduction Table Base
Utility: Plans Conversion from Payroll to Human Capital
After the above steps have been completed, this utility can be run to convert benefits and deductions from Payroll to Human Resources):

Pgm: PYBDCONV – Plan Conversion From Payroll to HR; standard Treeview path: Human Resources > Utilities > Plans Conversion From Payroll to Human Capital
Creating 1095 Export Files
The first step in creating 1095 export files to import into Greenshades, is to build its ACA data. This can be done in the Build 1095C Report Data screen, shown below:
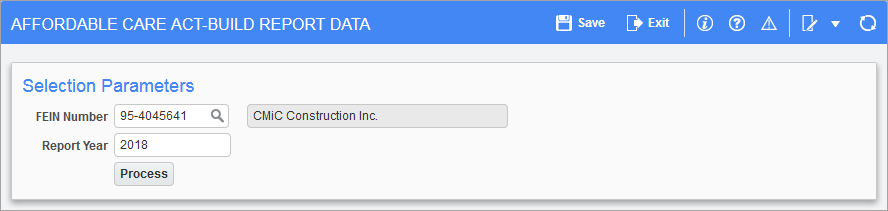
Pgm: HRACA_BLDDATA – Affordable Care Act-Build Report Data; standard Treeview path: Human Resources > Reports > Affordable Care Act > Build 1095C Report Data
This screen processes relevant data for all employees, for a specified year, including data from all subsidiaries under the FEIN for which the employees worked. The resulting ACA data is stored into a separate table, by year, for audit history.
The next step is to export the ACA data into an XML file for Greenshades. This is done through the ACA 1095C Filing screen, shown below:
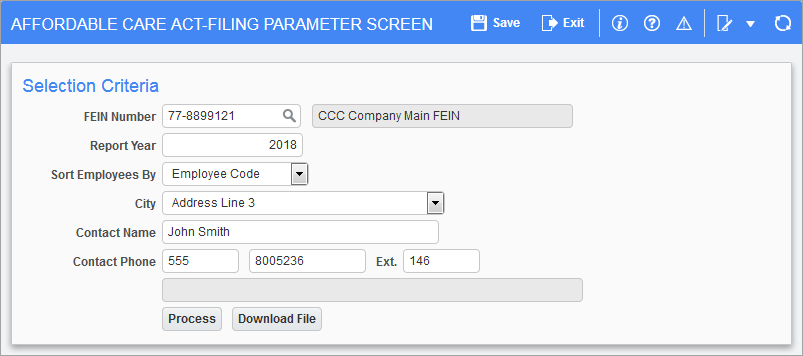
Pgm: HRACA_FILING – Affordable Care Act-Filing Parameter Screen; standard Treeview path: Human Resources > Reports > Affordable Care Act > ACA 1095C Filing
In this screen, enter the parameters, including the file path and file name for the XML file, then click the [Process] button to create the file.
This concludes the work necessary in Enterprise for Form 1095-C reporting. The next step is to use Greenshades to import the created XML file of ACA data. For details about this next step, please refer to the 1095 Reporting sub-section in the Reporting via Greenshades section of this guide.