Overview
NOTE: The Clock In/Out feature is available in Nexus 01.
Employees can record their daily work time in Construct ESS using the Clock In/Out feature if the setup described in this section is completed. Employees can record their shift start (clock in), add or edit task details, record breaks (pause/play), switch tasks, and end their task/day (clock out).
NOTE: Clock In /Out is a mobile-only feature. This feature is not available via desktop or web browser.
Setup for Clock In/Out Time Entry
Access to entering clock in/out times in employee timesheets is controlled at the system level. Access can also be controlled at the HR level using the Employee Dashboard screen, and this setting ultimately takes precedence over the system level. The settings, which are located across several screens, are described in more detail below.
System Options
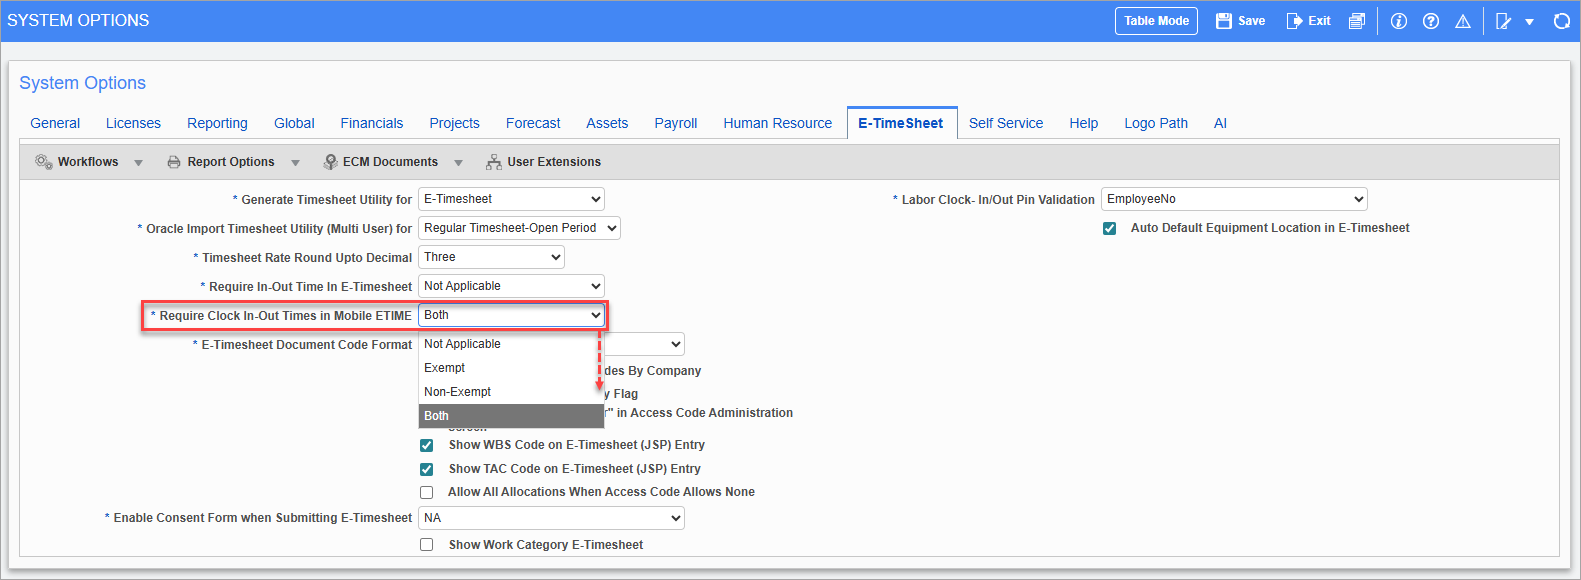
Pgm: SYSOPT – System Options; standard Treeview path: System > Setup > System Options – E-TimeSheet tab
The Clock In/Out Time Entry feature is used to control whether clock in-out times are used during timesheet entry. It must be enabled at the system level to allow employees to enter clock in/out times in the Timesheet Entry screen. This feature is enabled using the Require Clock In-Out Times in Mobile ETime field located on the E-Time Sheet tab of the System Options screen in the System Data module. From the field's drop-down menu, selecting an FLSA type of “Exempt”, “Non-Exempt”, or “Both” will give employees with that FLSA type assigned on their Employee Profile record, access to the Time In and Time Out fields in the Timesheet Entry screen. If this field is set to “Not Applicable”, the In/Out option will not be available to employees when entering timesheets.
Employee Profile
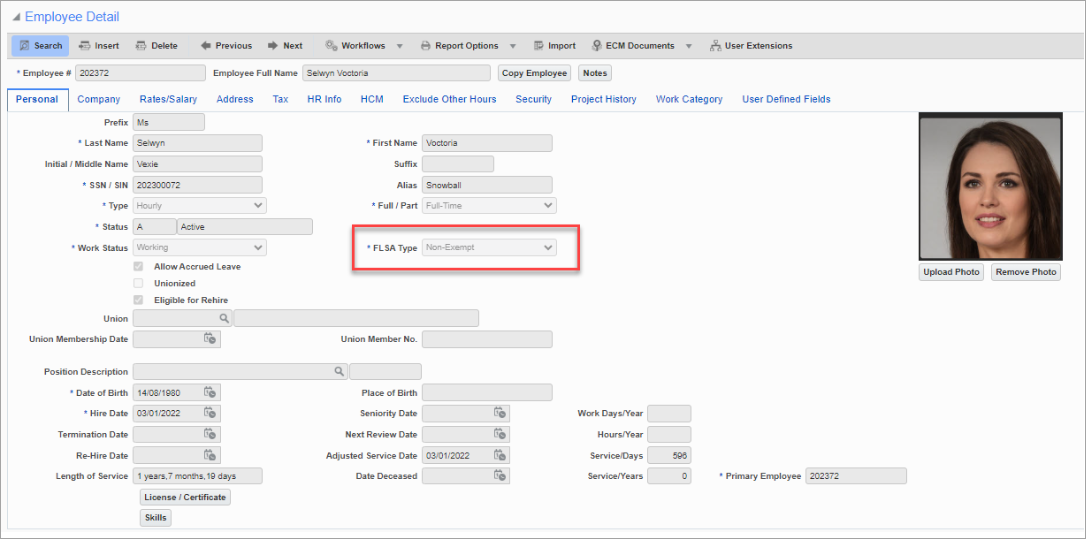
Pgm: PYEMPLOY – Employee Profile; standard Treeview path: US Payroll > Setup > Employees > Employee Profile – Personal tab
An employee's FLSA type is assigned in their Employee Profile record. If the Clock In/Out Time Entry feature is enabled at the system level, an employee's ability to enter clock in-out times during timesheet entry will depend on the FLSA type selected here.
Employee Dashboard
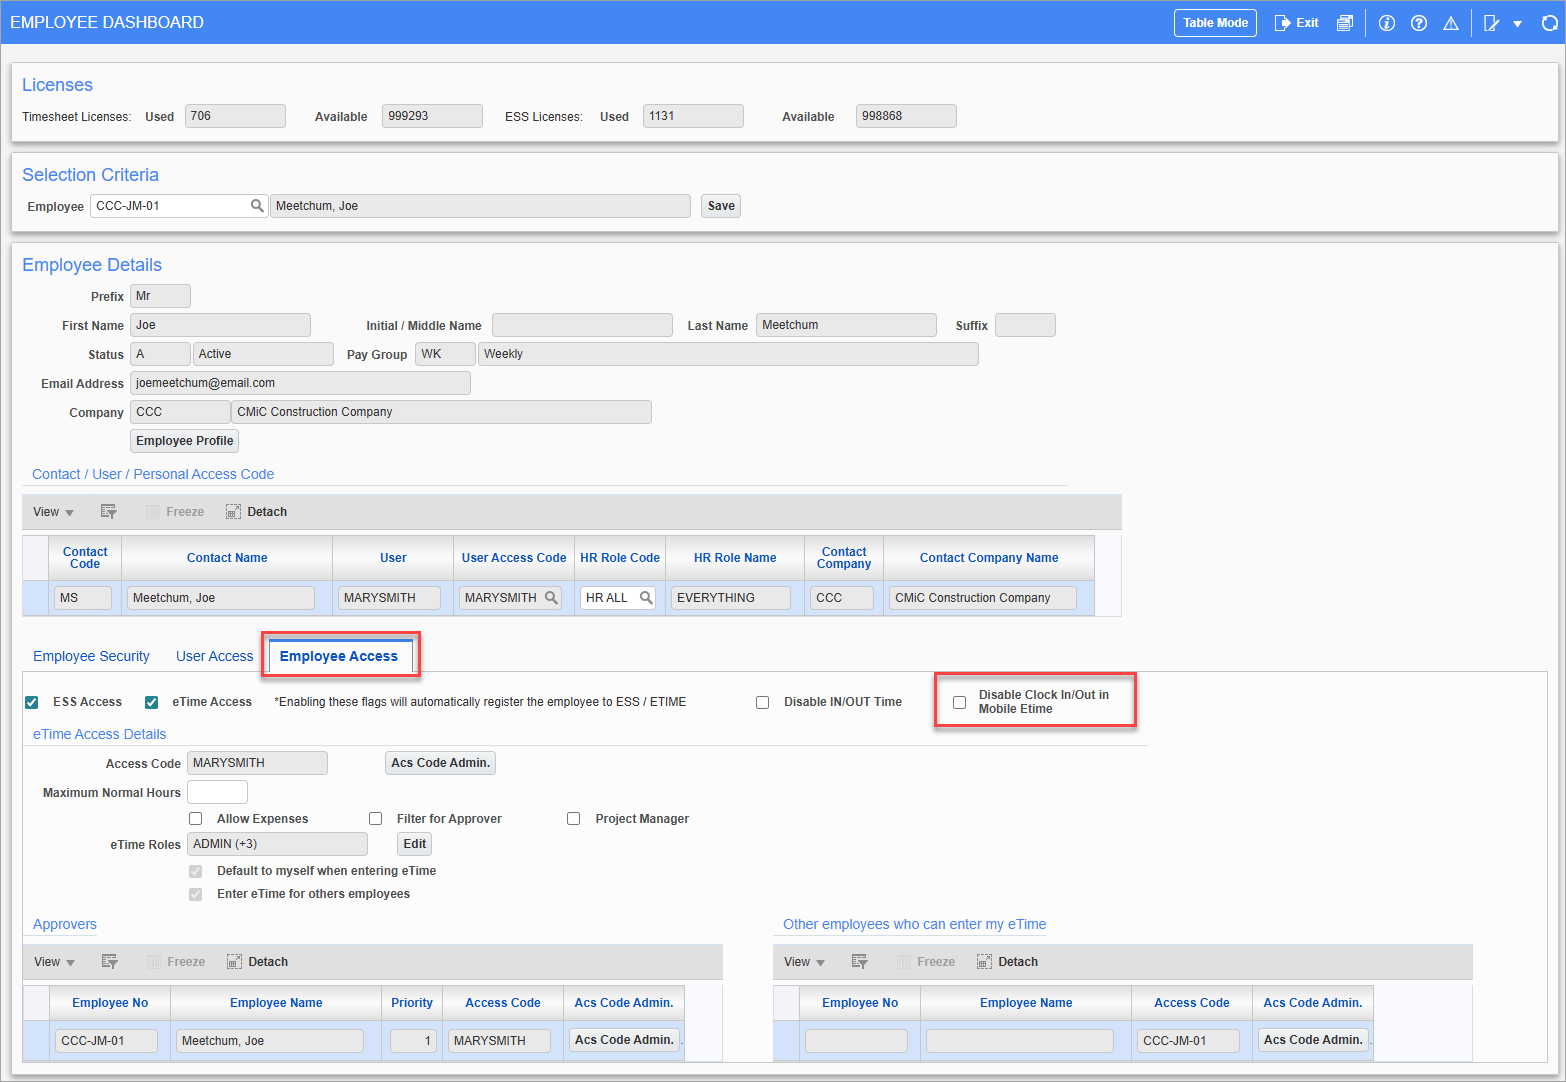
Employee Dashboard; standard Treeview path: Human Resources > Personnel > Employee Dashboard
The Employee Dashboard, located in the Human Resources module, is used to configure access restrictions for an employee's time entries at the HR level. The setting on this screen takes precedence over the system and profile levels.
To configure access for a specific employee at the HR level, navigate to the Employee Dashboard screen and open the Employee record. In the Employee Details section of the screen, click on the Employee Access tab and use the 'Disable Clock In/Out Time in Mobile Etime' checkbox to enable/disable access to the Clock In/Out Time Entry feature when entering timesheets.
Roles and Permissions
Access within Construct ESS will depend on the user's assigned role, defined in the E-Time Role Setup screen in the E-Time module. Employees can log time, add task details, start/stop breaks, and submit time entries. Users with approver privileges can review submitted time, approve or reject entries, and (where permitted) correct in/out time values.
E-Time Role Setup; standard Treeview path: E-Time > E-Timesheet > Setup > E-Time Role Maintenance
Both of the following privileges must be assigned in order to edit saved clock-in/out time entries:
-
'Approver'
-
'Allow to update submitted timesheets'
For more information, please refer to E-Time - Role Maintenance (E-Time Roles).
If the user has only one or none of the above privileges, they can only view the entry but cannot edit the clock-in/out times. Only task details (job, phase, category, comments) remain editable.
Entering Clock In/Out Time
Click on the Add icon ( ) to insert a timesheet entry.
NOTE: Only the current day is available for clock-in/out time. Future dates are available for Leave entries only. Users cannot clock into a future date.
The system will record the clock-in time using the device's current time and will start a running timer. Ensure the correct data type is selected and press the Save icon ( ) to keep the entry as a draft ("In Progress" task). Task details do not need to be entered yet.
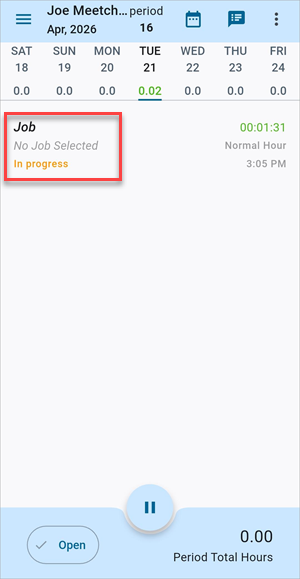
Upon saving, Construct ESS will ask the user to enable location tracking. Once an option is selected, the time entry will be saved as "In Progress".
The Time Entry screen will show an "In Progress" status while the timer is running. Press Cancel at any time before saving to discard the unsaved clock-in time. Click the Add icon () again to restart.
Add or Edit Task Details
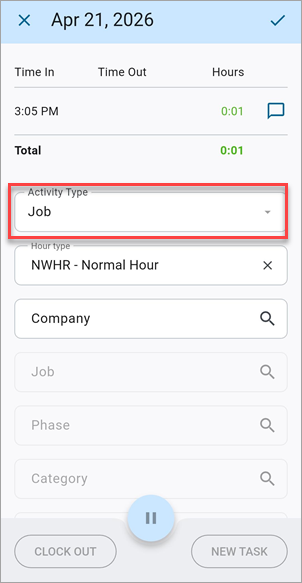
Task details are used to identify the work performed by the employee. Employees must complete all required fields before they can clock out or switch tasks.
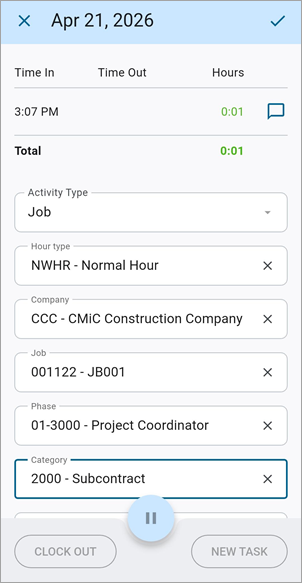
From the Time Entry log, click the in-progress record to open the detail screen. Select the activity type and complete all the required fields (e.g., phase, category, comments, etc.) applicable to the selected activity type.
| Activity Type | Code | Description |
|---|---|---|
| Job | J | Time is charged to a specific Job, Phase, and Category. |
| General | G | General overhead or non-job-specific time. |
| Equipment | E | Time associated with equipment usage. |
| Work Order | W | Time tied to a specific Work Order. |
Press the Save icon () to keep the timer running with the details recorded.
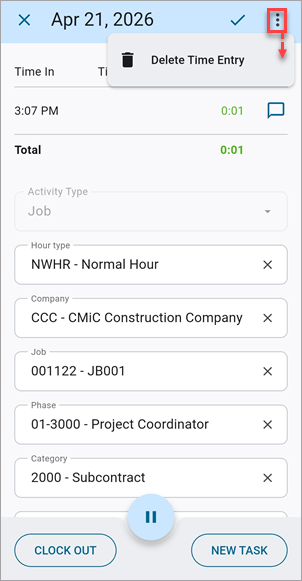
Press the Cancel icon (![]() ) to discard any edits or select the "Delete Time Entry" option from the Options menu to remove the details and the recorded clock-in time.
) to discard any edits or select the "Delete Time Entry" option from the Options menu to remove the details and the recorded clock-in time.
NOTE: The "Delete Time Entry" option is permanent. Use it only if the entry must be discarded entirely.
Record Breaks (Pause/Play)
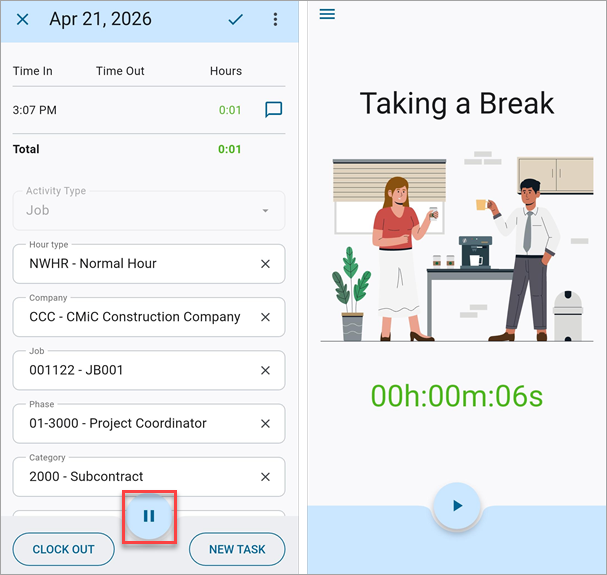
To start a break, press the Pause icon on the in-progress task. The timer will pause and a break banner will appear to confirm the break is running.
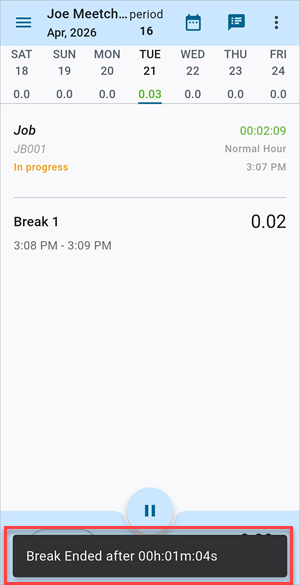
To end a break, press the Play icon. A message will display the break duration and the task timer will resume.
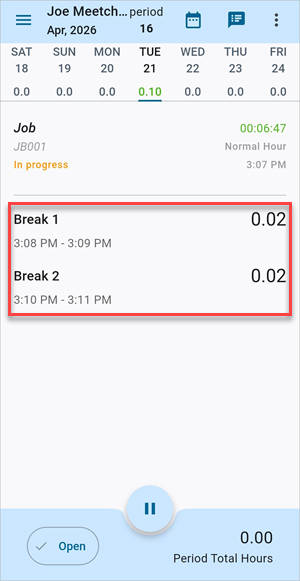
To review all break entries for the day, scroll to the bottom of the Time Entry log. Each break is listed with its duration (in hours and minutes).
NOTE: Break times are automatically excluded from your total worked hours .
Switch Tasks
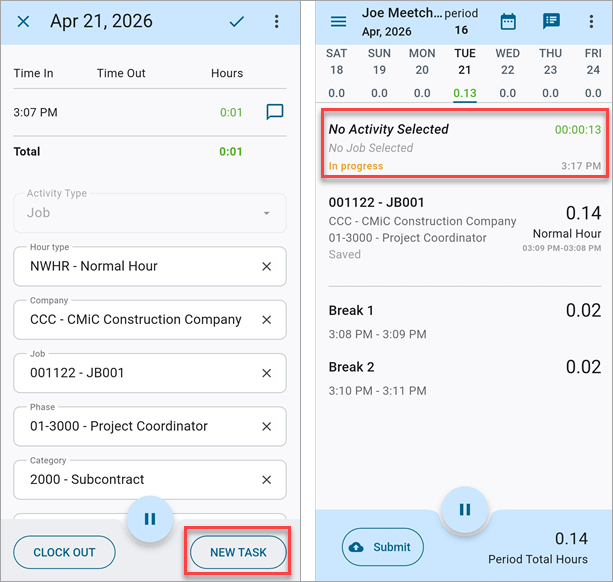
The [New Task] button allows users to move seamlessly from one task to another without needing to clock out first. Ensure the current in-progress task has all the required details saved before pressing the [New Task] button. The system will record the clock-out time for the current task and immediately start a new in-progress task at the current time. Refer to Add or Edit Task Details for more information.
Employees can switch tasks as many times as needed throughout the day. Each new task automatically ends the previous one.
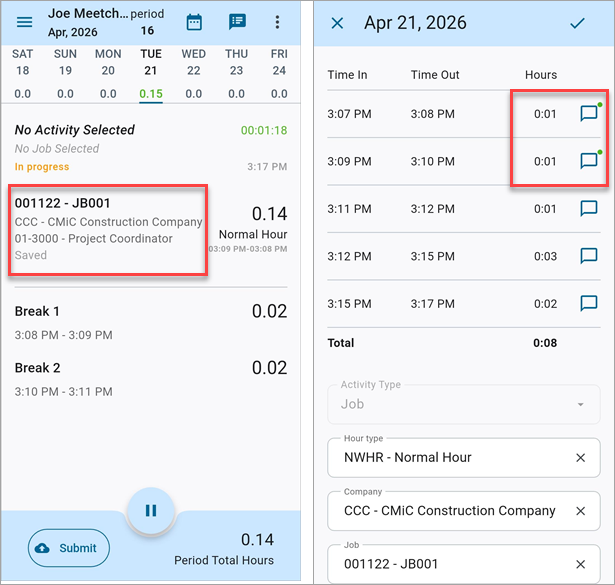
The main log screen combines multiple time segments of the same task into a single line with a total time. Select the task to drill down into each individual segment with its exact clock-in/out times and comments.
Clock Out (End Task/Day)

In the in-progress task, confirm all the required details are complete and press the [Clock Out] button. The system will record the clock-out time, calculate the hours worked (excluding breaks), and update the period total. The task status will change from "In Progress" to "Saved" in the log.
NOTE: Only clocked-out entries can be submitted for approval. Any in-progress tasks remain in the log and are not included.
Time Entry Statuses

The timesheet log shows all entries for the current period. Each entry displays one of the following statuses:
-
In Progress: The employee is currently clocked into this task. The timer is running and the task is editable. Clock Out or Pause options are available.
-
Ended / Draft: The task is clocked out with full details but is not yet submitted. Clock-in/out times are locked (i.e., view only) unless the user has the required approver/update privileges.
-
Submitted/Resubmitted: The employee has submitted the entry for approval. Clock-in/out times are locked (i.e., view only) unless the user has the required approver/update privileges.
-
Approved: The employee has approved the time entry. Times are locked and only task details remain editable.
-
Rejected: The approver has sent the entry back. Only task details can be edited and the clock times remain fixed.
-
Posted: Entry has been posted to payroll or accounting. The task is read-only and no changes are allowed.
Time Entry Examples
Example 1: Changing Hour Type After Clock In
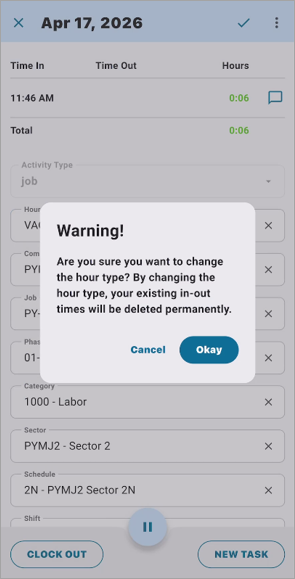
If you have clocked in with the Normal Hours type and all the required fields are filled, you may change the Hour Type field to a leave-based type (e.g., Vacation, PTO). Because leave types do not use real-time clock data, the system will display a confirmation warning.
Press the [Cancel] button to dismiss the alert and to keep the existing entry unchanged.
Press [Okay] to confirm. This will permanently delete the recorded clock-in/out times and you must then manually enter in/out time for the leave period.
NOTE: This will permanently delete the clock-in/out times. This action cannot be undone.
Example 2: Switching from Leave Hours Back to Normal Hours

Once you have manually entered in/out time using a leave-based hour type, switching back to the Normal Hours type is not available directly from the Hour Type field.
To switch back to normal hours, you must:
-
Delete the existing leave time entry.
-
Return to the main screen and tap the Add icon (
) to clock in as normal. -
The system will then record real-time clock-in/out times for Normal Hours.
Switching between leave codes (e.g., from Vacation to Personal Leave) is allowed without restriction. The system retains the existing in/out time entries and no data is lost.
Example 3: Recording Leave Hours for a Future Date
Future dates do not support real-time clock-in/out time entries. To record leave hours for a future date:
-
Clock out on the current date to close any active session.
-
Navigate to the future date.
-
Select the hour type. Only leave codes will appear (e.g., Vacation, Personal Leave).
-
Manually enter in/out time for the leave period.
-
Fill in all required fields and click Save.
NOTE: If you navigate to a future date and tap Pause, the system places your current-day session into break mode. It does not affect the future date. Pause always applies to the active current-day session only.
Submit Time Entries
Ensure all tasks are clocked out (i.e., no in-progress entries remain) and press Submit. Only clocked-out entries will be submitted. In-progress tasks remain on the log and are not included.
NOTE: In-progress tasks are never submitted automatically. Always clock out before tapping Submit.
After submission, entries move to the "Submitted" status and await approver action.
Resubmit Time Entry
If an approver rejects your time entry, open the rejected entry from the log and review the reason for the rejection. If it is not displayed, check with your supervisor. Edit the task details as needed (e.g., job, phase, comments). Only the task details can be updated after rejection and clock-in/out times will remain fixed. Once done, press Save and then Submit to resubmit for approval.
Editing and Approving Submitted Time Entries
Once an employee has clocked out and the entry is submitted with all the required details, the clock-in/out times are locked and cannot be modified by the employee. The employee can update any job costing or classification details after saving. Clock-in/out times reflect the actual recorded time and are protected from modification to ensure timesheet integrity after its being submitted.
NOTE: Time corrections cannot be made directly by the employee. Any discrepancies in clock-in/out times must be reported to a supervisor/manager for adjustment.
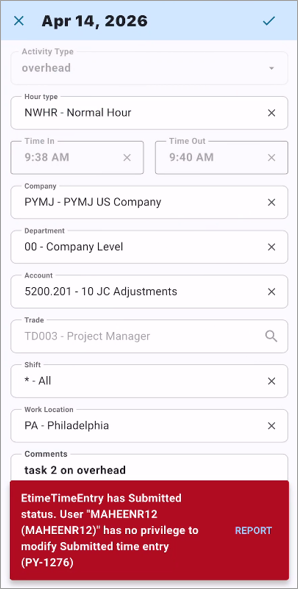
Editing Time Entries
A manager or supervisor can edit a submitted time entry only if they have the 'Allow to update submitted Timesheets/Expenses' privilege enabled in their E-Time Role Setup. Users will receive a warning when attempting to modify the time entry if the privilege is disabled, as shown in the screenshot below.
Approving Time Entries
Approvers can review, correct, and finalize employee time entries. To edit clock-in/out times on a saved or submitted entry, the approver must have both the 'Allow to Update Submitted Timesheets' and the 'Approver' privileges assigned for their role in the E-Time Role Setup screen. Either condition alone is not sufficient.
The following actions are available where permitted by your organization's policy:
-
Edit: Correct an employee's in/out time using the calendar/clock picker.
-
Delete: Remove an incorrect or duplicate time entry.
-
Insert: Add a missing time entry on the employee's behalf.
-
Approve: Finalize the time values. The entry is locked; the employee may still edit details only.
-
Reject: Send the entry back to the employee for correction. Original clock times remain fixed; only details can be changed.
For more information, please refer to Construct ESS - Timesheet Approval.
Web Timesheet Entry
When Clock In/Out is enabled, the web deployment of the Timesheet Entry screen has the following restrictions to prevent duplicating time entries.
Employees Cannot Manually Enter Normal Hours
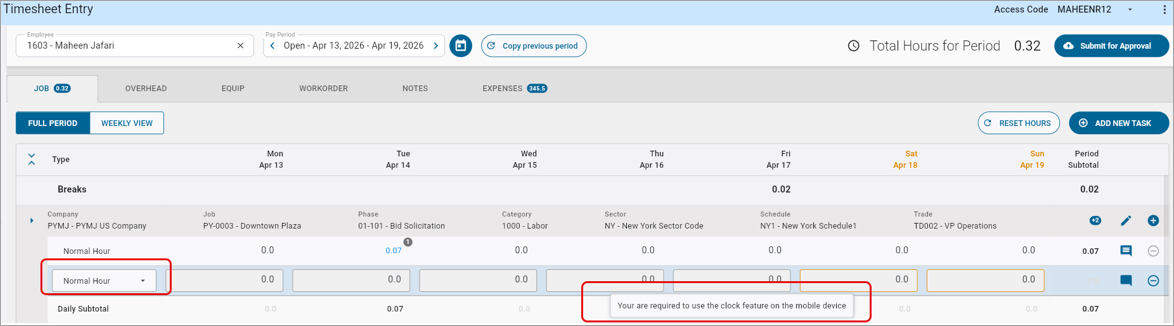
If an employee attempts to enter time under a Normal Hour type on the desktop, the system will display the following message: "You are required to use the clock feature on the mobile device."
This restriction ensures that normal hours are only captured through the real-time Clock In/Out feature on the mobile app, preventing conflicts between manually entered and system-recorded times.
Employees Can Enter Leave Hours
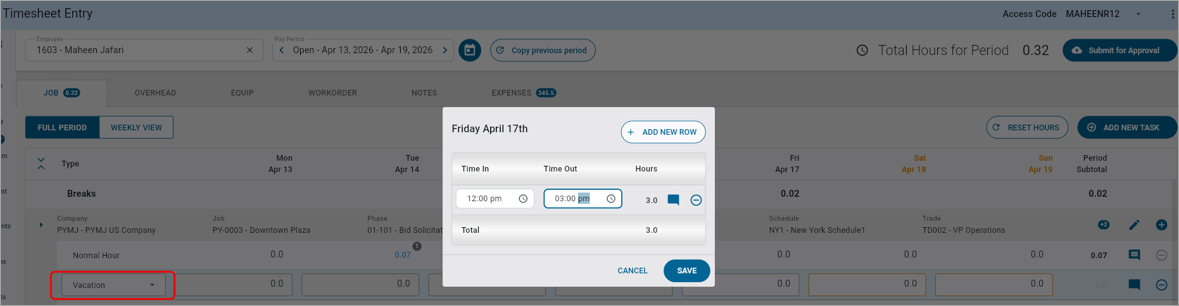
Employees can enter leave-based hours directly on the desktop timesheet (e.g., Vacation, PTO/Personal Leave, other leave codes). When selecting a Leave hour type (e.g., Vacation), the employee must manually specify the time in and time out.
Rules
The following rules are enforced by the system and cannot be overridden by the employee.
| Rule | Details |
|---|---|
| No future clock ins | You cannot clock in on a future date. Future dates support Leave entries only. |
| Required fields before clock out | All required task fields must be completed before pressing Clock Out or New Task. |
| Live running timer | An in-progress task displays a live timer that updates until you clock out. |
| Breaks excluded from totals | Break durations are automatically deducted from total worked hours. |
| Combined segments on main view | The main log screen combines multiple time segments of the same task into one line. Tap the task to view each segment individually. |
| Saved entries: Clock times locked | Once saved with full details (clock out complete), clock-in/out times are view-only by default for most employees. |
| Editing saved times: Requires dual privilege |
To edit clock in/out times on a saved or submitted entry, the user must have both privileges :
Either condition alone is not sufficient. |
| Approved time permanently locked | Once approved, time in and time out cannot be changed. Only task details (job, phase, comments) remain editable. |
| Rejected time: Update task details only | When an entry is rejected, only task details can be updated. Original clock times remain fixed. |
| Normal hours: Enter on mobile only | Normal hours must be entered via the mobile Clock In/Out feature. Desktop entry of normal hours is blocked when Clock In/Out is enabled. |
Privacy and Security
Construct ESS is designed to protect your time data and personal information. Please observe the following guidelines:
-
Clock in/out must be performed on your own mobile device. Do not allow others to clock in or out on your behalf.
-
Your session may time out automatically for security purposes. If prompted to re-authenticate, log in again with your credentials.
-
Do not share your login credentials with anyone.
-
If you believe your account has been accessed without your authorization, notify your system administrator immediately.
For FAQs and troubleshooting tips, please refer to Construct ESS - FAQs.