NOTE: CMiC ECM in Outlook (Classic) has been deprecated and is no longer supported as of February 28, 2024. CMiC encourages users to use Enterprise Content Management - CMiC for Outlook Add-In going forward.
1. Control Panel


Performs the text search across the ECM content.

The Attachment Detail / Detail View buttons toggle the view in the Details pane showing the details information/attachment information for selected PM item.

Filters the documents to be displayed. Available options are:


Scrolls to the current project node if it is not visible.
 /
/ 
Show/hide option in the Treeview to select the project, PM objects and document types nodes to be visible for the user. See Enterprise Content Management - Plug-In Interface Feature: Show/Hide Functionality in CMiC ECM in MS Outlook (Classic) for further information.

Displays the versions of installed ECM plugin and Web service:


Opens a pop-up window to log into OneDrive. After logging in, the One Drive panel will appear next to the CMiC ECM panel, where users can drag and drop files from One Drive to CMiC ECM. Please see the Using Cloud Storage (OneDrive, Dropbox, box) section in this guide for more details.

Opens a pop-up window to log into Box. After logging in, the Box panel will appear next to the CMiC ECM panel, where users can drag and drop files from Box to CMiC ECM. Please see the Using Cloud Storage (OneDrive, Dropbox, box) section in this guide for more details.

Opens a pop-up window to log into DropBox. After logging in, the DropBox panel will appear next to the CMiC ECM panel, where users can drag and drop files from DropBox to CMiC ECM. Please see the Using Cloud Storage (OneDrive, Dropbox, box) section in this guide for more details.

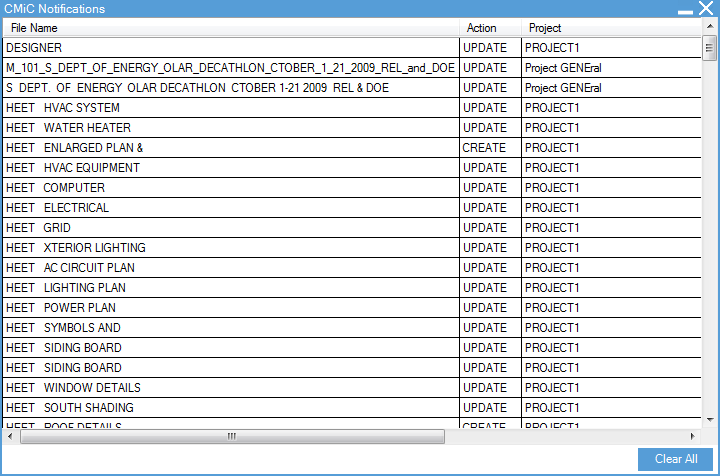
Opens the CMiC Notifications to see what actions have been made on a file, which user made the change, and when it was last updated.
2. Context Menus
For each of the CMiC ECM nodes, there is a context menu that can be accessed via a mouse right-click.
Enterprise Documents – ECM Node
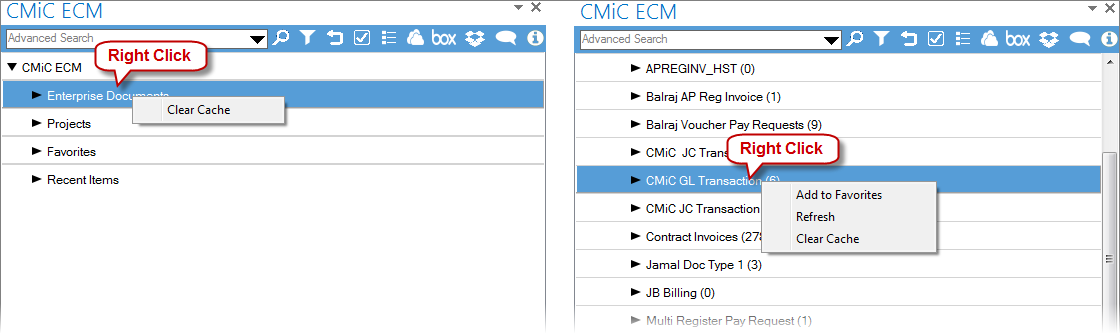
The Enterprise Documents have three options available:
-
Clear Cache: clear the local computer’s cache.
-
Refresh: update the document list of this type from the server. This option is available for the
document folders only. -
Add to Favorites: add a selected project to the Favourites node for quick access.
Projects – ECM Node
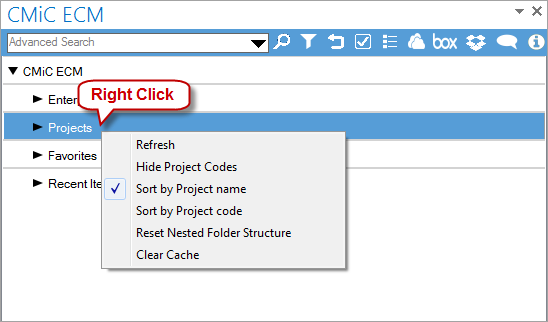
Available options are:
-
Refresh: updates the projects tree from the server.
-
Hide Project Code: hides or displays the project code.
-
Sort by Project name / Sort by Project code: sorting options for the list of project.
-
Reset Nested Folder Structure: resets the nested folder structure to its default state.
-
Clear Cache: clears the cache on the local computer.
Project Context Menu
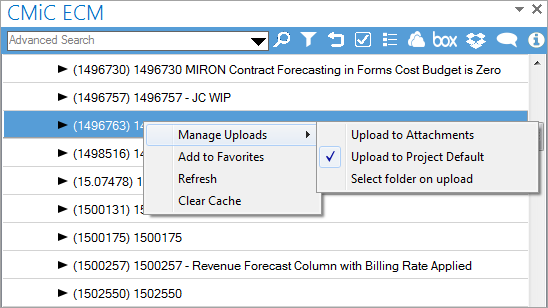
1. Manage Uploads
-
Upload to Attachments: file will be uploaded to the attachment document folder.
-
Upload to Project Default: file will be uploaded to the default folder set in the Project System Options screen.
-
Select folder on upload: a pop-up window will open allowing the user to select the document folder.
2. Add to Favorites
This option is used to add a selected project to the Favorites node for quick access.
3. Refresh
Updates the displayed items.
4. Clear Cache
Clears the cache on the local computer.
Project Items Context Menu
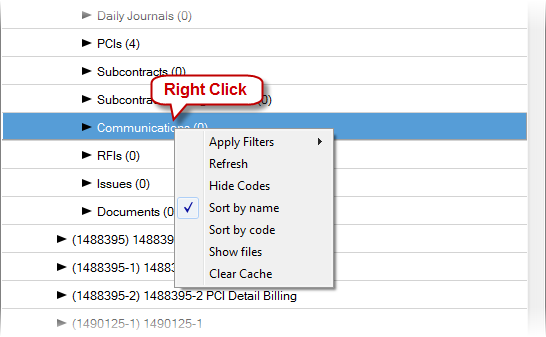
Available options are:
1. Apply Filters
This option is used to apply filters to the selected type of the CMiC Field items.
-
Mine: shows the CMiC Field items that have user names in the To or CC fields.
-
Not Submitted: only CMiC Field items which are created but not submitted are displayed.
-
Open Items: shows the CMiC Field items with a status other than “Closed”.
2. Refresh
Updates the displayed items.
3. Hide Code
Hide or display the CMiC Field item IDs.
4. Sort by name, Sort by code
Flags to control the sorting order of the CMiC Field items.
5. Show files
Shows the list of CMiC Field items in the lower pane of the ECM section.
6. Clear Cache
Clears the cache on the local computer.
NOTE: The context menu for PCIs and Daily Journals does not have “Apply Filters” and “Show Files” options. The Documents context menu has the same options as that of Enterprise Documents: “Clear Cache” and “Refresh”.
3. Detail Pane
The Details pane is located at the bottom of the ECM section and it shows information about a highlighted item.
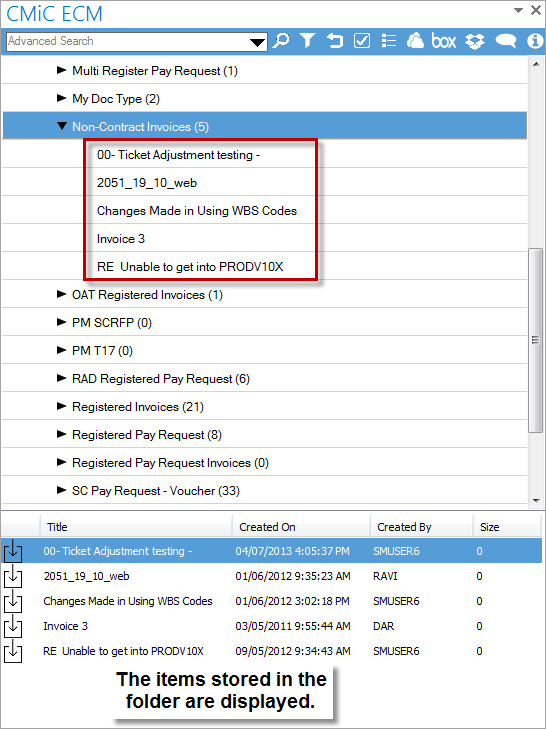
Enterprise Documents
When the document type node is highlighted, the files stored in this folder are displayed in the Details pane. Double-clicking the file will open it in the viewer.
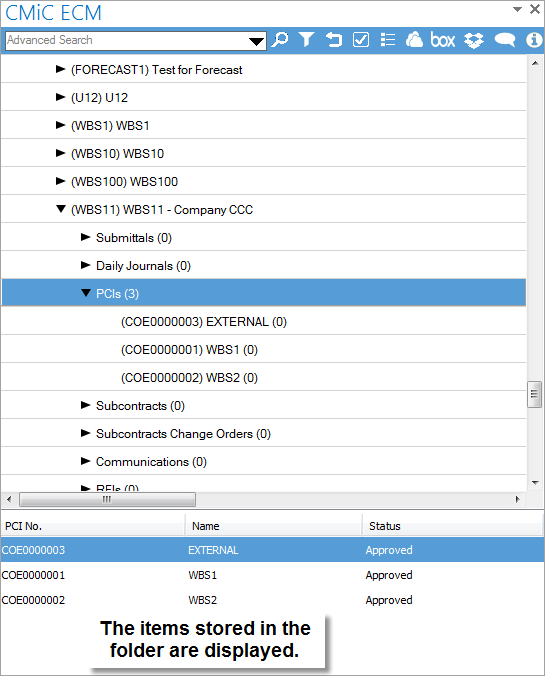
Projects
When the CMiC Field items folder is highlighted, the items in this folder are displayed.
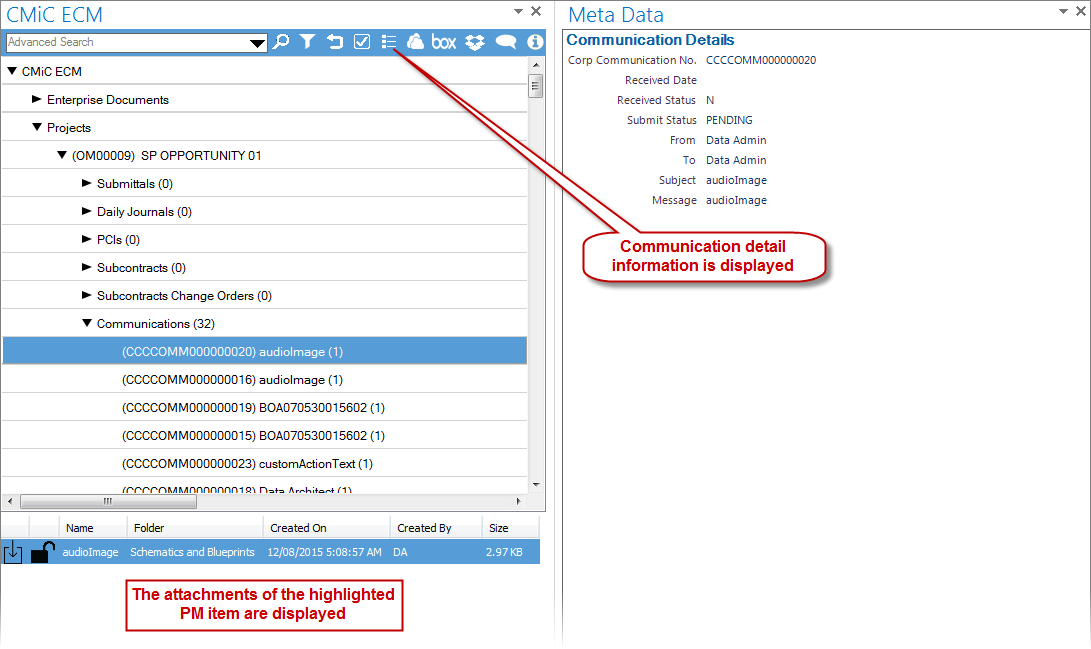
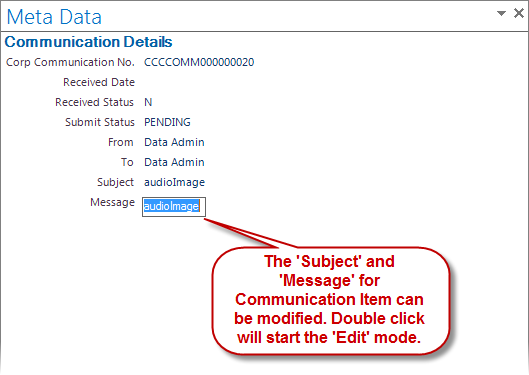
When the CMiC Field item is highlighted, the displayed information depends on the state of the Attachment Detail / Detail View button (see the Control Panel subsection in the Plug-In Interface Features section of this guide).
In Details mode, the information in some fields can be modified. Double clicking fields starts the Edit mode:
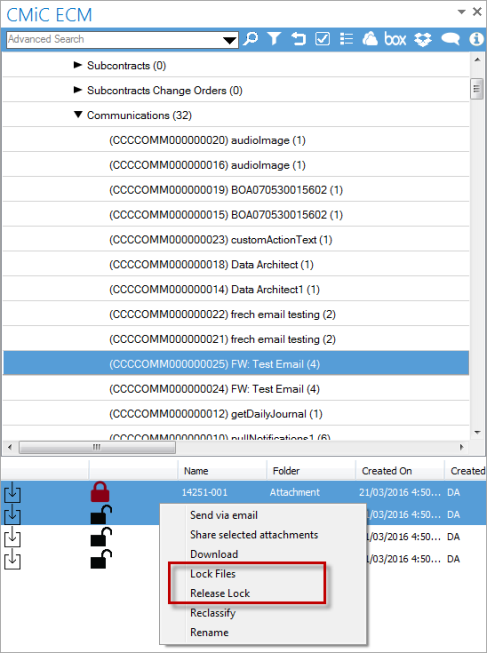
In the attachment detail mode the following options are available (upon right-click on selection).
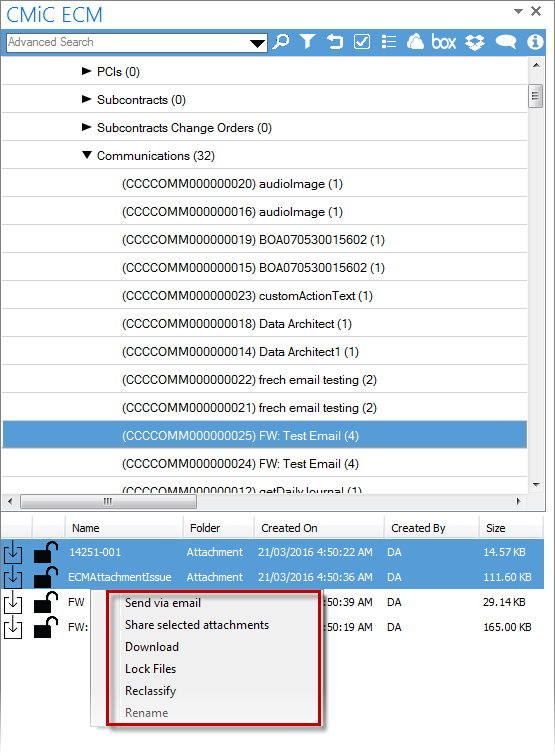
For multiple selection:
-
Folder (and document type) for the selected documents can be changed (“Reclassify” option).
-
Title of the selected documents can be modified (“Rename” option).
-
Selected documents can be downloaded from the system (“Download” option).
-
Selected documents can be locked/unlocked (“Lock Files” options).
-
Selected documents can be sent via email (“Send via email” option).
-
Selected documents can be shared (“Share selected attachments” option).
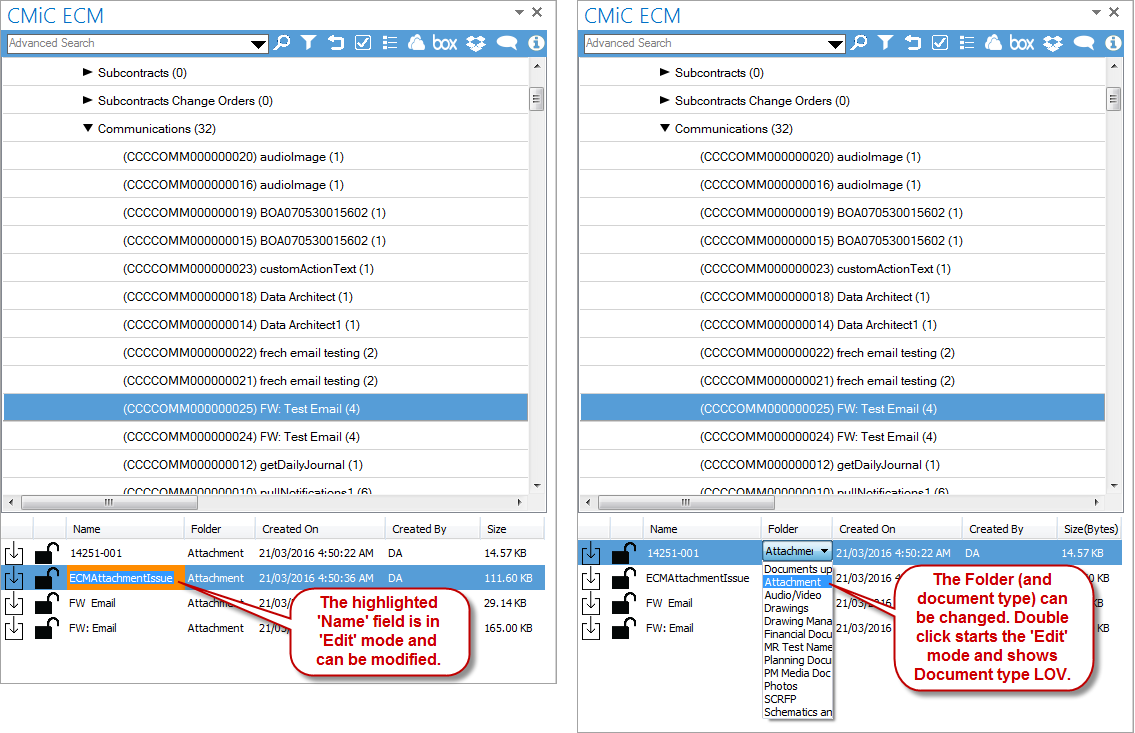
For single attachments:
-
Double clicking on Name or Folder field starts Edit mode and allows users to change the document title or folder (type) of the selected document respectively:
Right clicking starts the context menu with the following options:
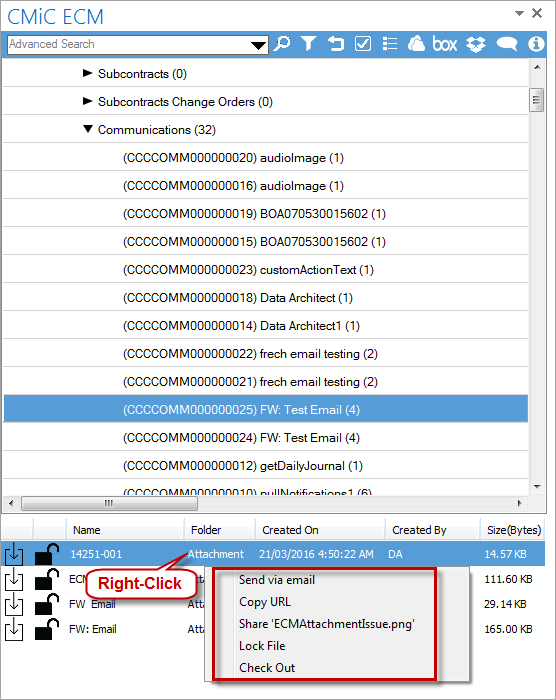
A. Send via email: Creates an email in Outlook with the file attached to send to email recipients.
B. Copy URL: Copy URL for selected file to the buffer for later use.
C. Share <file name>: Creates the email with link for the attachment to be shared.
D. Lock File / Unlock File: Locks/unlocks the selected file.
NOTE: if some of the selected documents are locked and some of them are unlocked, the context menu shows both options. When selected, the system applies the locking/unlocking action accordingly:
-
Lock File action will be applied to unlocked documents
-
Release Lock action will be applied to locked ones only
E. Check In / Check Out: Starts the dialog box to do the following.
-
-
Check In - Select the file for uploading and creating new revision of the selected document or to select place to download the selected attachment.
-
Check Out - Select the place to download the selected document.