The main difference between preparing checks for a selection code, as opposed to preparing checks for a pay run group, is the procedure to be followed in Steps 1-2. The rest of the procedure to be followed in Steps 3-7 is basically the same for both methods, except for in Step 5, the Move To New Group/Selection pop-up window varies depending on whether it’s launched for a selection code or pay run group.
Step 1: Select Payments and Create Pay Run Group
Pay run groups are used to group and pay posted vouchers associated with different payment selection codes of companies in the system using a single company’s bank account. If preparing checks for a pay run group, inter-company account setup is required.
In the screenshots below, the parent company “CCC” has inter-company accounts set up for one of its subsidiary companies, “RV123456”, and vice versa, so that checks can be prepared for vendors under both companies.
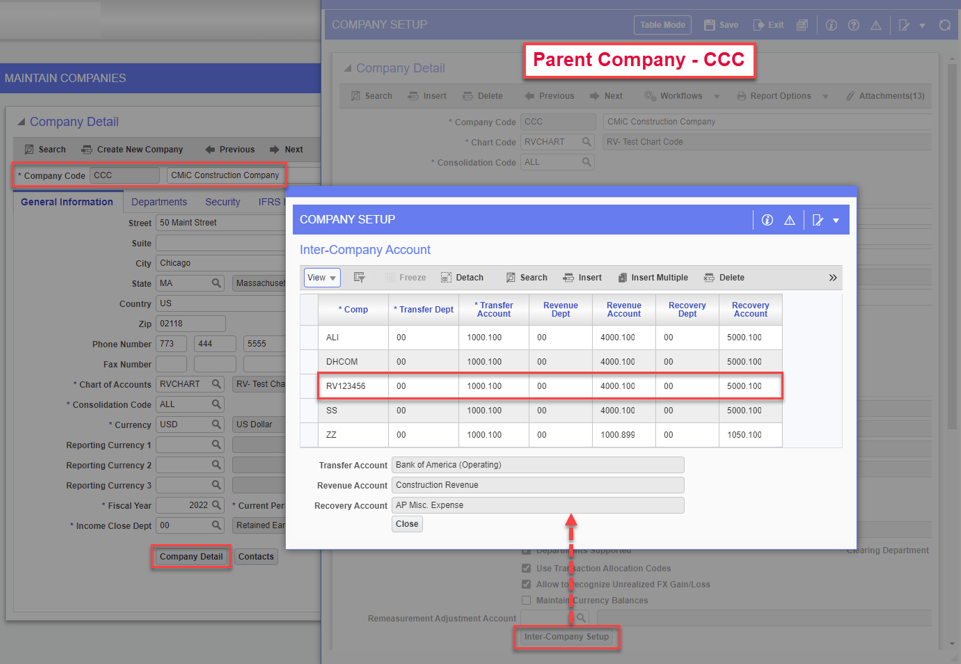
Pop-up window launched from [Inter-Company Setup] button on the Maintain Companies screen; standard Treeview path: General Ledger > Setup > Maintain Companies
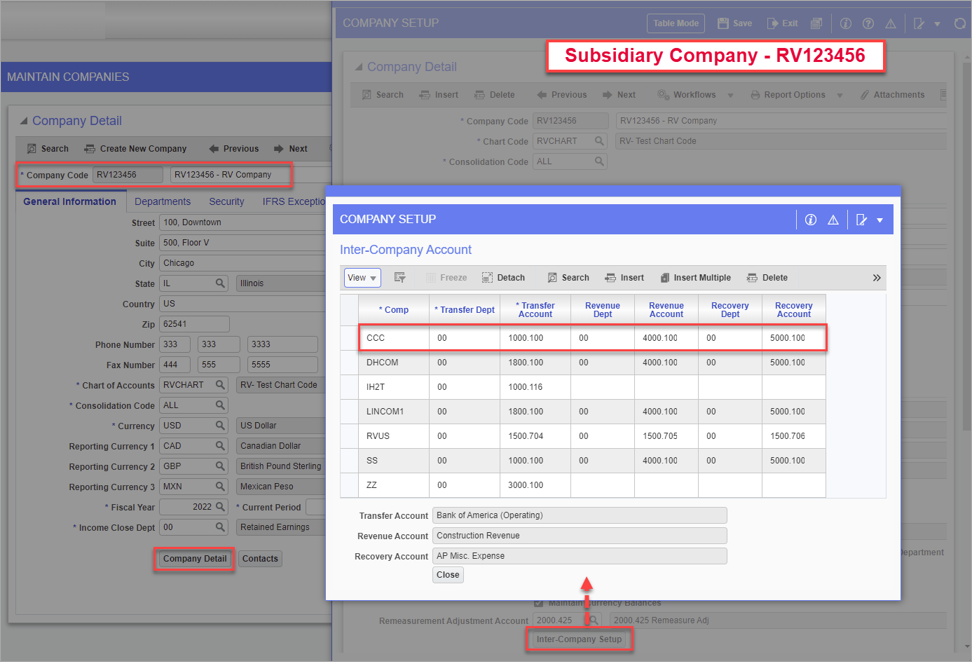
Pop-up window launched from [Inter-Company Setup] button on the Maintain Companies screen; standard Treeview path: General Ledger > Setup > Company Setup
NOTE All the companies under the pay run group must use the same chart of accounts.
In addition, the parent company must have the Multi-company Vouchers – Single Check checkbox unchecked on the Check tab of the AP Control File, as shown in the screenshot below.
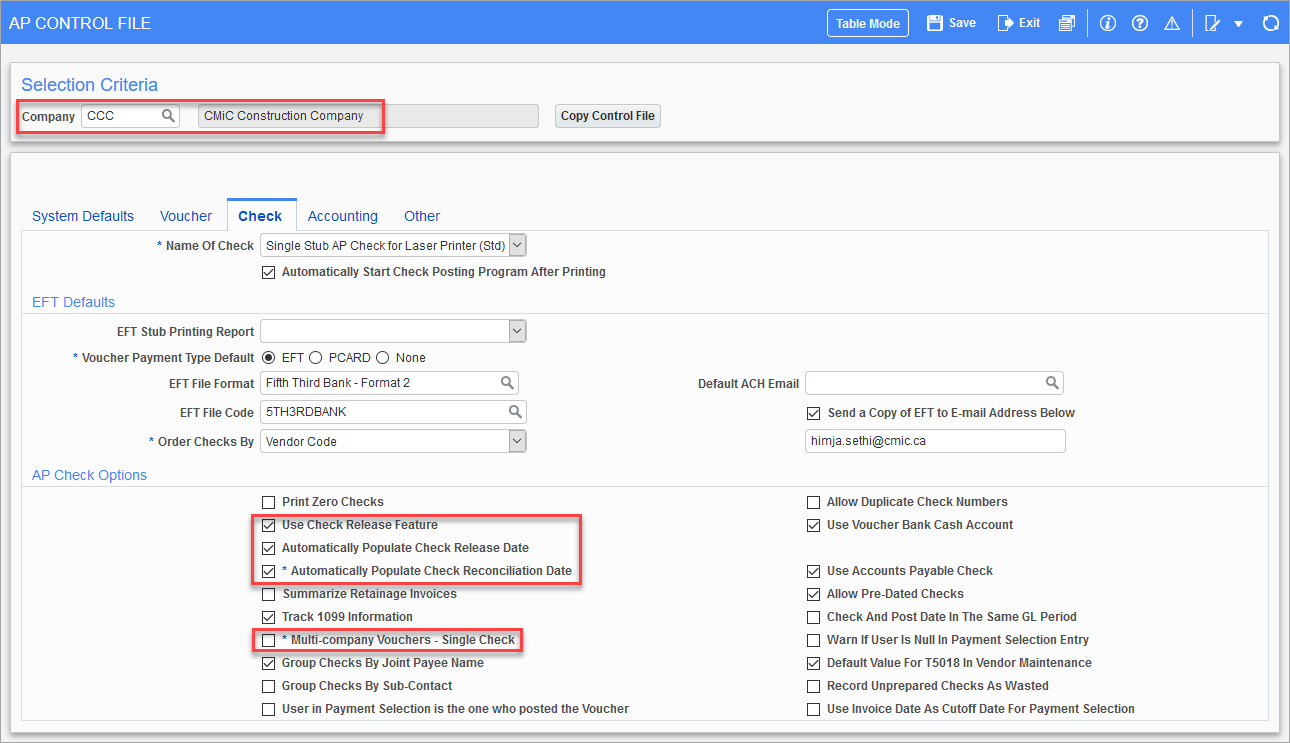
Pgm: APCTRLFM – AP Control File; standard Treeview path: Accounts Payable > Setup > Local Tables > Control File Options – Check tab
All the vendors must be defined under each company involved in the payment. For example, all the vendors under company CCC must be defined under company RV123456 as well and vice versa.
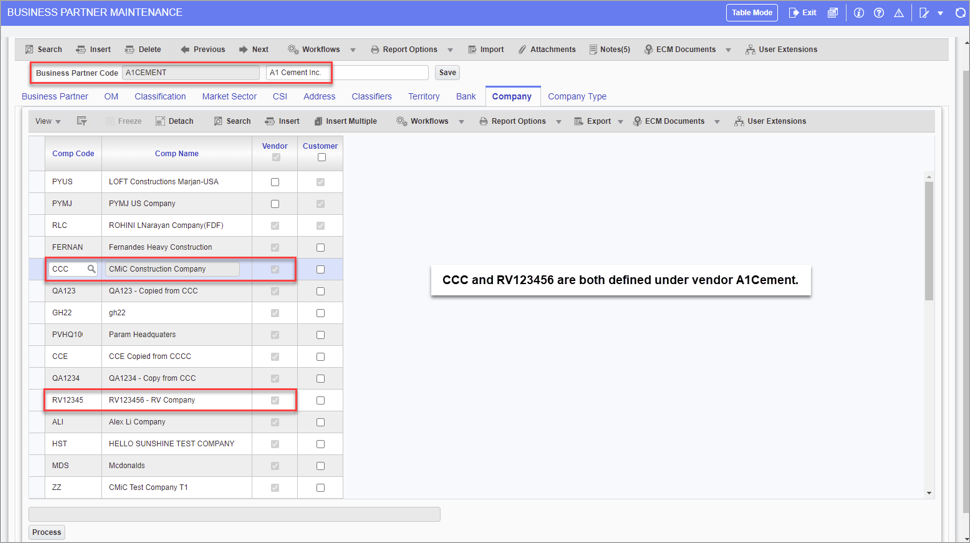
Pgm: BPBPFM – Business Partner Maintenance; standard Treeview path: Accounts Payable > Setup > Maintain Business Partners – Company tab
Vendors can be defined for both companies at once using the Company tab on the Business Partner Maintenance screen. For example, the screenshot above shows the vendor A1BRICKS with both CCC and RV123456 defined. This process must be followed for all vendors involved in the payment.
As shown in the following screenshots, selection codes have been set up for the two companies:
-
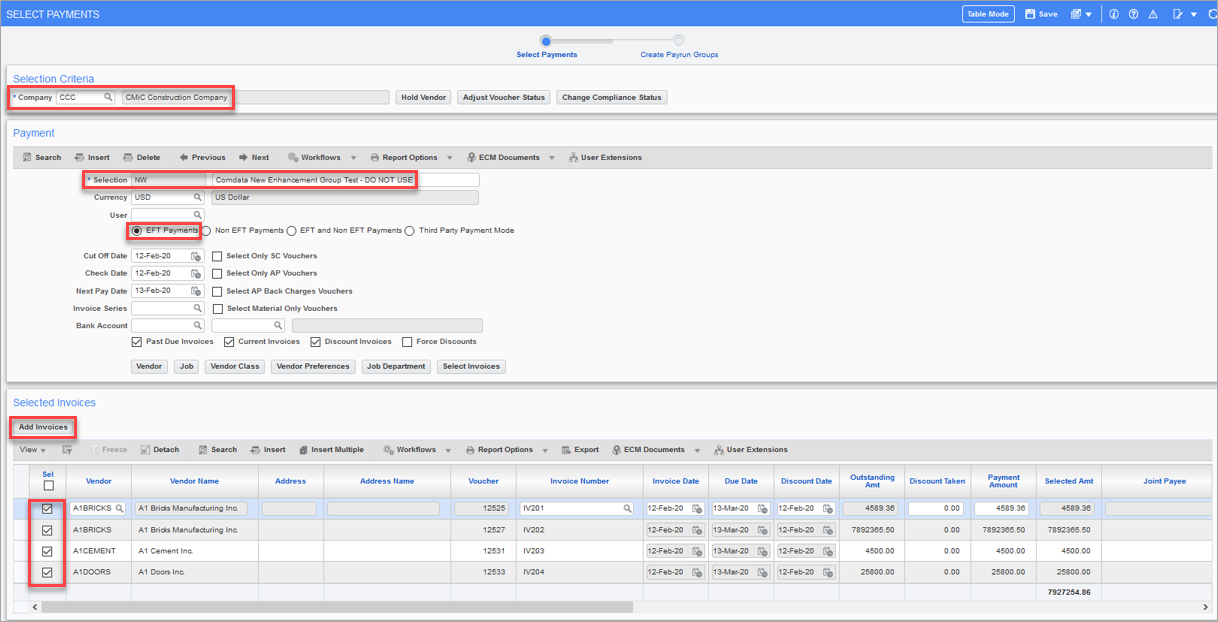
Selection code NI for company CCC.
-
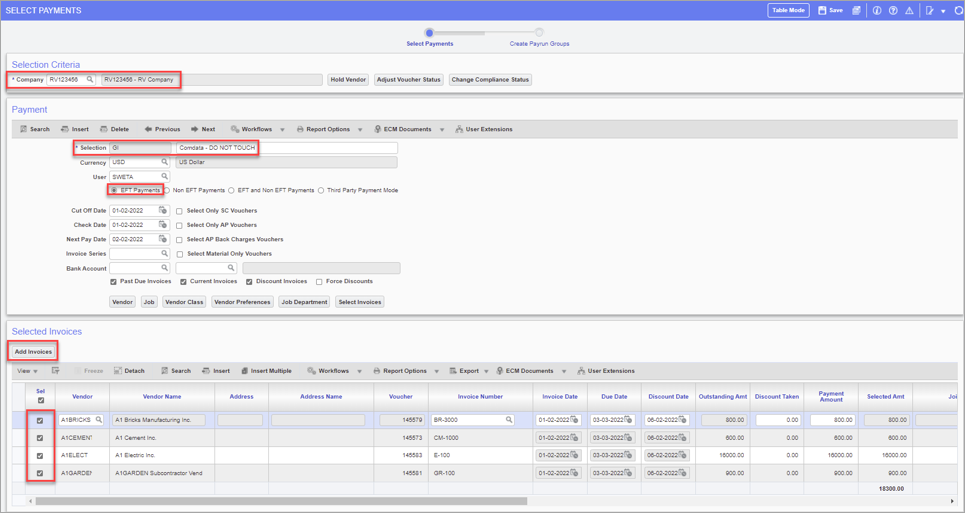
Selection code GI for company RV123456.
Pgm: PAYSEL – Select Payments; standard Treeview path: Accounts Payable > Payment > Select Payments
Selection code NI was created for the parent company CCC and four invoices have been selected for three vendors.
Pgm: PAYSEL – Select Payments; standard Treeview path: Accounts Payable > Payment > Select Payments
Selection code GI was created for the subsidiary company RV123456 and four invoices have been selected for four vendors.
Once the selection codes have been created with the associated invoices to be paid, a pay run group can be created to group and pay the invoices from the two companies.
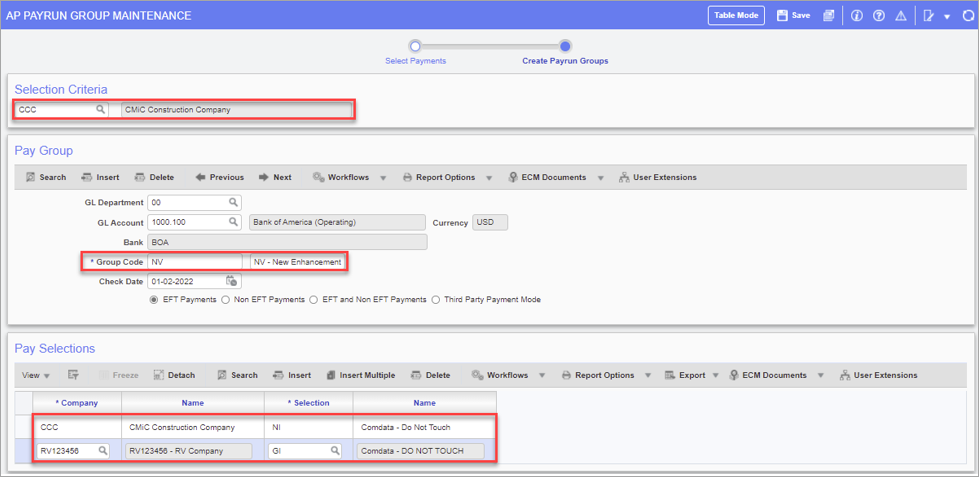
Pgm: PASELGRP – AP Payrun Group Maintenance; standard Treeview path: Accounts Payable > Payment > Select Payments
On the AP Payrun Group Maintenance screen, create a group code and associate the payment selection codes. In the screenshot above, a group code “NV” was created for the parent company “CCC” to include selection codes “NI”, and “GI”.
Step 2: Generate Comdata Payment/Request File
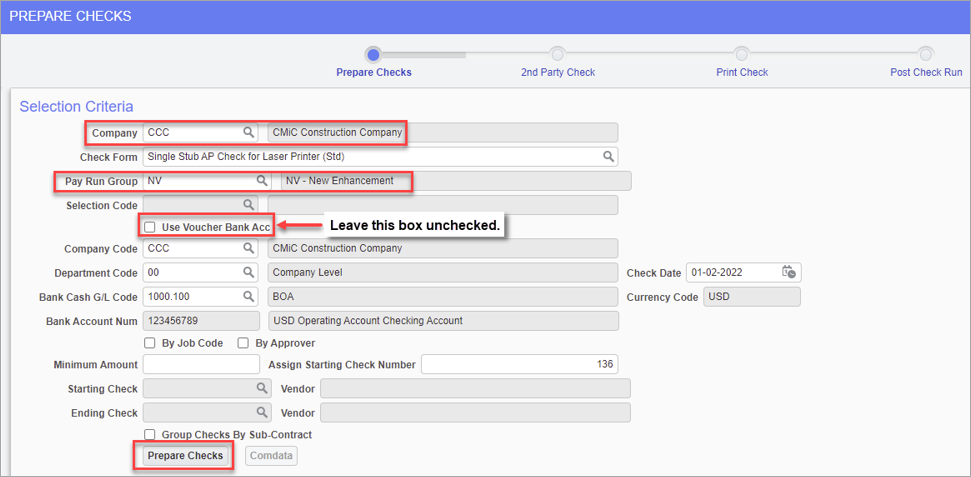
Pgm: APCHQPRE – Prepare Checks; standard Treeview path: Accounts Payable > Check > Print Checks
On the Prepare Checks screen, enter/select the company and pay run group, and leave Use Voucher Bank Acc unchecked. Click on the Prepare Checks button.

The Prepare Checks button changes to Renumber Checks. A message appears at the top of the screen to indicate the total number of checks prepared and the Comdata button becomes enabled.
Click on the Comdata button to launch a pop-up window to initiate the payment/request file generation process.
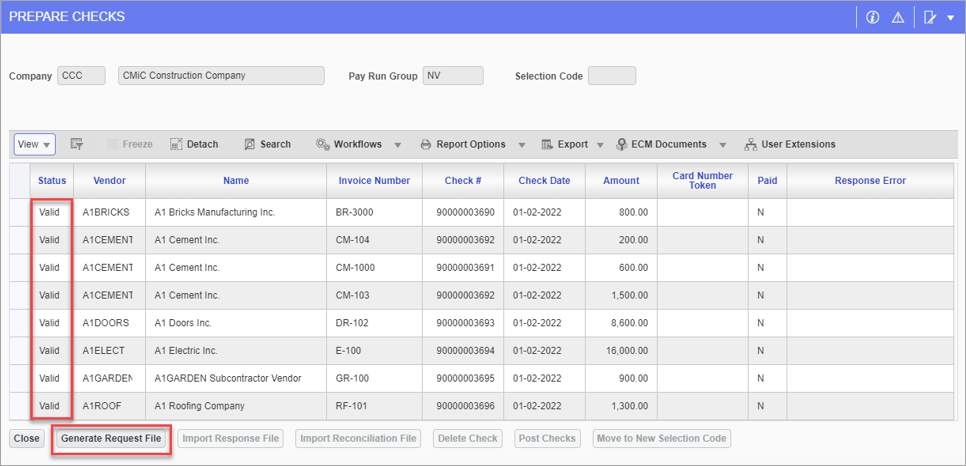
Pop-up window launched from [Comdata] button on Prepare Checks screen
All records must be valid in the Status column for the Generate Request File button to be enabled.
Once all records are valid in the pop-up window, click on the Generate Request File button to launch a pop-up window to select the EFT format.
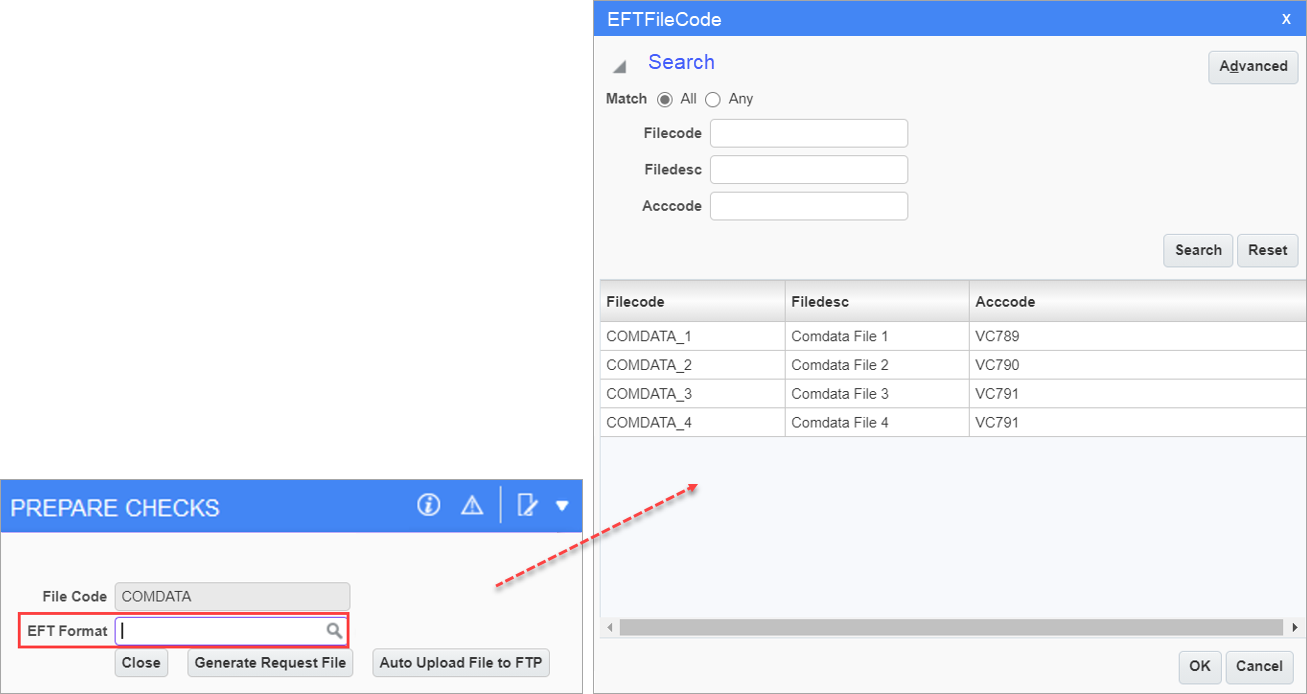
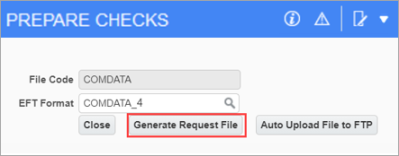
After selecting the EFT format, click on the Generate Request File button to generate the payment/request file.
A pop-up window is launched, prompting the user to select in which program to open the payment/request file.
The procedure from this point forward is the same as that for preparing checks for a selection code.
NOTE: For details regarding the [Auto Upload File to FTP] button, refer to Comdata Automation for Upload and Import of Files.
Steps 3 – 7: Follow Steps 3 – 7 in Preparing Checks for a Selection Code
Follow Steps 3 - 7 in Preparing Checks for a Selection Code as the procedures for both methods are the same. If required, additional details and screenshots are provided below to help guide the user through the process for pay run groups.
Additional Details for Pay Run Group
Importing and processing the reconciliation file in Step 4 for a pay run group is the same procedure as for a selection code. Moving unreconciled payments for pay run groups is also similar to Step 5. When payments are processed under a pay run group code, users will be given the same option of selecting unreconciled payments and moving them to a new pay run group code.
The logic behind moving vendors under a group code, which may have single or multiple selection codes, is basically the same as moving vendors when preparing checks for a selection code.
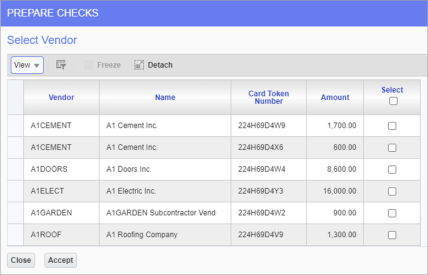
The Select Vendor pop-up window for a pay run group is similar to the one used for a selection code. The only difference is that the vendor may belong to single or multiple selection codes in the pay run group.
Payments can be moved from one pay run group code to a new pay run group code by clicking on the Move to New Selection Code button.
Select Vendor pop-up window launched from [Move to New Selection Code] button for pay run groups
In the Select Vendor pop-up window, select vendors and then click on the [Accept] button to retrieve all invoices for those vendors from single or multiple selection codes.
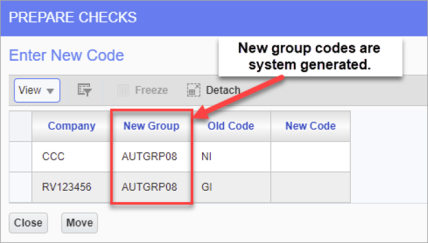
Enter New Code pop-up window launched from [Accept] button on Select Vendor pop-up window for pay run groups
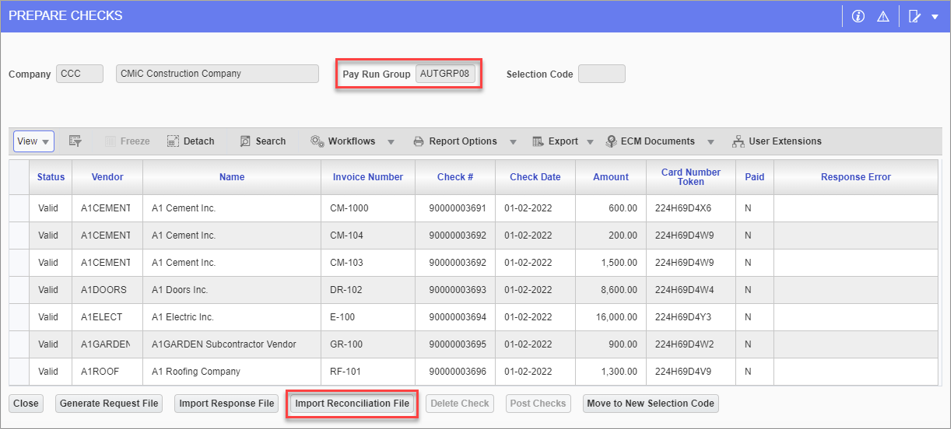
The Enter New Code pop-up window for pay run groups will display unique company wide selection codes. The screenshot above shows records from the pay run group NV being moved to a new group, AUTGRP08.
The new group code is a system-generated 8-character code, AUTGRP**, where the asterisk (*) represents a placeholder for the numbers in the string. For example, the first group code will be “AUTGRP01”, and the next code will increment by 01, so it will be “AUTGRP02”. If “AUTGRP11” already exists, the next group code generated will be “AUTGRP12”.
Since one group code may consist of multiple selection codes, if records are selected from two different selection codes, the pop-up window will list two records so two new selection codes can be entered.
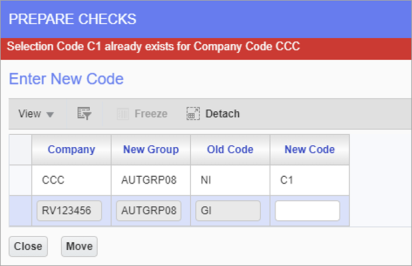
In the event a duplicate selection code exists, an error will be issued as shown in the screenshot above.
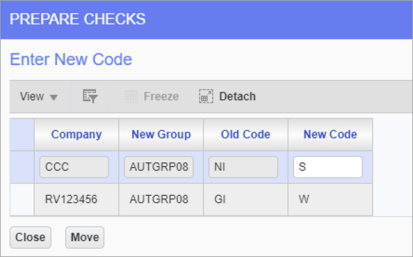
A new selection code can be defined for each company, as shown in the screenshot above.
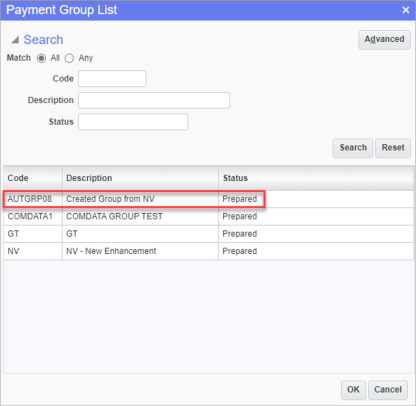
Payment Group List pop-up window launched from Pay Run Group field on the Prepare Checks screen
A new pay run group code “AUTGRP08” is created with a meaningful system-generated description, which indicates under which original group code it was created. The new pay run group code will be available in the pop-up window launched from the Pay Run Group field on the Prepare Checks screen.
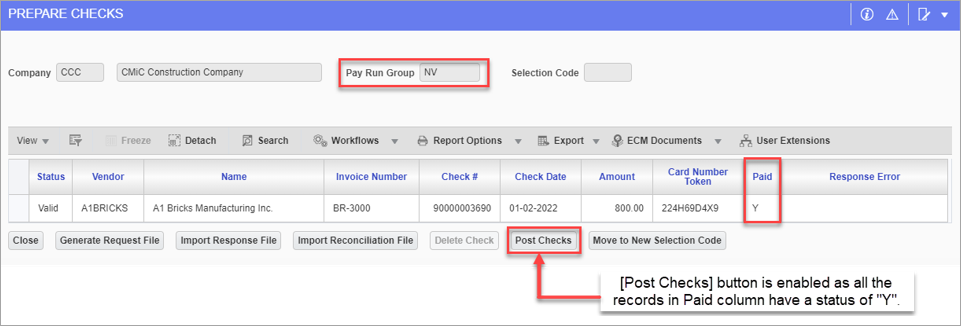
The original parent group code NV is now ready to be posted. This procedure is the same as Step 6. As all the records have a status of “Y” in the Paid column, the checkboxes in the Move column are disabled and the Post Checks button is enabled.
Pop-up window launched from [Comdata] button on the Prepare Checks screen
Processing and posting the new pay run group code AUTGRP08 can now be completed. Importing and processing the reconciliation file is the same process as described in Step 7.
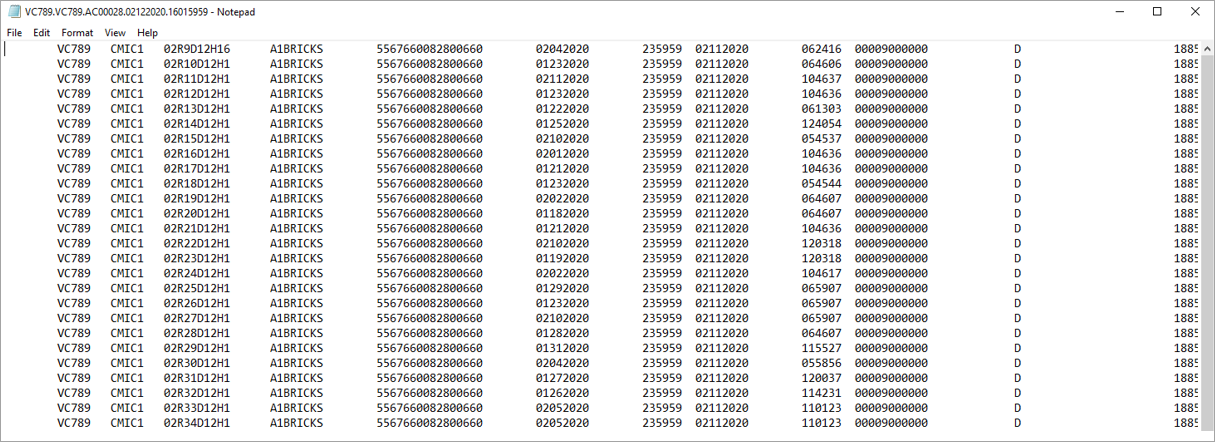
The screenshot above shows an example of a reconciliation file open in Notepad. Once the reconciliation file is processed, pay run group code AUTGR08 can be posted. It will be a different batch than that of pay run group code NV.