Overview
Logs; standard Treeview path: CMiC Field > File Maintenance > User-Defined Logs
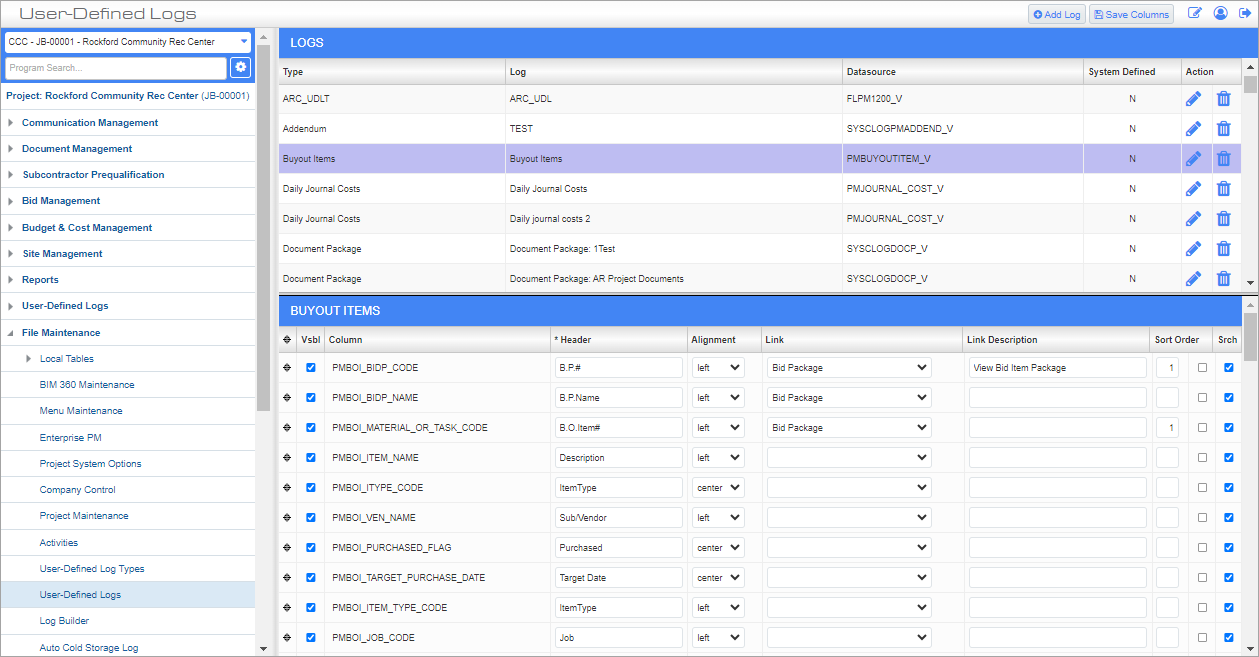
The User-Defined Logs screen is used to create and maintain user-defined logs in CMiC Field. These user-defined logs are based on log type codes, which are created in the User-Defined Log Types screen. The same log type can be used to design a variety of different logs when various layouts are required. User-defined logs appear under the User-Defined Logs menu in the Treeview.
The User-Defined Logs screen is divided into two sections. The top section of the screen lists all of the user-defined logs. When a log is selected, it will be highlighted and displayed in the lower section of the screen.
NOTE: For information on customizing system logs found in CMiC Field, refer to CMiC Field - Log Builder.
Add a New Log
![Pop-up window launched from the [Add Log] button.](../../../../Resources/Images/CMiC_Field/User_Defined_Logs_5.png)
Pop-up window launched from the [Add Log] button
The [Add Log] button is used to create a new log. Pressing this button will open the Add/Edit Log pop-up window, where the new log can be defined. Once the desired details have been specified, clicking on the [Save] button saves the new log.
Type
Select the type of log being created. These codes are created and maintained in the User-Defined Log Types screen.
Menu Name
Enter the name of the log as it will appear in the Treeview menu.
Where Clause
Add any required Where clause for the log to use for filtering data.
Add Clicked Rows To Tree – Checkbox
This checkbox is available for all objects.
Check this box to automatically add any opened log records to the Treeview menu. Opened records will appear in the Treeview as subheadings to the log menu item. If this box is unchecked, the record link will not be displayed in the Treeview.
Applications
Using the checkboxes, select which CMiC applications will have access to the log. Security access can then be assigned to users from those selected applications.
Once saved, the log will be listed in the Logs section (i.e., top section) of the screen. Select the log to view it's details in the lower section of the screen.
Define Log Type Details
The lower section of the screen contains features similar to CMiC Field - Log Builder. Once a log type is selected in the top section of the screen, modifications can be made to the log type's details as required (e.g., add/remove columns, rename column headers, adjust column alignment, update links, rearrange sort order, and apply column searching).
Vsbl – Checkbox

The only fields available are those that are shown on the log screen. By adding or removing fields, you are changing the look of the log. To add a field to the log, check the 'Visible' checkbox, and to remove a field, uncheck the checkbox.
Move
To move a field anywhere on the log, click on the field’s Action icon ( ) and drag and drop the field to the desired location.
Header, Alignment
The system allows the title (or header) of the field to be changed plus the alignment of the data within the field. To modify the title, change the Header information (this field can’t be left blank). There are three settings for alignment: Left, Right and Center. This alignment refers to the data being displayed, not the column title.
Link, Link Description
Link columns are pre-defined by the system but can be applied to any field within the log. A link is a drill down to more detail. For example, from the RFI log, a standard link would be to drill down into the detail where the user can view the answer and the question and add notes if required. The Link Description is the field help that will display when the cursor moves over the linked field.
Sort Order, Sort Descending – Checkbox
Use the Sort Order field to define the log’s sort order. You can specify to sort by a specific field, in ascending order, or check the ‘Sort Descending’ checkbox to sort by descending order. The 'Sort Descending' box is located directly beside the Sort Order field. In the example below, the sort order has been defined to sort by Date first (in descending order, e.g. oldest to most current date) and then by Transmittal No.

Example of Sort Order on User-Defined Log for Transmittal
Srch – Checkbox
Checking the ‘Search’ checkbox makes the column searchable in the log.
Edit Existing Logs
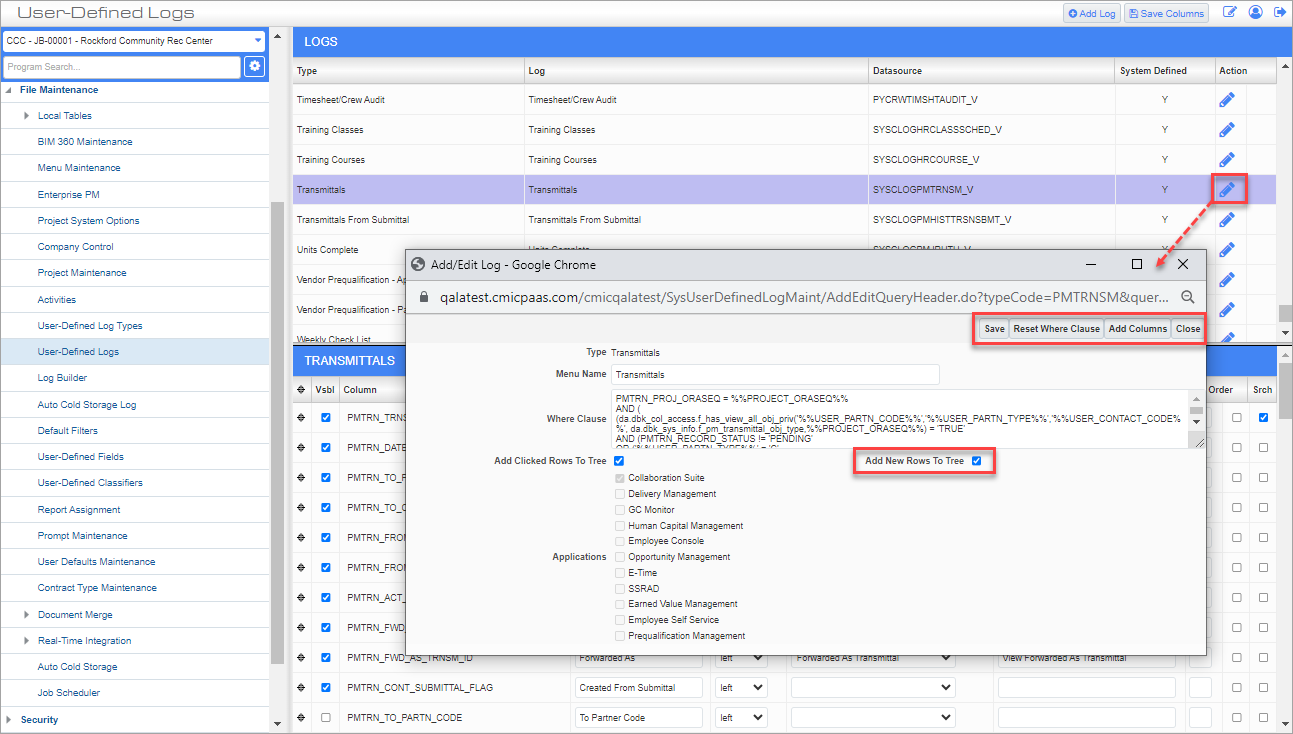
Clicking on the Edit icon (![]() ) next to any log launches a pop-up window where the selected log's details can be edited. The fields in this pop-up window are the same ones available when Adding a New Log, but this window includes a few more options. Some extra buttons are available along the top of the window and the 'Add New Rows To Tree' checkbox might be displayed.
) next to any log launches a pop-up window where the selected log's details can be edited. The fields in this pop-up window are the same ones available when Adding a New Log, but this window includes a few more options. Some extra buttons are available along the top of the window and the 'Add New Rows To Tree' checkbox might be displayed.
[Reset Where Clause] – Button
This button is used to clear out any existing text in the Where Clause field.
[Add Columns] – Button
This button is used to add or remove columns from the selected log. Pressing the [Add Column] button will display the selected log, where additional columns can be made visible or hidden using the checkboxes in the 'Vsbl' column. When finished, press the [Save Columns] button to save the selection changes to the log.
![Screenshot of User-Defined Logs with [Save Columns] highlighted.](../../../../Resources/Images/CMiC_Field/User_Defined_Logs_7_767x421.png)
Add New Rows To Tree – Checkbox
The ‘Add New Rows to Tree’ checkbox only applies to objects where a count of the new and modified records are shown on the tree (e.g., Communications, Issues, Transmittals, etc.).
When ‘Add New Rows To Tree’ is checked, all new and modified records for the associated program will be displayed in the Treeview when the user clicks on the program link for the log when it loads. Otherwise, the program link will only show the count of new and modified records beside the program link on the tree.
View User-Defined Logs

Security Roles; standard Treeview path: CMiC Field > Security > Role Maintenance – Assign Menu Items
Users must be assigned menu access to the user-defined log in the Security Roles screen. In this example, the user-defined log's name is "Collab RFI".

Sample user-defined log launched from Treeview
The user-defined log will appear under the User-Defined Logs menu in the Treeview.
NOTE: The user-defined log is added to the standard Default Menu and may need to be added to the Current Project Menu. For more information, please refer to CMiC Field - Menu Maintenance
Once a record is selected, the user can press the [Back To Log] button to return to the user-defined log screen.
Log functionality depends on the log type/data source and related privileges. For example, the ability to batch edit PCI records in a user-defined log is the same project role privilege 'Allow Batch Edit on PCI' required for the system-defined PCI log.