The Voucher Entry program allows for the matching of vendor invoices, entered as vouchers in the system, to purchase orders processed and received within the system. Entering a voucher that is associated with a purchase order is similar to the standard voucher entry process, in that their common invoice fields, such as Vendor, Series Code, Invoice Number, Invoice Date, Due Date, and Discount Date, are required in the way that they are for all entered vouchers. The difference is, before the amount fields are entered, the user must either enter the purchase order number if the voucher is only for one purchase order, or use the [PO Selection] button to select more than one.
This button launches the Purchase Order Invoice Detail pop-up, shown below, to associate more than one purchase order to a voucher. The pop-up is also used to display the details of the purchase order and Line Items being invoiced, and allows the editing of payment details. If a purchase order is selected via the PO Number field, this button can be used to view and alter the purchase order’s details.
Also, if a purchase order is associated with a voucher, “Multi Distribution” must be selected in the Distribution Type field, as the Multi Distribution type allows for all distribution scenarios for a purchase order.
PO Detail Invoice Select List
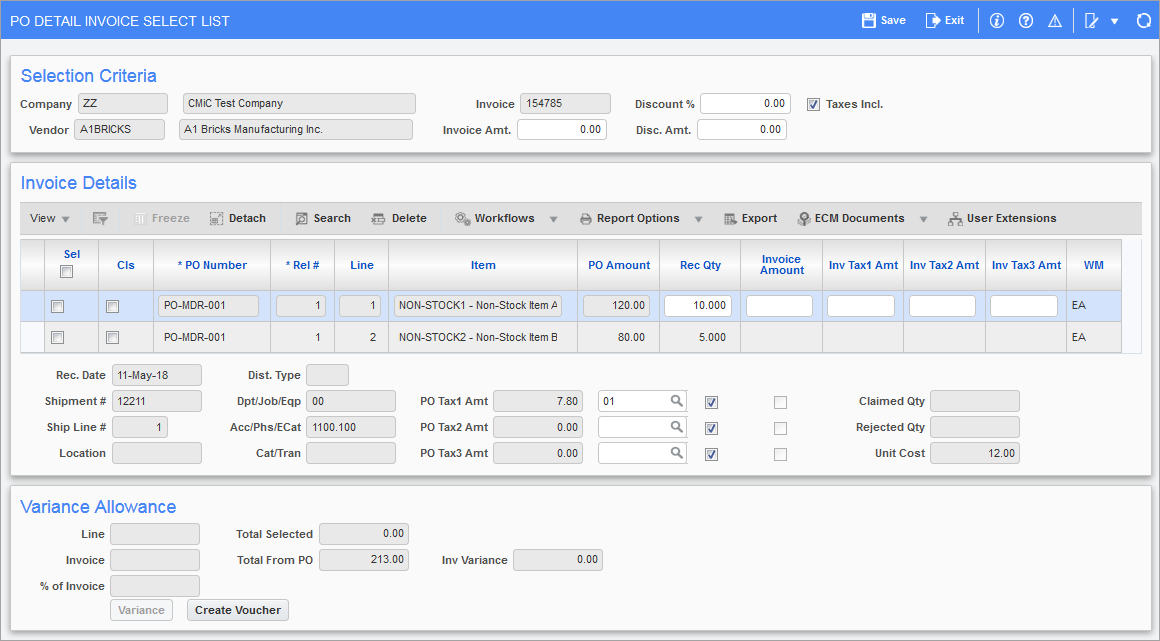
Pgm: APPOPICK – PO Detail Invoice Select List; pop-up window launched from [PO Selection] button on Enter Voucher screen (standard Treeview path: Accounts Payable > Voucher > Enter Voucher – Voucher Detail tab)
This screen is used to match the purchase order line items to the invoice check. When a line is selected, the invoice amount and received quantity will automatically be populated according to the lines receiving information.
Invoice Amt, Discount %, Disc. Amt
Enter the invoice amount and Enter/select the discount % and/or discount. The system defaults the discount % as defined by the terms code.
NOTE: The terms code may be determined by either the vendor or the purchase order, depending on the setting of the ‘Use PO Terms’ checkbox on the Other tab of the AP Control File.
Taxes Incl. – Checkbox
Check this box if the amount entered in the Invoice Amount field includes any tax amounts.
Sel – Checkbox
These checkboxes are used to select the corresponding purchase order line.
Cls – Checkbox
Sometimes, although the complete line has not yet been received, or the amounts don't quite match, the line is complete and should be marked as closed. Because there is a discrepancy, the system will not automatically mark the line as closed, but it can be done manually by checking this box.
If the line has a ‘J’ distribution, the quantity commitment to the job will be relieved for this line.
In some cases, generally when the Automatic Receipt option is used while processing a purchase order, the quantity will not change, but the amount may need to be changed. To have the commitment to the job relieved for the amount, the Purchase Order Control File’s ‘Increase Commitment To Match Higher Costs’ checkbox must be checked on the Posting tab.
A line can’t be closed if the purchase order line is for a non-stock or a free-form item and the Purchase Order module’s ‘Control File’s Post to GL’ and ‘Post To JC’ checkboxes are checked on the Posting tab. To do so, use the Close/Re-Open PO utility (standard Treeview path: Purchase Order > Utilities > Close/Re-Open PO).
Closing all lines on a purchase order does not close the purchase order to allow for future purchase order change orders. To close the purchase order, you must use the PO Utility, Close/Re-Open PO.
NOTE: Both the [Sel] and [Cls] buttons must be used for the line to close.
Tax Amounts
The tax amounts and tax codes may be changed at this time to reflect the voucher. To change the tax codes, enter the tax code required against Tax1, Tax2, or Tax3 in the line detail area of the screen. If the tax needs to be changed for the entire purchase order, change the tax codes in the PO Tax fields where necessary.
When entering an invoice amount that does not equal the purchase order line item amount due to a variance, the system requires that the amount of the variance be distributed.
In the case where a variance has occurred, at the bottom left hand corner of the screen the Invoice Variance field will not be equal to zero. Use the [Variance] button and distribute the amount of the variance.
Within the variance window, the system allows distribution of the variance to General Ledger accounts (G distribution type), jobs (J distribution type) or equipment (E distribution type).
If a G distribution type is entered and then the user tabs through the fields, the system will automatically enter the General Ledger account defined on the control file as the PO Variance Account.
The [Retrieve Distribution] button that is available on the variance window will automatically populate with the original distribution if the PO Control File is set to not post Non Stock or Free Form items during receipt. If the system is set-up to post during receipt, then this button will retrieve the expense account. The distribution this button uses can be seen on the PO Matching screen, along with the tax and shipping information.
NOTE: The [Variance] button may or may not be available depending on the AP Control and privilege settings.
[Create Voucher] – Button
Once all the details have been entered, use this button to create the voucher and associated distribution for its invoice. The distribution of the voucher will automatically be created by the system and it is not updateable by the user.
Lump Sum POs
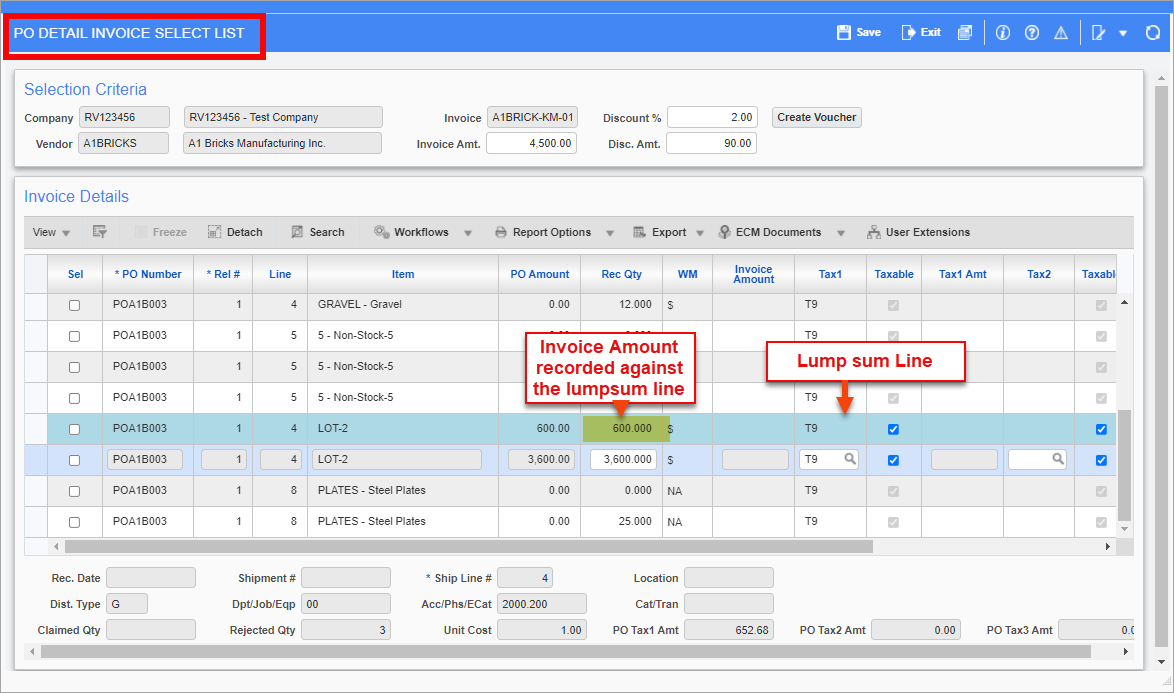
Pgm: APPOPICK – PO Detail Invoice Select List; pop-up window launched from [PO Selection] button on Enter Voucher screen
If using lump sum POs, lump sum lines will be visible along with their allocated sub-items. When the 'Lump Sum PO' checkbox is checked on the Voucher Detail tab of the Enter Vouchers screen, only lump sum POs will be visible in this pop-up window. The lump sum line will be highlighted in a different color. The invoice amount will be recorded only against the lump sum items.
NOTE: If using tax, the Invoice Amount will be a pre-tax amount and tax will be created on Invoice Amount. Users will have an option to override the tax amount.
Refer to
Advance Payment
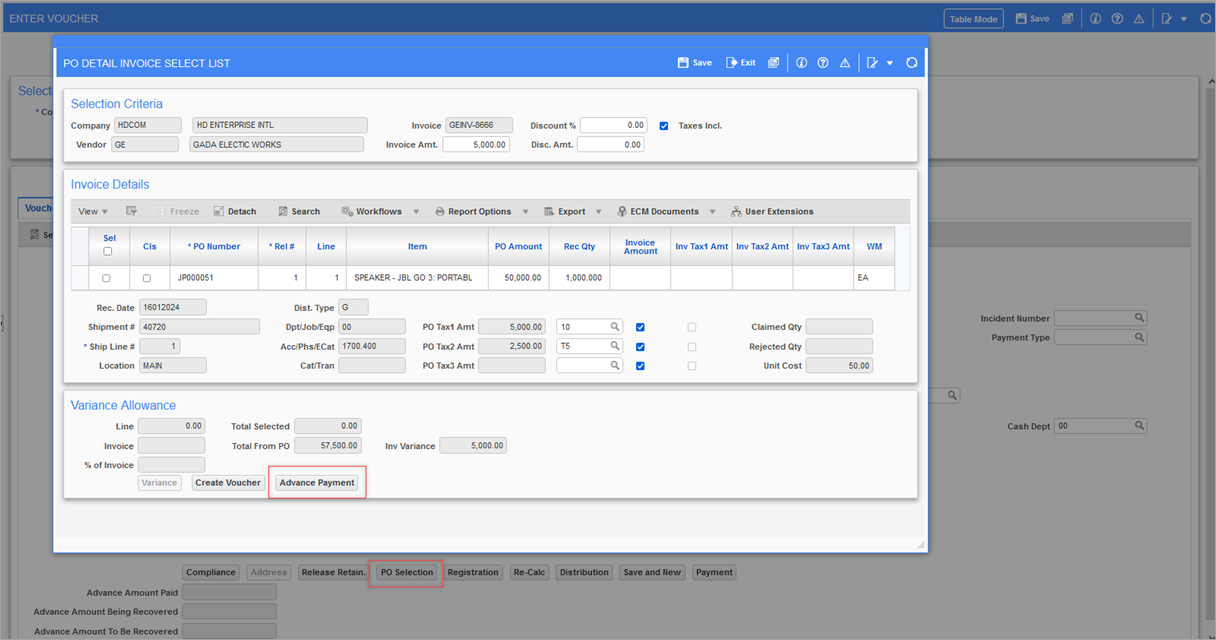
Note Users must uncheck the Taxes Incl. checkbox in the PO Selection pop-up window when creating the recovery invoice.
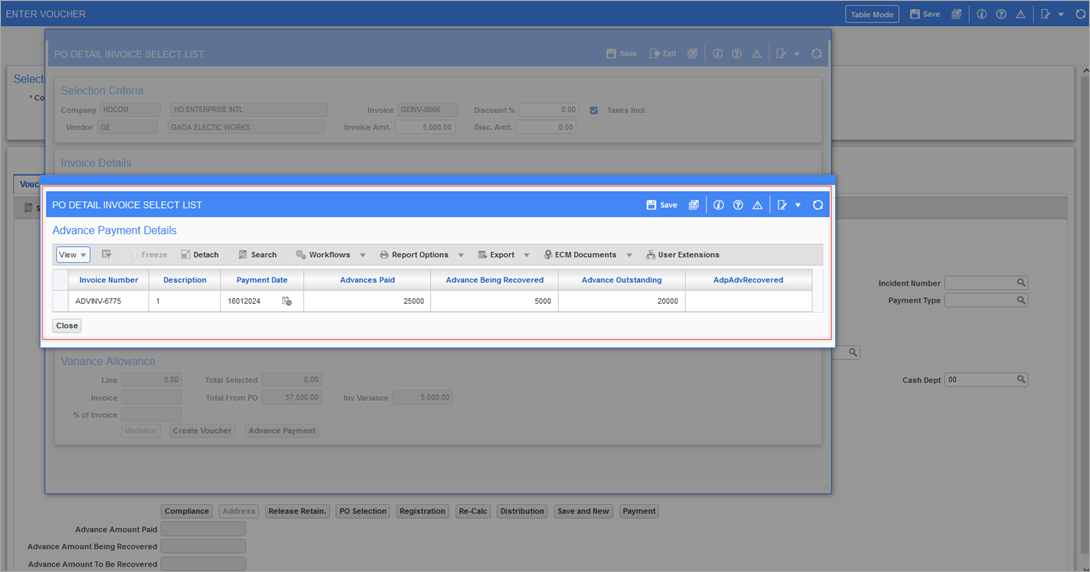
Click on the Advance Payment button from the PO Detail Invoice Select List pop-up window which launches the Advance Payment Details pop-up window. It displays the invoice details for the Advance Payment and the fields described below.
Note The change order (if applicable) must be posted before entering and posting the Advance Payment invoice. If the Advance Payment invoice is already posted, users must void the Advance Payment invoice and then recreate it in order to reflect Purchase Order Change Order changes in the Advance Payment amount. Users will not be allowed to void the Advance Payment invoice if an associated recovery invoice is posted. For Advance Payment details in Purchase Order, see Purchase Orders.
Advances Paid
The advance amount already paid for the Purchase Order. This field is non-editable.
Advance Being Recovered
The advance amount being recovered in the current recovery invoice. Enter the amount being recovered from advances.
Advance Outstanding
The advance amount available to be applied to next recovery invoice. This field is non-editable.
Advance Payment Recovered
The Advance Payment recovered and posted for the Purchase Order. This field is hidden and non-editable.