CMiC Analytics: Getting Started
Getting Started with CMiC Analytics
Granting Analytics Privileges in Enterprise Security
1. Navigate to the User Maintenance program: CMiC Enterprise Console > System Data > Security > Users > User Maintenance
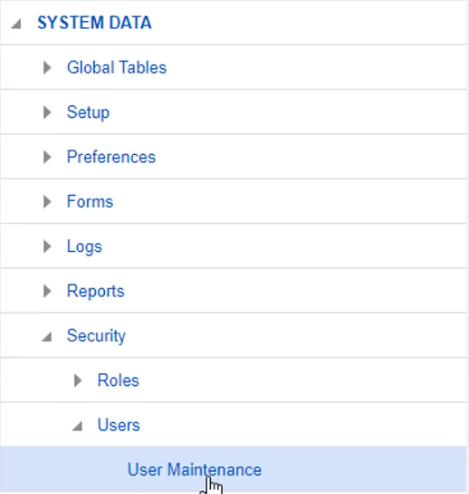
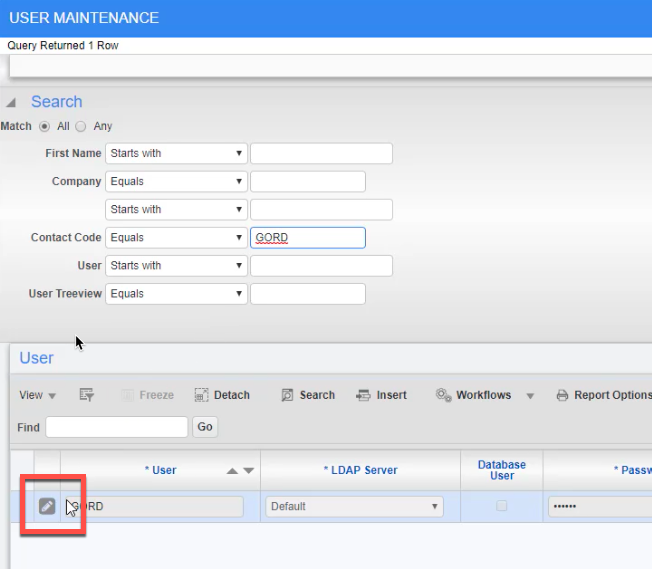
2. Search for the user using the ‘Search’ feature, and press the edit icon from the list of Users.
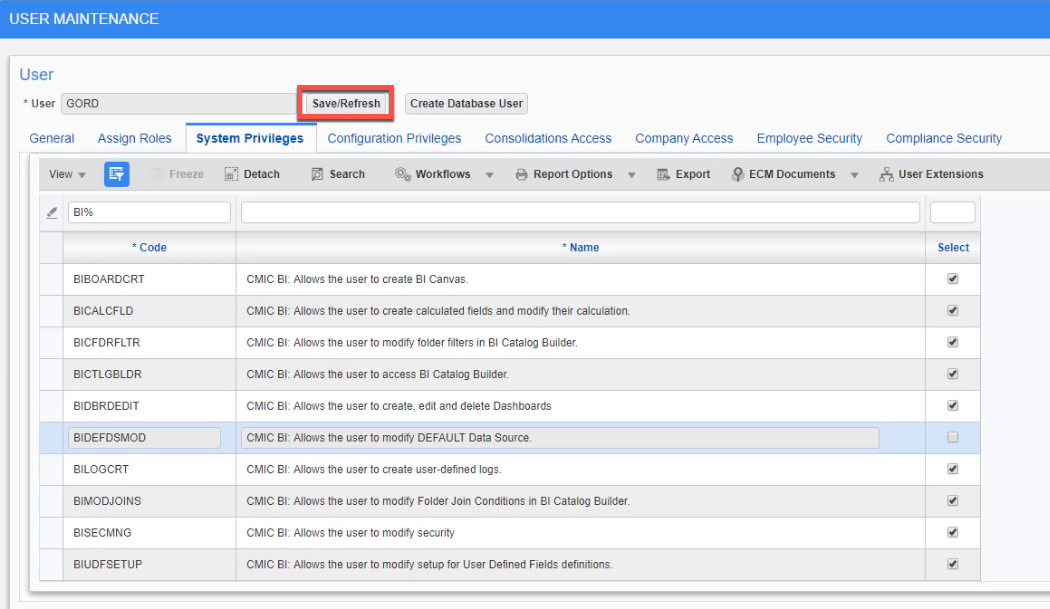
3. Under the System Privileges tab, filter for the relevant settings by clicking on the [Filter] button entering BI% into the Filter string and pressing [Enter] on the keyboard. This will isolate all of the required settings in the table below.
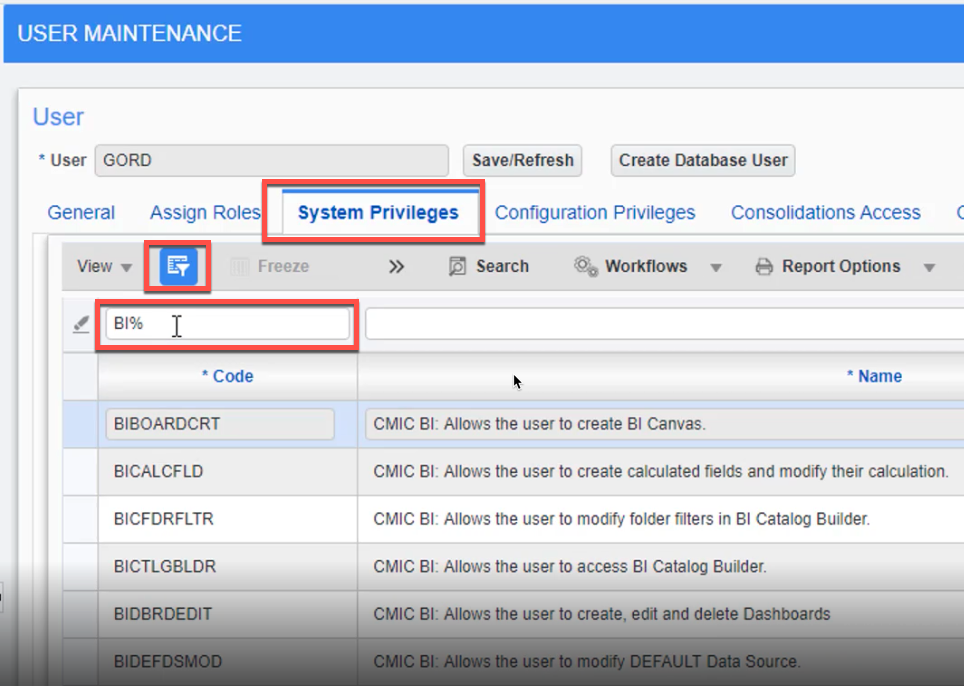
4. Review the checkboxes are enabled, to ensure that this user has the correct access.

Note: It is recommended that all settings are enabled, except for BIDEFDSMOD: Modifying the default data source, which should be disabled under most circumstances.

5. If any changes are made, be sure to [Save] before leaving the page.
Accessing the Default Analytics Canvas
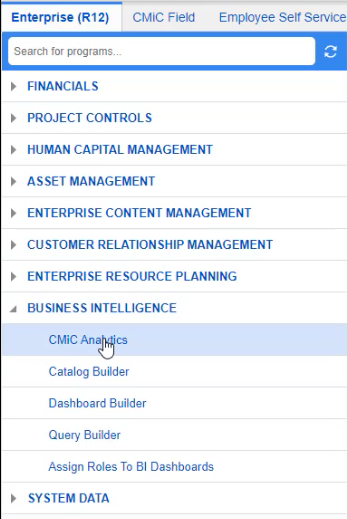
Navigate to the main Analytics screen by selecting CMiC Analytics from the Tree Menu: CMiC Enterprise Console > Business Intelligence > CMiC Analytics
Notes: Some environments will allow users to directly access CMiC Analytics from the launch screen. Please contact your Account Manager for assistance.
This menu option is available for default configurations. If it is not present, contact your Account Manager to have it added.
Understanding the terms Canvas Buckets and Objects
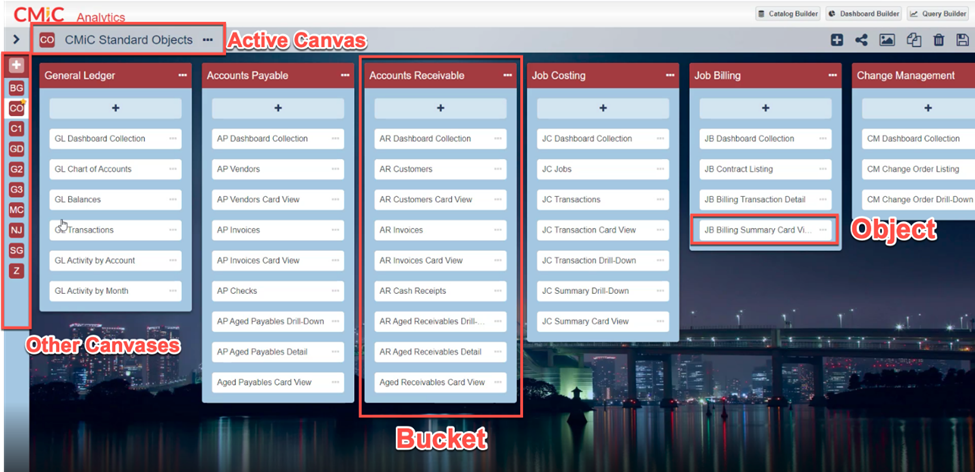
Canvas:
Collection of dashboards and queries that have been created using the Dashboard Builder or Query Builder and organized into logical groups (buckets). A default canvas is automatically created when a system is installed.
Bucket:
Grouping of Objects within a Canvas. By default, buckets will be created for each Application within the CMiC System.
Object:
Represents a single Dashboard, Query, or Card View within CMiC Analytics. Objects are always nested inside of Buckets. Objects can be launched by clicking on them.
The first Object in each Bucket is a collection of Dashboard visualizations specific to that Application.
The other objects shown in each bucket include a list of standard Queries specific to that Application.
Additional Notes:
As you move further along in your implementation of CMiC Analytics, you will be creating additional Canvases, which can be accessed by clicking on the icons displayed down the left side of the screen. These can each display a completely different set of Objects, or they can display the same Objects arranged into different Buckets.
It is very easy to rearrange the object groupings, simply by dragging and dropping objects from one bucket to another.
The names of the Buckets can be modified by clicking the three-dot menu to the right of the Bucket Name, and the name of the Objects can be modified by clicking the three-dot menu to the right of the Object Name.

Adding Analytics Objects to a Canvas
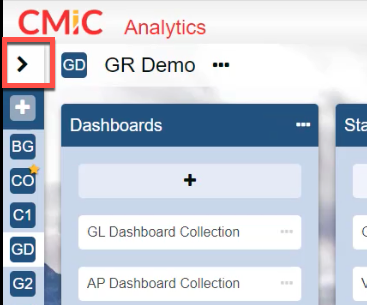
1. Open the left panel by clicking the expand ( > ) arrow at the top of the panel.
2. Navigate to the Objects Tab. This will show a full list of all Analytics Objects available for use in a Canvas.
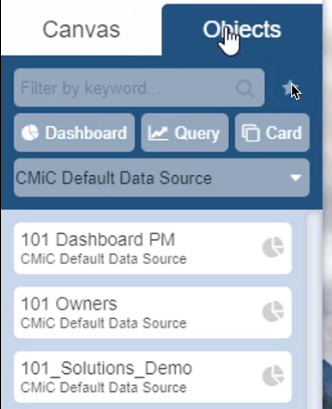
3. Find the desired Object either by keyword search, filtering based on Object type, or both.
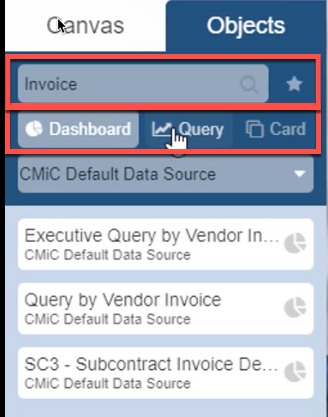
4. Drag the Object into the respective Bucket.
Note:At the top of each bucket, the ‘Add’ button has been made available to quickly navigate to the Objects Panel where the user can then select the Object to be added.
Assigning Security Roles to All Objects in a Bucket
1. Click the Ellipsis (…) at the top of the bucket to open the settings panel.

2. Click the Security Role icon ( ) to open up a dialog that allows users to grant access to all objects within the selected bucket, based on security roles.
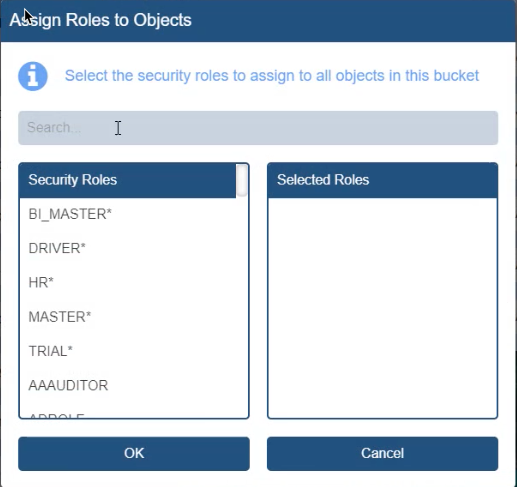
3. Select all security roles that should have access to the Bucket.
4. Upon submitting, a confirmation will be displayed and permissions will be granted.

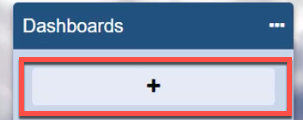
Adding Additional Buckets
Press the plus (+) icon on the Canvas title bar.
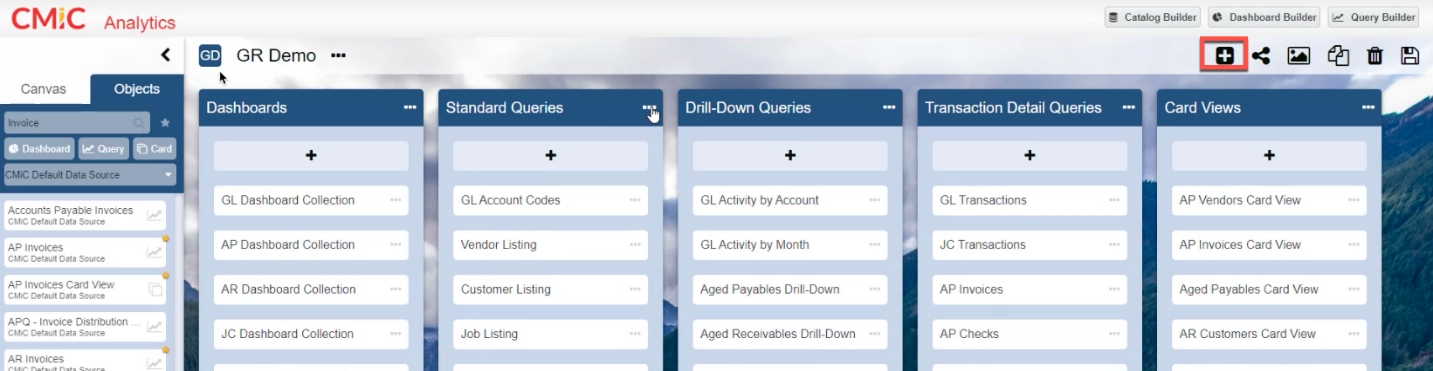
The new Bucket will be added to the right of the last bucket and can then be dragged and dropped anywhere on the Canvas. Objects can be added to this bucket by dragging and dropping Objects into it, and the name of the new Bucket can be modified as desired.
Assigning Security Roles to a Canvas
1. Click the Security icon ( ) on the Canvas Title Bar.
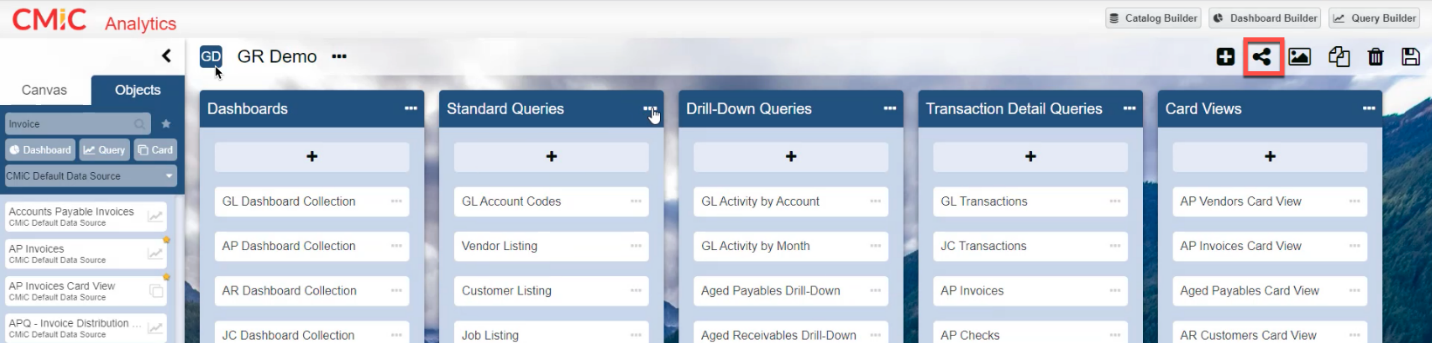
2. Assign the permitted roles by including them in the ‘Selected Roles’ grouping.

Setting the Background Image on a Canvas
1. Click the Background Image icon ( ) on the Canvas menu bar.
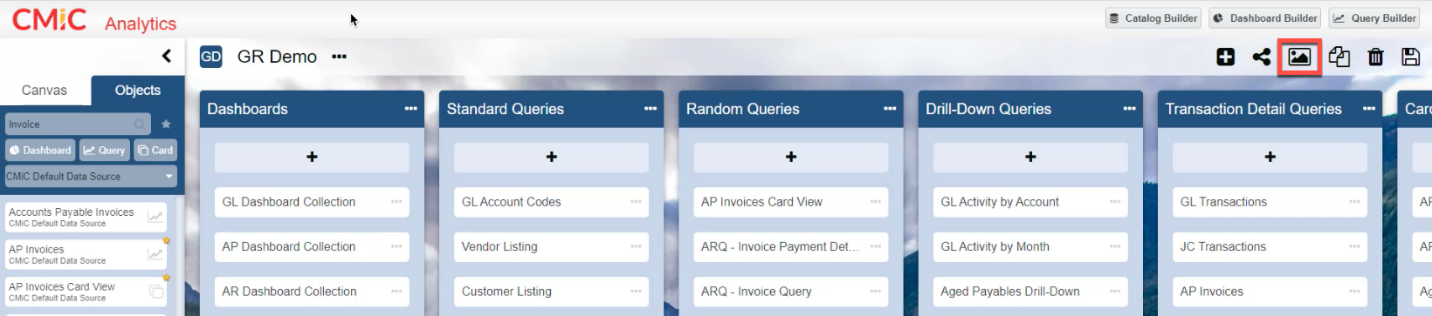
2. Select a default image, or upload a custom one by following the prompts on the screen.
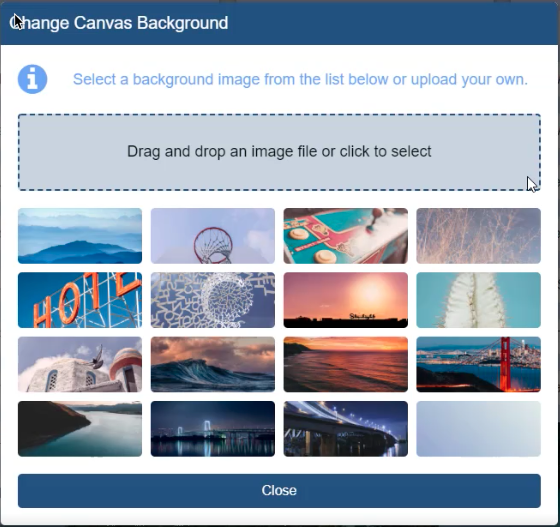
Custom images must be smaller than 2MB in order to be used.
The color scheme of the page will be automatically updated to match the colors of the selected background.
Copying Saving and Deleting a Canvas
1. Select the desired operation from the Canvas Menu.

Duplicate: Copies the currently active Canvas, and provides an alert once duplicated.
Rename the Canvas title as required. By default, the new canvas will have ‘-Copy’ appended to the end of the original Canvas’s name.
Any Duplicated Canvases will need to be saved before they are added to the database. To avoid saving the new Canvas, simply navigate away from the Canvas and select ‘Don’t Save’ when prompted.
Save:  Saves any changes made to the Canvas. Unsaved changes will be lost upon navigating away.
Delete: Deletes the currently Active canvas.
Accessing the Catalog Builder, Dashboard Builder, and Query Builder

At the top right of the CMiC Analytics page are three menu options that allow for quick access to the programs needed to create new Analytics Objects: The Catalog Builder, Dashboard Builder and Query Builder. These buttons are provided as a convenience only, as these are separate programs that will be opened in a separate browser tab when selected.
Each of these programs will be explained in detail in follow-up sessions.
This completes the ‘Getting Started with CMiC Analytics’ training session. If you are the Analytics Administrator, you may want to move on to the ‘Catalog Builder Basics’ and ‘Catalog Builder Advanced’ sessions at this point, otherwise you can select from any session relating to using or running Analytics Queries or Dashboards.
Overview
BI Analytics Standard Canvases
BI Analytics is supplied with standard canvases and objects. Standard canvases and objects are read-only and are updated by CMiC in future releases of the software. Only users with the system privilege ‘BISECMNG – CMIC BI: Allows the user to modify security’ can modify security access to standard canvases and objects.
NOTE: Users with the system privilege BISECMNG can view all default canvases, regardless of the user’s assigned roles.
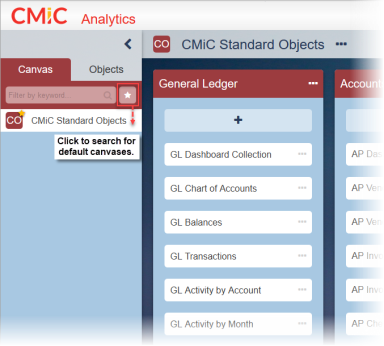
Users can search for default canvases on the Canvas tab by clicking on the Default Canvases Only icon ( ), located beside the Filter by keyword search field, and the criterion will be saved for subsequent logins. A yellow star beside the canvas icon (
 ) indicates that the canvas is a default canvas.
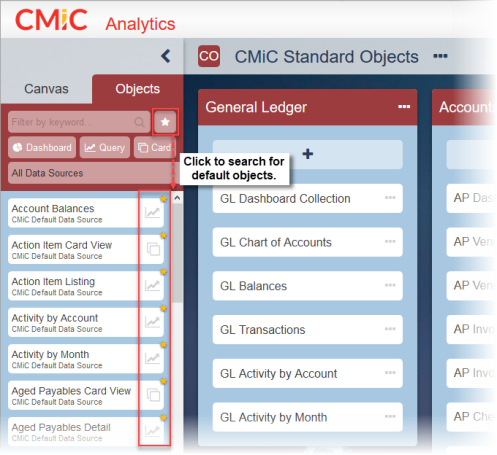
BI Analytics Standard Objects
Similarly, users can search for default objects on the Objects tab by clicking on the Default Objects Only icon (), located beside the Filter by keyword search field. A yellow star beside the object’s icon ( ) indicates that the object is a default object.
Security/AI Usage Bucket in Standard Canvas
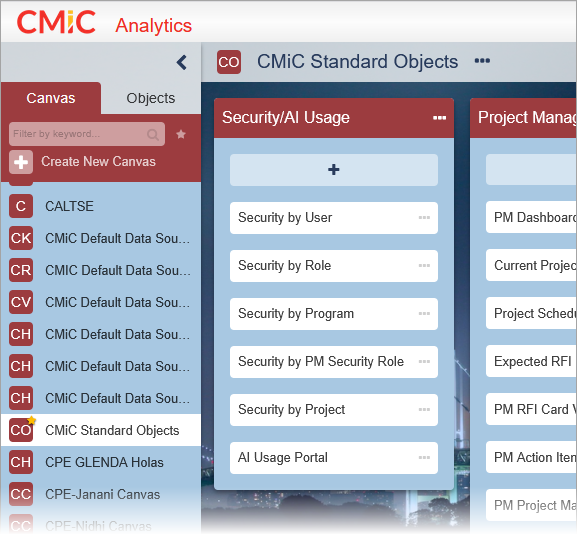
Security/AI
The default standard canvas contains a bucket for Security/AI
Security by User
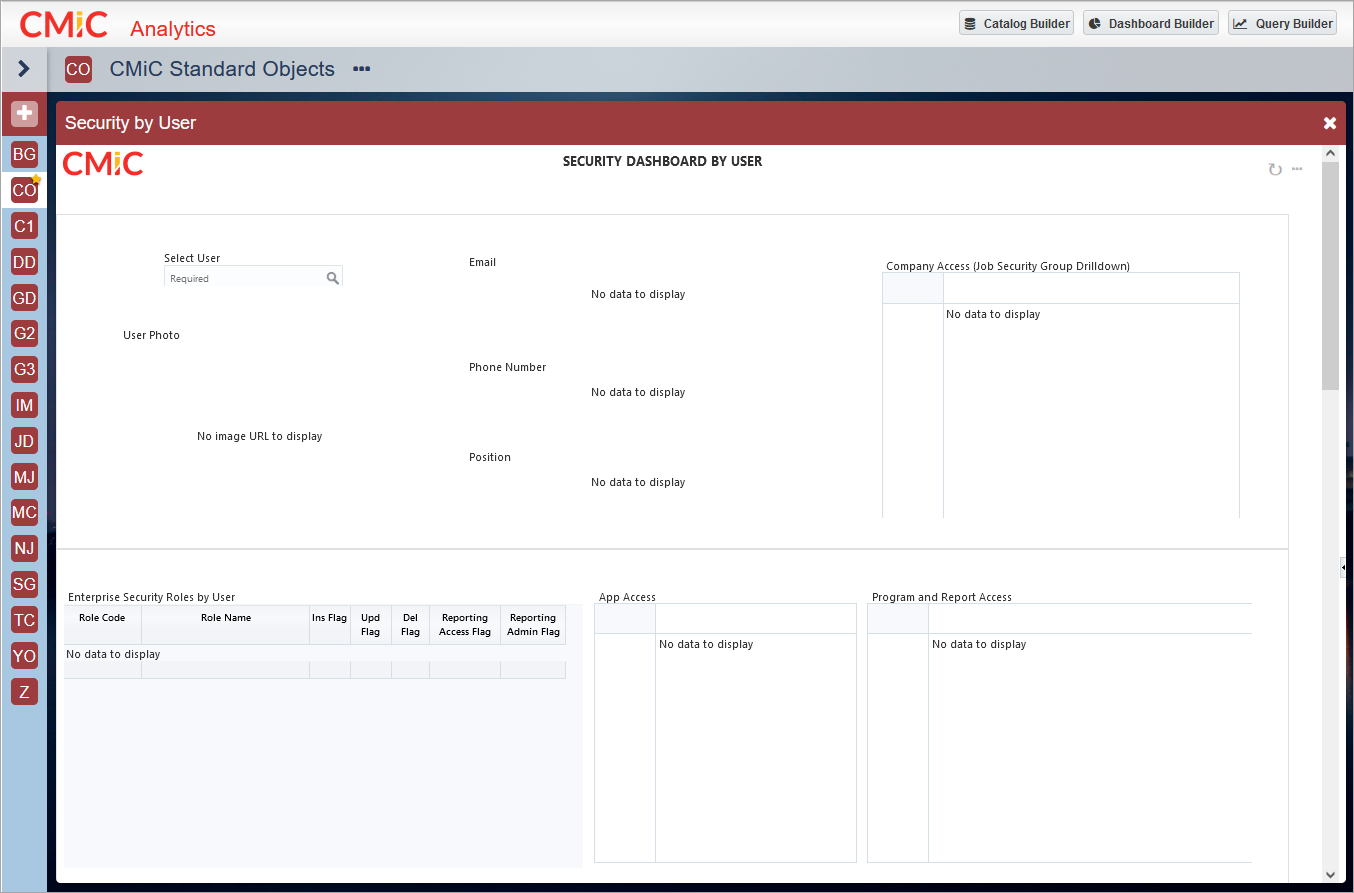
Security by User Dashboard
This dashboard displays the selected user’s security roles, both from an Enterprise and Field perspective.
NOTE: No data is loaded unless a user is selected.
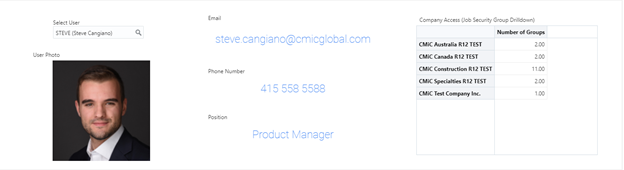
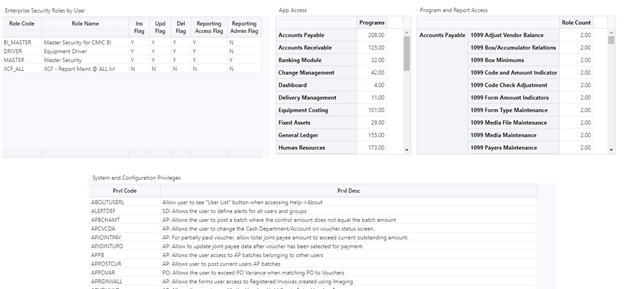
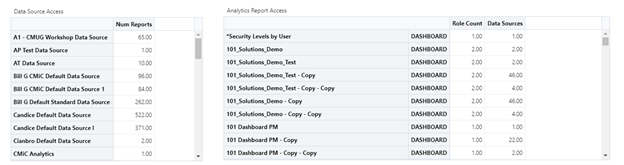
The information displayed in the Security by User dashboard includes:
-
Basic information
-
Job security groups
-
Enterprise security roles
-
App and program access
-
System and configuration privileges
-
Analytics data source and report access
-
PM Security roles, PM app privileges, and PM program access
-
Project-specific roles
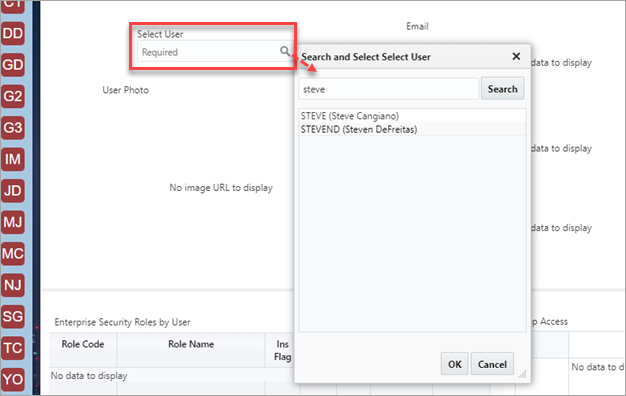
Use the Select User field to search for and select a user. The selected user's security details will be displayed in various visualizations on the dashboard.
Security by Role

Security by Role Dashboard
This dashboard displays the users that have a particular security role. In addition, it displays the apps, programs, and analytics reports to which that user has access.
Security by Program
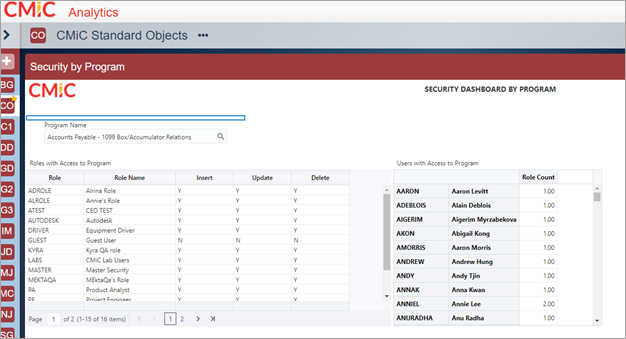
Security by Program Dashboard
This dashboard identifies the roles and users who have access to a program.
Security by PM Security Role
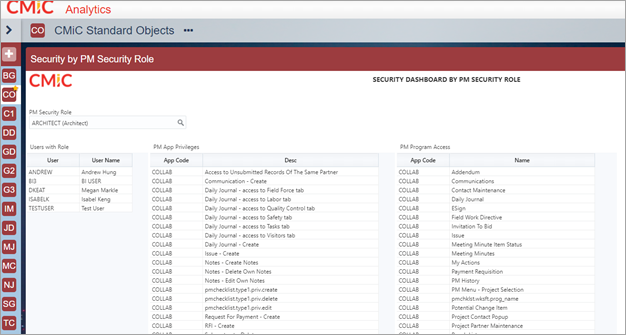
Security by PM Security Role Dashboard
This dashboard displays the users with a selected PM security role, as well as their PM app privileges and PM program access.
Security by Project
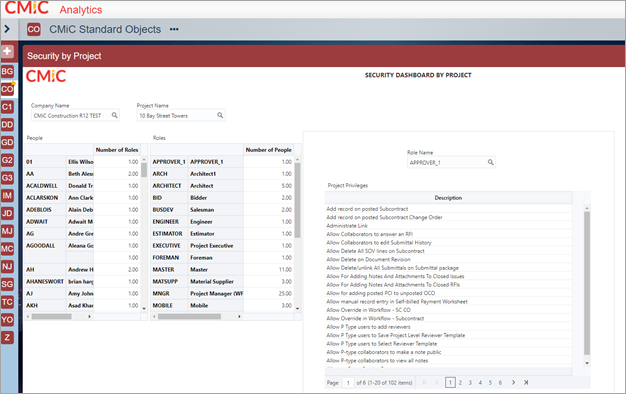
Security by Project Dashboard
This dashboard displays the project-specific roles and contacts that exist in the system. It also displays the project privileges for a particular project role.
AI Usage Portal
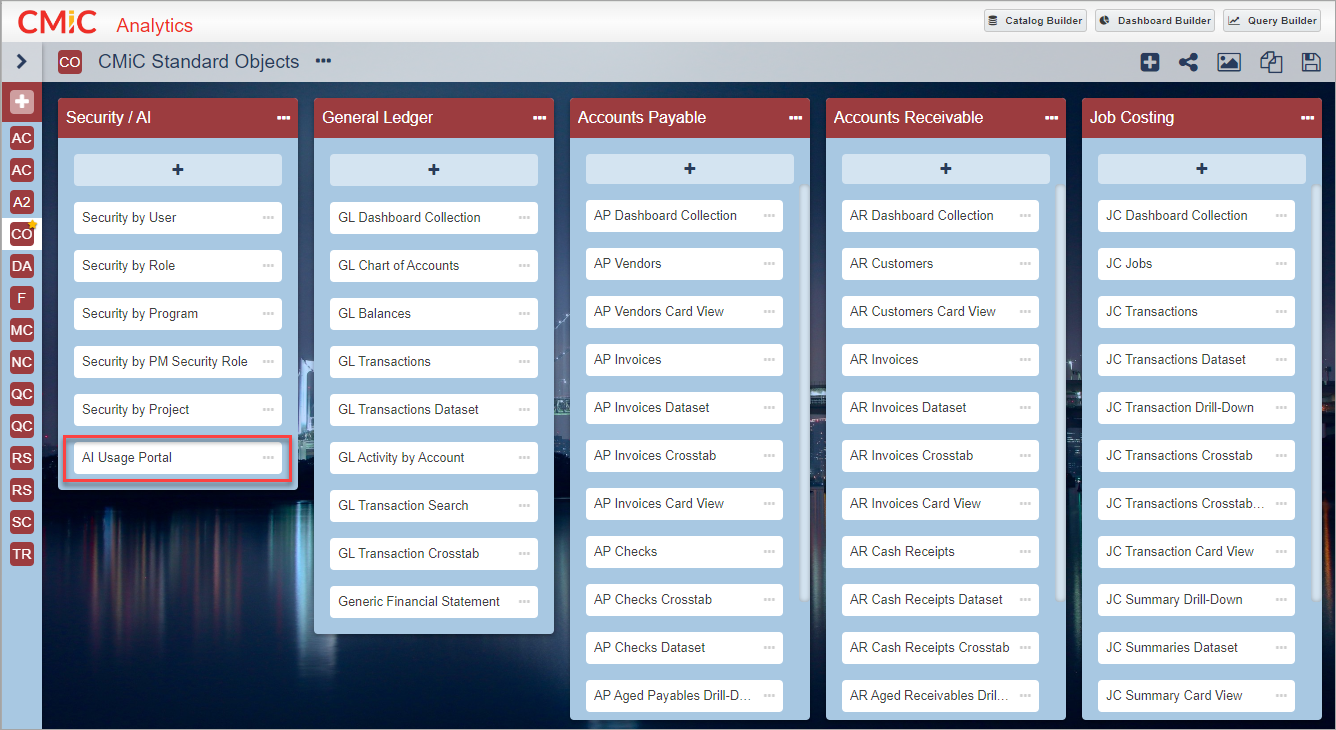
AI Usage Portal
This dashboard provides a comprehensive view of all AI usage data, allowing users to monitor their current monthly AI usage in ACUs (AI Compute Units), view their usage limits, and analyze a detailed breakdown of usage by user and feature. This centralized tracking system is particularly useful as it simplifies the management of AI resources, helping users optimize their allocations and understand how AI is being leveraged across different segments of the organization. By giving a clear snapshot of AI activities, the dashboard enables more informed decision-making and ensures that investments in AI are aligned with business objectives.
![]()
On the dashboard, you will find your current month's usage data displayed on the left side, and a historical monthly breakdown on the right side.
![]()
For a more detailed analysis, click on any month listed in the historical breakdown.
![]()
This action will direct you to a separate dashboard where you can view a detailed breakdown of usage by user and feature for that specific month. This setup makes it straightforward to track and analyze AI usage over time.
Standard Datasets for Analytics +AI
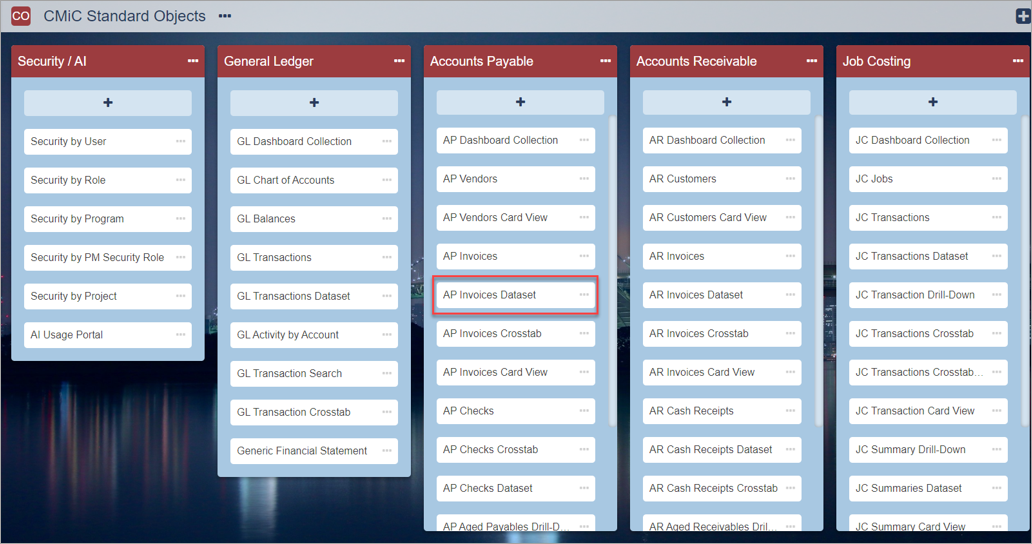
Example of standard dataset for Analytics +AI
Standard dataset queries are provided in the CMiC Standard Canvas (available for GL, AP, AR, JC and SC). These datasets are optimized to leverage the AI tool for gaining insights from a specific business area.
Standard Dashboards
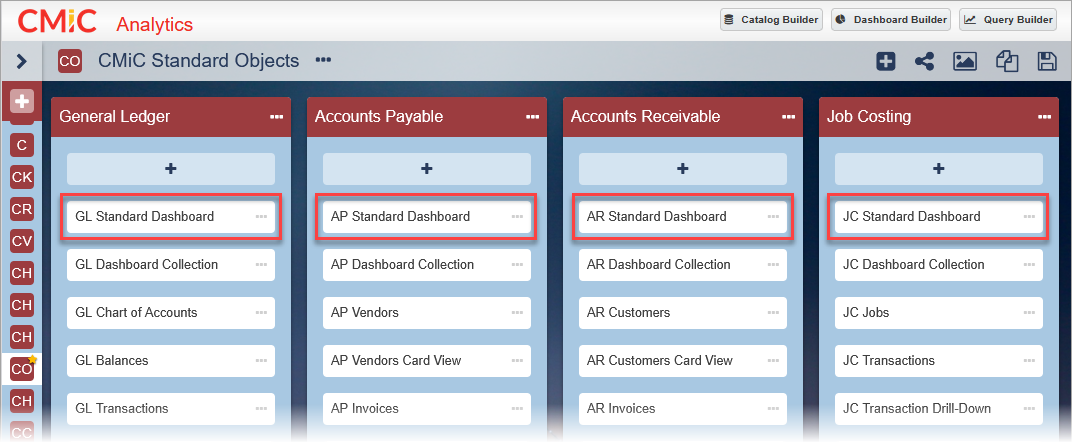
Examples of standard dashboards
Standard dashboards are provided in the CMiC Standard Canvas (available for GL, AP, AR, and JC ). These dashboards are pre-configured for immediate use and can be customized to align with your business’s specific processes and priorities. Users can build upon the standard setup by tailoring dashboards to meet their unique needs and reporting goals.
From here, you may want to dive deeper into Analytics Setup and Configuration, or follow the next guide in our Analytics series: Catalog Builder.
Catalog Builder Guide