
Pgm: WKFEVMNT – Workflow Event Maintenance; standard Treeview path: Workflow > Setup > Event Based Launch Maintenance
This screen is used to define automatic workflow events. These events are defined to automatically run whenever a specific definition (defined via this screen) associated with the function of inserting, updating, or deleting a record from a specific table occurs.
Steps to Create a Workflow Event
A new workflow event is created using the following steps:
-
Define workflow in the Workflow Processes section of the screen.
-
Enter related database event in the Database Events section of the screen and ensure that the ‘Enabled’ checkbox is unchecked to mark its status as inactive.
-
Create required condition using the [Condition] button.
-
Create the event using the [Create] button and check for errors.
-
Enter the attributes that should be mapped to the workflow process in the Attribute Mapping section of the screen.
-
Change the status of the database event to active by checking the ‘Enabled’ checkbox in the Database Events section of the screen.
-
[Create] the database event.
Show Inactive Workflows – Checkbox
When the screen is opened, the 'Show Inactive Workflows' checkbox is checked so that all Workflow processes defined are displayed. To limit the list to only active processes, uncheck 'Show Inactive Workflows' checkbox.
Workflow Processes – Section
This section of the screen is used to indicate which existing workflow item types and processes are to be linked to a CMiC table.
Item Type, Item Description
Enter/select a workflow item type from the list of item types currently registered in the database. The item type’s unique identifier will be displayed, along with its description.
Process Name
Enter/select a specific process defined within the selected item type.
Active – Checkbox
Indicates whether the process is active or not. Unchecking this box prevents this process from being launched.
Database Events – Section
This section is for defining what table and when the process is to be initiated. This area creates database triggers on the selected table. Multiple triggers can be created on the same table.
Schema
This Schema field defaults to “DA”, but the user can type in any known schema applicable.
NOTE: DA must have rights to create objects in this schema; otherwise, the [Create] function will fail.
Object Table
Enter/select the object table within the selected schema. This table, depending on the setup in the next couple of fields, will start the workflow process.
Event Type
Enter/select the event type. There are
-
Insert: When a new record is created.
-
Update: When an existing record changes.
-
Delete: When an existing record is removed from the table.
-
Button: If this option is selected, the [Condition] and [Create] buttons, as well as the 'Enabled' checkbox, are disabled.
The event type determines when the workflow process will be initiated.
NOTE: If there are multiple triggers on a table, there is no way of knowing in which order triggers will fire, so do not base workflow triggers on data which is updated by other triggers.
Enabled – Checkbox
This checkbox determines if this program should create the trigger as enabled or disabled. When first creating workflow events, this checkbox should be unchecked. It should be changed to be checked when the workflow is complete, and the trigger can be created without errors.
[Condition] – Button
Conditions are not necessarily required for insertions or deletions but are recommended for updates. Conditions limit when the workflow process will be initiated. For example, a trigger can be created on the update of the employee table each time a new employee is terminated that sends an email to the IT department. If a condition was not entered, then every time an employee record was updated, IT would get an email.
NOTE: A special condition is used when launching a workflow from the [Workflow] button on a JSP screen. Refer to the Launching Workflows from JSP Screens (CMiC Field, OM, ESS) section in this guide for more details.
A condition can be created using the [Condition] button. Clicking on this button opens a pop-up window where the condition can be entered.

Pop-up window launched from the [Condition] button on the Workflow Event Maintenance screen
When creating a condition, it is not necessary to include a “Where” or “If” at the beginning of the expression since the system will automatically add it. If the user does enter one, the system will remove it.
Conditions can be built manually by using the prefixes: new.column_name and :old.column_name, as required, or if the user clicks on the LOV, the Column List pop-up window appears.
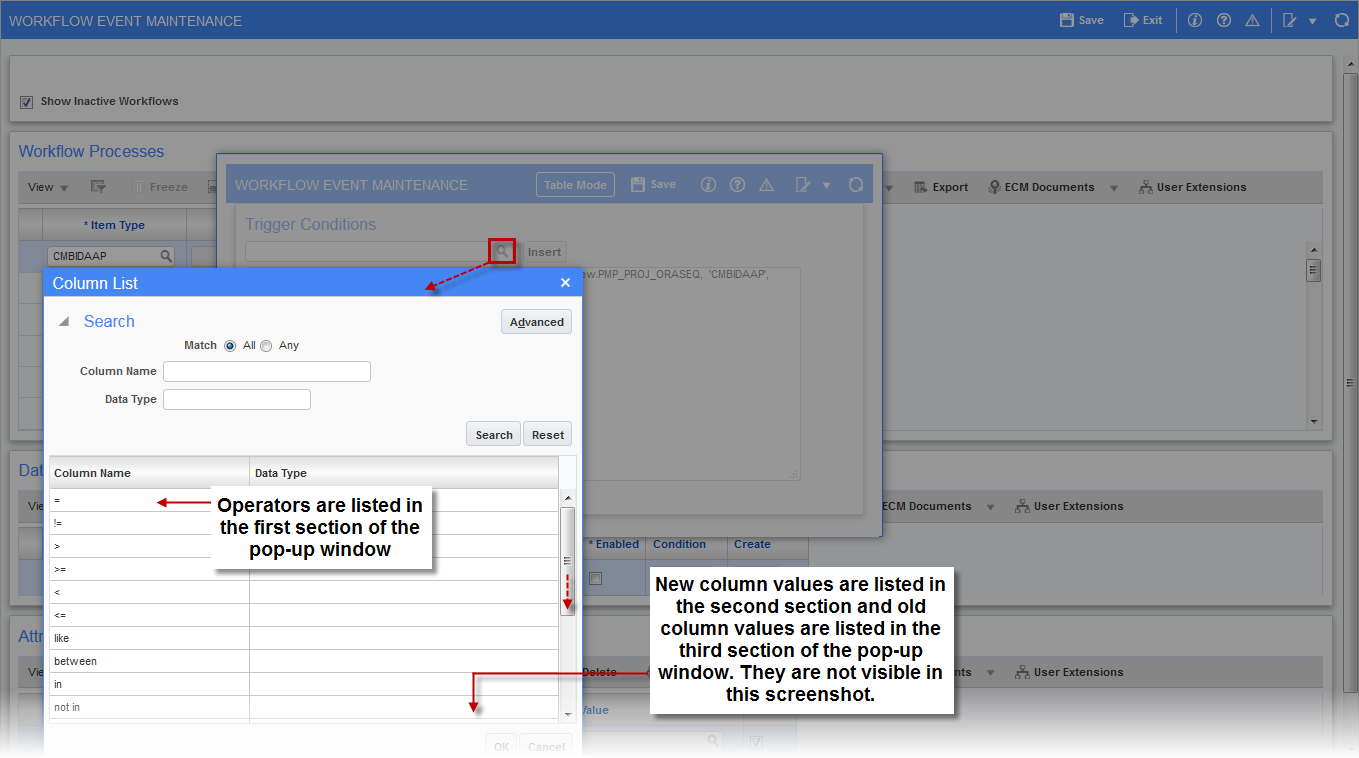
Pop-up window launched from Trigger Conditions field LOV
The Column List pop-up window is divided into three sections: Operators, New Column Values, and Old Column Values. The Operator section contains a list of all available operators such as like, equals, not in, etc. The New Column Values and Old (Original) Column Values sections display a list of all the column names in the related table.
After the columns and operators are selected, the system will build the required statement.
To verify the syntax in the condition, build the trigger using the [Create] button on the Workflow Event Maintenance screen. This will display a screen similar to the one shown in the screenshot below.

Pop-up window launched from the [Create] button on the Workflow Event Maintenance screen
If there was any problem with the condition and creating the trigger, the Result section of the window will display an error.
NOTE: To trace the error, the user may find it helpful to cut/paste the DDL statement directly into SQL Plus, try to run it, then use ‘Show Errors’.
Attribute Mapping – Section
Attribute mapping is a way to pass CMiC data values directly to the workflow process attributes. For example, the email indicating that an employee is terminated is not much good without the employee number and name. Attribute mapping allows this type of information to be passed to the workflow process.
The attributes must have already been defined in the workflow item type.
Attribute Code
Enter/select the required attribute code. The attribute codes are defined on the workflow selected in the first section of this screen.
Not all attribute codes must be mapped.
Source Type, Value
These two fields together define what data from CMiC is being passed to the specific workflow attribute. The system has four predefined choices.
-
Column – This means that the attribute maps to a column that exists in the associated table. The source’s Value field will have an LOV showing all columns within the table associated with this workflow event. If the event type is defined as “Update” in the Event Type field in the Database Events section, then this list will include both new.column_names and old.column_names. If the event is defined as “Insert”, the list will only contain new.column_names, and if defined as “Delete” it will only contain old.column_names.
-
Constant – This means that the attribute is mapped to a predefined typed-in value. The Value field’s LOV will be empty. This is a free-form field to type in a constant value – do not include quotes.
-
System Variable – This means that the attribute is mapped to one of the Oracle predefined variables. The Value field’s LOV contains two choices: SYSDATE and USER.
-
Context Variable – This means that the attribute is mapped to the current user’s CMiC session context variable that is active when the trigger fires. The LOV for the Value field shows all available contexts with a short description.
Active – Checkbox
A mapping may be defined but not active. If this is the case, then when the [Create] button is activated, the trigger created will not include the inactive attribute assignment.
Launching Workflows from JSP Screens (CMiC Field, OM, ESS)
Workflows can also be manually launched using the [Workflow] button on specific JSP screens. This type of workflow leverages the setup for the database trigger, as defined in the Workflow Event Maintenance screen.
A special condition is used when launching a workflow from the [Workflow] button on a JSP screen, as shown in the screenshot below.

Pgm: WKFEVMNT – Workflow Event Maintenance; standard Treeview path: Workflow > Setup > Event Based Launch Maintenance
To see an example of launching a workflow from a JSP screen, refer to the Workflow - CMiC Field Subcontract Workflow section in this guide.