Adjustments pertain to specific pay runs. Payroll processing must be run after adjustments have been entered in order for them to affect the pay for that particular run. In practice, the method for applying an adjustment is to process the payroll, print the payroll journal to review the calculated amounts, then return to the Adjustment Entry screen and enter any adjustments. Once the adjustments have been entered, re-process the pay run and re-print the payroll journal to verify the adjustments.
The system allows for the following adjustments: Benefits, Deductions, Tax, Leave, Loan Principal, Loan Interest, and Salary.
Adjustment Entry
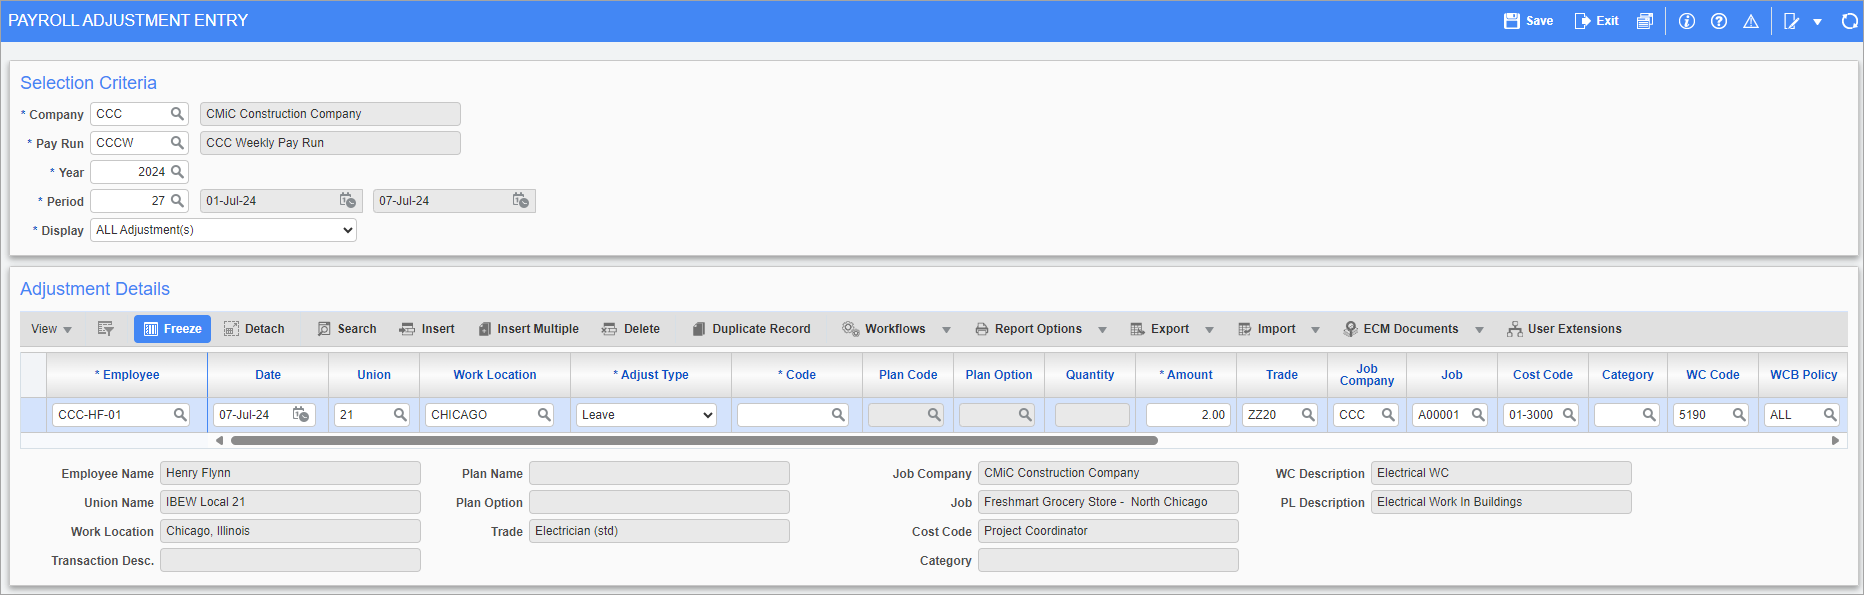
Pgm: PYPAYADJ – Payroll Adjustment Entry; standard Treeview path: US Payroll > Processing > Adjustments > Adjustment Entry
The Payroll Adjustment Entry screen is used to increase or decrease salary amount, benefits, deductions, taxes, or any other items that affect an employee's net pay.
NOTE: Wages (hours or rates) of hourly employees can’t be adjusted in the Adjustment Entry screen. Hourly wages can only be adjusted in Timesheet Entry. Salary adjustments for salaried employees apply to their gross wages.
Adjustment Details
Employee, Union, Work Location
Enter/select the employee, union, and work location codes for the employee having the adjustment applied.
Date
Enter/select a transaction date. Transaction dates can be entered for all non-accrued LE (Leave) and BW (Basic Wage) transactions. This includes transaction dates for salaried employee leaves in timesheets.
Adjust Type
Select whether the adjustment is a benefit, deduction, tax, leave, loan principal, loan interest, or salary/wage.
NOTE: Adjustment Entry for Leave types can be made only for salaried employees.
Code
Enter/select the code for the adjustment. The list of available codes changes depending on the adjustment type selected.
Plan Code, Plan Option
Enter/select the code and option for the adjustment plan. These fields are only available for Benefit and Deduction types.
Quantity
Enter the amount of hours associated with the adjustment. This field is only available for Leave and Salary/Wage types. For Leave types, the amount field defaults based on the value entered here and the leave code.
Adjustment Amount
Enter the adjustment amount as a positive or negative number. This is the difference between the calculated amount and the desired amount for that period. Adjustment amounts are entered as increases or decreases to the selected adjustment code and not as increases or decreases to the net pay.
For example, if a benefit is calculated at $100 on the payroll journal and it should be $90, then a benefit adjustment of -10 should be entered. After processing, the benefit increases net pay by $90 rather than the original $100.
Likewise, if a deduction is calculated at $100 and it should be $90, then enter the same adjustment of -10. After processing, the deduction decreases the net pay by $10. This is not to be confused with the fact that deductions are displayed as negatives that reduce the net pay. If the desired adjusted amount is less than the calculated amount, enter a minus before the adjustment amount regardless of the type of adjustment being entered.
Data Type
Select whether the adjustment entry type is G: General Ledger (e.g., for overhead data) or J: Job Costing (e.g., for job data). Transaction data can be entered manually or imported, and all transactions will be saved with dates.
NOTE: This custom field is hidden by default and will need to be enabled by a programmer to be displayed.
When this option is enabled, the leave
When this option is disabled, imported data is not populated in the Account field in the Adjustment Details section.
The following fields are only available for Leave and Salary type adjustments:
Trade
Enter/select the trade code. The trade code defaults from the Company tab on the Employee Profile.
Job Company, Job
Enter the job and company codes for the adjustment being added.
NOTE: It is only possible to enter values in the Job, Cost Code, and Category fields for a supplementary pay run and not a regular pay run.
Cost Code, Category
Enter the cost code and category associated with the job code entered in the previous field. These codes associate the cost of the labor entered on this line with a specific component of the job.
NOTE: It is only possible to enter values in the Job, Cost Code, and Category fields for a supplementary pay run and not a regular pay run.
WC Code, WCB Policy
Verify/modify the workers’ compensation code for the adjustment. The code defaults from the Employee Profile and the policy is “ALL” by default.
PL Code, PLC Policy
Verify/modify the public liability code for the adjustment. The code defaults from the Employee Profile and the policy is “ALL” by default.
Leave Cash – Checkbox
Check this box to pay the adjustment as a leave encashment. The system will pay the amount under the leave heading.
NOTE: When the 'Leave Cash' box is checked, the system does not reduce the basic wage by the leave amount. To reduce the leave amount from the gross pay, leave this box unchecked and reprocess payroll.
Gross Amount – Checkbox
Check this box when making a tax adjustment to adjust the gross amount reported for taxation but not the gross amount that affects tax calculations.
This situation can arise when an employee receives a nonreceivable benefit that increases the gross earnings reported to taxation but not the actual taxes the system calculates on their wages or when a benefit is entered that increases gross wages but is not included in gross earning per government rules.
Take the following example: an employee has a gross wage of $500 and a $50 car allowance, both of which are paid bi-weekly. Gross wages therefore accumulate to an end of year pay of $14,300.00. If the government were to decide that the E1 can’t include car allowances then a gross amount adjustment is required. The gross amount adjustment does not affect the debits and credits, rather it affects the reported gross amount figure.
Processed – Checkbox
When this box is checked the adjustment entry has been processed. The adjusted amount appears after re-processing the payroll.
Receivable – Checkbox
Check this box if only making an adjustment for a carry forward deduction.
Adjustment Type
Select whether to apply the adjustment for employers, employees, or both. This field is only available for Deduction type adjustments.
Loan Receivables
Select whether to process the adjustment with GL, without GL, or normally. This field is only available for Loan Principal and Loan Interest type adjustments.
Salary Adjustment Edit Listing
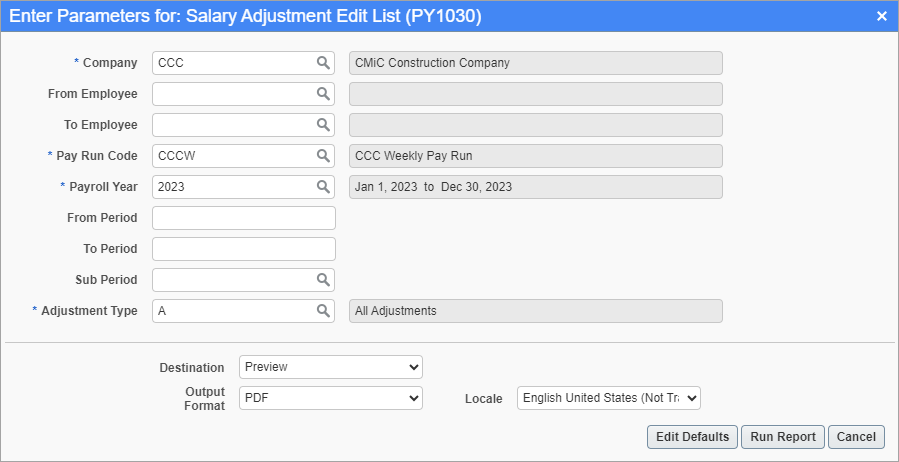
Pgm: PY1030 – Salary Adjustments Edit List; standard Treeview path: US Payroll > Processing > Adjustments > Salary Adjustment Edit List
The Salary Adjustments Edit listing displays the entries made in the Adjustment Entry screen. It is used to verify the adjustment entries for a particular pay period prior to payroll processing. This listing can be printed for all entries in a range of pay periods in a pay run or can be limited to a range of employees.
Company, Pay Run Code, Payroll Year
Enter/select the company, pay run, and year for the listing.
From Employee, To Employee
Enter a starting and ending employee code in the appropriate fields in order to print the adjustment edit listing for a selected range of employees. In order to print the adjustment listing for a single employee, enter the same code in both fields. Leave both fields blank in order to print adjustments for the full range of employees.
From Period, To Period
Enter the starting and ending pay periods in order to print a selected range of pay period adjustments. In order to print a single pay period, enter the same period in both fields. Leave both fields blank in order to print adjustments for the full range of periods.
Sub Period
Enter/select the sub-period number to include sub-period pay adjustments. Leave this field blank to print adjustments for all sub-periods. This feature is used to support companies that require a sub-payroll option and is not mandatory for adjustment entry. For more information on sub-periods, please refer to US Payroll - Pay Periods.
NOTE: This field is hidden by default and can be added using Lite Editor. To view sub-periods created by other users, the following system privilege must be assigned: PYSUBPPRVW - PY: Allows User to access Sub Period created by other Users.
Adjustment Type
Select which type of adjustments to print. All entries are printed in order of employee code and pay. Each new employee is distinguished by a solid black line.
Closing an Employee Loan
If an employee pays off their loan outside of the payroll process (e.g., with an early repayment), a payroll adjustment is required to update the system to close the loan. Use the Payroll Adjustment screen to enter or update an adjustment entry, as outlined in the steps below.
-
Select "Loan Principal" in the Adjust Type field and enter the remaining loan balance in the Amount field.
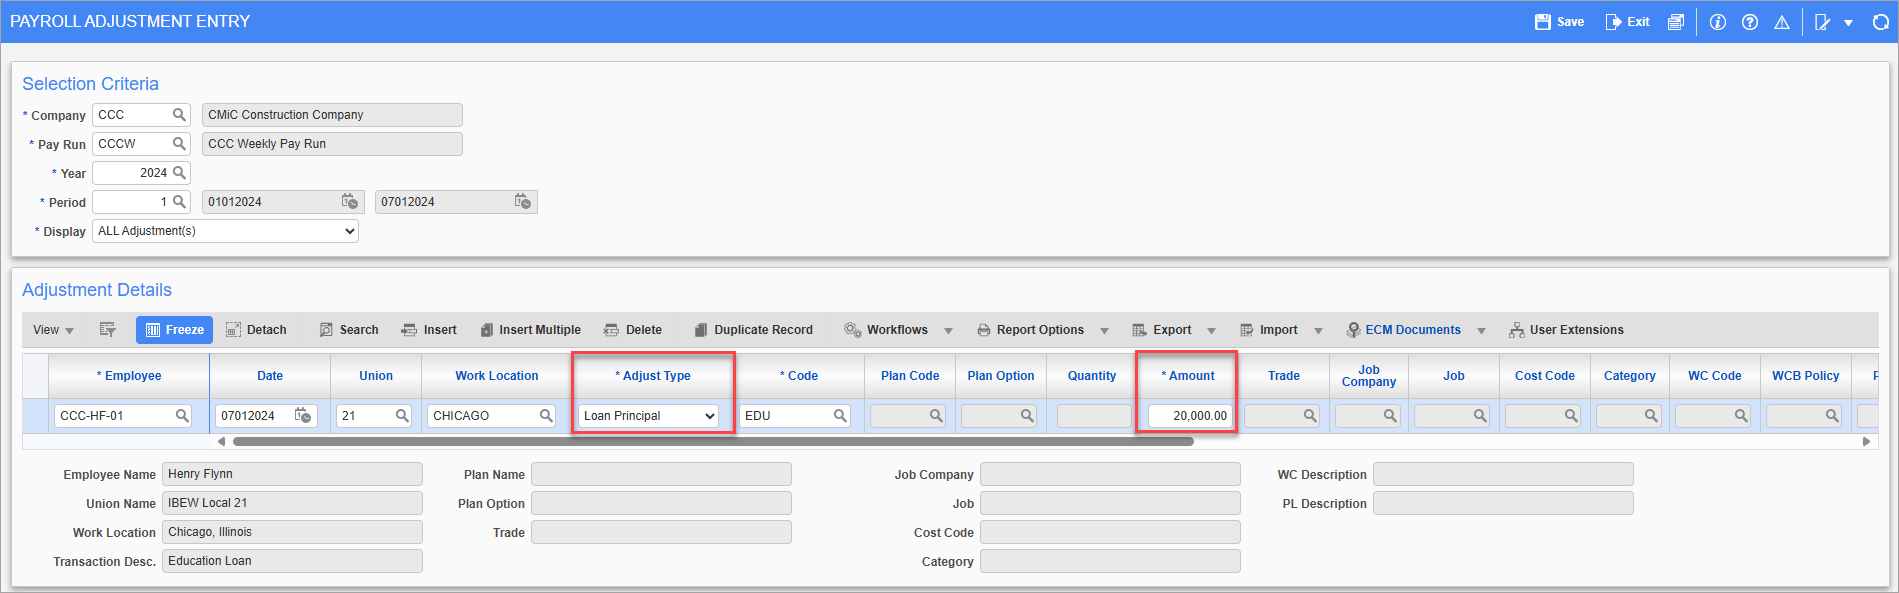
Pgm: PYPAYADJ – Payroll Adjustment Entry; standard Treeview path: US Payroll > Processing > Adjustments > Adjustment Entry
-
Select "Adjustment Without GL" in the Loan Receivables field.

Pgm: PYPAYADJ – Payroll Adjustment Entry; standard Treeview path: US Payroll > Processing > Adjustments > Adjustment Entry
-
Process payroll and verify the adjustment in the Mid-Year Pay History screen and the Payroll Register Report.
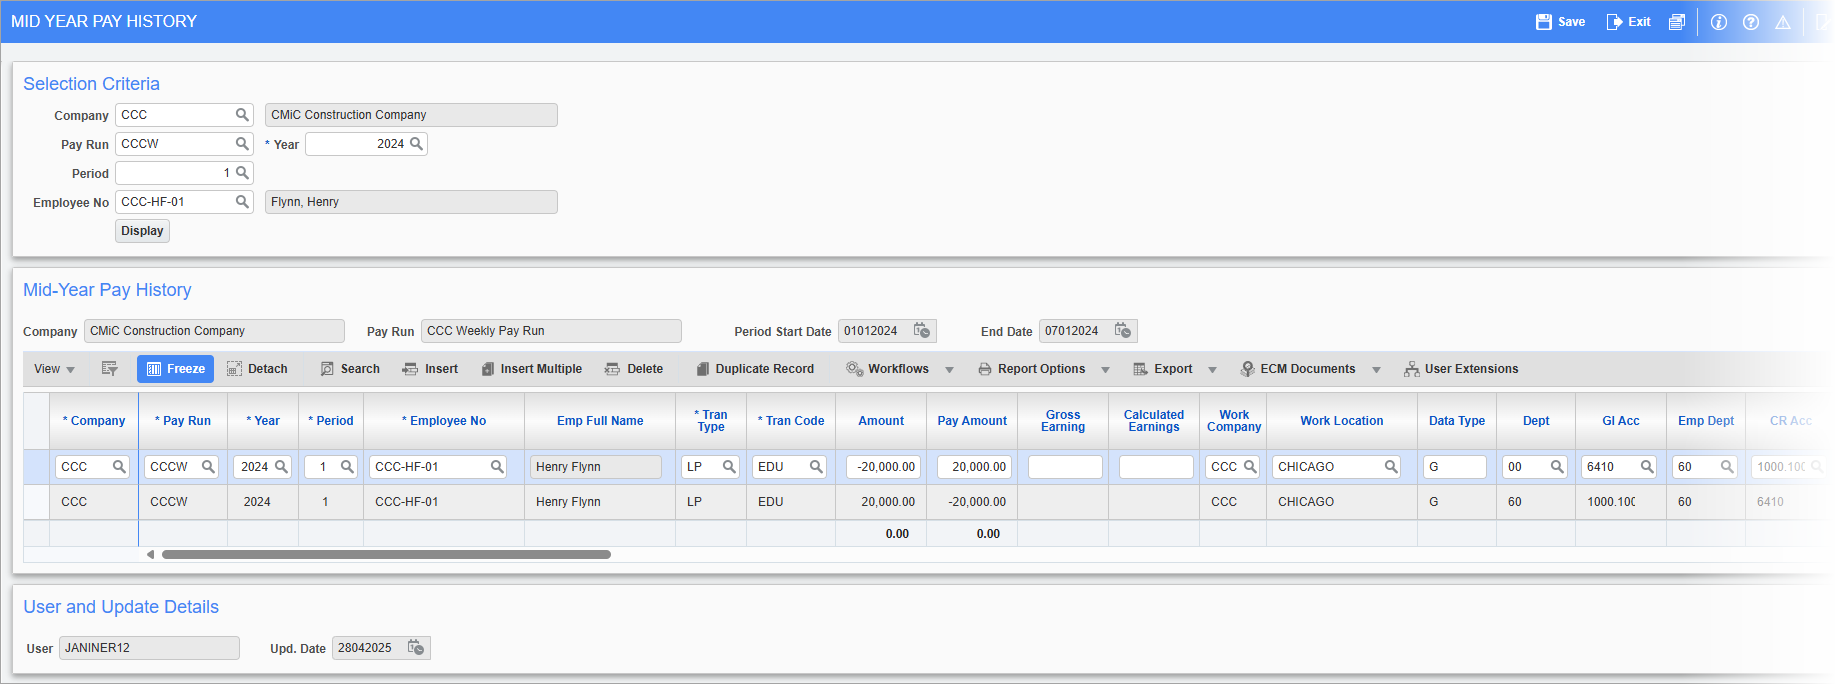
Pgm: PYEPHIST – Mid-Year Pay History; standard Treeview path: US Payroll > Utilities > Mid-year Pay History Setup
-
Post the payroll to update the status of the loan. The status will be updated in the Employee Loans and Advances screen to "Paid Out" and the Balance Remaining field will display "0.00", as shown in the screenshot below:

Pgm: PYEMPLAA – Employee Loans and Advances; standard Treeview path: US Payroll > Setup > Employees > Loans and Advances