NOTE: As of Patch 20, support for the JSP E-Time Entry screen will be limited. While the screen will remain accessible from our standard menu, no further enhancements will be made. Users are encouraged to transition to the timesheet entry solutions available in the Construct ESS (App) to benefit from continued support and new feature development.
Timesheet Entry

E-Time Timesheet Entry; standard Treeview path: E-Time > E-Timesheet > Timesheet Entry
In the Timesheet Entry screen, timesheets can be entered, saved, and submitted for approval. The date defaults to the current open pay period if the 'Default Current Period From Company Pay Period' box is checked in the Company Control screen (standard Treeview path: US Payroll > Setup > Company > Control).
Employees may enter timesheets by entering in and out times for each day depending on the employee FLSA type selected in the Personal tab of the Employee Profile. Press the [Time Entry] button after entering hours in the main E-Time entry screen to enter in and out times. The number of hours for each day must be equal to the total number of hours in the main E-Time entry screen before the timesheet can be submitted.
Timesheets for exempt employees validate the hours based on the employee pay run frequency. For example, weekly employees can enter a maximum of 40 NWHR per period. This includes posted, submitted, and saved timesheets. Additional hours must be entered as JCHR or NBHR.
NOTE: Timesheets can also be entered via the Timesheet Entry screen in the US Payroll module (standard Treeview path: US Payroll > Timesheet > Timesheet Entry). Please see the US Payroll guide for further details.
Timesheet Entry Buttons
[Change Password] - Button
The [Change Password] button is only visible when an access code is mapped to an SSO user. It is used to change the system password, not the E-Time password. To hide the button, the SSO user should be disassociated from the access code used to log into E-Time.
[Reload] - Button
Press the [Reload] button to clear any timesheet information entered on the screen that has not yet been saved by pressing the [Save] button. The page reloads and any uncommitted changes are deleted.
[Save] - Button
Press this button to save any entered data.
[Auto Recall] - Button
Press this button to duplicate the timesheet data from the previous period to the timesheet being entered for the current period. This is recommended if timesheets tend to be identical from week to week.
[Reset] - Button
Press this button to reset all the timesheet entry lines to zero when the [Save] button is pressed.
[Submit For Approval] - Button
Press this button to mark the current record it as complete and ready for approval. Once a record is submitted, it is highlighted in yellow, becomes display-only, and is only available again for entry if the approver un-approves the timesheet in the Timesheet Approval screen.
If the Timesheet Approver E-Mail field in the Access Codes screen has been filled, an e-mail is sent to notify the approver that a timesheet has been submitted, along with the name of employee and the period for which they are submitting.
[Close Period] - Button
Press this button to close the selected period. Please note that employee timesheets can’t be entered against closed periods.
[Notes] - Button
Press the [Notes] button to open a window where additional comments can be added to the timesheet for that pay period. After the timesheet has been submitted, approvers can view or add to the notes on the timesheet by pressing this button.
After a note has been added and saved, press the [Reload] button. Once this is pressed, an asterisk (“*”) appears next to the record to which the note was added.
[Print] - Button
Press this button to print the current timesheet. A window appears in which a start and end date may be specified. Press the [Run Report] button to display the timesheet report.
Period
Company
The company name of the entered employee appears here. This field is display only and can only be edited by changing the employee.
Employee
Enter/select the employee code to enter their timesheets.
Period
The period of the value entered in the Date field appears here. This field is display-only and can only be edited if the date is changed.
Date
Enter/select the date of the timesheets to be entered or edited.
Job
Hours Type
Select the hour type being entered. These codes can be set in the Hour Types screen (standard Treeview path: US Payroll > Setup > Company > Hour Types).
Trade
Enter/select the trade worked by the employee for the hours entered. These codes can be set in the Trade Codes screen (standard Treeview path: US Payroll > Setup > Local Table > Trade Codes).
Company, Job
Enter/select the company and job the employee worked for the hours entered.
NOTE: The visibility of the Company column in the Job section and the Overhead section of the screen is controlled by the ‘System Wide Unique Job Code’ checkbox in the Projects tab of the System Options screen in the System Data module (standard Treeview path: System > Setup > System Options – Projects tab).
Cost Code, Category
Enter/select the cost code and category to which to charge the hours worked.
NOTE: If the 'Filter Phases For Default Category' checkbox is checked in the E-Timesheet tab of the Payroll Control screen and a default category has been defined in the Default Category field on the same tab, then the Cost Code field's LOV in E-Timesheet will be filtered to display only those cost codes under the specified default category.
Date Fields
Enter the time worked for the period in the relevant date fields.
Comment
Enter any comments about the timesheet line here. These comments can be included when printing the US Payroll - Timesheet Reports.
Reason For Change
If the timesheet line has been amended, enter the reason for the change here.
Status
This fields display the status of the timesheet line.
Approve/Unapprove By, Approve/Unnaprove Date
If the timesheet line has been approved or unapproved, these fields display when and by whom the approval action was taken.
[Workflow Audit List] – Button
This button appears once the timesheet has been submitted. Press this button to launch a pop-up window displaying the workflow audit history for each timesheet entry line.
Overhead
This section functions in much the same way as the Job section. The Cost Code and Cost Type fields are replaced by the Department and Account fields so that overheads can be correctly charged to the company.
Quick Expense Entry
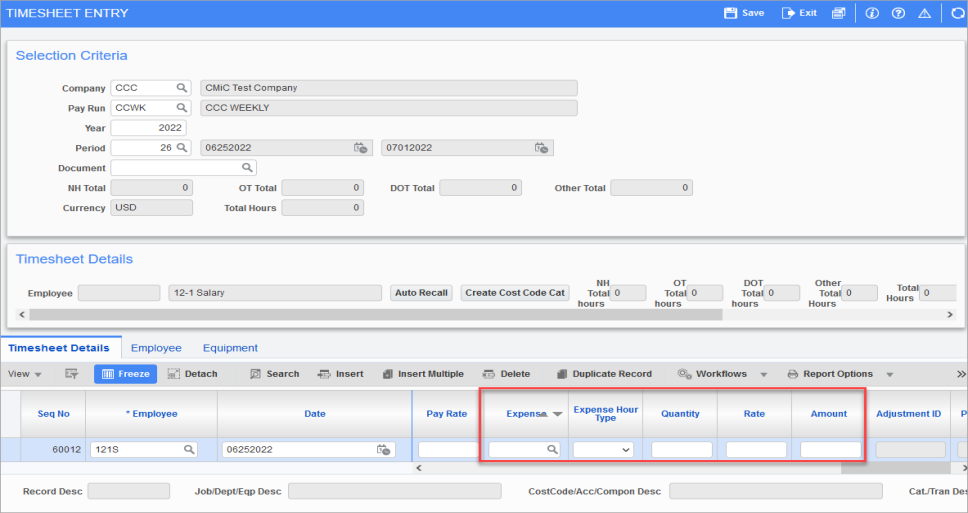
PYTIMSTM – Timesheet Entry; standard Treeview path: US Payroll > Timesheet > Timesheet Entry
Quick expense entry is available in the Timesheet Entry screen in US Payroll. It allows for the entry of expenses without requiring access to the Expense menu within E-Time. The relevant fields are highlighted in the screenshot above.
Expense
Enter/select the required expense code. These codes can be set in the Expense Categories screen in Enterprise (standard Treeview path: US Payroll > Setup > Company > Expense Categories).
Quantity
Enter the number of units to be charged by the expense. This could be, for example, the number of miles driven, or the number of days spent in a hotel.
Rate
Enter the rate at which the expense is charged. This value defaults from the entry in the Expense field but may be changed.
Amount
Enter the total monetary amount of the expense. This is automatically calculated as the quantity times rate but may be changed.