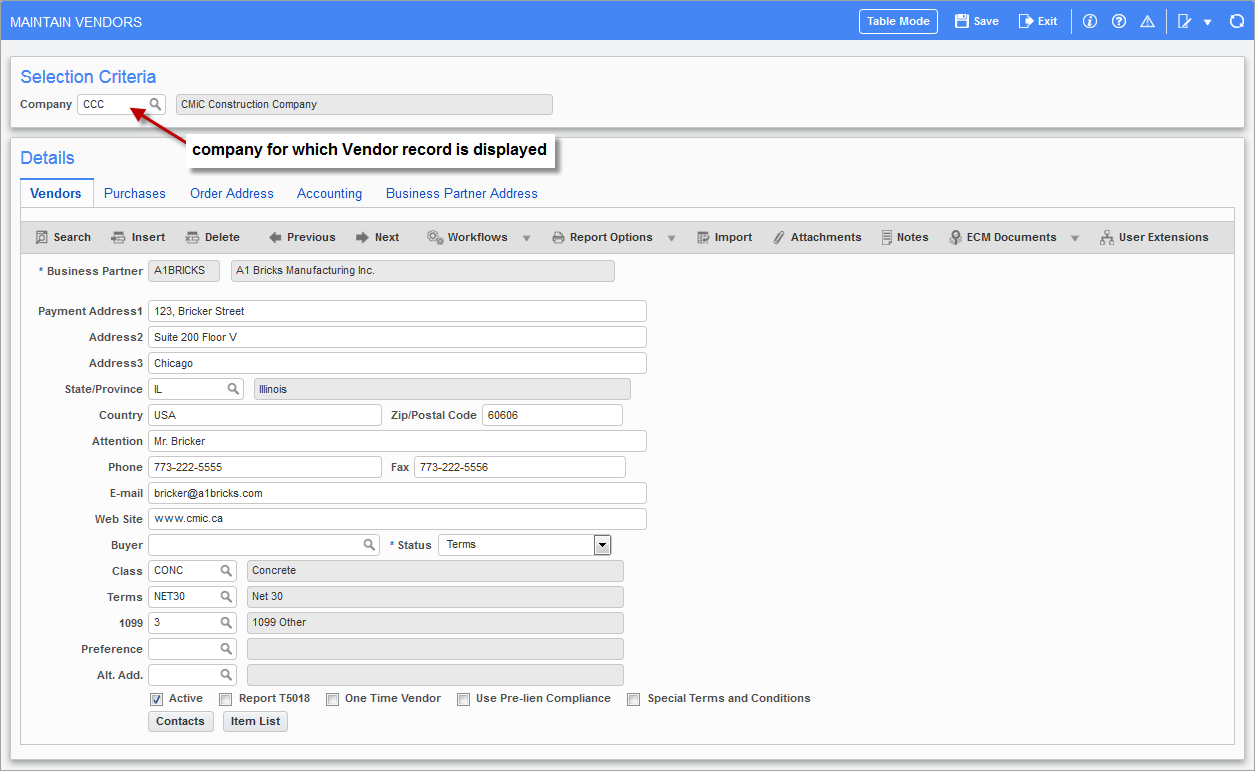
Pgm: BPVENFM – Maintain Vendors; standard Treeview path: Purchase Order > Setup > Maintain Vendors - Vendors tab
The Vendors tab displays the vendor’s address and contact information, copied from the Business Partner’s Business Partner tab when the vendor record was created. It also displays other details about the vendor, which are described in this section.
Ensure that the terms and 1099 code are valid for the vendor in this company as these are applied at a higher level and defaulted into the system.
Company
Enter/select the company code.
Business Partner
This field is a display-only field that displays the business partner record associated to this vendor record, which was used to create this vendor record.
Payment Address 1-3, State/Province, Country, Zip/Postal Code
Enter the address information for the vendor. These fields default from the Business Partner tab of the Business Partner screen.
Attention
Enter the primary contract for the vendor. This field defaults from the Business Partner screen.
Phone, Fax, E-mail, Web Site
Enter the contact information for the vendor. These fields default from the Business Partner screen.
Buyer
If the Purchase Order module is being used and purchase order roles have been set up for the company, creating buyer records, select the buyer (purchase order role) using this field. If this field is used, when a purchase order is entered against this vendor, the buyer will be automatically assigned.
Please refer to Purchase Order - Purchase Order Roles for further details. Maintenance screens’ standard Treeview paths:
-
Purchase Order > Setup > Local Tables > User ID Cross-Reference
-
Purchase Order > Setup > Local Tables > Purchase Order Roles
Status
Enter/select the default status for this vendor. It indicates if the vendor is in good standing with the company. One of the following options can be selected:
-
Terms: The vendor is in good standing with the company, so users can include this vendor’s vouchers in a payment selection, unless the vouchers have been deferred by setting their Payment Status (Status) field to “Temporarily Deferred (T)” or “Permanently Deferred (P)”.
Hold Payment: Users will not be able to include this vendor’s vouchers in any payment selection, regardless of the payment statuses of the vendor’s vouchers.
Class
Enter/select the class in which the vendor falls. The vendor class code is used to group different types of vendors. Usually, it is used to group vendors by product category. The class code can be used in several reports and queries to limit data, and it can be used during the payment selection process to select vouchers for payment. The Material Sales module uses vendor class to indicate if the vendor is a broker or sub-hauler.
Terms
Enter/select the payment terms for the vendor. Payment terms determine the default due date, discount date, percent, and retainage percent used during invoice entry. This field defaults from the AP Control file, but can be changed as required. These codes can be set in the Payment Terms screen (standard Treeview path: System > Global Tables > Payment Terms).
1099
Enter/select the most applicable 1099 reporting code for the vendor. If the company operates in the US, then this field is probably set to mandatory. Codes for this field can be set in the 1099 Transaction Accumulators screen (standard Treeview path: 1099 > Setup > Accumulator Codes).
Preference
Enter/select the appropriate vendor preference code for this vendor. This code is only used during payment selection to allow operators to produce checks for only vendors with specific vendor preference codes.
Codes for this field can be set in the Vendor Preference Code screen (standard Treeview path: Accounts Payable > Setup > Global Tables > Vendor Preference Codes). For details about this screen, please refer to the Vendor Preferences Code section of the AP guide.
Alt. Add.
Enter/select an alternate address for the vendor. The addresses available in this field are created through the Business Partner Address tab on this screen, or the Business Partner Maintenance screen’s Address tab.
Use this field to specify an alternate address on the checks, instead of using the address that defaults from the Business Partner to the address fields on the vendor record’s Vendors tab.
Active – Checkbox
Check this box if the vendor is being used at this time. The system will default the active status of the business partner. If the status of the vendor is not to be the same as that of the business partner, either check as ‘Active’ or uncheck as ‘Inactive’, as required.
Report T5018 – Checkbox
This field is only applicable in Canada for government reporting, where required. If users are registered in this program and the vendor being entered is to be reported within this program, then check this checkbox.
To print T5018 forms, use the Print T5018 Forms screen under Utilities.
One-time Vendor – Checkbox
Check this box if the vendor is a one-time partner. This field will default from the Business Partner File. If checked, every time this vendor is used on an invoice, the user will have to enter the vendor name and address. One-time vendors are used to record miscellaneous invoices received from suppliers that are not expected to be used again. The vendor’s information is entered during the voucher entry process.
Use Pre-lien Compliance – Checkbox
Check this box if the vendor is a pre-lien vendor. Compliance codes for pre-liens are set on the Compliance Codes Maintenance screen (standard Treeview path: Accounts Payable > Setup > Global Tables > Compliance > Compliance Codes).
NOTE: When this checkbox is checked, the Payment Status default must be kept as “Normal (N)”.
Special Terms and Conditions – Checkbox
Check this box to indicate that special contract terms and conditions are associated with the vendor. A checkmark in this field triggers a notification in the Subcontract Entry screen.
[Contacts] – Button
The [Contacts] button launches the Contacts screen used to create, view, and edit contacts. The screen is restricted to display contacts that have an address code associated with the current company, as well as any contact associated with the company that does not have any specified address codes.
For details about the Contacts screen, please refer to the Contacts
[Item List] – Button
The [Item List] button is only applicable once the system is up and running. This button will open a window that displays all the inventory items supplied by this vendor, and the vendor’s code for the item. As this type of information must be entered via the Purchase Order module, when a vendor is first created, there is no data available in this window.