
Example of Search Options in a Screen's Block Toolbar
Enterprise Console takes full advantage of Oracle’s ADF technology to simplify and enhance advanced searches, customize how tables display their records, and enhance how a table’s records are sorted (ability to sort records by up to three columns).
There are three main searching options:
These search options are described in more detail below.
Query by Example

Using Query by Example Option
The [Query by Example] button is only available for a table of records, when a screen is in table mode.
It appears as a filter icon (![]() ) on the Block Toolbar. This option is used to filter the records displayed by the table.
) on the Block Toolbar. This option is used to filter the records displayed by the table.
When activated, a row of empty fields (columns) that correspond to the fields of the records will be displayed above the header row. Enter a value or text in the field(s) to match records against and press the Enter key on your keyboard to have the matched records displayed. To remove the filter, click the [Query by Example] button again.
This option is a basic filtering method but it also supports the use of Wildcards – Pattern Matching.
Find

Using Find Option
Similar to Query by Example, the Find option is only available for a table of records, when a screen is in table mode. It appears as a search field on the Block Toolbar and is used to filter records displayed by the table.
Enter a value or text in the Find field and press [Go] to locate records that contain a match. What distinguishes this search option from Query by Example is that this search is not limited to specific fields (columns).
This option is a basic filtering method but it also supports Wildcards – Pattern Matching.
Search
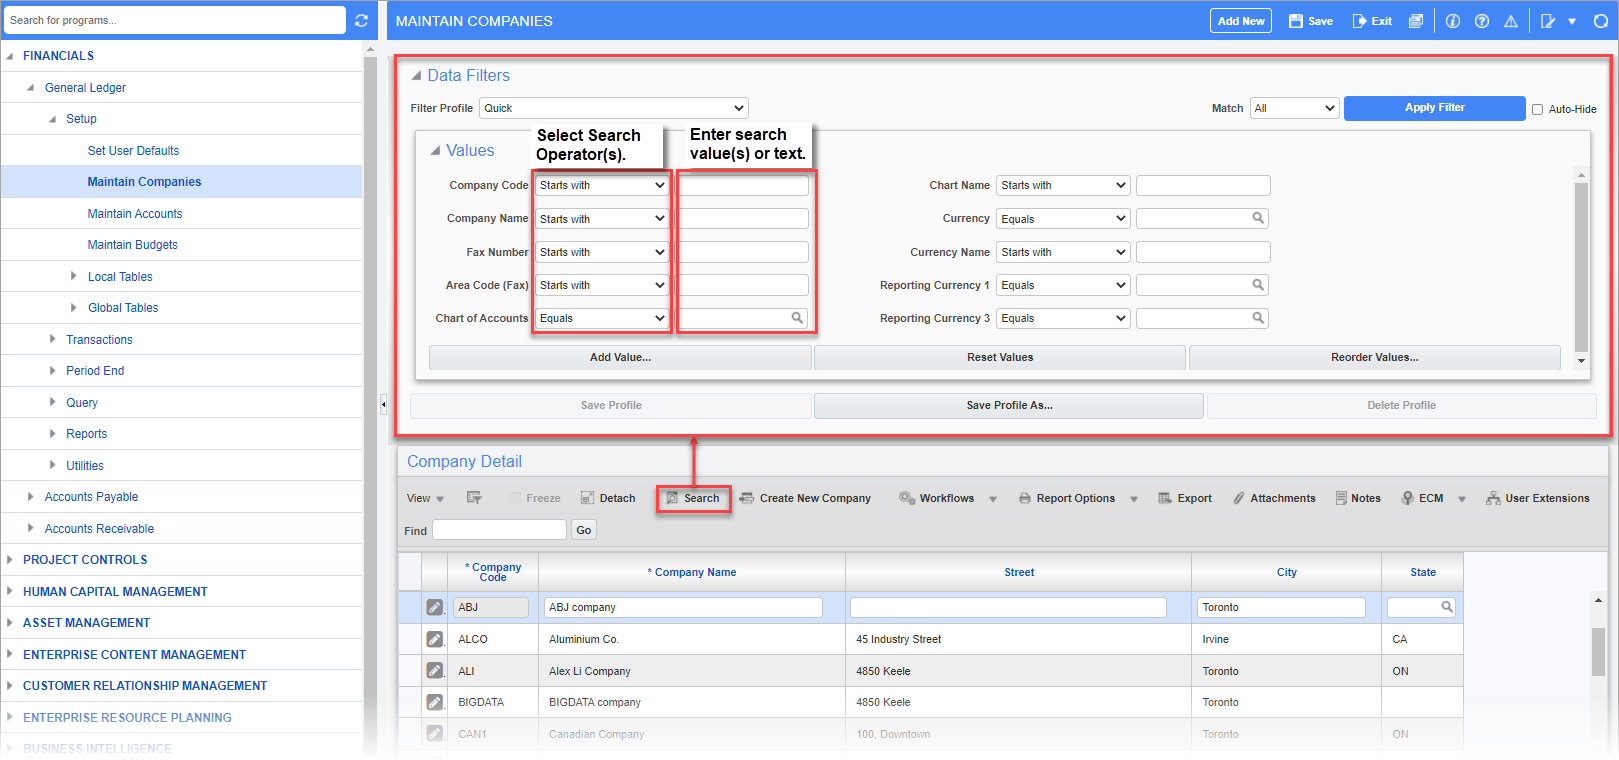
Using Search Option
The [Search] button is also located on the Block Toolbar, and it is available when the screen is in table mode or form mode.
If data filter parameters have been defined and executed, then the [Search] button's color will change to indicate that a filter has been applied to the data. The button's color will be the same color as the theme. For example, if the default theme color is set to blue, then the button will be blue.
Data Filters
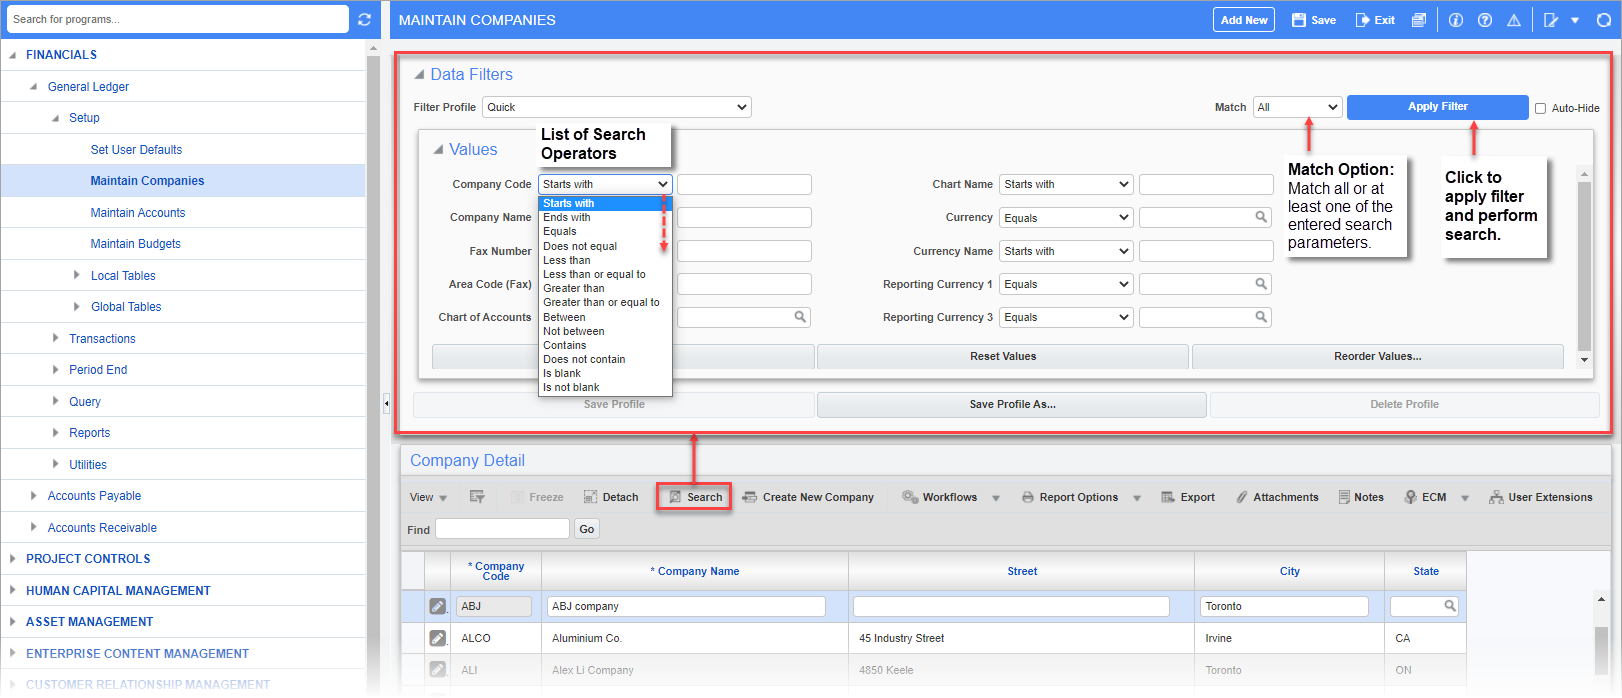
Search (filter) section showing drop-down list of search operators
When activated, a filter (search) section will appear with key fields (or values) that correspond to the fields of the displayed records. Drop-down lists of search operators and options such as "Is blank" are available for each field to search on. To match all or at least one of the search parameters entered in multiple fields, select either “All” or “Any” from the Match field's drop-down menu.
To perform a search, select search operators using the drop-down menus and then enter any values or text in the input fields to match records against. Use the 'Auto-Hide' checkbox to control whether the query automatically collapses when the [Apply Filter] button is pressed. When finished, click the [Apply Filter] button.
To remove the search section, re-click the [Search] option on the Block Toolbar.
NOTE: For dates, use either the format DD-MMM-YY (01-JAN-15) or DD/MMM/YY (01/JAN/15).
Several buttons are available in the search section for managing the key fields.
[Add Value...] - Button
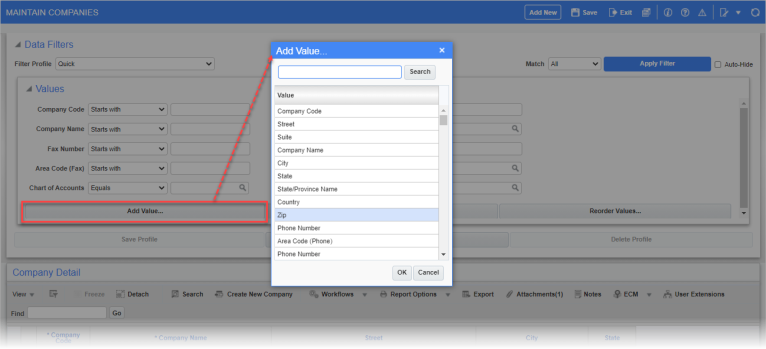
This button is used to add any additional fields to filter records by in the search section.
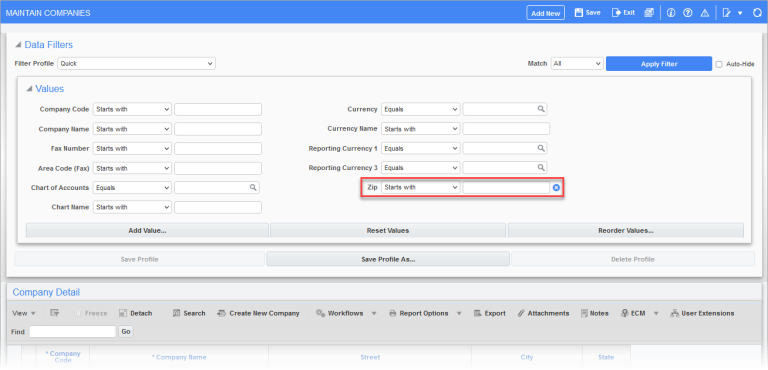
Any new fields are added to the search section as shown in the screenshot above. To remove a newly added field, use the Delete icon (![]() ).
).
To save a search with newly added fields, use the [Save Profile As] button to create a new filter profile. Refer to Saved Searches and Default Table Filters for more information.
[Re-order Values...] - Button
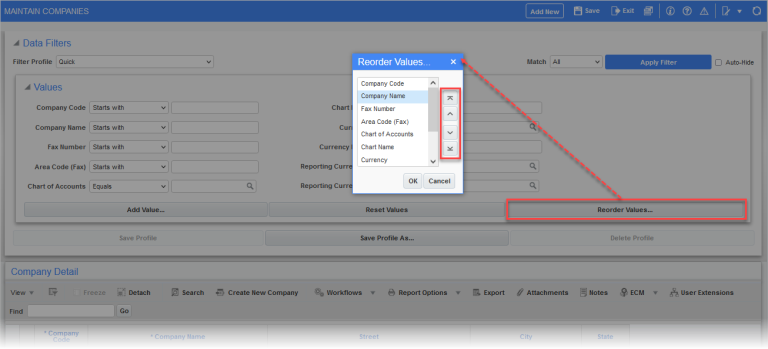
This button is used to launch a pop-up window where the search section fields can be re-ordered using arrow buttons. When finished re-ordering, click [OK] to close the pop-up window.
[Reset Values] - Button
This button is used to clear and reset the search fields in the search section.
Saved Searches and Default Table Filters
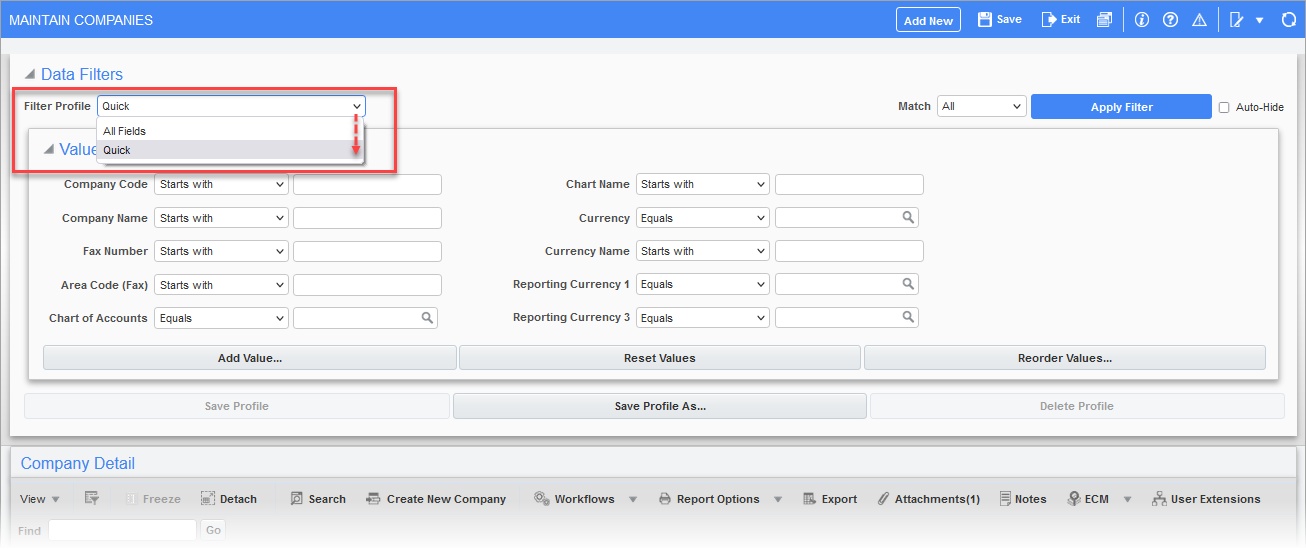
Creating Saved Searches Using Filter Profiles
A filter profile is used to save a specified search and set it as a default filter for the current application and user. The Filter Profile field's drop-down menu lists the existing filter profiles. Filter profiles can be system-defined or user-defined. Refer to Site/User-Level Filters for more information.
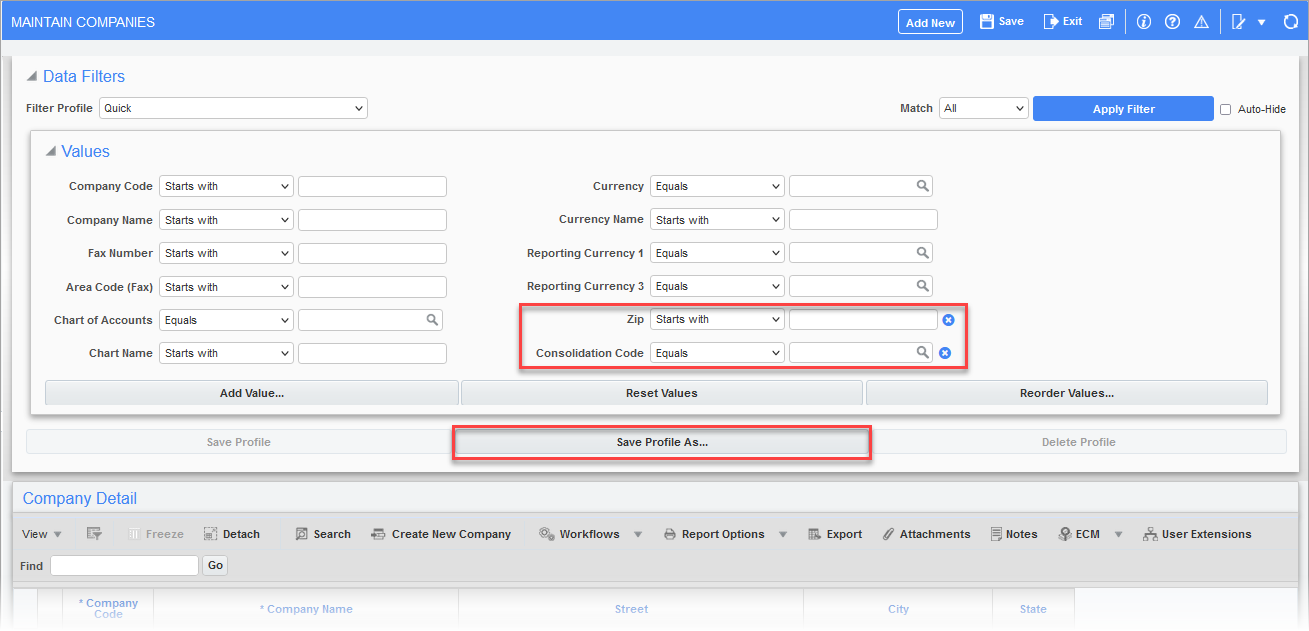
If new values have been added to the search section, as shown in the screenshot above, the [Save Profile As] button becomes enabled.
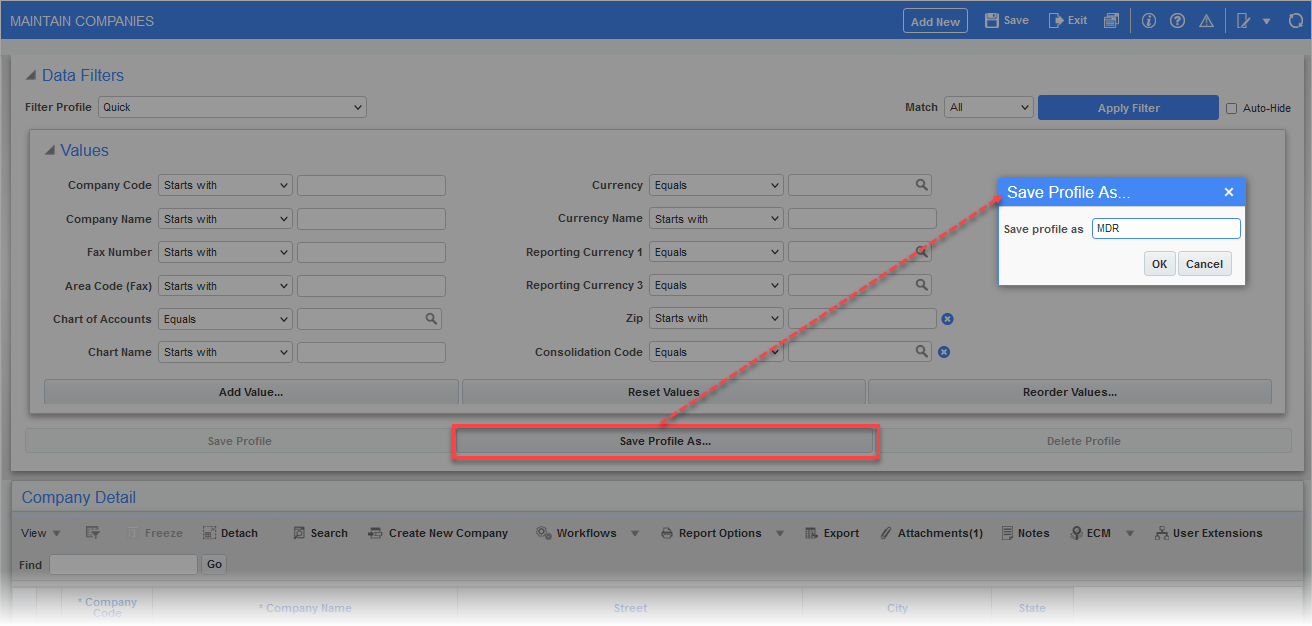
To save a specified search and set it as a default filter for the current application and user, click the [Save Profile As] button to launch a pop-up window where a name for the new profile can be entered. Enter a name and click [OK] to close the pop-up window.
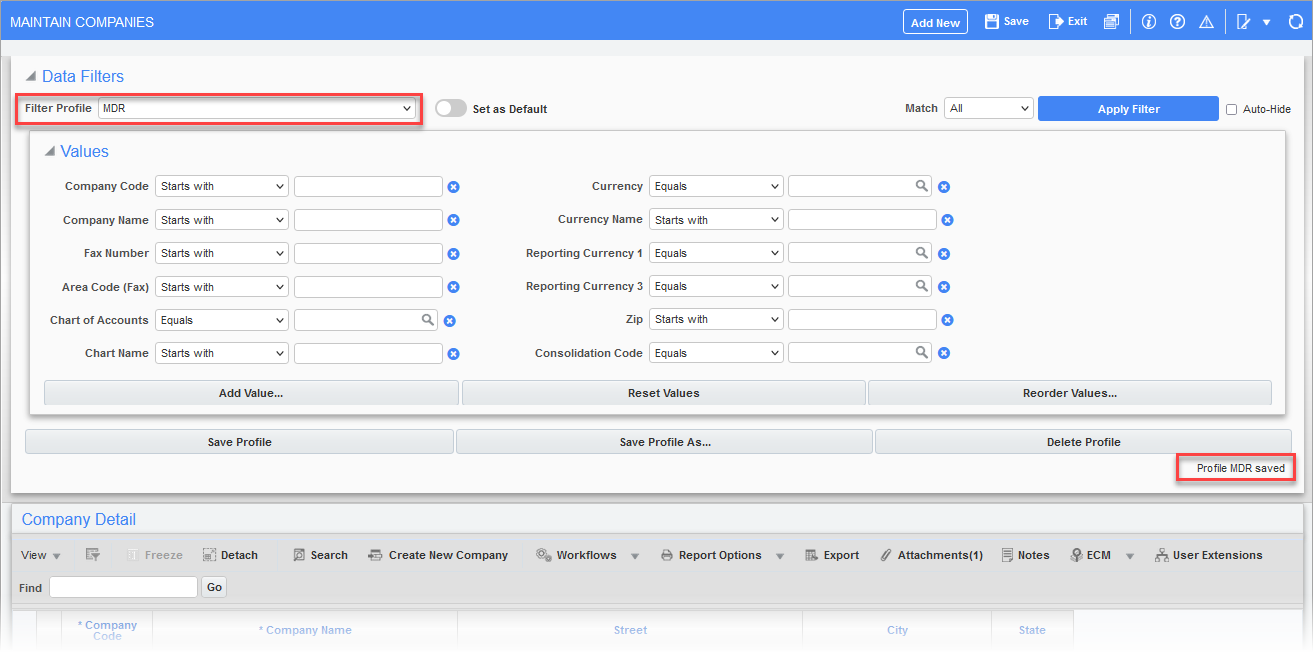
The new profile will be added to the list of profiles in the Filter Profile field and a message will be displayed to indicate that the profile has been saved. On subsequent uses of the application, the saved search will be available to be used as a filter, filtering the records displayed by the table.
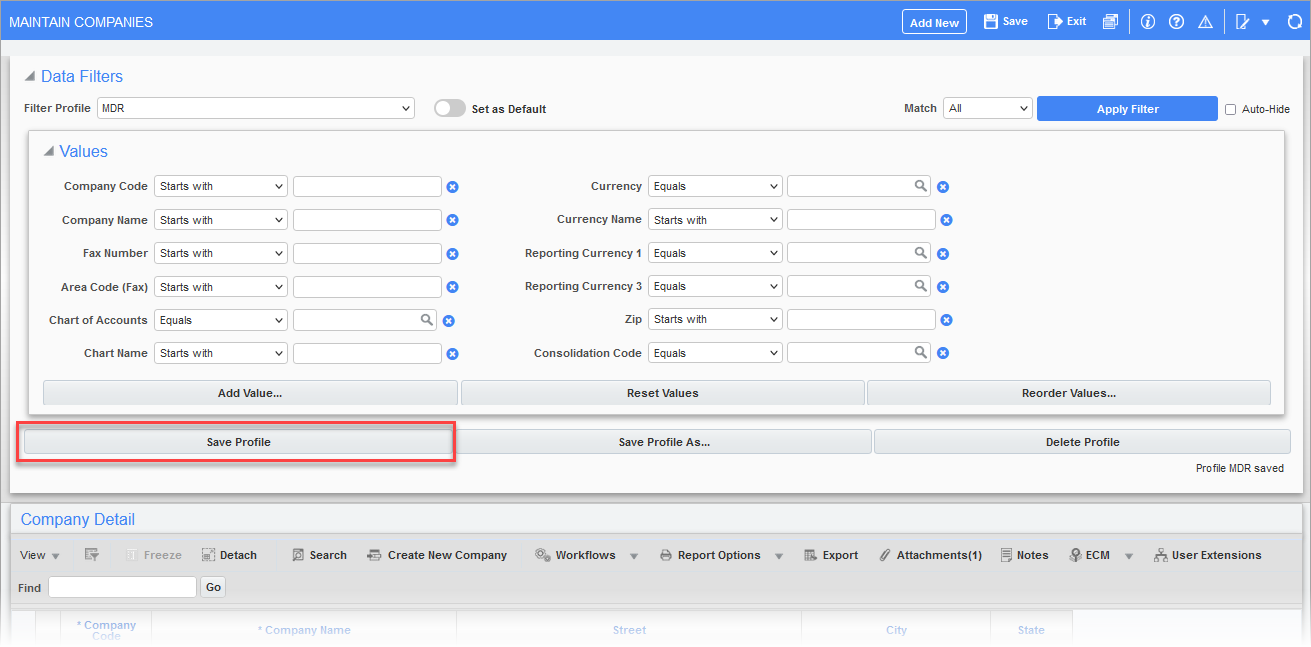
Further customizations can be performed to the filter such as adding or deleting key fields, if required. When finished completing any customizations, click on [Save Profile].
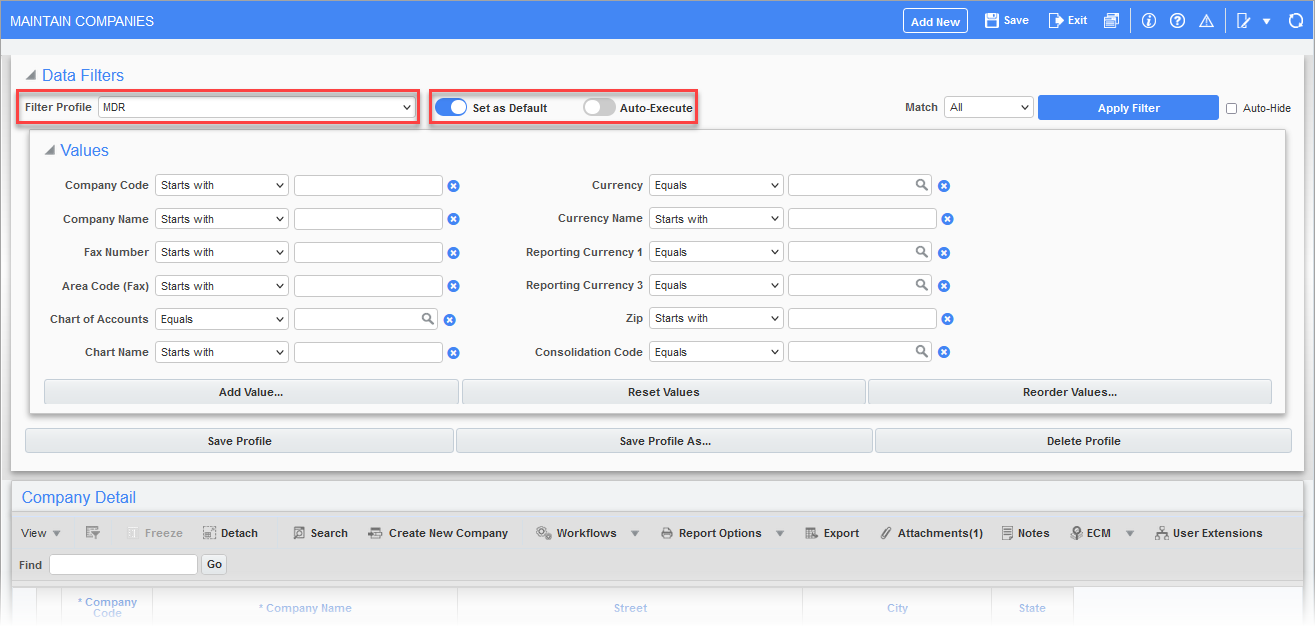
To set a saved search as the table's default filter, or to change which saved search is used for the table’s default filter, select a filter profile from the Filter Profile drop-down menu. Use the Set as Default toggle to specify whether this saved search will be used as the default filter. When the Set as Default toggle is enabled, the Auto-Execute toggle will also be displayed. Use the Auto-Execute toggle to specify whether the default search should be automatically executed when the screen is launched. If this toggle is turned off, when the screen is opened, the [Apply Filter] button will need to be clicked to filter and display the screen's records.
Site/User-Level Filters
Site/user-level filters can be used to further improve the performance of a screen by limiting the data set that will be loaded by default when the screen is launched. The site-level filter will default for those users who have not specified their own user-level filter for a selected screen. If users define their own user-level default filter for a screen, that filter will override the site-level one.
To create a site-level filter for a selected screen, follow the steps below.
-
Log into Enterprise using your user credentials.
-
Navigate to a specific screen where a site-level filter will be created and applied.
-
In the console, click the arrow in the Lite Editor icon (
 ) and select "Site DA" from the drop-down menu. This setting is used to create site-level filters, which are defined at the system level.
NOTE: Users without proper security privileges assigned will not see the "Site DA" option listed in the Lite Editor drop-down menu. Refer to Lite Editor Lite Editor - Setup for more information about the level-type security privileges required to create customizations and modify screens for all users at the site level.
-
Click on the [Search] button in the Block Toolbar to launch the Data Filters pop-up window. In the Data Filters pop-up window, create a new filter profile with the desired parameters and enable the Set as Default and Auto-Execute toggles. See Saved Searches and Default Table Filters for more information on creating filter profiles.
-
If a user logs in and navigates to the screen and has no user-level filter assigned using the Data Filters pop-up window, then the site-level filter will be automatically launched for them.
-
If a user logs in as DA and navigates to the screen, the new site-level filter will be displayed in the Data Filters pop-up window under the Filter Profile field's drop-down menu, along with any other system-defined filters.
Sorting Displayed Records

To sort the records displayed by a table, click the [View] button on the table’s Block Toolbar, then select “Sort” and choose the “Advanced” option (typically, tables will have more than one column, and sort’s advanced option must be used).
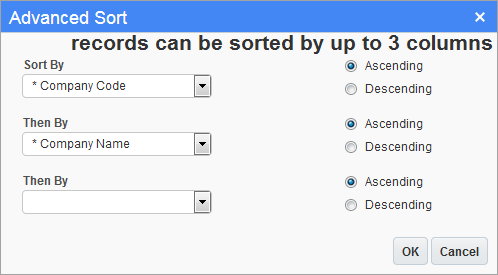
In the pop-up window that appears, choose up to three columns by which to sort the table. It’s also possible to choose whether the columns are to be sorted in ascending or descending order.
Wildcards – Pattern Matching
Wildcard characters can be used in search parameters when performing searches using the three searching options:
-
Query by Example: Wildcards can be used in the row of empty fields (columns) that appears above the header row that is used to enter the search parameters.
-
Find: Wildcards can be used in the Find field's search box.
-
Search: Wildcards can be used in many of the input type text fields where values or text are entered, depending on the search operator selected. These fields are located beside the search operator fields.
An example using the Query by Example search option is provided below.
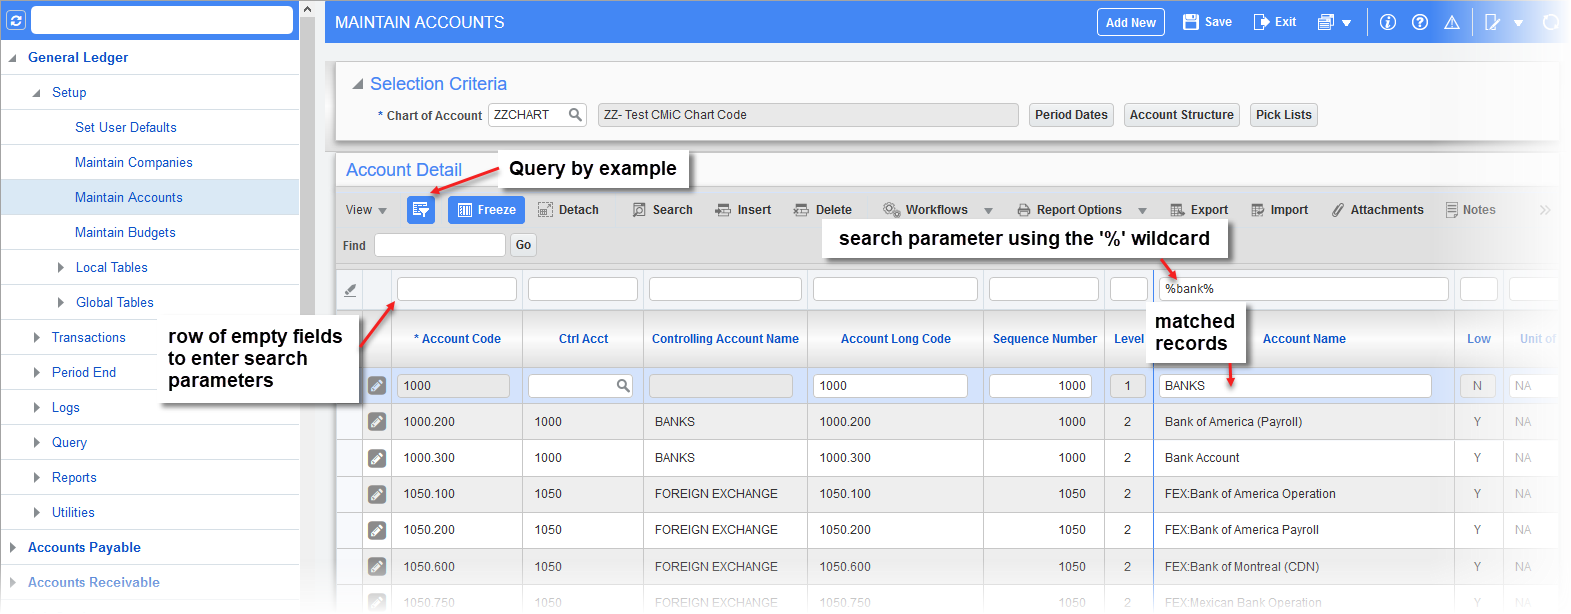
Screen of Enterprise Console, in which the “%” wildcard was used in a query (filter)
When entering a search parameter in a search/query field, wildcards can be used to create a pattern to match against the pattern of the corresponding field of the records. They are used when exact matches are not sufficient. There are two wildcards: one represents any single character, and the other represents any string of characters. They are used with regular characters to create a pattern, as a search parameter, and the pattern is used to match fields that follow the specified pattern.
Wildcard Characters
Single Character: “_“
String of Characters: “%”
Example Patterns and Possible Matches
| Example Patterns | Possible Matches |
|---|---|
|
JON_S |
JONES, JONAS, JONOS, JON-SRA |
|
JON%S |
JONSTONES, JONES, JONAS…. |
|
ENTER% |
ENTER, ENTERS, ENTERTAIN… |
|
S_AR_ |
SHARE, SMART, SHARP, SNARE |
|
S%AR_ |
SAMARTRA, SHARE, SMART… |