
Example of Printing Options screen for parameter entry
All Enterprise modules that handle records have a Reports menu option that lists the module’s reports. This section covers running reports for ADF screens.
ADF based screens use Oracle’s ADF technology and web browsers to streamline reporting. When a report is selected from a module’s Reports menu, the selected report’s printing options pop-up window is launched, an example of which is shown in the screenshot above. The printing options window is divided into two sections: one for report specific parameters and another for output parameters.
Report Specific Parameters
Report specific parameters are used to filter what records are displayed in the report. The parameters available in this section depend on the report being launched.
In certain reports, a Relative Date field is available that allows for expressions to be used instead of date values so that the Date field doesn't need to be hard-coded for recurrent scheduling of reports. For more details please see Getting Started - Using the Relative Date Field for Recurring Reports.
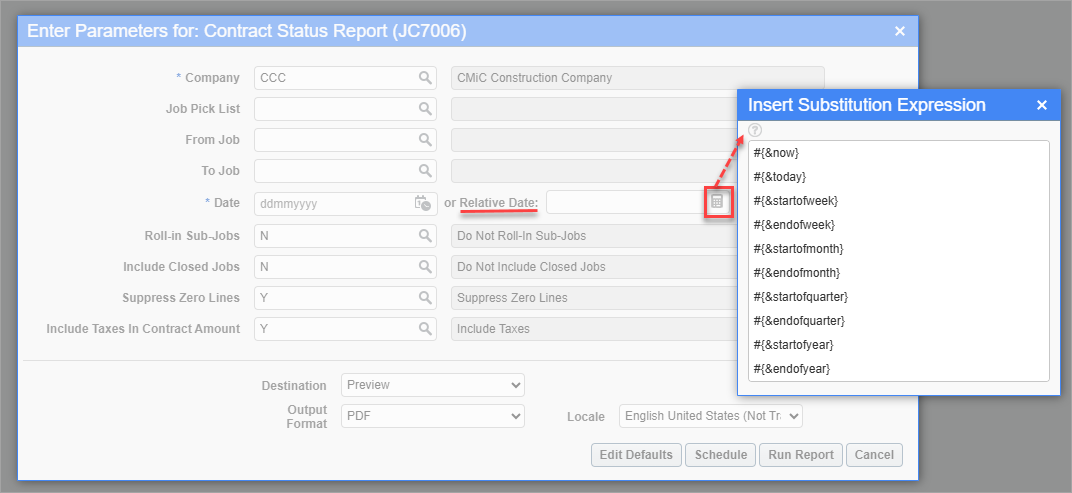
Example of the Relative Date field on the Contract Status Report (JC7006)
Output Parameters
Output parameters are used to specify how the report will be displayed (e.g. Previewed, Emailed, Printed, etc.).
NOTE: Ensure the web browser is set to allow pop-up windows for the server running CMiC Enterprise, as some reports are displayed on new browser tabs.
Destination
Select a destination for the report from the drop-down menu. Available options include “Preview”, “Email/Schedule”, “Printer”, and “File”. The destination selected determines which fields become enabled in the pop-up window.
Preview
To preview a report, select “Preview”, choose a report format from the Output Format field, and then click on [Run Report]. The format of the report will depend on the output format selected in the Output Format field (e.g., PDF, HTML, Excel, RTF, CSV, etc.). For example, if “PDF” is selected as the output format, the report will open as a PDF in a new tab of the web browser. Depending on the selected output format, the report can be saved or printed from the default program in which it is opened.
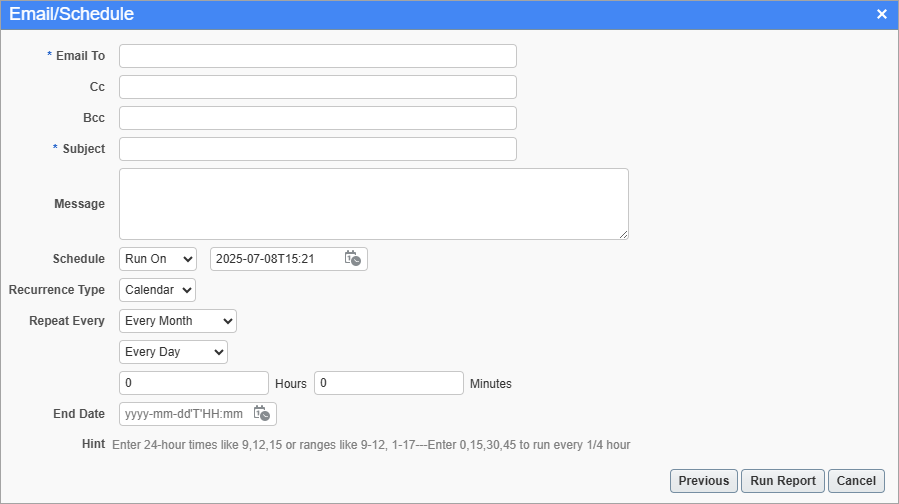
To email a report, select “Email/Schedule”, choose a report format from the Output Format field, and then click on [Next]. Clicking the [Next] button launches an Email/Schedule pop-up window where email fields are completed (e.g., Email To, Subject, Message, etc.). An email can be sent to multiple recipients by entering the email addresses in the Email To field separated by commas. Click [Run Report] to create and send the report via email. The format of the attached report will depend on the output format selected in the Output format field.
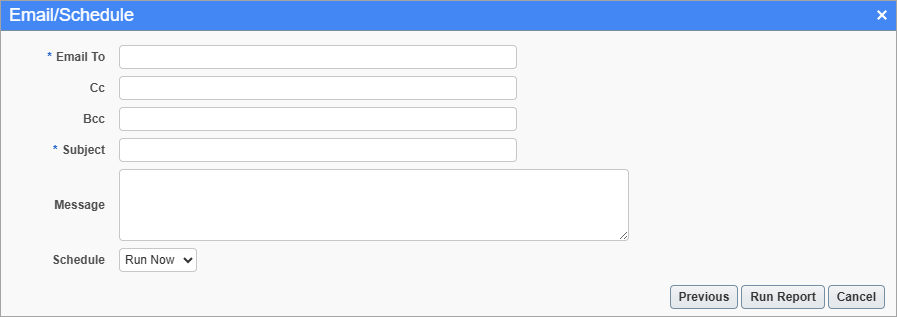
The Schedule field is used to schedule reporting. This field is limited to users with the following system privilege assigned: ‘SCHREPORT - SD: Allows the User to Schedule Reports’. Reporting can be scheduled to run immediately by selecting "Run Now" or at a specified time by selecting "Run On" from the Schedule field's drop-down.
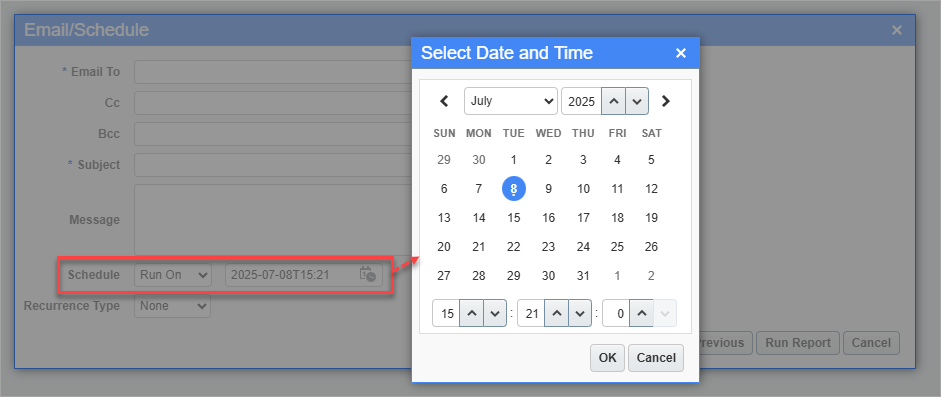
Reports can be scheduled to be printed at a specified date and time using the calendar pop-up window.
In addition, the Recurrence Type field can be used to repeatedly print the scheduled reports with the following options.
-
None: This option does not schedule any repeated printing.
-
Simple: This option allows the user to specify the recurrence's frequency (in minutes, hours, days, or weeks), and end date (if any).
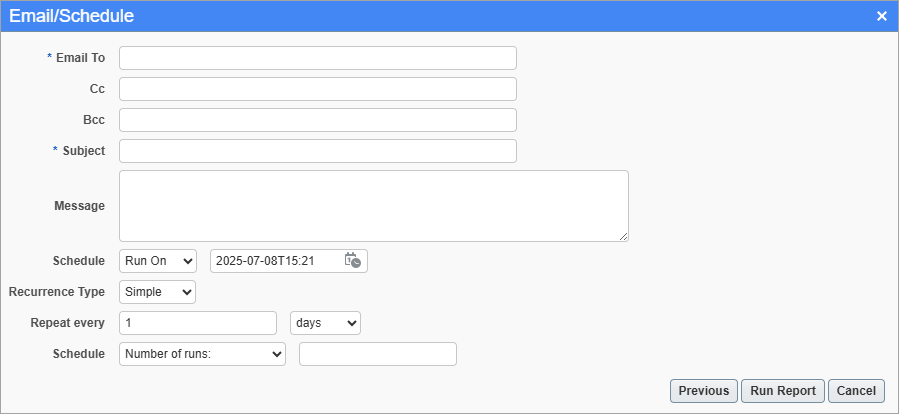
-
Calendar: This option allows the user to specify the recurrence's frequency by specific months, dates, and times, and an end date (if any).
Printer
To print a hardcopy of the report, select “Printer”. The Print Server and Printer Name fields will become enabled. Select the print server and printer that will be used to print the report. Finally, click on [Run Report] to print the report on the specified printer.
File
To create a softcopy of the report, select “File” and choose a report format from the Output Format field. The File Name field will become enabled. Enter a name for the report in the File Name field and click on the [Run Report] button. A file will be created in the print server’s working directory, using the file format specified in the Output Format field.
Output Format
Select an output format from the drop-down menu (e.g. PDF, HTML, Excel, RTF, CSV, etc.). The selection made here will determine the format of the report being generated.
Locale
Select a locale from the drop-down menu to define the way in which the report will print the date and time.
[Schedule] – Button
This button launches the Email/Schedule pop-up window to schedule reporting. This field is limited to users with the following system privilege assigned: ‘SCHREPORT - SD: Allows the User to Schedule Reports’. For more information, please refer to Email/Schedule.
[Edit Defaults] – Button
To edit a report’s parameters, the Report Definition screen launched using the [Edit Defaults] button is used. Access to the [Edit Defaults] button limited to users with the Configuration Privilege ‘UIREPPRMMD - UI Report: Allow User To Modify Report Parameters Definition’.
NOTE: The UIREPPRMMD configuration privilege can only be granted at the site/client level, and it is not necessary to enter a privilege level in the Edit Privilege Levels section, as it is automatically set to the site/client level.