NOTE: This tool is deprecated and no longer being supported by CMiC. We recommend using our Drawing and Specs Upload and Extraction Tool which is more convenient to use and has all of our latest features. For more information, see CMiC Field - Drawing and Specs Upload and Extraction Tool.
The ECM Explorer desktop application is used to extract drawing sets from large PDF files from architects and engineers, and it can handle both raster and vector images. The extracted drawing sets, which contain one PDF for every page in the large PDF from the architect or engineer, are uploaded into CMiC Field’s Document Management module, where they can be used on a page-by-page basis to greatly enhance mobile communications through Mobile Field.
NOTE: Once drawings are extracted, they can be viewed in PSPDF viewer in CMiC Field and Mobile Field, where users can add image annotations, and publish/unpublish link annotations.
Once the documents have been selected in the Document Data Extraction pop-up window, click [Proceed] in the Select Extraction Regions section to open the following screen to select the regions on each page from which the sheet label (PDF ID) and sheet title (PDF title) can be extracted by the optical character recognition (OCR) functionality.
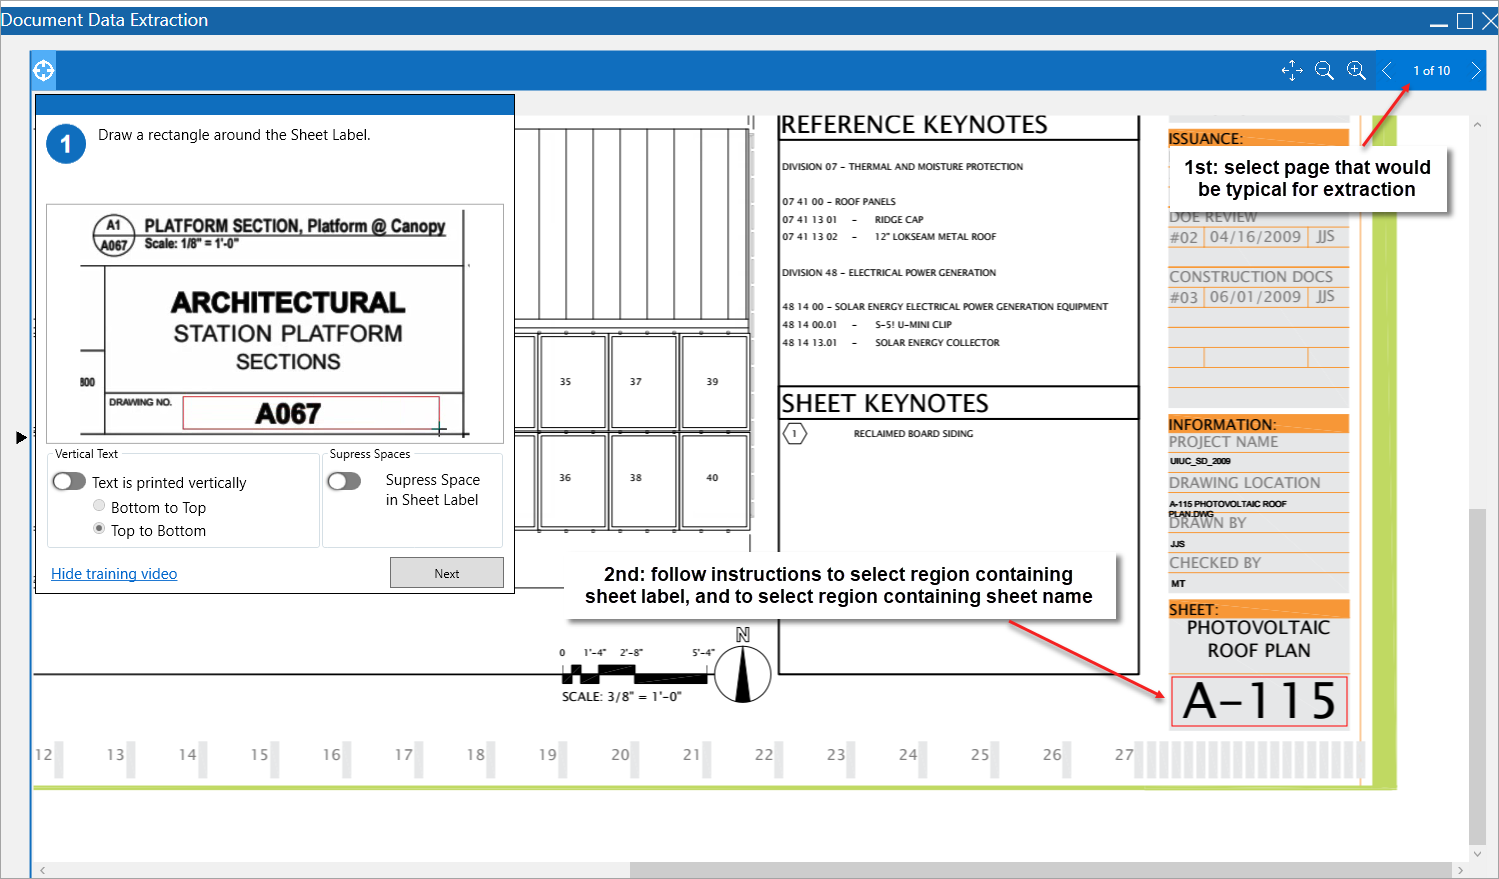
As shown above, use the launched screen to navigate to a page that is typical, in regards to where the sheet label and sheet title are located.
Zoom into the area with the sheet label, and following the displayed instructions, use the red rectangle to select the area where the sheet label is typically found. If the text for the sheet label is vertical, enable the ‘Text is printed vertically’ toggle in the pop-up window displaying the instructions. Click the pop-up window’s [Next] button to continue.
Next, follow the displayed instructions to select the area where the sheet title is typically found, using the blue rectangle. If the text for the sheet title is vertical, enable the ‘Text is printed vertically’ toggle in the pop-up window displaying the instructions. Click the pop-up window’s [Proceed] button to begin the extraction process.
NOTE: When selecting these areas, be sure to select the whole area where longer instances of the relevant text could be found, and do not overlap the areas. Also, be sure not to include areas where irrelevant characters could be found.
Validate Extracted Sheet Info & Enter Overrides
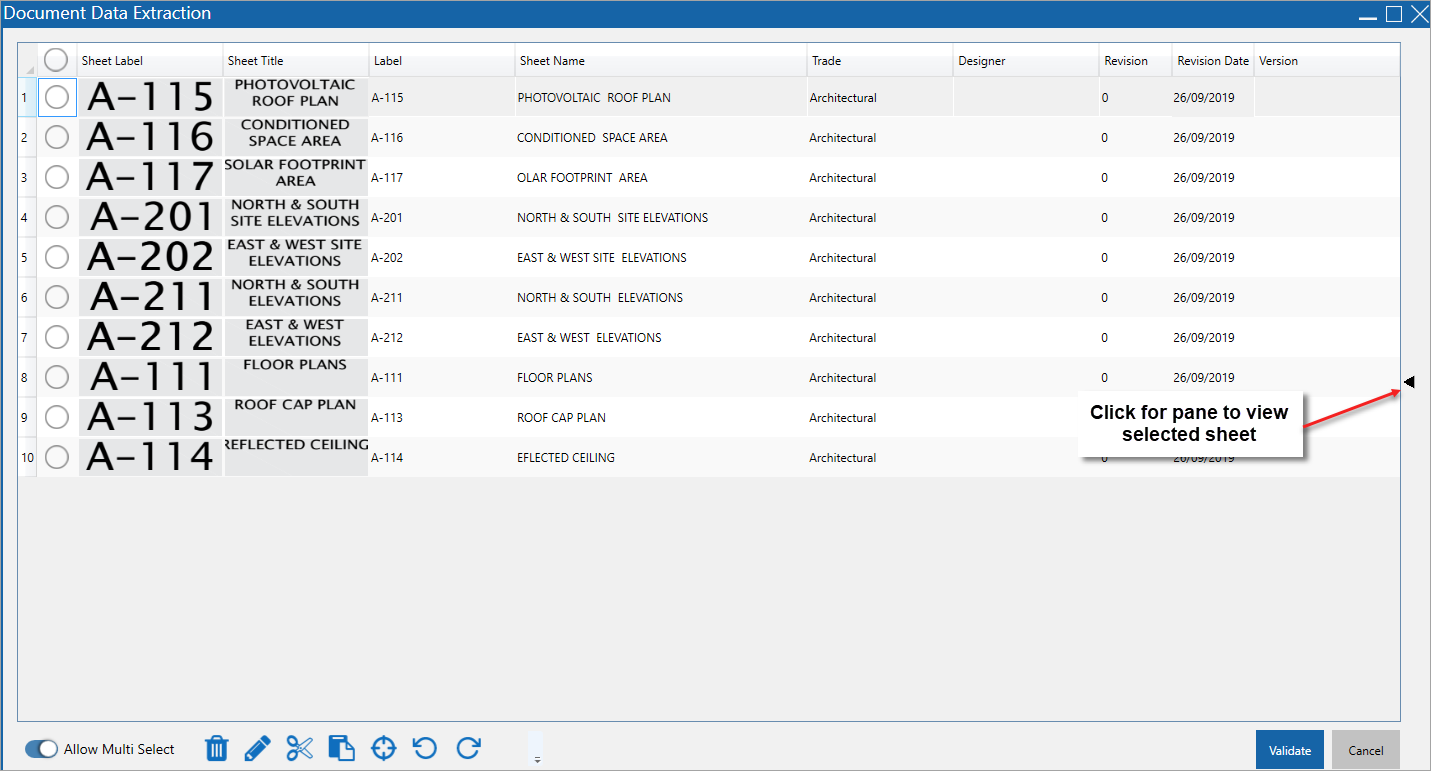
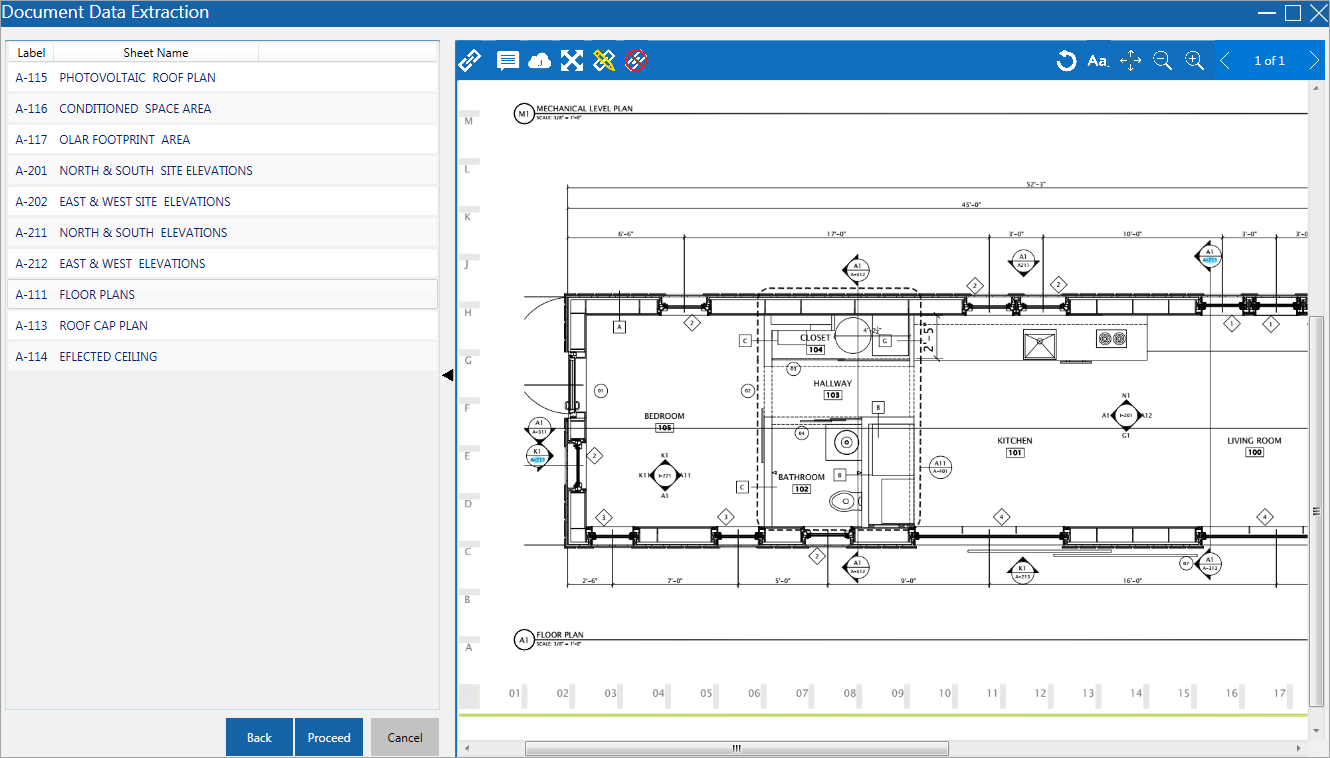
After the extraction process finishes, the above screen is shown to display the extracted data for each sheet in the drawing set. This screen is used to verify the extracted data, and to make any necessary corrections/overrides.
As shown above, click the Hide/Show Pane icon ( ) to view a selected sheet in the left-most pane.
The following are details about the extracted data for each sheet in the extracted drawing set.
Sheet Label
Image used to extract the sheet label.
Sheet Title
Image used to extract the sheet title.
Label
Extracted sheet label; extracted text can be overwritten if incorrect.
Sheet Name
Extracted sheet name; extracted text can be overwritten if incorrect.
Trade
Extracted drawing type, based on prefix from the sheet label (e.g. architectural, electrical, mechanical, etc.).
Revision
Revision number for the sheet. If a previous version of the sheet is found, this number is auto-incremented.
Revision Date
This date comes from the Revision Date field on ECM’s Document Data Extraction pop-up window.
Version
This text comes from the Version Name field on ECM’s Document Data Extraction pop-up window.
If there are sheets with incorrect sheet labels or sheet names due to differences in the regions containing them for those sheets, enable the ‘Allow Multi Select’ toggle in order to reselect the regions and rerun the extraction process for the atypical sheets, as per the following subsection. The ‘Allow Multi Select’ toggle’s functionality, detailed in the following subsection, can also be used to select multiple sheets to perform various en masse actions.
Once the extracted data has been verified and any necessary corrections/overrides have been made, click the [Validate] button to have ECM check the extracted sheets for missing labels and names, and to check them against the sheets existing in CMiC Field. The following are details about the validation indicators, which can be hovered over for additional details:
-
Extraction Error (
 ): a red circle appears next to each sheet with extraction errors.
 -
Sheet Already Exists (
 ): a blue circle appears next to each sheet that already exists in CMiC Field, and their revision number is automatically incremented.
Once the sheets pass validation, clicking the [Validate] button results in the [Link Files] button appearing in order to progress to the next part of the extraction process: Converting Sheet Label Call-Outs to Hyperlinks.
Allow Multi Select: Override Values En Masse & Re-Extract Sheet Labels & Names for Selected Sheets
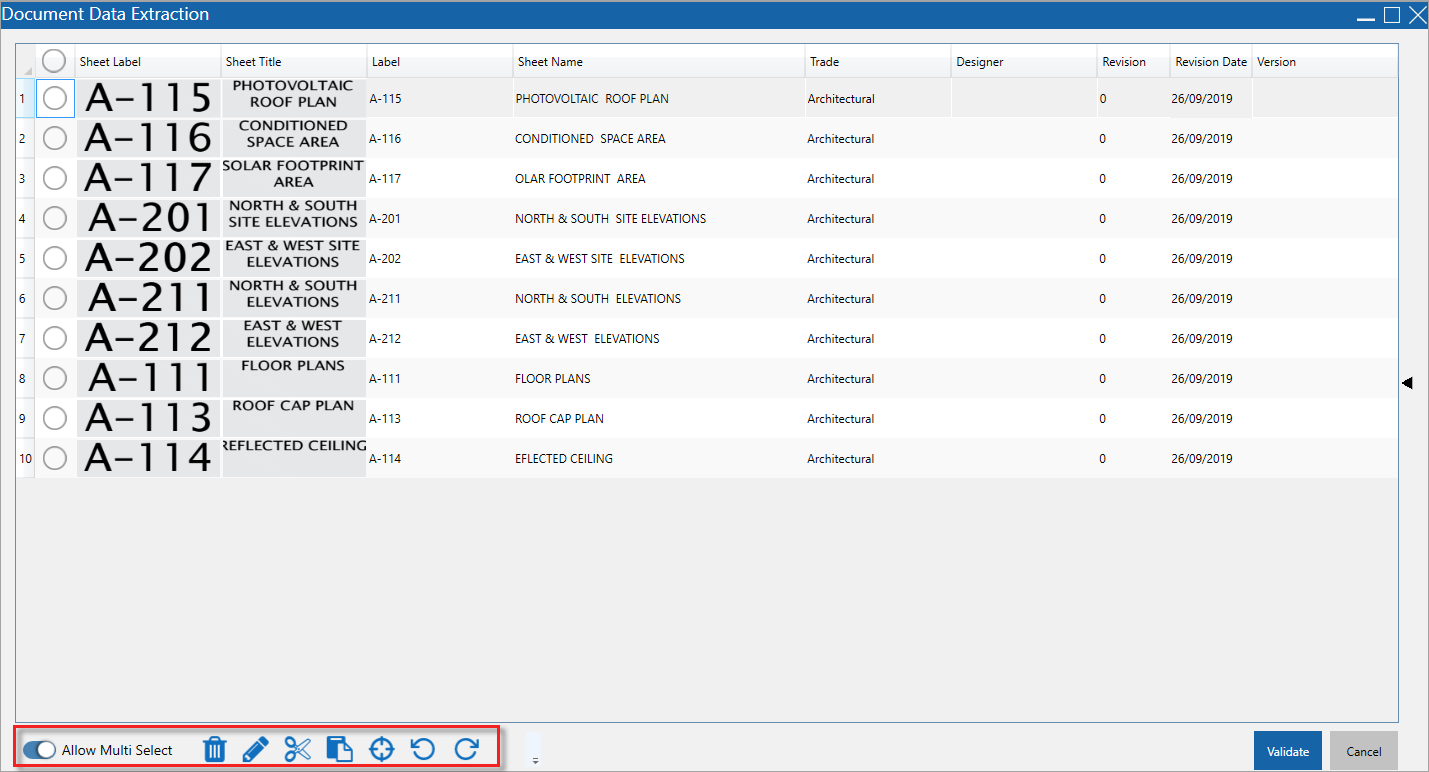
The ‘Allow Multi Select’ toggle’s functionality is used to select multiple drawing set sheets to perform the following en masse actions:
Delete Selected Sheets 
Deletes selected sheets from drawing set.
Edit Field for Selected Sheets 
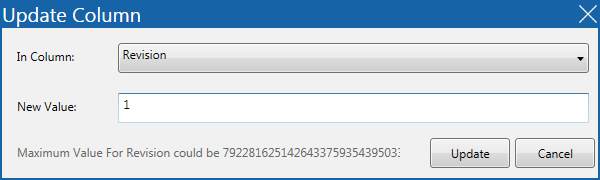
For selected sheets, the launched pop-up window is used to change the value of the column selected via the In Column drop-down list to the value entered in the New Value field.
Trim Column Text for Selected Sheets 
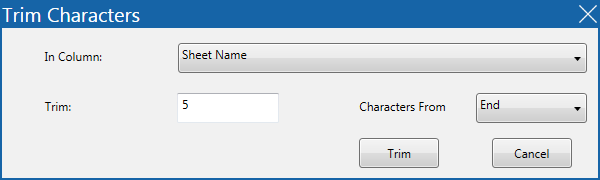
For selected sheets, the launched pop-up window is used to trim off a specified number of characters from the start or end of a specified column’s text.
The In Column drop-down list is used to select the column containing the text to be trimmed, the Trim field is used to specify how many characters are to be trimmed off the text, and the Characters From drop-down list is used to select whether the trimming is to happen at the start or end of the text.
Append Text to Column Text for Selected Sheets 
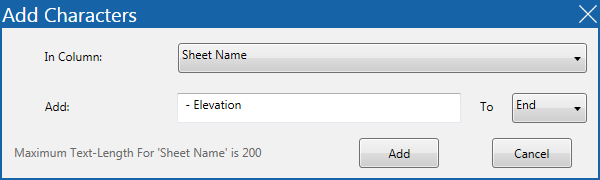
For selected sheets, the launched pop-up window is used to append text to the start or end of the selected column’s text.
The In Column drop-down list is used to select the column containing the text, the Add field is used to specify the text to be appended to the existing text, and the To drop-down list is used to select whether the text is to be added to the start or end of the text.
Specify Sheet Label & Name Extraction Regions 
If there are sheets with incorrect sheet labels or sheet names due to them being atypical in regards to the regions containing the sheet labels and sheet names, use this option to reselect the regions and rerun the extraction process for the atypical sheets.
Rotate Left 
This button rotates the sheet counter clockwise.
Rotate Right 
This button rotates the sheet clockwise.
Converting Sheet Label Call-Outs to Hyperlinks
After the [Link Files] button is used in the previous step, ECM’s OCR functionality examines each sheet to search for text that matches any of the sheet labels extracted during the previous step. Every found instance of text, anywhere on the sheet, that matches an extracted sheet label is converted to a hyperlink to the corresponding sheet. As shown in the above screenshot, instances of text matching sheet labels were automatically converted to blue hyperlinks.
Due to various reasons, such as a missing dash, not all instances of text representing sheet labels get converted to hyperlinks. Hence, after the process of automatically creating the links is finished, we need to verify that all necessary links were created. If any text representing a sheet label was not converted to a hyperlink, we can manually create the link by clicking the Hyperlink icon, as detailed by the following subsection.
After verifying that all required links have been created, click [Proceed] to begin the process of uploading the extracted sheets into CMiC Field for the project selected in the first part of the extraction process.
During the upload process, if it is detected that a sheet with the same sheet label already exists for the project, a message will be displayed to inform the user that the sheet being uploaded will be marked as a revision of the existing sheet in CMiC Field.
Once the upload process is completed, the extracted drawing set becomes available in CMiC Field.
Hyperlink 
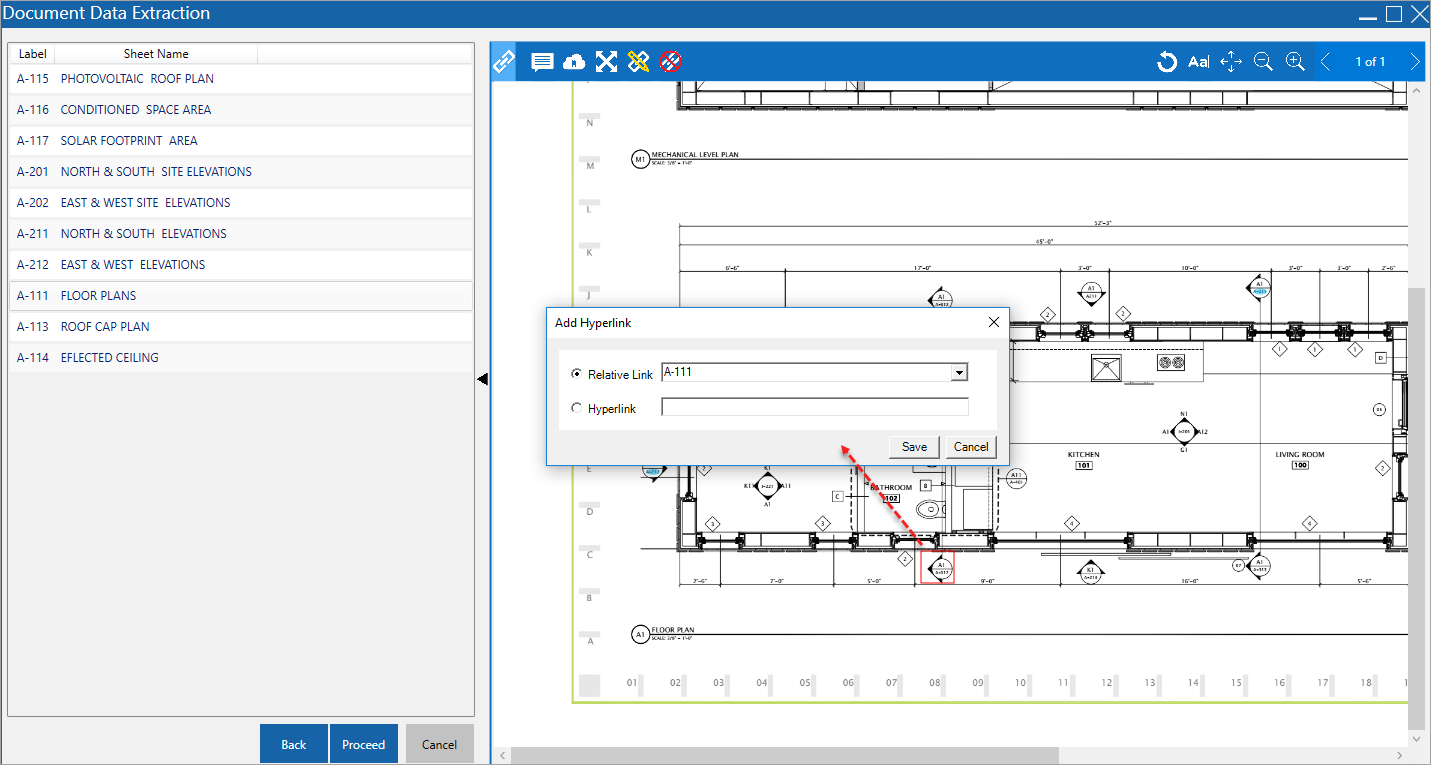
To convert text to a hyperlink, click the Hyperlink icon and select the relevant text using the red rectangle.
After selecting the text, the Add Hyperlink pop-up appears, as shown above. In the pop-up window, select the Relative Link radio button and click its corresponding  button to open a pop-up window to select the sheet to link to the selected text.
Cloud Note 
Click this icon and select a region in the PDF to add a note.
Link PM Object 
Click this icon and select a region in the PDF to link a PM object.
Move Markups 
To move a markup to a new location on the sheet, click the Move Markups icon, then click and hold on the markup and move it to its new location.
Edit Markups 
To edit a markup, such as a hyperlink, click the Edit Markups icon, then click on the markup to bring up the Editor pop-up window.
Delete Hyperlink 
To delete a hyperlink, click the Delete Hyperlink icon, then click the markup to be deleted.