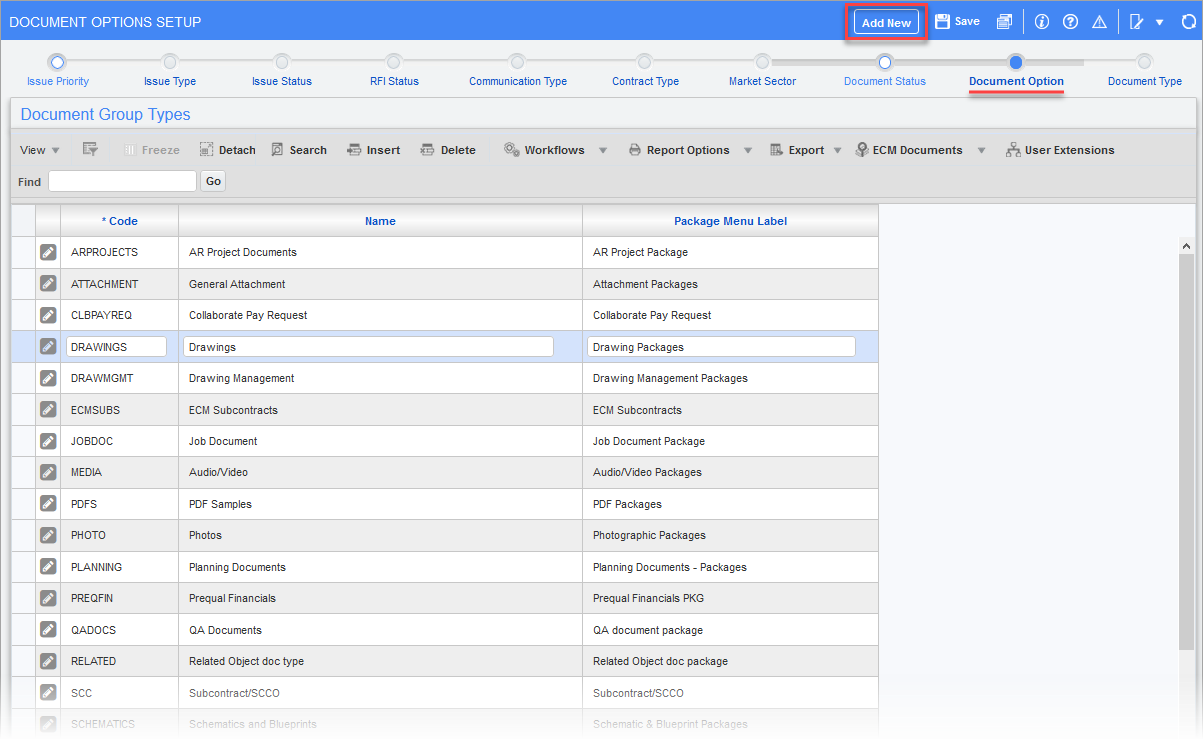
Pgm: PMOPTFM – Document Options Setup; standard Treeview path: System > Global Tables > Maintain Data Process – Document Option node
The Document Options Setup screen is used to create and configure document group types which then appear as document folders in the Documents screen.
NOTE: Document Options Setup can also be accessed in the Job Costing module (standard Treeview path: Job Costing > Utilities > Document Options).
To add a new document group type, press the [Add New] button, and to edit an existing one, click its corresponding Edit icon.
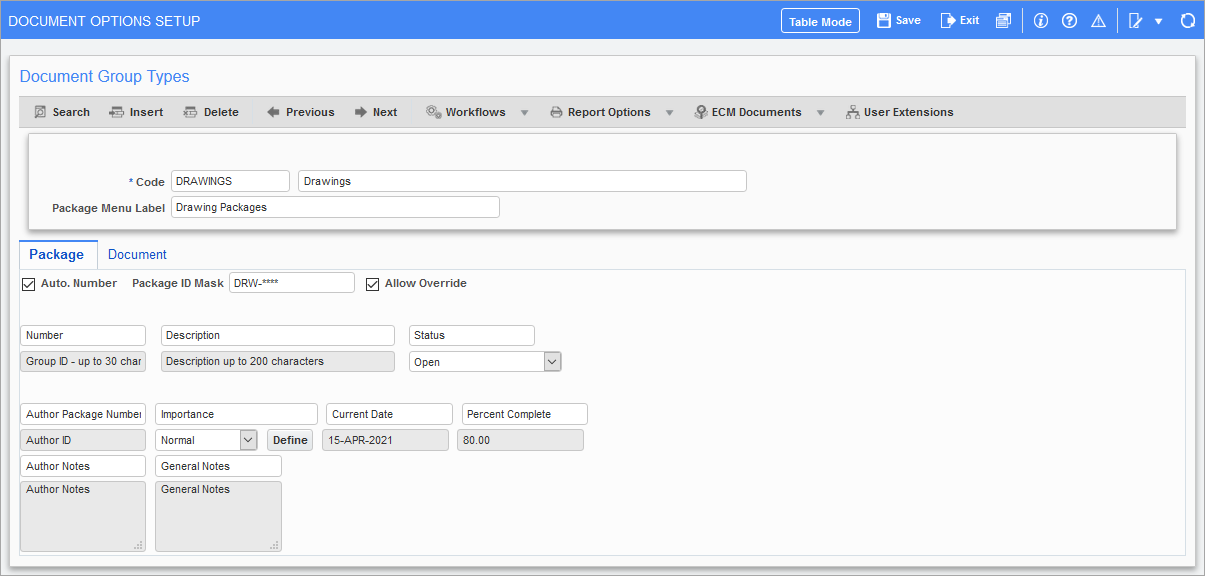
Document Options Setup screen in Form Mode
Code, Name
Enter identifying code for document package type and its description.
Package Menu Label
Enter the name to identify the document package in system.

Document Options Setup – Package tab
This Package tab is used configure the defaults for document packages of this type.
NOTE: The Documents tab is used to configure the defaults for documents contained in this package type.
Auto. Number – Checkbox
Indicates whether auto-numbering is to be used for new document packages of this type.
Package ID Mask
If the 'Auto. Number' box is checked, the Package ID Mask field becomes enabled to enter the auto-numbering mask used for new document packages of this type. This field is a user-defined mask that specifies how the numbering system generates a new document package code.
The asterisk (*) is used to indicate the placeholder for numbers within the string. There are pre-defined codes that may be used as detailed below, or you may hard code a prefix or suffix. The pre-defined codes must be entered in lowercase, otherwise they will be assumed to be hard coded values. Do not include a space between characters when defining masks.
The available pre-defined codes are as follows:
| Code | Description |
|---|---|
| t | Document Type |
| c | Company |
| j | Project |
| y | Year |
| m | Month |
| d | Day |
| l | Location |
| e | Sheet Number |
| * | Next Available Number |
NOTE: When creating document types, masks can be defined for both the Package ID and the Document ID. The Package ID Mask field on the Package tab and the Document ID Mask field on the Document tab are defined using the same process as described above.
Allow Override – Checkbox
This box enables the Number field (Document Package ID) for new document packages to allow editing, even if auto-numbering is being used. The auto-generated number can be overridden when creating a new package.
NOTE: If not assigning a mask, ensure the ‘Allow Override’ box is checked, otherwise that document type cannot be used.
Status
Select the default status for new document packages of this type.
[Define] – Button
Press this button to manage the values available for its corresponding drop-down list. For instance, the corresponding drop-down list can be configured to be a field to select the level of importance of the package, or it can be configured to be a field to select the topic of the package (General, Electrical, Mechanical, Structural, Labor, etc.).
The remaining editable fields on this tab are used to edit the labels for their corresponding fields.
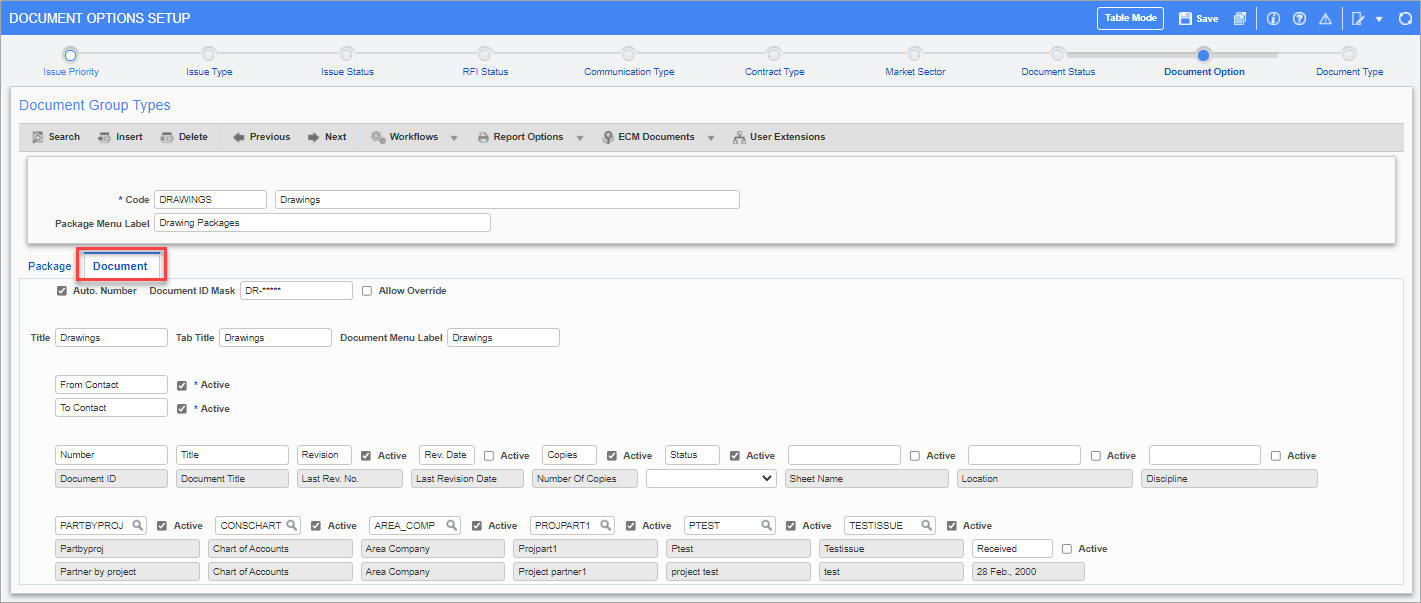
Document Options Setup – Document tab
The Document tab is used to set up the defaults for documents contained in this type of document package.
Auto. Number – Checkbox
Indicates whether auto-numbering is to be used for new documents that will be included in document packages of this type.
Document ID Mask
If 'Auto. Number' checkbox is checked, the Document ID Mask field becomes enabled to enter the auto-numbering mask used for new documents contained in this type of document package. This field follows the same mask format as the Package ID Mask field on the Package tab of this screen. Refer to Package – Tab section for more details on how to define a mask.
NOTE: This field can accommodate up to 100 characters.
Allow Override – Checkbox
This checkbox enables the Number field (Document ID) for new documents, to allow editing, even if auto-numbering is being used. The auto-generated number can be overridden when creating a new document.
NOTE: If not assigning a mask, ensure the ‘Allow Override’ box is checked, otherwise users will not be able to find the document.
The remaining editable fields on this tab are used to edit the labels for their corresponding fields, and the default states of the fields.
Title
Enter a label for the document type.
Tab Title
Enter a label for the document tab (if using document groups).
Document Menu Label
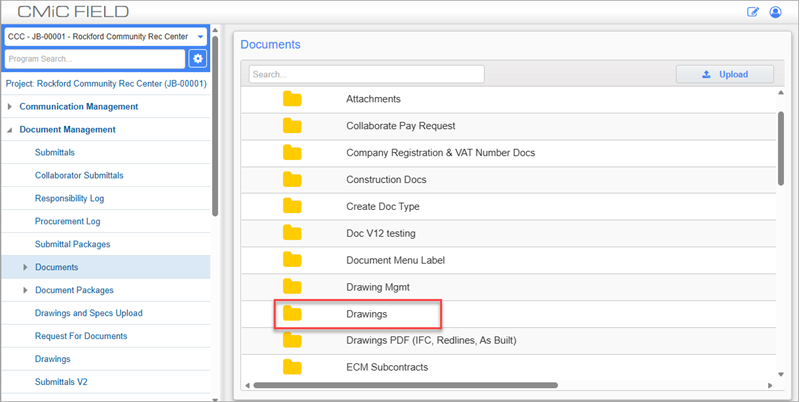
Enter a label for the Documents sub-menu. This label is displayed for the document folder in the Documents screen, as shown in the screenshot above.
The following fields are available on the Detail tab of the Document record. Check the 'Active' box to indicate whether the related field should be displayed.
NOTE: The custom label fields can accommodate up to 30 characters.
From Contact, To Contact
Enter a label for the From Contact and To Contact fields.
Document ID, Document Title
Enter a label for the Document ID and Document Title fields. These fields are enabled by default.
Last Rev No., Last Revision Date
Enter a label for the Last Revision Number and Revision Date fields. These fields are available in Table mode. Revisions can be added via the [Add Revision] button on the record's Detail tab.
Number of Copies
Enter a label for the Number of Copies field.
Status
Enter a label for the Status field and select a default status from the LOV. These statuses are maintained in the Document Status node of the Maintain Data Process screen.
Sheet Number, Location, Discipline
Enter a label for the Sheet Number, Location, and Discipline fields.
Custom Fields
Enter/select a user-defined field/classifier or leave this field blank and enter a custom field label (to create a free-form field). UDF labels are read-only and can be edited in the UE Field Maintenance screen in the System Data module.
PM Role & Project System Options
Ensure that the user’s required Document Types are set for each of the user’s PM Project Role(s), and Project System Options are set under the Document Types tab.
For example, for drawings, check that the user’s Project Role has the required Document Type settings assigned, as shown in the screenshot below.
NOTE: If the user has ‘Multiple’ PM Roles, these settings must be applied to each PM Role.
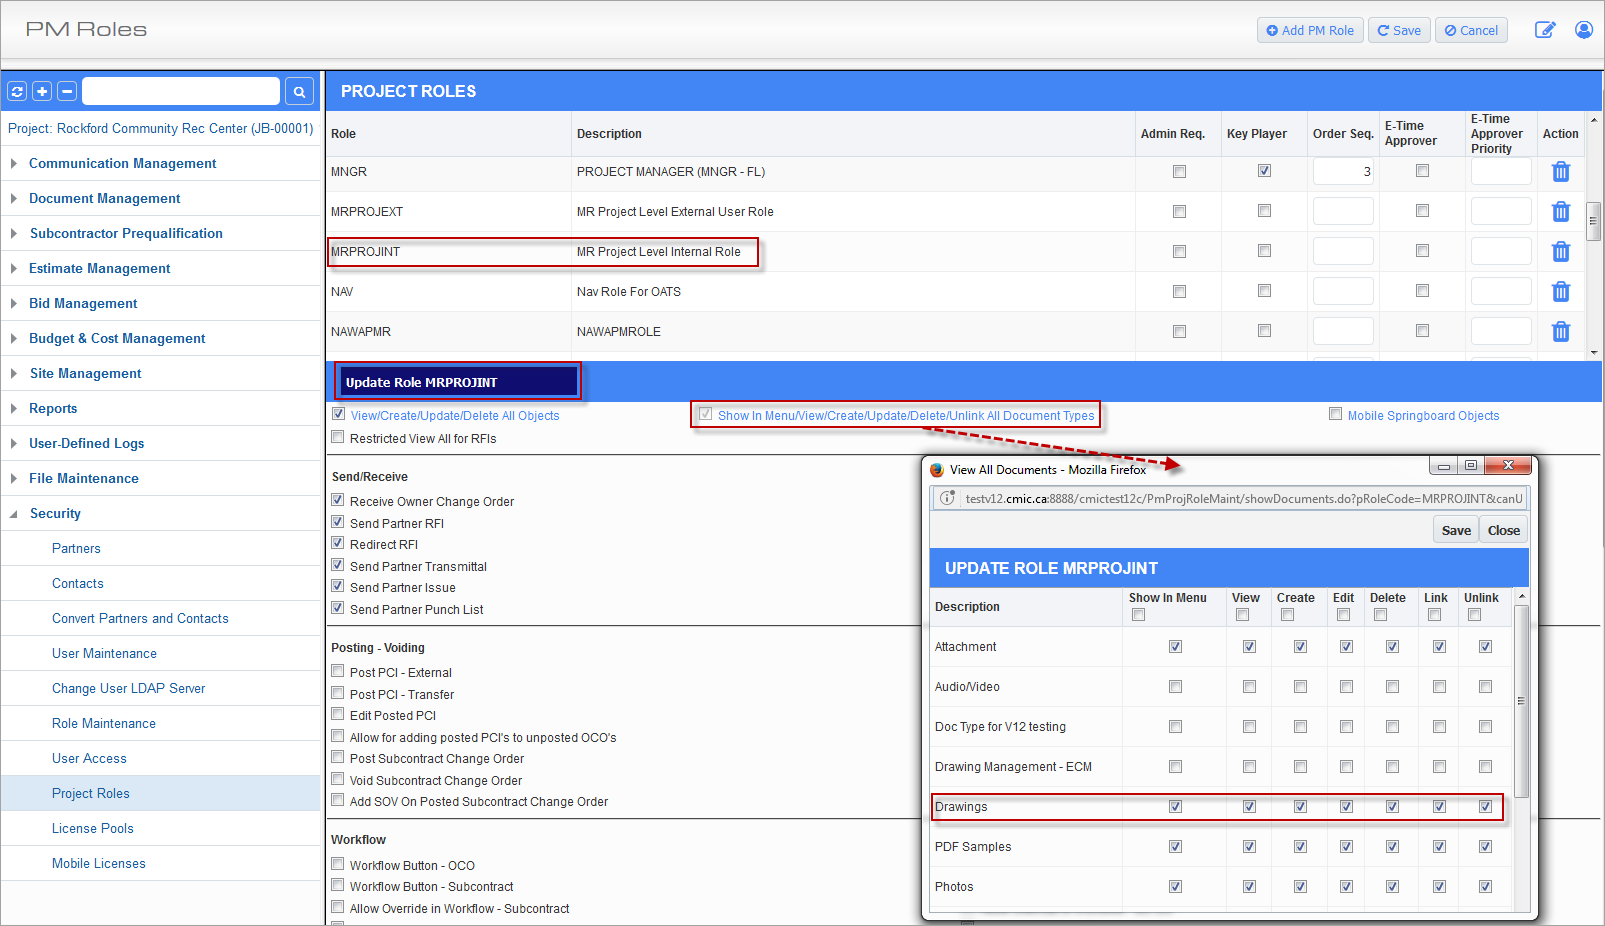
Example of assigning Document Types to a PM Role
Next, ensure that Project System Options are set under the Document Types tab.
For example, for drawings, you can set which documents can use drawings as attachments.
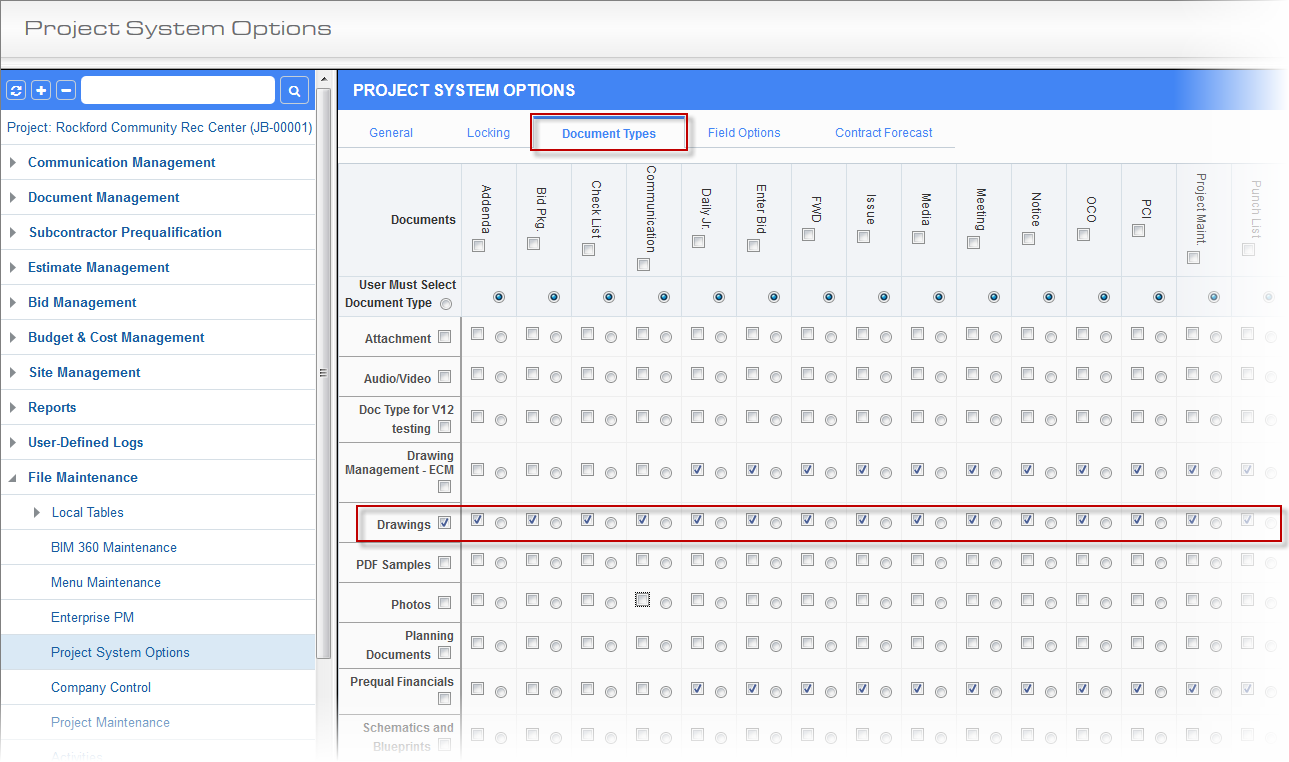
Example of setting Project System Options for Document Types
Importing Document Headers
To import document headers, users need only to be logged into the Documents Log of that type in the appropriate company and project. Press the [Import] button to open the file selection pop-up window.
Once the file is selected, press the [Upload] button to bring the data in prior to validation. The Validation screen is presented to the user.
Edit the data. All fields shown with a non-white background include an error and must be corrected to be imported. Placing the mouse-pointer over the colored area will give details of the error. Individual records may be deleted from the Import by checking the ‘Delete Document’ checkbox on the left side of the display.
Use the [Re-Validate] button to update changes and review any further errors. Once all records are corrected, click the [Accept] option. Existing document headers will be updated and new ones will be created by the import, if they do not already exist. The Document Package will also be created if it does not already exist. Otherwise, the package will be updated if necessary.
The import file for Document Headers includes the following fields (in this order):
| Field Name | Description | Attribute |
|---|---|---|
| PMFDI_COMP_CODE | Comp. Code(required and must pre-exist) | VARCHAR2(2) |
| PMFDI_PROJ_CODE | Proj. Code (required and must pre-exist) |
VARCHAR2(10) |
| PMFDI_GROUP_ID | Document Package ID (if available) | VARCHAR2(20) |
| PMFDI_ID | Document ID (required) | VARCHAR2(20) |
| PMFDI_TITLE | Document Title (required) | VARCHAR2(200) |
| PMFDI_TYPE_CODE | Doc. Type Code (req’d and must pre-exist) | VARCHAR2(10) |
| PMFDI_REV_NUM | Revision Number | NUMBER |
| PMFDI_REF_CODE | Designer Reference Code | VARCHAR2(60) |
| PMFDI_REV_DATE | Revision Date | formatted as: 'DD-MON-RRRR' |
| PMFDI_RECVD_DATE | Received Date |
formatted as: 'DD-MON-RRRR' |
| PMFDI_REV_COMMENT | VARCHAR2(4000) | |
| PMFDI_DESC1 | VARCHAR2(100) | |
| PMFDI_DESC2 | VARCHAR2(100) | |
| PMFDI_DESC3 | VARCHAR2(100) | |
| PMFDI_DESC4 | VARCHAR2(100) | |
| PMFDI_DESC5 | VARCHAR2(100) | |
| PMFDI_DESC6 | VARCHAR2(100) | |
| PMFDI_DATE1 | formatted as: 'DD-MON-RRRR' | |
| PMFDI_COPIES_NUM | NUMBER(11) | |
| PMFDI_STATUS_CODE | Document Status | VARCHAR2(10) |
Auto-numbering Documents
Users can auto-number their documents using a defined mask for each individual Document Type. Masks are defined in the System’s Global Tables (standard Treeview path: System > Global Tables > Maintain Data Process). On the Maintain Data Process screen, click on Document Option in the process train.
From the Document Options Setup screen, select the Edit icon of the Document Group Type for which you would like to define a mask. The selected Document Group Type will open in Form mode. Click on the Document tab. The Document tab is used to configure the defaults for Documents contained in this package type.
The Allow Override flag allows access to the Number Field to either enter in cases where no mask is defined, or to allow Override where a Mask is being used. Documents added will show a username, allowing 'at a glance' display of the user that uploaded the document.
NOTE: If not assigning a mask, ensure the ‘Allow Override’ box is checked. Otherwise, users will not be able to use that document type. (Default value is checked for this flag).
Creating Documents without Document Packages
Documents can be created without necessarily having an associated Document Package. The CMiC Field Document Packages menu will not show the menu option for document packages if the ‘Package Menu Label’ field is left empty when defining the document type in Document Options Setup.
Document Type definition is done in System > Global Tables > Maintain Data Process – Document Option (on the process train).
If the Package Menu Label (in the top block of the System’s Document Options Setup screen) is not specified, then the packages for that document type will not be available in the menus and in the Transmittal detail line item type LOV, if a transmittal is created from the document.
The hint line of the Document Package Menu Label has been modified to specify that if the field is left blank, then the package option will not be available in the menu.