NOTE: The Meeting Minutes screen has undergone many changes in the 12-2 and 13-1 patch updates for CMiC Field. All information in this article is consistent with these updates. More information about specific updates can be found at the following links: Patch 12-2, Patch 13-1.
Overview
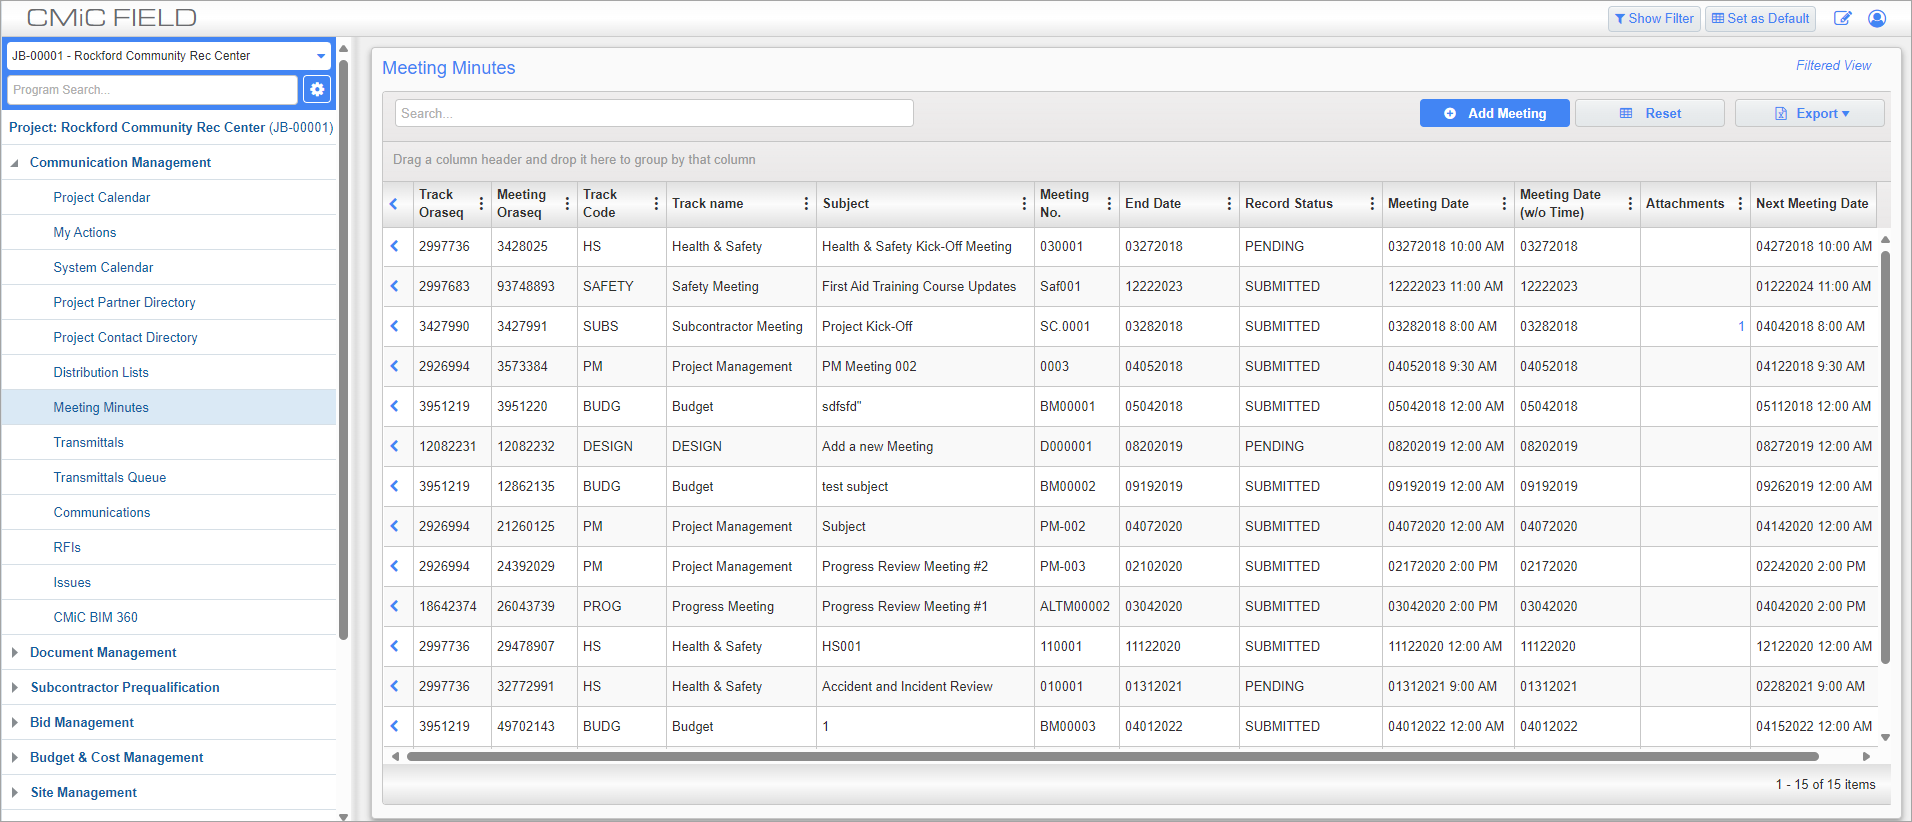
Meeting Minutes; standard Treeview path: CMiC Field > Communication Management > Meeting Minutes
Every project involves meetings: weekly subcontractor meetings, safety meetings, owner meetings. CMiC Field makes the tracking of meeting information simple by allowing users to track attendees and agenda items, meeting notes and responsible parties. Meeting Minutes has been designed for the entire project life-cycle: from first meeting to final revision.
NOTE: Users can only see minutes for meetings that they attended.
Meeting ID/Item ID Masks Default and Field Security
Users can define both the meeting ID and item ID masks via the Defaults tabs on the Project Control and Project Maintenance screens. The values from the Project Control screen are used as defaults for the Project level, which in turn will be used as defaults at the Meeting Track level.
Field security can also be defined on any of the following fields: Group Item, Sequence No., Restart Meeting, Meeting ID Mask, Item ID Mask, and the [Re-Open Meeting] button which is enabled if the last meeting in a track is closed and the field security is set to “Unrestricted”.
Creating A New Meeting
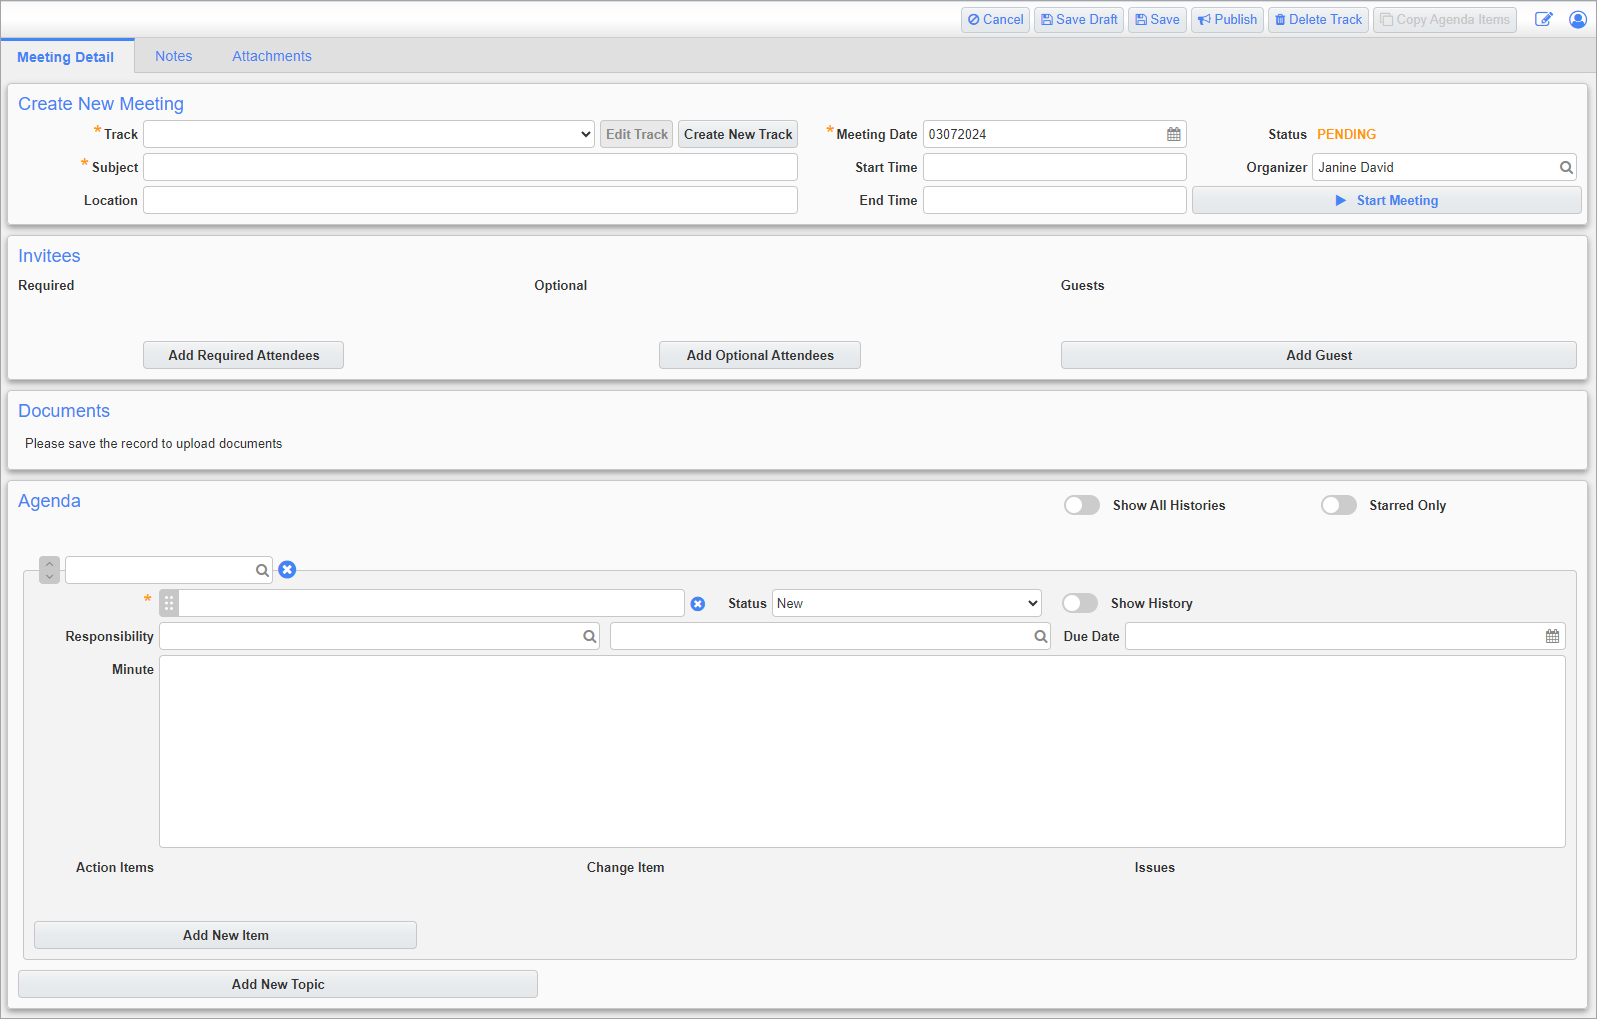
Meeting Information; standard Treeview path: CMiC Field > Communication Management > Meeting Minutes – [Add Meeting] button
To create a new meeting, press the [Add Meeting] button on the Meeting Minute log screen. This screen can be used to enter all the meeting information including agenda items and attendees.
Create New Meeting

This section is used to enter the basic meeting information. Meetings are also started by pressing the [Start Meeting] button. Location, date, and time information can all be edited while a meeting is active.
Track
Enter/select a meeting track code or create a new one by pressing the [Create New Track] button.
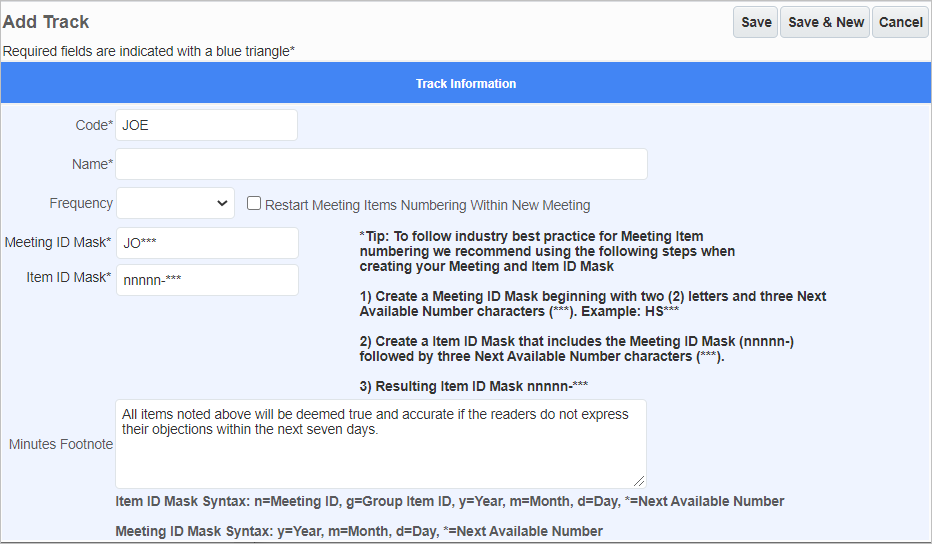
Meeting tracks are used to differentiate types of meetings such as safety, progress, and owner meetings. Information entered on the ADD Track screen shown above can be used to link and sort meetings with the same track code.
Entering a value in the Code field automatically fills the Meeting ID Mask and Item ID Mask fields. The autofilled values of these fields adhere to rules for industry best practice, which are presented in the screenshot above. The setup shown above allows meeting ID codes and agenda item codes to be numbered sequentially for every new meeting using the same track code.
Select the meeting frequency from the Frequency drop-down list. This determines when the next meeting will take place.
Check the ‘Restart Meeting Items Numbering Within New Meeting’ box to restart meeting items from 1 for each new meeting.
Enter a footnote that will be printed on all meeting documents for this track.
Delete a track by pressing the [Delete Track] button and selecting the track to be deleted in the resulting pop-up window.
Subject
Enter the meeting subject.
Location
Enter where the meeting will take place.
Start Time, End Time
Select the start and end times for the meeting.
Organizer
Enter/select the main organizer for the meeting.
[Start Meeting] – Button
Press this button when the meeting has started.
NOTE: Ensure that the user has the ‘Update All’ box checked for the Meeting row in the View/Create/Update/Delete link on the Project Roles screen. If this box is not checked this button may not appear.
Editing a Meeting Track
To edit a meeting, select the meeting from the Meeting Minute screen and then press the [Edit] button at the top of the screen. The status of the meeting can only be edited by the creator of that meeting.
Closed meetings can also be edited, the only difference being that the status is immutable and can not be changed from “Closed”.
Invitees

This section can be used to invite those attending the meeting. Any contacts invited will have an email sent to them when the [Publish] button is pressed.
[Add Required Attendees] – Button
Press this button to add contacts required to attend the meeting.
[Add Optional Attendees] – Button
Press this button to invite contacts who are not required to attend.
[Add Guest] – Button
Enter a name in the Guest field and press this button to invite anyone to the meeting not found in the Project Contact Directory screen (standard Treeview path: CMiC Field > Communication Management > Project Contact Directory).
Documents

This section can be used to attach documentation already saved in CMiC Field to the meeting minute record. Press the [Attach Existing File] button to add documents or see the Documents for more information.
This section only appears after a meeting minute record has been saved.
Agenda

Add topics and their individual items in the Agenda section. Items can be moved between topics by dragging and dropping the  icon. The order of topics can be changed by pressing the up and down arrows next to the topic title. A meeting's agenda can be entered manually, or it can be copied from a previous meeting by pressing the [Copy Agenda Items] button.
Delete icons ( ) can be found next to the topic and item entry fields and can be used to delete a topic or topic item from the meeting agenda. When clicked, a pop-up screen will appear asking you to confirm the deletion of the topic or topic item. Clicking [OK] will remove the topic or topic item from the meeting notes and clicking [Cancel] will leave the meeting notes unchanged.
[Add New Topic] – Button
Press this button to add a new topic to the agenda.
[Add New Item] – Button
Press this button to add an item to a topic. If the Item ID Mask field has been set up in the Track pop-up window, then new items will be named automatically.
[Copy Agenda Items] – Button
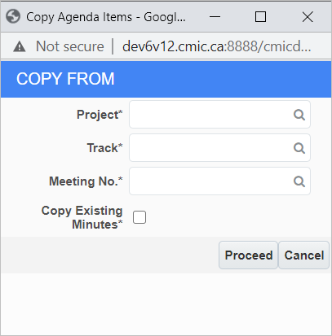
This button, located in the main toolbar and available during Edit mode, can be pressed to copy agenda items from one meeting to another. Just select the Project, Track, and Meeting No. codes from the old meeting and press [Proceed]. Check the 'Copy Existing Minutes' box to copy the minutes for the agenda items as well. This box is unchecked by default.
Saving and Publishing Meetings
Once all meeting information has been entered, press the [Save] button to save the information, and press the [Publish] button. An email notification will be sent to attendees if their Project Contact record's Email Notifications tab has the 'New' box checked under the CC or All section for Meeting Minutes. The To section does not apply since the meeting is not directed to any particular To contact, but attendees (both required and optional) can be regarded as CCs. Pressing this button also changes the meeting status from "Pending" to "Published".
Starting A Meeting
![Screenshot of Meeting Minutes with [Start Meeting] highlighted.](../../../../Resources/Images/CMiC_Field/CMICFIELD_MeetingMinutes2.png)
Start a meeting by pressing the [Start Meeting] button. This button only appears for Pending and Published meetings. The Invitees section then becomes the Attendance section, as shown below. Take attendance by clicking on the names of those who attended or press the [Select All] button if all are present. Attendees can be added while the meeting is taking place by pressing the [Add Required Attendees] button and they can be removed by pressing the x that appears next to their name.

Entering Meeting Minutes
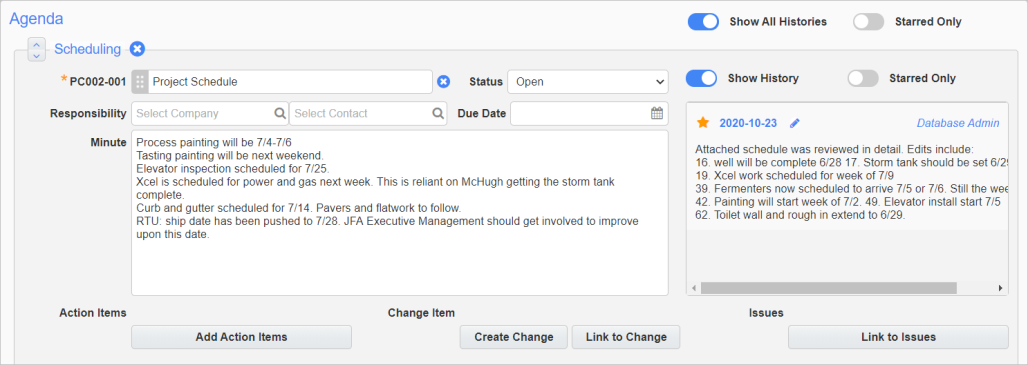
At any time, users may enter meeting minutes and star items of particular note, as shown in the screen above. Minutes for meeting items can be entered in the Minute field. Responsibility for specific items can be assigned to whole company codes or to individual contacts in the Responsibility fields. Agenda items can also be linked to action items, change items, and issues through the [Add Action Items], [Link to Change], and [Link to Issues] button.
When a new meeting is created in a track, for any action items from the previous meeting that were not closed, a new action item is created for the responsible contact.

Each default action item includes the meeting ID, action item title, and an integer that will increment for each additional action item. As well, the first "For" contact on the action item will be displayed, followed by a "+" to indicate any additional contacts.
Previously entered minutes may be edited by pressing the Pencil icon next to the date in the History section. This icon is governed by the "Notes - Edit Own Notes" privilege in the Role Maintenance screen.
Show History, Starred History
Every agenda item has a history which shows any notes added to the minute. A minute's note history can be displayed by turning the Show History toggle on. Notes can also be starred or unstarred by pressing the Star icon. Starring a note on an agenda item turns the Star icon yellow and marks that note as open. Likewise, unstarred notes are considered closed. The Starred Only toggle can be pressed to show only open agenda item notes.
The Show All Histories and Starred Only at the top of the Agenda section can be used to view or hide all note histories and only see open agenda item notes for all agenda items on the meeting.
Closing and Reopening Meetings

Once a meeting has ended, press the [Close Meeting] button. At this point, all meeting participants may review the information. If any information needs to be changed, users with permission can press the [Reopen Meeting] button to re-open and amend the last meeting in the selected track. All information can then be edited by users with permission, except for information entered in the top Create New Meeting section.

Creating The Next Meeting In A Track

After a meeting is submitted, the [Create Next Meeting] button appears. Press this button to generate a new meeting log for the next meeting in the currently selected track. All info for the new meeting automatically populates from the previous meeting and the track information. To change any of this information, press the [Edit] button at the top of the screen. All agenda items without a status of “Closed” will also appear for the new meeting. Agenda items can be copied over from other meetings by pressing the [Copy Agenda Item] button.
Once this button is pressed it disappears and the Next Meeting link appears, as shown below. Press this link to bring up the next meeting in the given track.

Searching Meeting Minute Notes

After a meeting is saved, the [Search PM Notes] button appears. Press this button to launch the Search PM Notes pop-up to search all meeting notes (i.e., notes entered in the Minute field of a meeting item). The search will only check to see if the text exists, and users can drill down on the item to open the related Meeting Minutes record.
Meeting Minute Reports
The functionality for printing meeting minute reports differs slightly from other objects within CMiC Field. Please see Meeting Minute Reports for more information.