Overview – Additional Check Functions
The other payment processing options include:
The processing of these auxiliary payment options is explained below.
Void Posted Checks
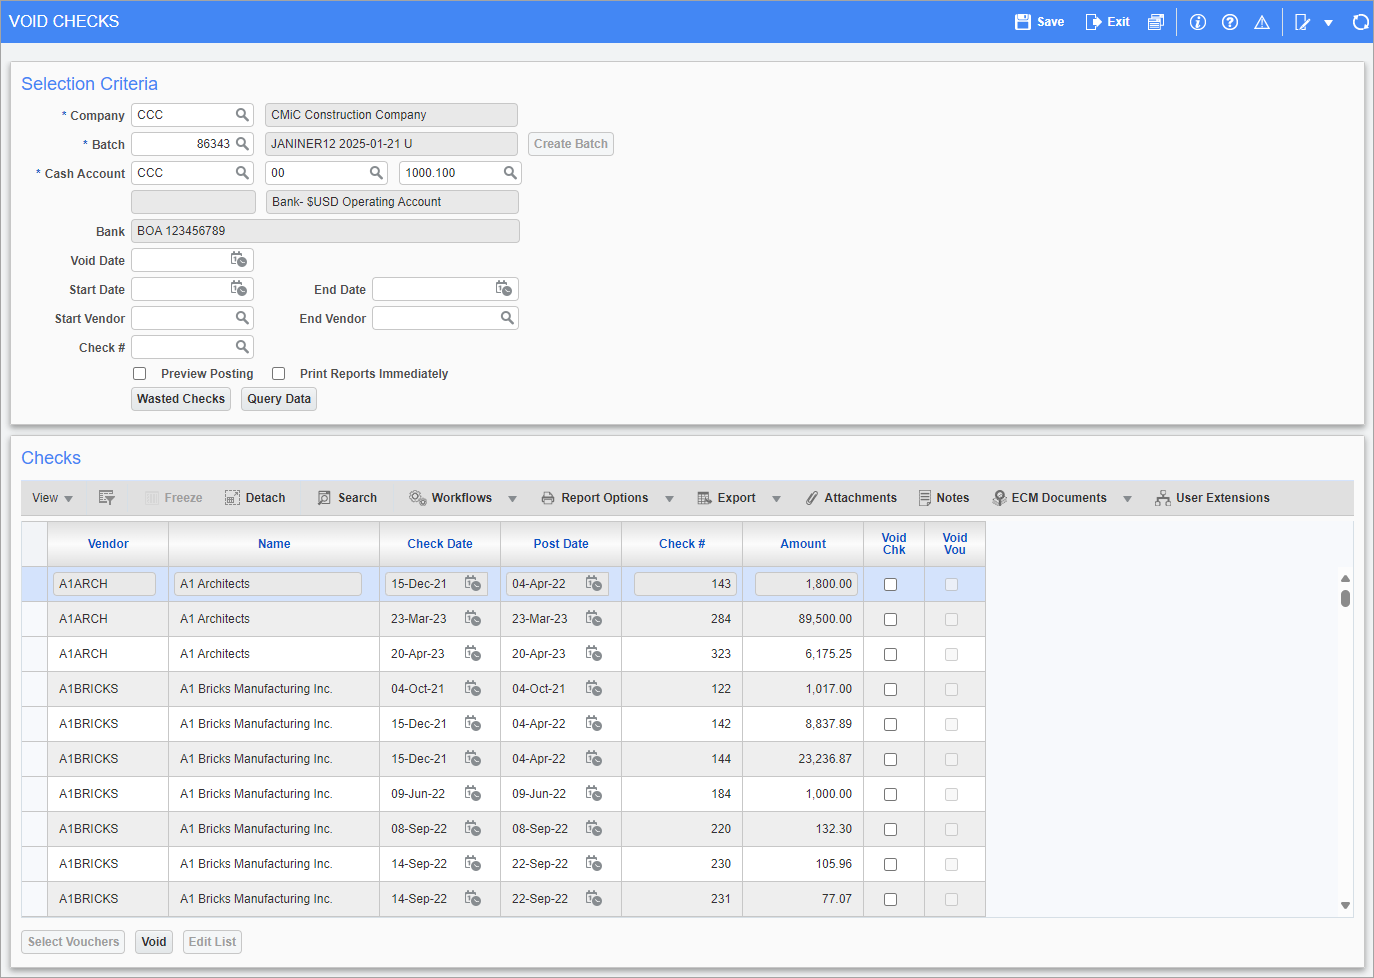
Pgm: APCHQVOD – Void Posted Checks; standard Treeview path: Accounts Payable > Check > Void Checks
This screen is used to void checks that have already been posted to the system.
Selection Criteria
This section is used to enter the selection criteria to use to list the appropriate posted checks in the Checks section.
Company
Select company for which checks are being voided.
Batch
Select batch of checks to void (“U” batch type), or create a new one. To create a new batch of checks to void, clear the Batch field, then click the [Create Batch] button.
Cash Account
Select the company, department, and cash account from which the checks being voided were issued. The system will default the cash account set in the AP Control File.
To the right of the editable fields are display-only fields that display the account’s currency and description.
Bank
Bank name of cash account.
Void Date
Enter/select the void date that the debits and credits from this batch should be posted to. All checks set up to be voided on this screen will be voided upon exit from the screen, and the appropriate GL distributions will be processed to the General Ledger as of the date entered here. All checks selected to be voided will use this void date.
Start Date, End Date
Enter a date range for which checks with a check date on or within this range will be listed under the Checks section. If either of these fields is left blank, checks are not filtered by it.
Start Vendor, End Vendor
Enter a range of vendors to which the checks were issued. If the Start Vendor field is left blank, the first vendor (by vendor code) is assumed; and if the End Vendor field is left blank, the last vendor is assumed.
Check #
Enter/select a check number to filter the query results in the Checks section. The LOV also displays the check amount. Leave this field blank to include all check numbers in the query.
Preview Posting – Checkbox
Check to preview the voiding details prior to the actual voiding process.
Print Reports Immediately – Checkbox
Check this box to print the posting report immediately after the voiding process, or later use the Print Posting Reports utility to print it.
[Wasted Checks] – Button
This button launches the Wasted Checks screen. For details, please refer to Wasted Checks (Registry).
Checks
This section lists all the checks that matched the selection parameters entered in the Selection Criteria section. It is used to select the checks to void.
The following provides details about the editable fields in this section’s table:
Void Chk – Checkbox
These checkboxes are used to select checks for voiding. If checked, the corresponding ‘Void Vou’ checkbox is enabled.
Void Vou – Checkbox
For the checks selected for voiding, check this box to void the associated vouchers as well. Once this box is checked, the [Select Vouchers] button becomes enabled, which launches a pop-up to select which associated vouchers get voided.
[Select Vouchers] – Button
This button is enabled if the selected check in the above table has the ‘Void Vou’ checkbox checked.
This button’s pop-up is used to select which vouchers associated with the selected check get voided. By default, all listed Vouchers are marked for voiding via the ‘Selected for Voiding’ checkbox.
NOTE: It is not possible to void the check and the matching voucher if the voucher has had retainage released. In this case, the check must be voided, then the retainage release vouchers, then the original voucher. Additionally, a voucher created via subcontract can’t be voided here.
[Void] – Button
This button initiates the voiding process. Unlike most other programs, the Void Checks screen does an immediate posting.
Payment Status of Associated Vouchers
When a check is voided, the voucher’s payment status will be set back to the vendor's default payment status. This means that if the vendor's payment status was “Permanent Deferral (P)”, but the voucher was changed at time of entry to “Normal (N)”, after voiding the check against the voucher, the voucher’s payment status will be reset to “Permanent Deferral” instead of “Normal”.
Close Status of Associated Partially Paid Vouchers
When checks are voided, any associated vouchers for partial payments with a close status of “Partially Paid (P)” will not switched back to “Open (O)”, because there is still a link between the voided check and the voucher.
So, a voucher with a close status of “Partially Paid (P)” could be a voided voucher. Details about the close status of a voucher can be viewed in the Payments pop-up launched via the [Payments] button on the Invoice Query screen.
[Edit List] – Button
This button prints the edit list for the voiding, for verification purposes, prior to voiding.
Wasted Checks (Registry)
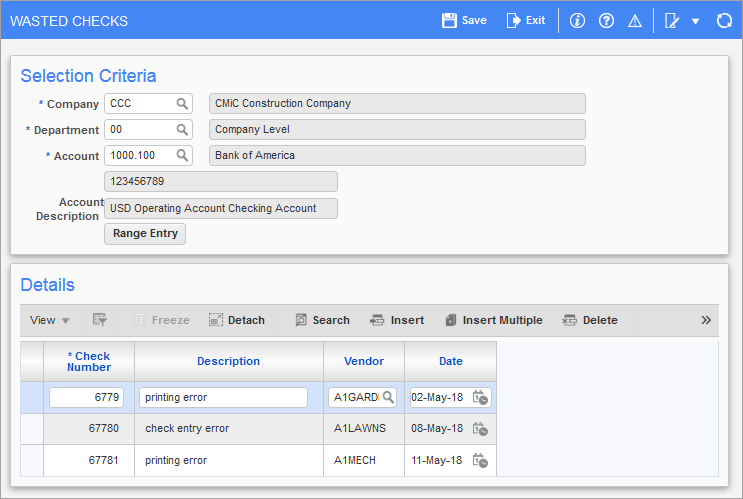
Pgm: APCHQMWC – Wasted Checks; standard Treeview path: Accounts Payable > Check > Wasted Checks
This screen is applicable if pre-numbered checks are used. It is used, along with the Missing Checks screen, to track the use of all pre-numbered check numbers for historical purposes.
This screen lists manually entered wasted check numbers, and wasted check numbers automatically entered during the posting of checks used as overflow or stub only checks. It also lists wasted check numbers automatically entered with the Unprepare Checks utility if the ‘Record Unprepared Checks As Wasted’ checkbox on the Check tab of AP Control File was checked.
NOTE: While any user can enter a wasted check, only the DA can modify or delete an already committed check.
Selection Criteria
This section is used to specify the company, department, and account against which the check was issued, and it can be used to enter a range of numbers.
[Range Entry] – Button
If a range of checks needs to be entered, enter the range of unused checks through the [Range Entry] button’s pop-up. The pop-up allows the entry of the range’s start and end numbers, and the entry of the Description, Vendor, and Date fields, in order to create a record for each wasted check number in the range.
Details
This section lists the wasted check numbers for the selected company, department, and account, and it can be used to manually enter wasted check numbers. To add an entry, click the [Insert] button.
Missing Checks (Registry)
This screen is used to fine tune the numerical sequence of pre-printed check numbers by defining the sequence of numbers to bypass during the check printing process.
For details, please refer to Accounts Payable - Missing Checks (Registry).
Release Checks
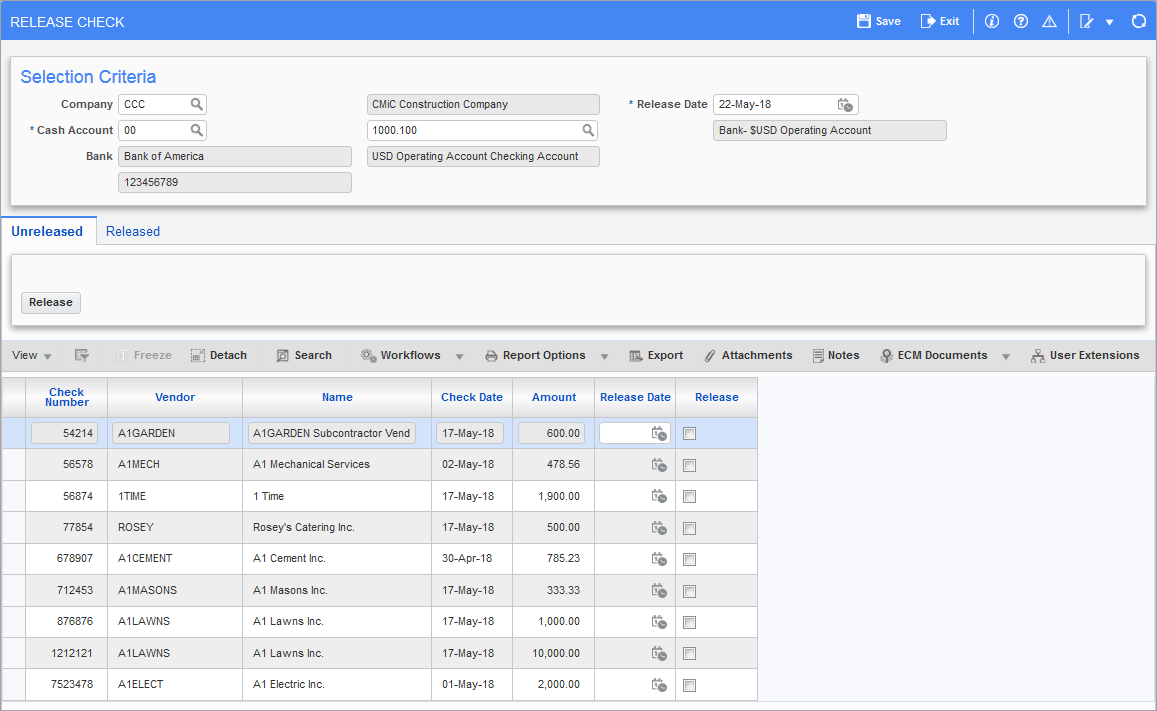
Pgm: APCHQRLS – Release Check; standard Treeview path: Accounts Payable > Check > Release Check
The Release Checks screen is only available for companies that have the ‘Use Check Release Feature’ box checked on the Check tab of the AP Control File.
This screen is used to release posted and printed checks to the vendor, which must have been approved and signed in order for the checks to be available for release. During the process of being signed and approved, this screen allows the company to determine the total amount for checks not released simply by executing a query of unreleased checks. Thereby, allowing the necessary adjusting journal entries to be made at the end of the period for maintaining an accurate balance of the cash account.
This screen can also be used to un-release released checks, via the Released tab.
NOTE: The negating system privilege ‘CHQRELBT – AP: Prevent access to Check Release/Unrelease All buttons’ can be used to disable the [Release All] and [Unrelease All] buttons.
Unreleased – Tab
The Unreleased tab lists the unreleased checks matching the selection criteria.
To release checks, check their ‘Release’ checkbox, select their release date, and click [Release].
Release – Tab
The Released tab displays checks that have been released, and it can be used to un-release checks that have been released.
To un-release checks, check their ‘Release’ checkbox, select their release date, and click [Unrelease].
NOTE: When un-releasing checks, the bank must be notified as the checks may have already been included in a positive pay transmission.
Reconcile Checks
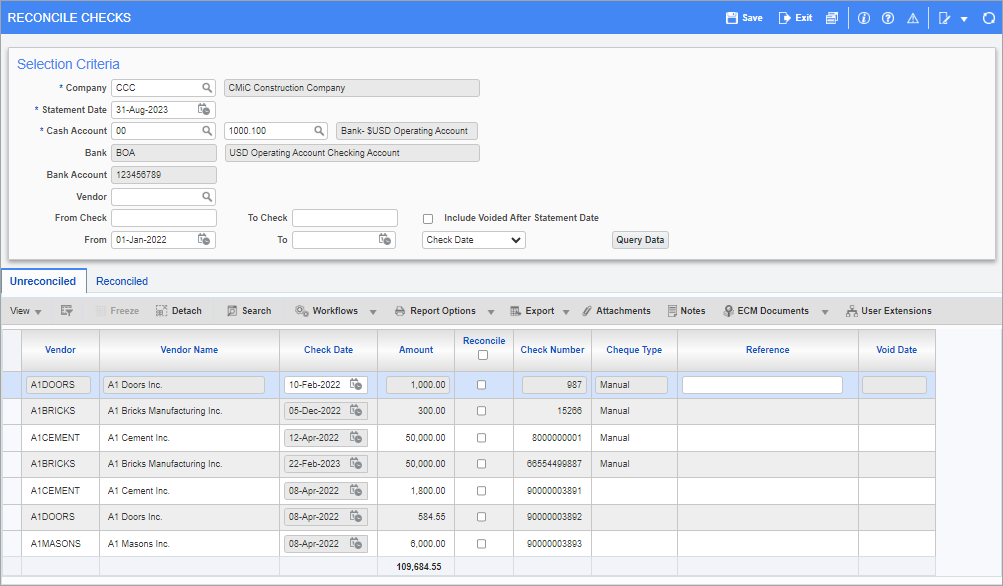
Pgm: APCHQREC – Reconcile Checks; standard Treeview path: Accounts Payable > Checks > Reconcile Checks
This screen is used to set the reconciliation status of AP Checks.
According to the entered parameters in the Selection Criteria section, this screen lists unreconciled AP checks on the Unreconciled tab, and AP checks that have been flagged as reconciled (either manually via this screen, or automatically via the Import functionality of the Bank Reconciliation screen) on the Reconciled tab.
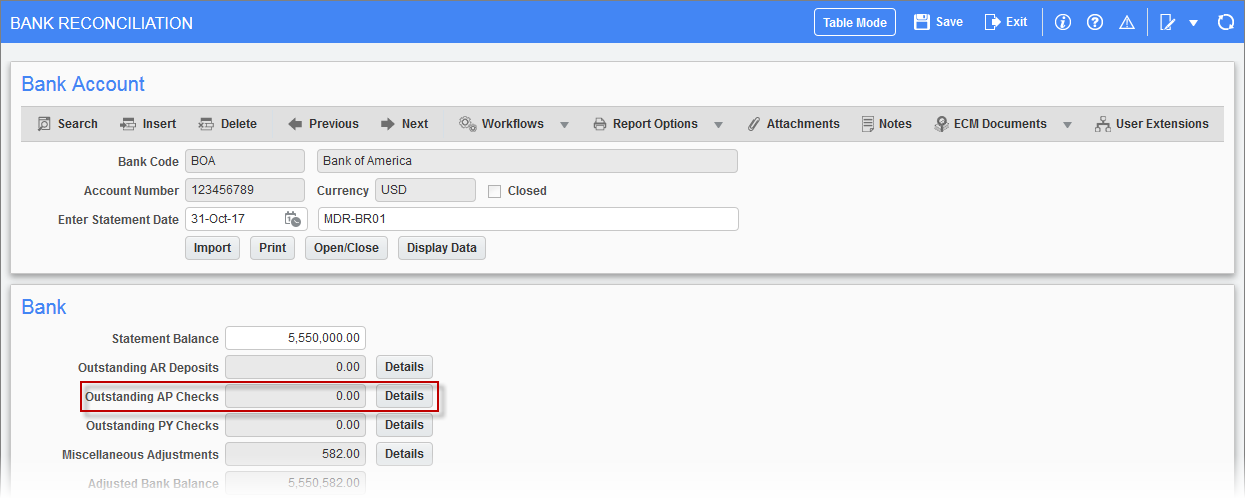
This screen is used in conjunction with the Bank Reconciliation screen of the GL module, if AP clerks are responsible for manually flagging AP checks as reconciled. If all relevant AP checks are flagged as reconciled through this screen, then the Outstanding AP Checks field on the Bank Reconciliation screen will display “0.00”, as shown below. Otherwise, there are unreconciled AP Checks making up the outstanding balance, which can be viewed on the Unreconciled tab of this screen.
Pgm: BANKRECFM – Bank Reconciliation; standard Treeview path: General Ledger > Utilities > Bank Reconciliation
If the Import functionality of the Bank Reconciliation screen is used, which imports a bank statement for the reconciliation process, the Reconcile Checks screen would not be used to manually set checks as reconciled, since the Import functionality would automatically flag checks as reconciled. This screen could, however, be used to manually make adjustments as to what checks are and are not reconciled. To access this screen from the Bank Reconciliation screen, click the [Details] button that corresponds to the Outstanding AP Checks field (shown above).
Selection Criteria
Statement Date
Enter the date on the bank statement from which the checks are being reconciled. This limits the display of unreconciled checks to checks that were issued before or on the entered statement date.
Cash Account (Department, Cash Account)
Reconciliation is done by bank account, so a valid GL department and account representing the bank account to be reconciled must be selected.
These fields will default from the department and account entered for the Cash fields on the Accounting tab of the AP Control File for the selected company.
Include Voided After Statement Date – Checkbox
If checked, when a query is initiated, unreconciled checks that were voided after the specified statement date will be displayed. The Void Date column will indicate the date the check was voided. These checks can then be selected for reconciliation.
Unreconciled – Tab

Pgm: APCHQREC – Reconcile Checks; standard Treeview path: Accounts Payable > Checks > Reconcile Checks - Unreconciled tab
This tab lists unreconciled checks that satisfy the selection parameters entered in the Selection Criteria section.
Use this tab to mark checks as reconciled. To reconcile checks, check their “Reconcile” checkbox and click [Save].
The Check Type display-only column displays the payment’s type: Automatic, EFT, Manual, and Draft.
The Reference fields are used to enter the payment’s corresponding reference statement number.
The Void Date column indicates the void date if an unreconciled check was voided.
Reconciled – Tab
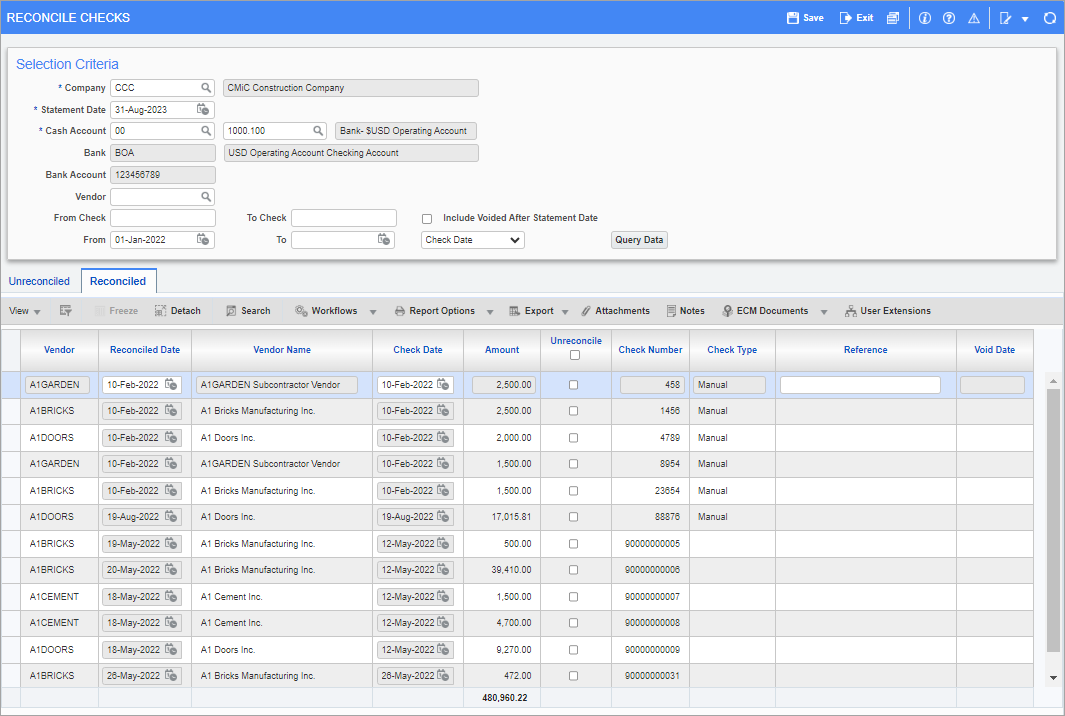
Pgm: APCHQREC – Reconcile Checks; standard Treeview path: Accounts Payable > Checks > Reconcile Checks - Reconciled tab
This tab lists previously reconciled checks, based on the selection parameters entered in the Selection Criteria section.
To un-reconcile checks, check their ‘Unreconcile’ checkbox and click [Save].
The Check Type display-only column displays the payment’s type: Automatic, EFT, Manual, and Draft.
The Reference fields are used to enter the payment’s corresponding reference statement number.
The Void Date column indicates the void date if an unreconciled check was voided.
Print Check List (AP Check List Report)
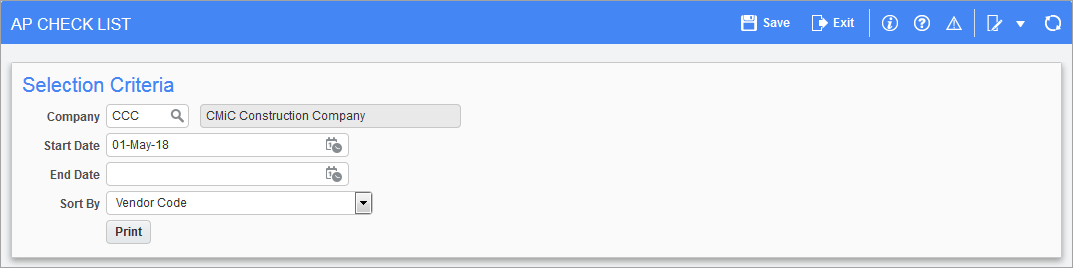
Pgm: AP4100 – Print Check List; standard Treeview path: Accounts Payable > Check > Print Check List
This screen is used to print the AP Check List report, which lists details about checks that have been produced using the AP module’s automatic prepare checks functionality. It can be used to reprint vital audit trail reports if the original is damaged or lost.
The report is generated for a particular company, and if desired, for checks with a check date on or within the range of dates specified by the Start Date and End Date fields. If either of the date fields is left blank, checks are not filtered by it.
The Sort By field can be used to specify the order of the listed checks.
One the report’s parameters have been selected, click [Print] to generate the report.