Notification List

Workflow Notifications; standard Treeview path: Workflow > Notification List
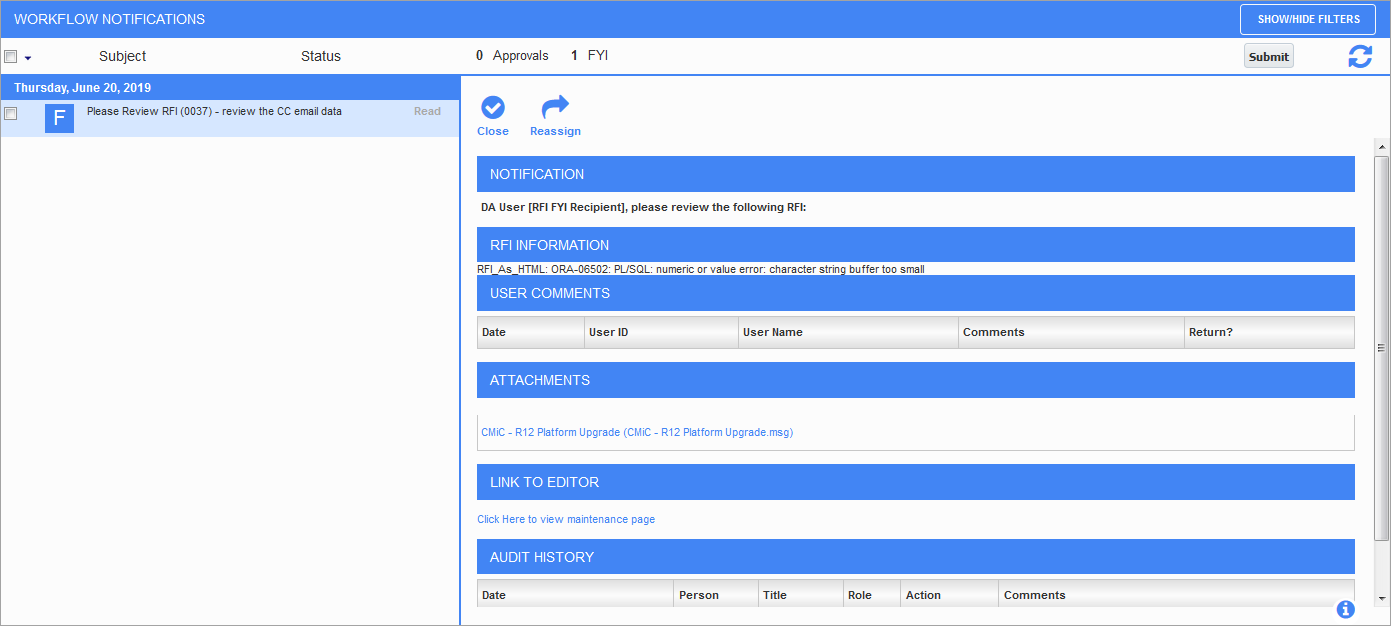
The Workflow Notification screen is designed to house all open workflow notifications to a user. The workflow will send two types of notifications:
-
Approvals: Approvals are designated with an “A” in the list. Approvals require the user to approve or reject the notification (or use the Reassign option to designate another person to become that approver) and become a part of the ongoing tracking of the history of that workflow approval.
-
FYIs: FYIs are designated with an “F” in the list. An FYI is usually some kind of information that the user may or may not need to act on but does not require approval and usually does not get added to the history of the workflow.
You can view or reassign another user's notification list by using the following link:
https://[ENVIRONMENT_URL]/WkfNotificationList/home.do?Userid=[USERID]Replace the "[USERID]" in the link, using uppercase letters, to reflect the id of the user whose list you need to view and the "[ENVIRONMENT_URL]" should be changed to the client’s environment (e.g. https://qa.cmicpaas.com/cmicqadaily/WkfNotificationList/home.do?Userid=TERRYR12).
NOTE: The user ID must be in uppercase for the above link to work.
Navigate to this link using a web browser and you will be prompted to login (if you have not already done so) to view the specified user's Workflow Notification List.
NOTE: Ensure that the 'Workflow Notification List - View Others' privilege has been granted in the Security Role Maintenance screen of Enterprise Content Management for the above link to work.
[Show Filter] − Button

Workflow Notifications; standard Treeview path: Workflow > Notification List - [Show Filter] button
The following describes the available filters that can be applied to the notification list.
From Date, To Date
Use these fields to filter by the notification date.
Workflow Type
This will list the different workflows that are in your list and allow you to pick one to filter by.
Notification Type
This can be set to "Approval", "FYI", or "Both". There are only two types of notifications in the notification list.
Priority
There is a flysheet in the Image Manager called Priority. This flysheet is usually tied to the invoicing document types (AP, PO, RFP). There are three statuses you can set for an invoice, which are "Normal", "Medium", or "High". Normal is the default. This filter allows you to filter by priority, otherwise it is set to "All".
Oraseq
Every record has a unique Oraseq number assigned. If you know the Oraseq you are looking for, you can add it in this field.
Key 1, Key 2, Key 3, Key 4, Key 5
In Workflow, you can assign keys to attributes. For example, Key 1 can be tied to the job number that the workflow found, Key 2 can be tied to the vendor it found, and so on. The Key LOV will show the data for that key and allow you to filter by it. There is no standard to how or if keys are assigned.
Sort By
You can choose from the available options how to sort the notifications by in either ascending or descending order.
[Apply Filter] − Button
After all the necessary fields have been entered, click on the [Apply Filter] button to apply the filter.
[Undo Last Filter] − Button
This removes whatever filter changes were made since the last time the [Apply Filter] button was used.
[Clear Filter] − Button
Clears all filters when clicked.
[Show/Hide Keys] − Button
Shows the keys assigned to each notification. In the below example, Key 1 is the vendor code and Key 3 is the job code.
![Example of how the [Show/Hide Keys] button works](../../../Resources/Images/WorkFlow_12c/Example1.png)
Workflow Notifications; standard Treeview path: Workflow > Notification List
Show All − Checkbox
Filters are ignored when this box is checked.
Workflow Status List
This screen has been deprecated.
Workflow Monitor

Workflow Monitor; standard Treeview path: Workflow > Workflow Monitor
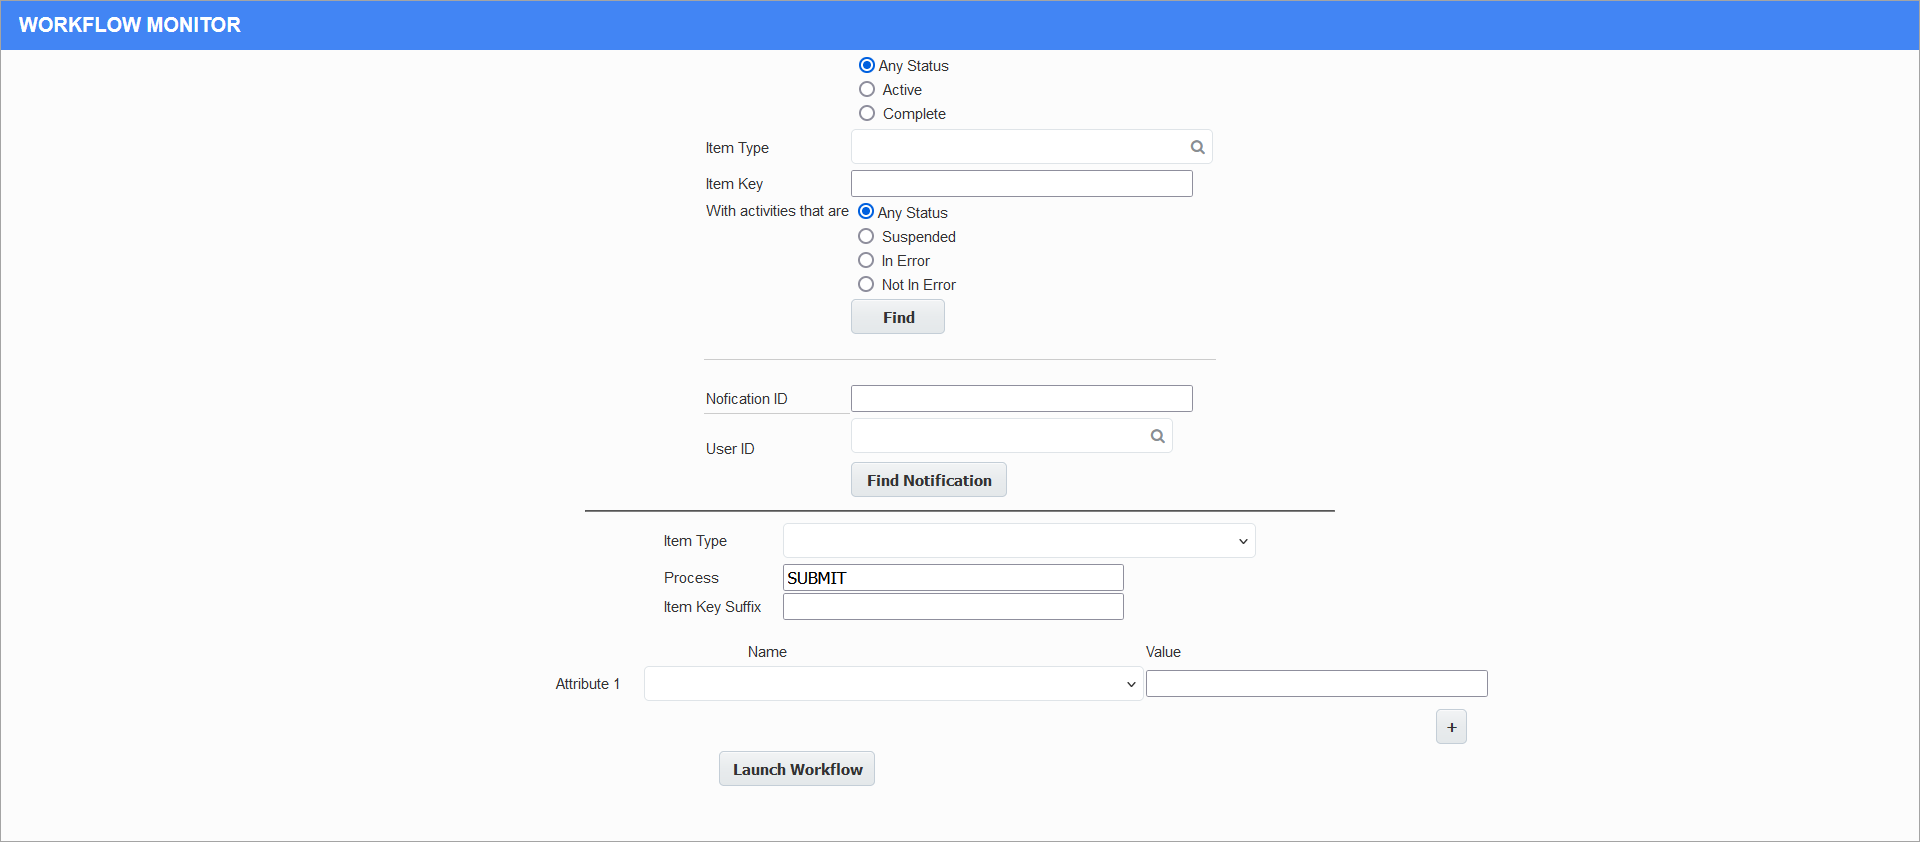
Workflow Monitor is a tool used by administrators to manage workflows. The screen can be used to pull up any workflow that has ever been started in the system, and the Activity List screen can be used to stop, start, bypass approvals, restart, and change attributes of a particular workflow.
CMiC and administrators uses this screen to investigate workflows and customers can gain some knowledge on the back-end process running for a workflow.
The following describes the fields available on this screen.
Status
Select to view active, completed, or all workflows.
Item Type
The item type is the name of the workflow to be examined. The workflow can be selected from the LOV by clicking on the Search icon.
Item Key
The item key is a PL/SQL expression used to match all or part of the unique key of the workflow(s) to be displayed. It is usually used with the object oraseq to find the workflow instance(s) for a specific object using the pattern "%x<oraseq>".
Users can also use the Item Key field to search for workflows based on the date values. The item key for any workflow starts with the year, followed by month, then day. For example, entering "2025%" in the Item Key field will return results for all workflows in the year 2025.
Activities
The Activities field is usually set to the 'Any Status' radio button, but sometimes it is convenient to filter for workflow instances that are either in error or not in error. The 'Suspended' radio button is seldom used.
[Find] − Button
After entering all necessary fields, click the [Find] button to open the Process List screen which lists workflows that match the selected criteria. From the Process List screen, you can click on a workflow under the Process Name column to be taken to the Activity List screen, as described in the section below. The [Back] button can be used to go back to the Workflow Monitor screen.

Workflow Monitor; standard Treeview path: Workflow > Workflow Monitor - [Find] button
Activity List

Workflow Monitor; standard Treeview path: Workflow > Workflow Monitor - [Find] button - Process Name link
The Activity List screen displays a list of the actions (activities) that a single workflow went through in the order in which it went through them. Initially, the only activities it shows are notifications, but the [Details] button will expand it to show all activities. This is where users will stop, start, bypass approvals, restart, and change attributes of a particular workflow. The [Back] button can be used to go back to the Workflow Monitor screen.
Approve (![]() ) Icon
) Icon
When an activity has an active status, clicking on the Approve icon will approve the workflow.
Reject (![]() ) Icon
) Icon
When an activity has an active status, clicking on the Reject icon will reject the workflow.
Envelope (![]() ) Icon
) Icon
When an activity has an active status, clicking on the Envelope icon displays the notification only. It is not possible to approve or reject a workflow from the notification display.
Search for a Specific Notification

Workflow Monitor; standard Treeview path: Workflow > Workflow Monitor
This section is used to find a specific notification (approval or FYI). Enter the notification ID which can be found on the workflow diagram, and click the [Find Notification] button to display the notification. This screen is meant to only show the notification. You cannot approve or reject a notification from this screen. These actions can be done using the Activity List screen described in the above section.
NOTE: The User ID field is optional. If entered, it will find all open notifications for the specified user, but adding the “?Userid=” option on the Notification List URL works better and is easier to use.

Workflow Monitor; standard Treeview path: Workflow > Workflow Monitor - [Find Notification] button
Manually Launch a Workflow for Any Object

Workflow Monitor; standard Treeview path: Workflow > Workflow Monitor
This section is used to launch a workflow manually for any object. It is used for testing workflows under development.
Item Type
The name of the workflow to be launched.
Process
This is almost always “SUBMIT”, but it might need to be changed if a different name was used as the starting process of the workflow.
Item Key Suffix
This is usually the object oraseq and is the value you would use in the pattern, "%x<oraseq>", to find this workflow instance. However, it can be anything.
Attribute 1, 2, etc.
The attribute/value pairs are used to define input attributes (parameters) to the workflow. The [+] button is used to add new rows. At least two are usually required:
-
Requestor is the user ID of the person who launched the workflow.
-
Image Document ID is the oraseq of the object being put through workflow.
-
Depending on the workflow, other attributes may be required.
Workflow Notification Rules

Workflow Notification Rules; standard Treeview path: Workflow > Workflow Notification Rules
In order to access the Select User to Define Rules for LOV, the user must have the 'ALERTDEF' system privilege enabled, which can be found on the User Maintenance screen (standard Treeview path: System > Security > Users > User Maintenance). This is the out of office setup for workflows received by a user.
When the [Replace User] button is clicked, the user is taken to a screen that allows all occurrences of the current user (in any Workflow Lookup definition having an Output Type of "Workflow User") to be replaced with the user selected in the Replace to User field. This will not update any project contacts associated with the current user.
Automatic Reassignment
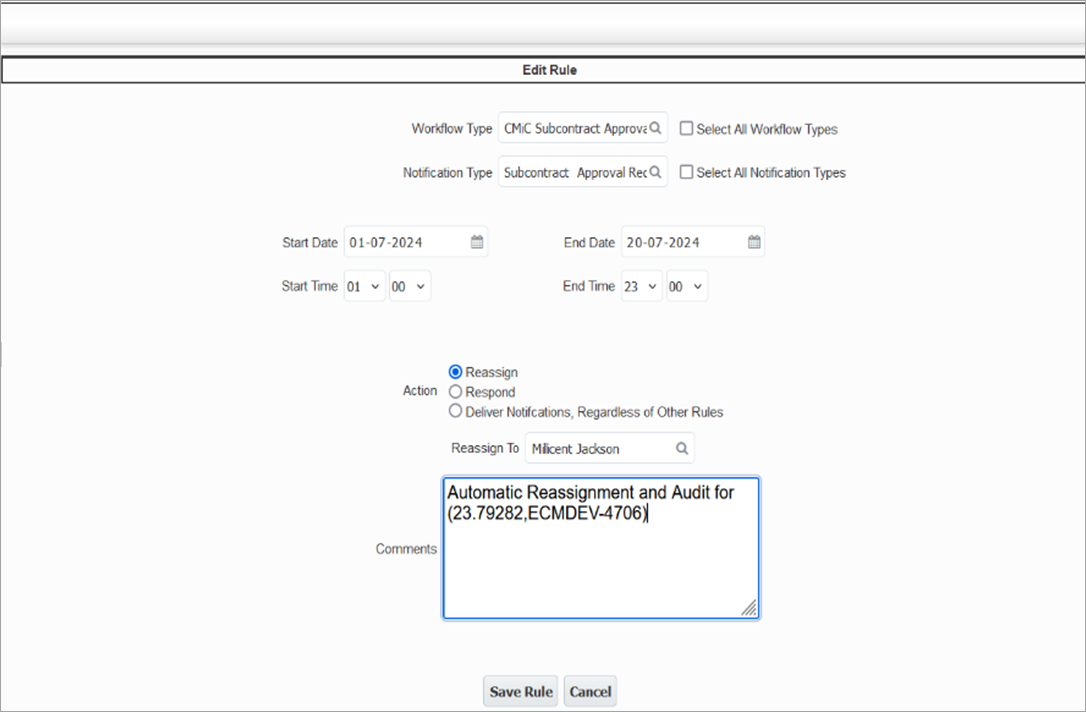
In the Workflow Notification Rules screen, notifications and approvals can be automatically reassigned to another user. This change is also logged in the Audit History section of the workflow items so there is a record of the change. The update of the Audit History section applies to the Image Manager flysheet as well.
In the example below, a rule is created to automatically reassign Subcontract Approvals to the user Millicent Jackson.

Workflow Notification Rules; standard Treeview path: Workflow > Workflow Notification Rules - [Create Rule] button
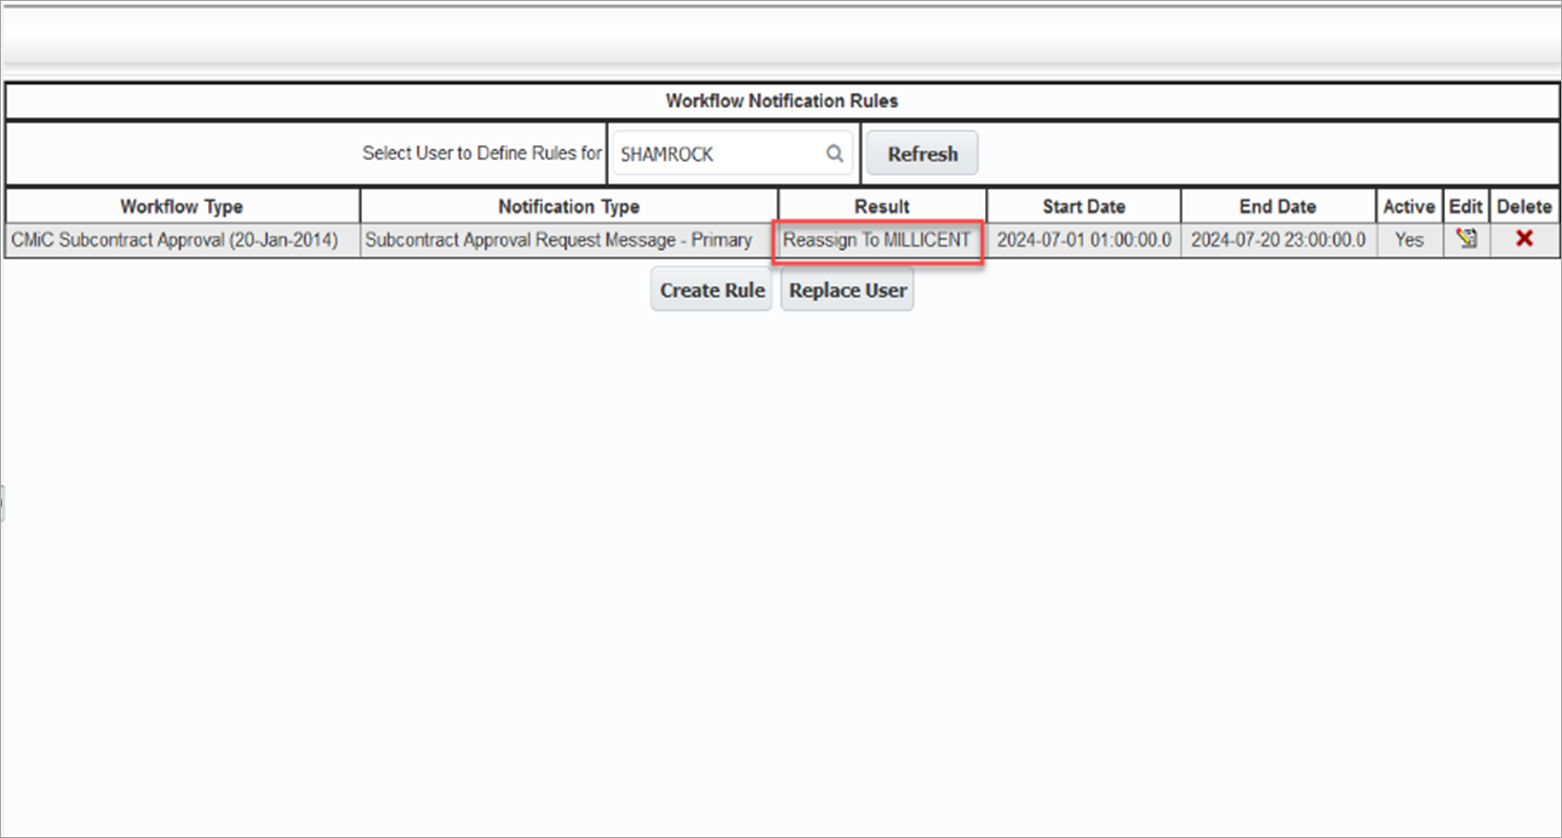
Any new approvals that would go to the SHAMROCK user (up to and including Jul 31st as per the rule) will also be automatically reassigned to the MILLICENT user. When the rule expires, the approvals/notifications will revert back to the original approver.

Workflow Notification Rules; standard Treeview path: Workflow > Workflow Notification Rules