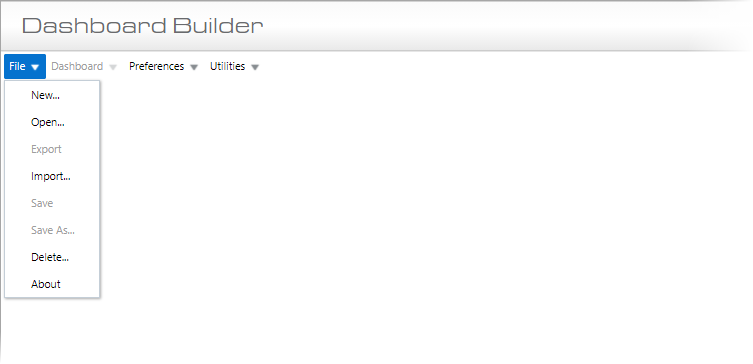
File drop-down menu
New
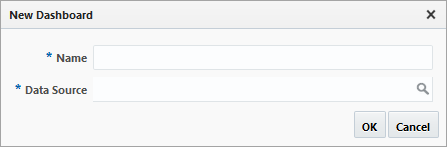
Use the New Dashboard pop-up window to create a new dashboard.
Name
Enter a name for the new dashboard.
Data Source
Enter/select the data source to be used for the new dashboard. A data source contains the folders (i.e., tables/views) to use to create the dashboard’s visualizations (i.e., charts, gauges, tables). Visualizations can either use data from a single folder, or data returned by joined folders.
When finished entering the name and data source, click [OK]. The new dashboard will automatically be launched for the user to start adding visualizations.
Open
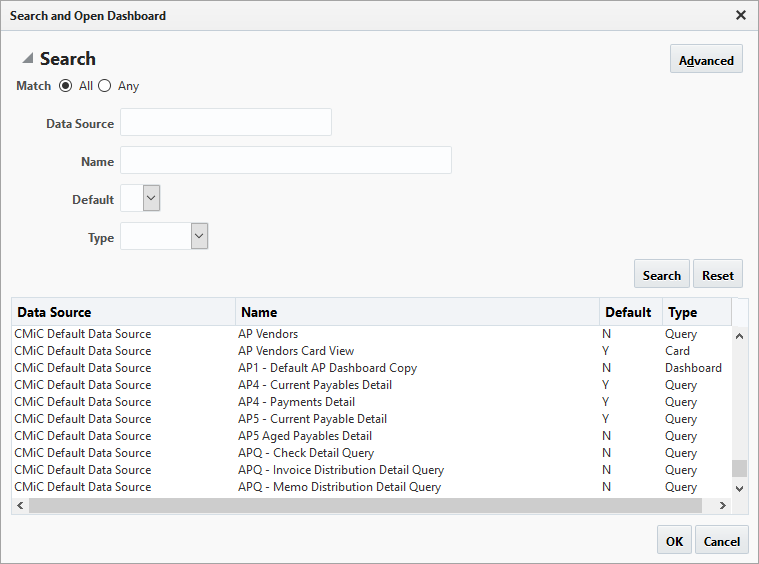
Use the Search and Open Dashboard pop-up window to search for and select a dashboard/query/card to open.
NOTE: When BI Dashboard Builder is accessed for the first time, none of the provided, default dashboards/queries/cards will be available to any user, until they are granted appropriate security access.
Use the Data Source and/or Name search fields to find a dashboard/query/card, and note that the following wildcard characters can be used:
-
% (any string of characters)
-
_ (any single character)
Use the Default field to filter whether the dashboard/query/card is a default provided with the system. Available options are “Y” or “N”.
NOTE: If a default dashboard/query/card is opened, the Save option will be disabled. These standard elements are not intended for modification, due to subsequent patch installations and hotfixes that update the default data source, which could overwrite any alterations and render any dependent dashboards inoperable.
Use the Type field to filter search by “Dashboard”, “Query”, or “Card”.
Use the [Advanced] button to switch the pop-up to Advanced Search mode, shown below.
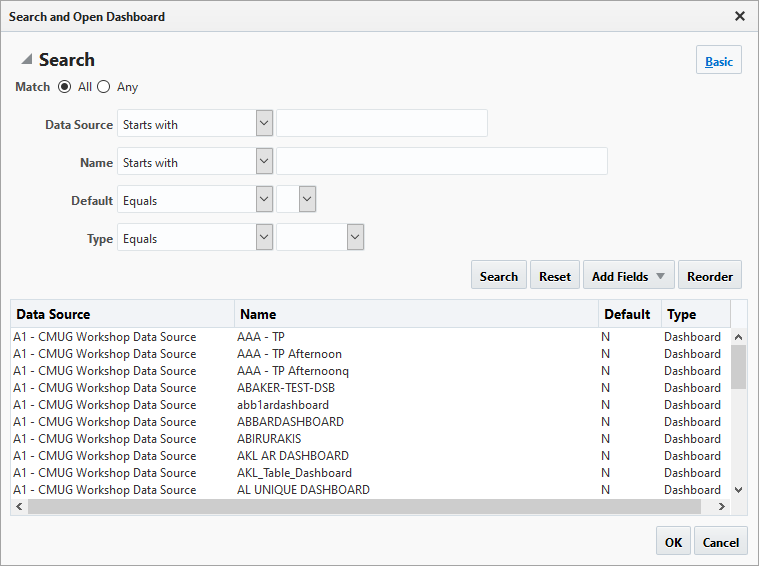
Advanced Search mode pop-up window
In Advanced Search mode, matching operators can be used, search fields can be added, and the search fields can be reset and reordered.
Export
Use the Export and Import functionality to copy dashboards/queries from one Enterprise environment to another. For instance, if dashboards/queries are created in the Test/Development environment, they can be copied to the Production environment using this functionality.
Copying Dashboards/Queries Between Enterprise Environments
NOTE: To import dashboards/queries into one environment from another, the environments must be on the same patch/hotfix level. For example, if dashboards are created in the DEV environment, to export them to the PROD environment, the PROD environment must be on the same patch/hotfix level as that of DEV.
To copy a dashboard/query from one environment to another, using BI Dashboard Builder, open the dashboard/query to copy in the environment it exists. Then, use this Export option to export (save) the dashboard/query to a location from which it can be imported. The exported dashboard/query will have a “BI” file extension.
Next, launch BI Dashboard Builder in the environment into which the dashboard/query is to be imported. Then, use the Import option to import the dashboard/query that was exported to the temporary location.
NOTE: Imported dashboards/queries are not automatically saved. Use the “Save” or “Save As” option to save and keep the imported dashboard/query.
Working with Multiple Environments
When working with multiple environments, where you are planning on developing in one environment (e.g. TEST or DEV) and then promoting these changes into another environment (e.g. PROD), the following rules and best practices for import/export should be considered:
-
Always make changes to your data source and dashboards/queries in your development environment (e.g. TEST, DEV, etc.).
-
Once changes are completed and ready to be promoted into your production environment (e.g. PROD):
-
Export your data source from the development database and import it into your production database. For more details, refer to the Installation Scripts section of the BI Catalog Builder guide.
-
Export your dashboards/queries from the development environment and import them into your production environment. For more details, refer to the Export – Menu Option and Import - Menu Option sections of this guide.
-
-
Importing a data source will override the existing data source in the destination environment, therefore, it’s important to follow Rule 1.
-
If users modify a dashboard/query in the source environment, and these changes don’t require any modifications in the corresponding data source, then it’s not necessary to export/import the data source. In this case, users can skip Rule 2a.
-
If you are planning to clone one environment into another (e.g. clone PROD to DEV) and you have data sources and/or dashboards/queries in the destination environment (e.g. DEV) that don’t exist in the source environment (e.g. PROD), or you don’t want some of them to be overridden by cloning, you will need to export these data sources and dashboards/queries before cloning and import them back after cloning.
NOTE: If you export/import a dashboard/query between different environments and the dashboard/query required any changes in the corresponding data source, then you first need to export/import your data source as described in the Installation Scripts section of the BI Catalog Builder guide.
Import
This option is used along with the “Export ” option to copy dashboards/queries from one Enterprise environment to another. For details, please refer to the above documentation about the “Export” option.
BI Dashboard Builder only supports three patches at a time, so. bi files can be imported with backwards compatibility from two previous patches. For example, if Patch 19 is the most recently released patch, then .bi files can be imported back to Patch 16.
Imported dashboards/queries are not automatically saved. Use the “Save” or “Save As” option to save and keep the imported dashboard/query.
NOTE: If you export/import a dashboard/query between different environments and the dashboard/query required any changes in the corresponding data source, then you first need to export/import your data source as described in the Installation Scripts section of the BI Catalog Builder guide.
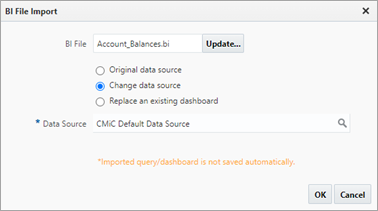
BI File
Use the [Browse] button to select a .bi file to be imported.
Original data source
Select this option to maintain the original data source.
Change data source
Select this option to change the data source. When this option is selected, the Data Source field is displayed to select a different data source.
This option allows users to import dashboards to different data sources in the same patch version. This feature makes it easier for users to add new default dashboards into their custom data sources.
Folders and fields are uniquely identified by ID within a data source. Sometimes, the alternative data source may not contain the folder IDs or the field IDs in a dashboard for a successful import. Below are the replacement rules for missing folders and fields in a data source.
-
When a folder ID is missing, a folder with the same name is used. All fields inside the missing folder are replaced by fields with the same name inside the replacement folder.
-
When a field ID is missing, a field with the same name inside the field’s folder is used.
NOTE: The user must be authorized to access all folders in the dashboard. Any inaccessible folders will cause the import to fail.
Replace an existing dashboard
Select this option to update/overwrite an existing dashboard when importing a .bi file. When this option is selected, the Dashboard field is displayed to select the dashboard being replaced.
NOTE: The BISECMNG privilege is required to use this feature.
Save
Saves changes to dashboard.
NOTE: The user will be unable to save a dashboard if errors exist (missing fields, missing folder, etc.) and will be required to resolve these errors before the dashboard will save. This functionality prevents broken visualizations from becoming corrupted to the point that they become unrecoverable.
NOTE: If a default dashboard/query/card is opened, the Save option will be disabled. These standard elements are not intended for modification, due to subsequent patch installations and hotfixes that update the default data source, which could overwrite any alterations and render any dependent dashboards inoperable.
Save As
Use the Save As pop-up window to create a copy of the current dashboard by saving it with a different name.
Delete
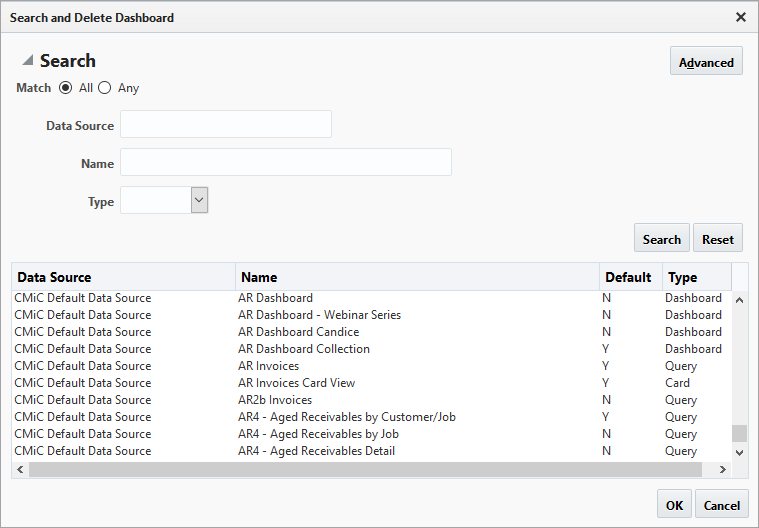
Use the Search and Delete Dashboard pop-up window to search for and delete a dashboard/query/card.
Use the Data Source and/or Name search fields to find a dashboard/query/card, and note that the following wildcard characters can be used:
-
% (any string of characters)
-
_ (any single character)
Use the [Advanced] button to switch the pop-up to Advanced Search mode, where matching operators can be used, search fields can be added, and search fields can be reordered.
Use the Type field to filter search by “Dashboard”, “Query”, or “Card”.
Once the dashboard/query/card is selected, click [OK].
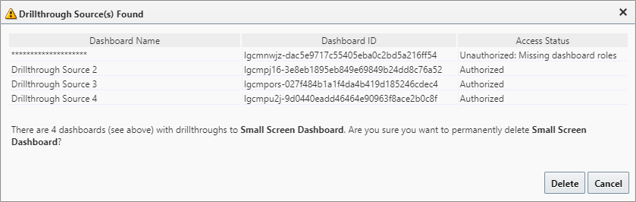
A pop-up will be launched which prompts the user to confirm the deletion of current dashboard. It also warns the user if the dashboard being deleted is referenced by another dashboard via drillthrough(s).
NOTE: The warning may list dashboards to which the user does not have access.
Click [Delete] to permanently delete it.
About
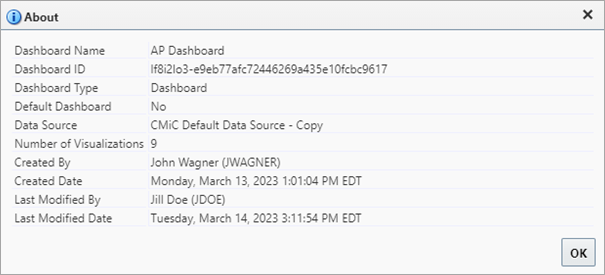
Use this option to display information about the application and its server.