Step 1: CMiC BI Security Setup
Before Query Builder can be used, CMiC BI security must be set up. Please refer to the following articles:
Step 2: Create New Query
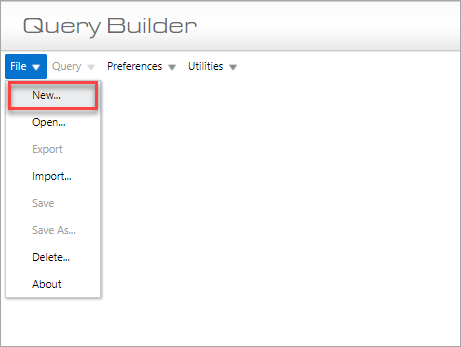
Click the File drop-down menu and select “New”.
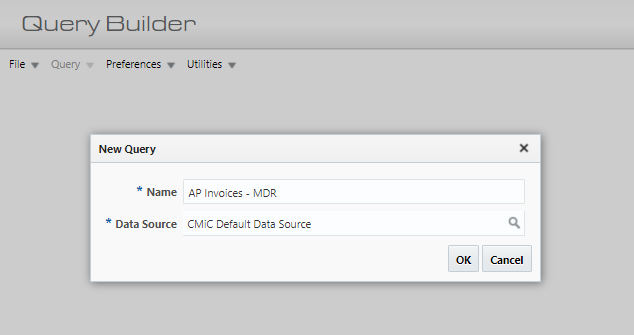
In the pop-up, shown below, provide a name for the new query and select the data source containing the folders (tables/views) required to create the query’s table visualization.
Upon clicking [OK], the newly created query is displayed:
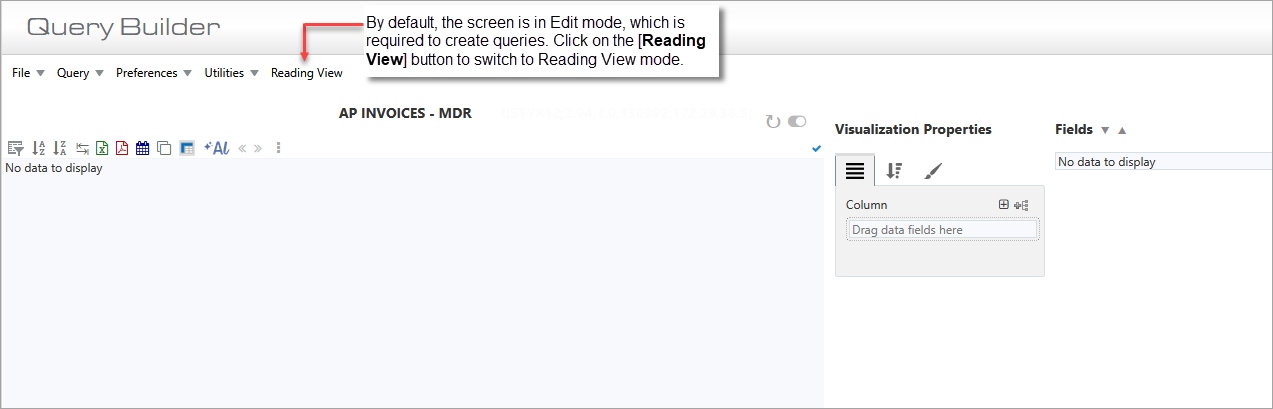
Since the screen will initially be in edit mode when a new query is being created, the Visualization Properties and Field panes will be visible, as shown above.
When a user creates a new query, the query’s name defaults as the title of the query on the dashboard.
Step 3: Add Fields to Query
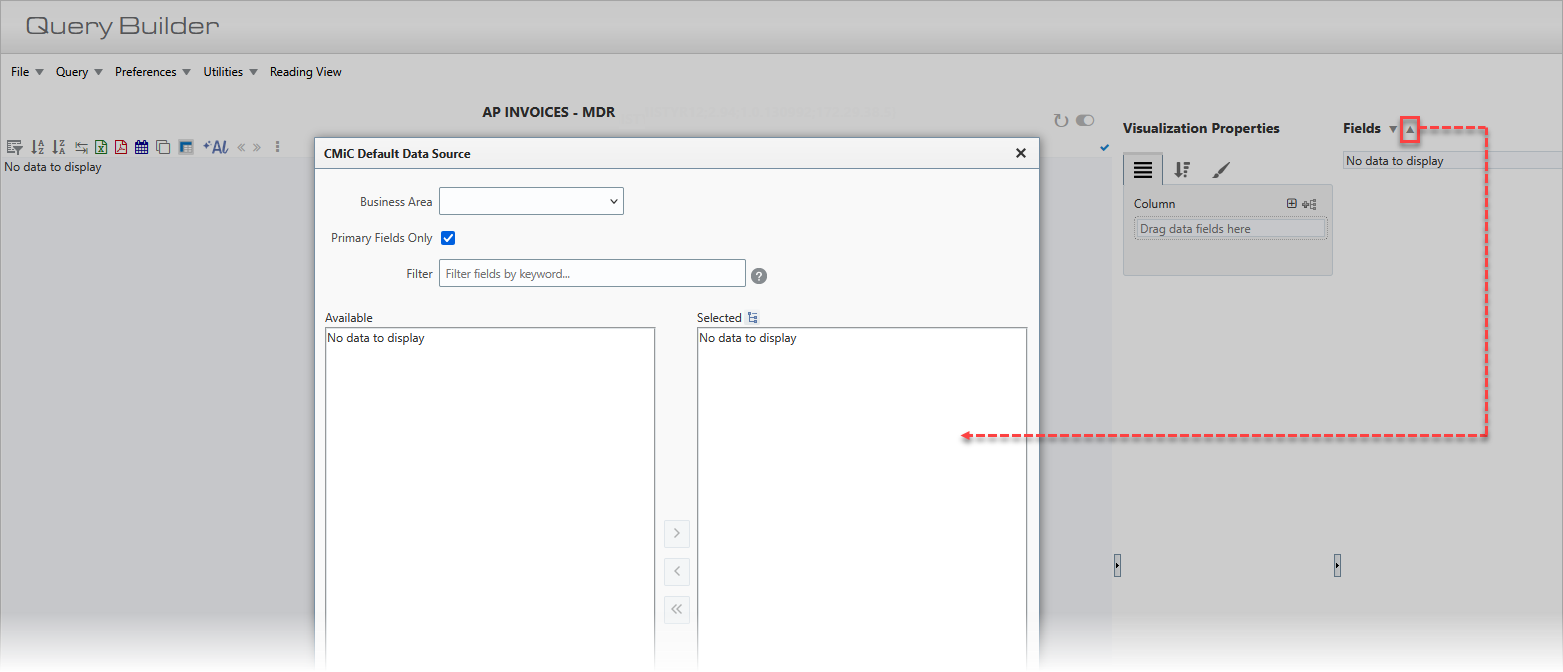
Click the up-arrow ( ) in the Fields pane to add fields (tables/views) to the query (table visualization).
NOTE: A calculated field can be created to launch a program from a field using targets. For example, launch fields can be created to open up other programs in table visualizations.
Step 4: Configure Query’s Properties
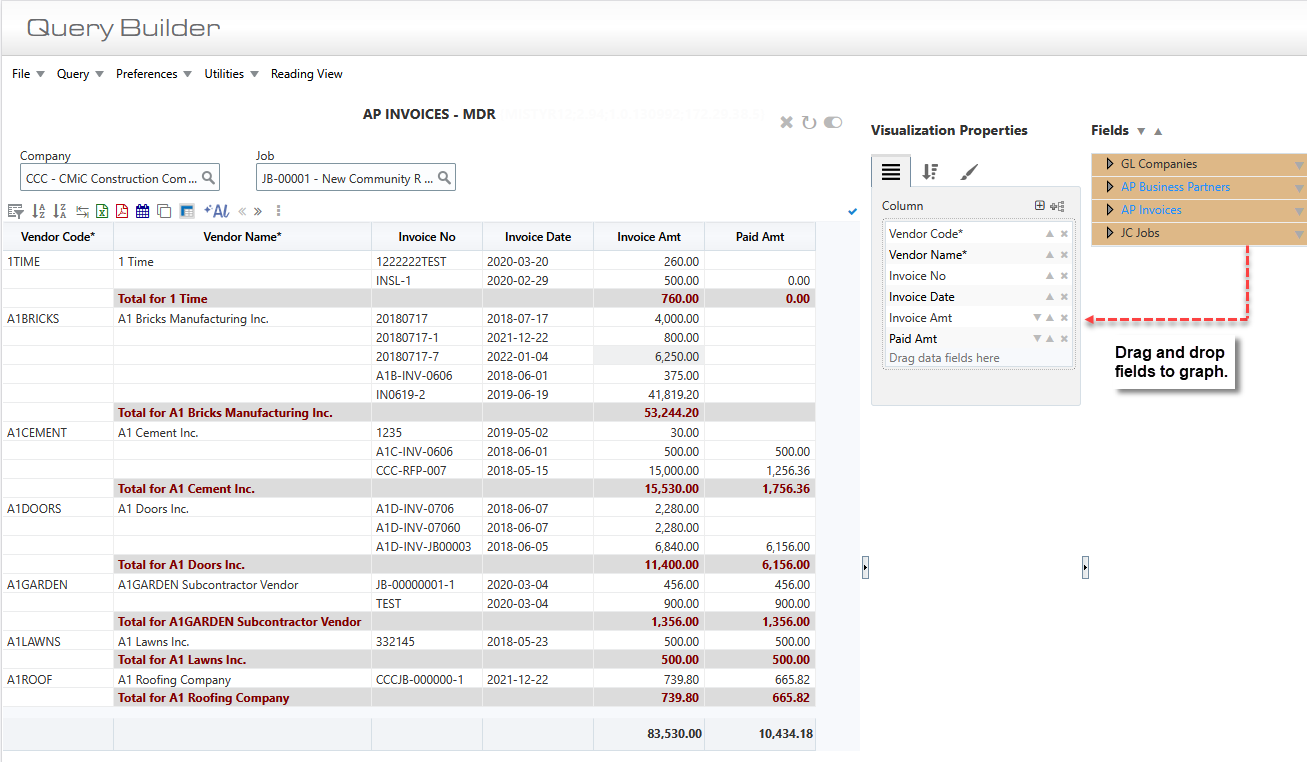
Example of Query
Configure the query’s properties using the Visualization Properties control, as shown above.
NOTE: Launch fields can be used to open up other programs in table visualizations by creating calculated fields with targets in BI Catalog Builder. For more information about using this feature, please refer to the BI Catalog Builder guide. To learn more about targets functionality, please refer to BI Dashboard Builder - Making Dashboards Accessible via Console
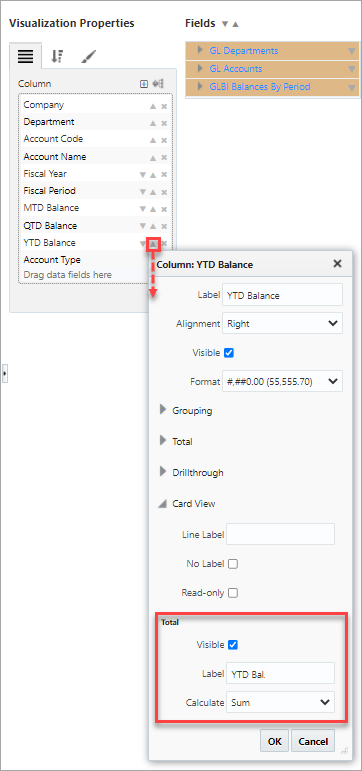
The Card View properties are located on the Plotting Fields tab and the Format tab, as shown below. They are used for customizing settings if the user will be launching their query in card view.
Plotting Fields Tab
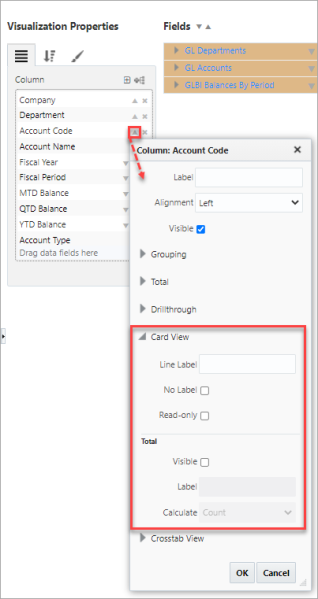
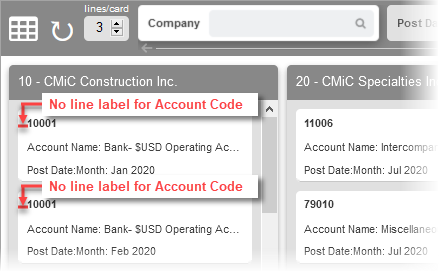
Line Label: This property is used to specify how the column’s line label appears on the card. For example:
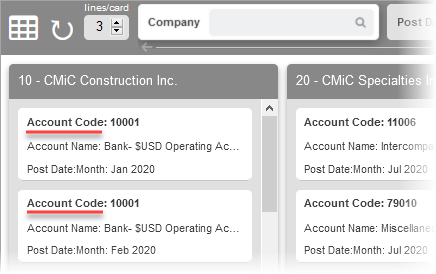
If this property is left empty, the card defaults the column’s title. In this example, it’s the Account column so it would appear in card view as follows:
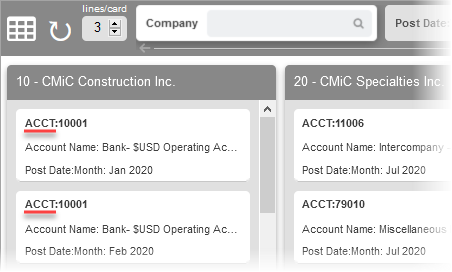
If a label is specified, such as “ACCT:”, then it would appear in card view as follows:
No Label– Checkbox: Check this box to display no label.
For example, if the ‘No Label’ checkbox is checked for the Account column, it would appear in card view as follows:
Read-only – Checkbox: Checking this box enables a read-only setting for the table column. This setting has the highest priority. It ensures that the column is not updatable and overrides the updatable setting in BI Catalog Builder. This setting can only be modified in BI Query Builder/BI Dashboard Builder and is disabled at runtime.
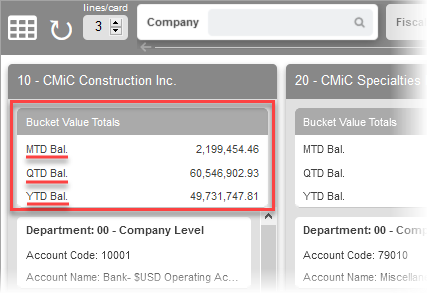
Visible (Total) – Checkbox: Checking this box enables the total Label and Calculate properties. A new totals card titled “Bucket Value Totals” will be added in card view.
This example shows a Bucket Value Totals card entered for the YTD Balance column.

The next example shows a Bucket Value totals card entered for the following three columns: Account, Department, and Opening Balance.
Label (Total): This property is enabled when the ‘Show Total’ box is checked. It allows the user to add a label to the column’s title in the Bucket Value Totals in card view.
Calculate: This property is enabled when the ‘Show Total’ box is checked. It allows the user to specify the type of calculation performed on each column’s bucket value totals (e.g. Average, Count, Count (Distinct), Maximum, Median, Population Standard Deviation, Sample Standard Deviation, or Sum).
Format Tab
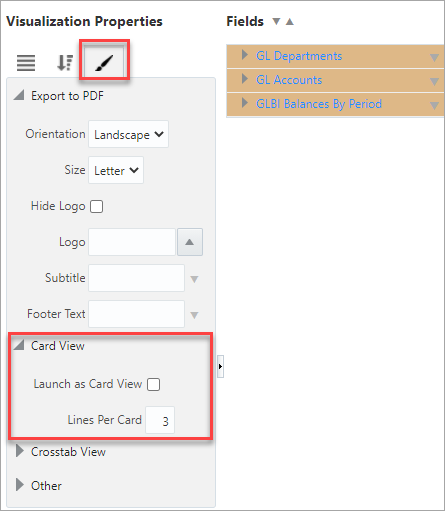
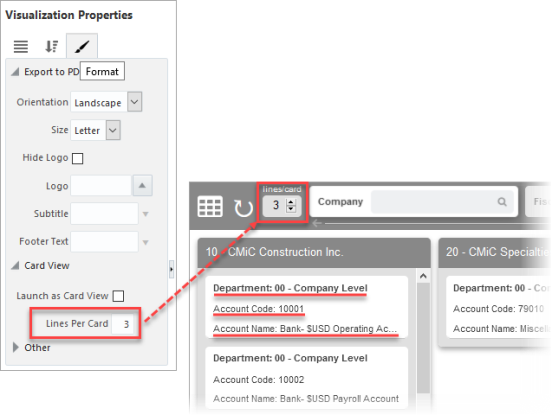
Launch as Card View – Checkbox: Allows the user to set the query to launch in card view by default and turns the query type from “Query” to “Card”, allowing it to be filtered as card view in BI Analytics.
Lines Per Card: Allows the user to set the number of lines per card. By default, the lines per card is three.
Crosstab Properties
The Crosstab View properties are located on the Plotting Fields tab and the Format tab, as shown below. They are used for customizing settings if the user will be launching their query in crosstab view.
Plotting Fields Tab
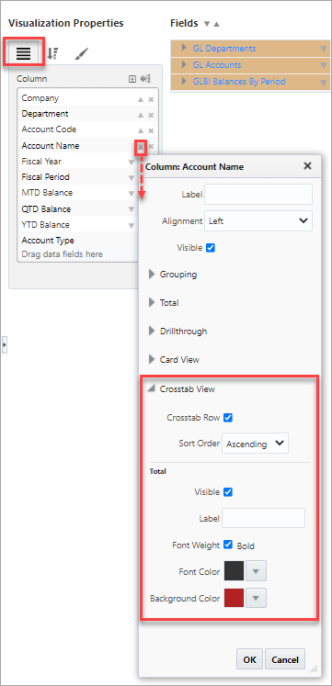
Crosstab Row - Checkbox: If checked, all visible non-aggregated columns are converted to crosstab rows.
Sort Order: This property is used to sort the crosstab rows in ascending or descending order.
Visible (Total) – Checkbox: Checking this box enables the total Label properties. A new totals crosstab row titled “Total Vendor” will be added in crosstab view.
NOTE: For subtotal/total to be available, all aggregated columns must use one of the following aggregations: Count, Count (Distinct), Sum.
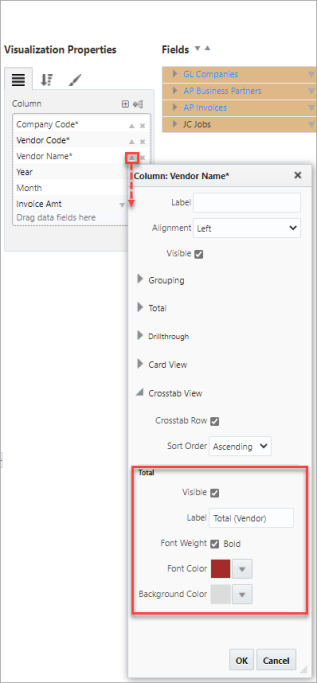
This example shows a Total (Vendor) crosstab row entered for the Vendor Name crosstab.

Label (Total): This property is enabled when the ‘Visible’ box is checked. It allows the user to add a label to the total crosstab row in crosstab view.
Font Weight - Checkbox: This property is used to set the font weight in the total crosstab row.
Font Color: This property is used to set the font color of the total crosstab row.
Background Color: This property is used to set the background color for the total crosstab row.
Format Tab

Launch as Crosstab View – Checkbox: Allows the user to set the query to launch in crosstab view by default and turns the query type from “Query” to “Crosstab”, allowing it to be filtered as crosstab view in BI Analytics.
Step 5: Save and Assign Security Role(s) to Query
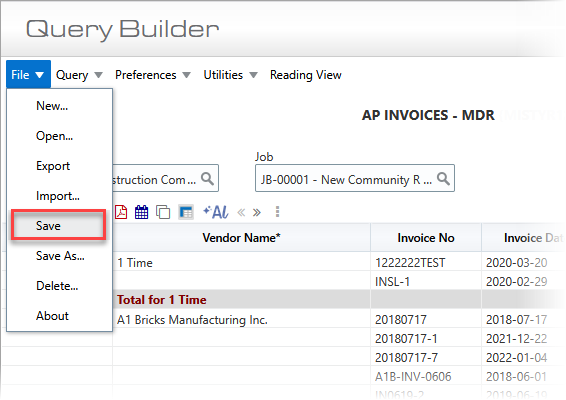
Click on File and select “Save” from the drop-down menu.
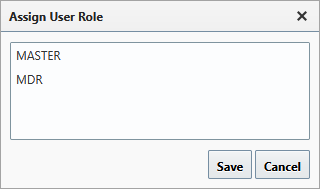
A pop-up window will appear to assign a security role to the query. Select a security role and click on [Save].
NOTE: Queries are only available to users that belong to the assigned security roles.
Step 6: Make Query Accessible via Console
Lastly, the new query needs to be made accessible to end-users.
Add BI Query Link to Treeview
To add a link to a BI Query in Treeview, please refer to the Treeview Builder reference guide in conjunction with the following instructions.
Create User-Defined Target
On the UI Treeview Builder screen, add a new menu item to a Treeview and use the Item Properties section to set the Target Type field to “BI Query”.
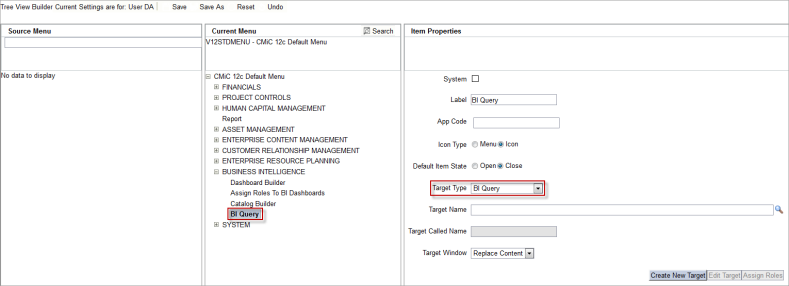
Next, click on [Create a new Target].
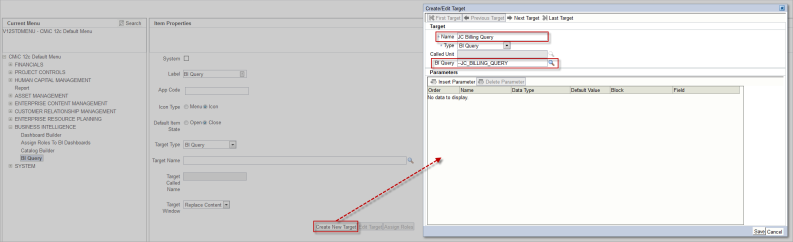
In the Create/Edit Target pop-up window, enter the target’s name in the Name field and select “BI Query” in the Type field. Use the BI Query field’s LOV to select the query to be added to the target. When finished, click on [Save].
Finally, select the created target via the Target Name field in the Item Properties section of the UI Treeview Builder screen and click on [Save].