
Pgm: OMCTRL – OM Control File screen; standard Treeview path: Opportunity Management > Setup > Company Control
The Company Control screen is used to set up the general options for the Opportunity Management module, for the company selected by the Company field in the Selection Criteria section. For instance, whether or not the company uses auto numbering for opportunity codes, and the default job security for projects created for opportunities. Each company must have a job security group assigned to it in order to complete the setup of the OM module for each company. Further options are available through the System Options screen. For more details, refer to [System Options] – Button .
Configure OM Module for Company
Select the company for which to configure the Opportunity Management module using the Company field, under the Selection Criteria section. Make any necessary changes, using the descriptions provided for each field in the following table. Click [Save] to save the company’s configuration to a record.
The following provides descriptions for the fields under the Control File section.
Automatic Opportunity Numbering
Automatically create the code for a new Opportunity record, as specified. This field is a user-defined mask that specifies how the numbering system generates a new opportunity code.
The asterisk (*) is used to indicate the placeholder for numbers within the string. There are pre-defined codes that may be used as detailed below, or you may hard code a prefix or suffix. The pre-defined codes must be entered in lowercase, otherwise they will be assumed to be hard coded values. Do not include a space between characters when defining masks.
The available pre-defined codes are as follows:
| Code | Description |
|---|---|
| c | Company |
| b | Business Partner/Organization |
| y | Year |
| m | Month |
| d | Day |
| * | Next Available Number |
E.g. “BDyy****” specifies that new codes begin with “BD” and the next available 4-digit number, which would result in "BD211234".
Department
Default department for newly created opportunities.
Default Job Security Group
Select the appropriate job security group to be applied to the selected company. This is a full list of all job security groups associated with the selected company.
Fee Calculation Method
This option determines how the Fee Amt field of an opportunity is calculated, as a percentage of the Potential Revenue field.
The following are the formulas for the two fee calculation methods:
1. Percentage of Contract: Fee Amt = Potential Revenue x Fee %
2. Percentage of Cost: Fee Amt = (Potential Revenue x Fee %) / (1 + Fee %)
CCIP Update %
This percentage is used to automatically calculate the CCIP Volume field on the Risk Management tab of an opportunity, based on the following formula:
CCIP Volume = Potential Revenue (on General tab) x CCIP Update %
Subcontract Update %
This percentage is used to automatically populate the Subcontract Volume field on the Risk Management tab of an opportunity, based on the following formula:
Subcontract Volume = Potential Revenue (General tab) x Subcontract Update %
Auto Create Bid Job – Checkbox
When checked, the checkbox tells system to automatically generate a bid job when an opportunity is created. Note, the Project Management module also has a checkbox that controls whether or not a bid job is automatically created when a project is created.
NOTE: If the ‘Auto Create Bid Job’ checkbox is checked and a default job security group has also been selected on the Company Control screen for a specified company, all bid jobs created from the Opportunity Management module in the specified company will be assigned to this security group by default. Ensure the user is assigned to the specified job security group in the System module (standard Treeview path: System > Security > Job/Project Security > Assign Users to Security Groups), otherwise the system will generate an error message when the user attempts to create a new opportunity.
Opportunities in Thousands – Checkbox
This checkbox is used to identify if amounts entered for opportunities are done so with the three zeros that represent thousands or without them. (E.g. Enter 7500 instead of 7500000, to represent an opportunity with revenues projected at $7,500,000.00).
Submarket – Checkbox
This checkbox indicates if sales plans are to be at the submarket level or not for the company. Basically, it controls whether or not submarket sectors are used. When this checkbox is checked, the Ctrl Market Sector field is enabled in the Opportunities screen; otherwise, only the Market Sector field is enabled and the Ctrl Market Sector field becomes irrelevant, and set to “ALL” by the system.
Refer to Opportunity Management - Opportunity - General - Tab to learn more about the Market Sector field and the Ctrl Market Sector field on the Opportunity screen.
Generate Revenue Spread – Checkbox
When checked, any changes to an opportunity’s potential revenue or gross profit amounts will trigger an automatic regeneration of the data on an opportunity’s Revenue tab.
Automatic Proposal Numbering – Checkbox
Automatically create the code for a new proposal record, as specified. E.g. “PR****” specifies that new codes begin with “PR” and the next available 4-digit number.
[System Options] – Button
To launch the System Options screen for the company selected in the Company field, as shown in the previous screenshot, click the [System Options] button. Below is a sample of the System Options screen:
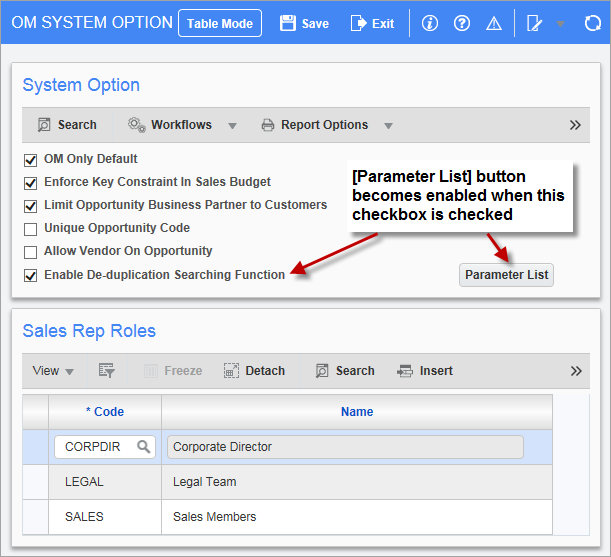
OM System Options screen launched from the [System Options] button
The following are details about the checkboxes on this screen, and details about the table that maintains the available values for the company’s Sales Rep Roles.
OM Only Default – Checkbox
This checkbox is used to determine if the 'Organization (Only)' checkbox on the Detail tab of the Organization Management screen is checked or unchecked by default when a new organization record is created. The 'Organization (Only)' checkbox determines whether the organization record is also available in other modules of CMiC Enterprise, such as Accounts Payable and Accounts Receivable, or if it only exists within the OM module. For more information, please refer to Opportunity Management - Organization - Detail - Tab.
Enforce Key Constraint in Sales Budget – Checkbox
This checkbox allows the user to create duplicate sales budget records (based on company, department, market sector, and year), thereby allowing the user to include user-defined fields in their key (which will not be enforced if the checkbox is unchecked). The result is that there will be multiple records with the same company, department, market sector, and year.
Limit Opportunity Business Partner to Customers – Checkbox
This checkbox is used to limit the types of business partners that are available in Organization/Business Partner drop-down lists (list of values) on the Opportunity screen. When this checkbox is checked, the business partner LOV will display only valid customers of the company named in the opportunity.
Unique Opportunity Code – Checkbox
When this checkbox is checked, only unique opportunities can be created system-wide, i.e., the same opportunity code cannot be created in multiple companies. In addition, the system requires that any code being used to create the opportunity/project/job should not already exist in the system.
Allow Vendor on Opportunity – Checkbox
This checkbox is used to limit the types of business partners that are available in Organization/Business Partner drop-down lists on the Opportunity screen. When this checkbox is checked, a business partner that was set up as a vendor in the system will be available in these lists, on the Opportunity screen.
Enable De-duplication Searching Function – Checkbox
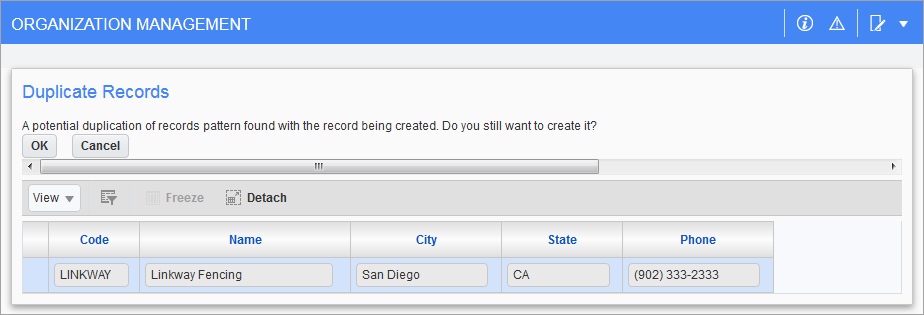
Duplicate Records notification
When this checkbox is checked, a backend process is run when saving a new organization, opportunity, or contact record to ensure that the new record is not a duplication of an existing record. Duplications happen simply because users enter slight variations of fields when creating records. As shown above, if matching records are found, the system presents them and asks the user if they would like to proceed with creating the record. Use this screen to verify if the new record is indeed a duplicate.
Also, when this checkbox is checked, the corresponding [Parameter List] button will be enabled, as shown in the previous screenshot. The rules and settings for how records are matched for duplicates are found on the screen launched by this button, as detailed in the following subsection.
NOTE: When the 'Enable De-duplication Searching Function' checkbox is checked,
De-Duplication Searching Function – [Parameter List] Button
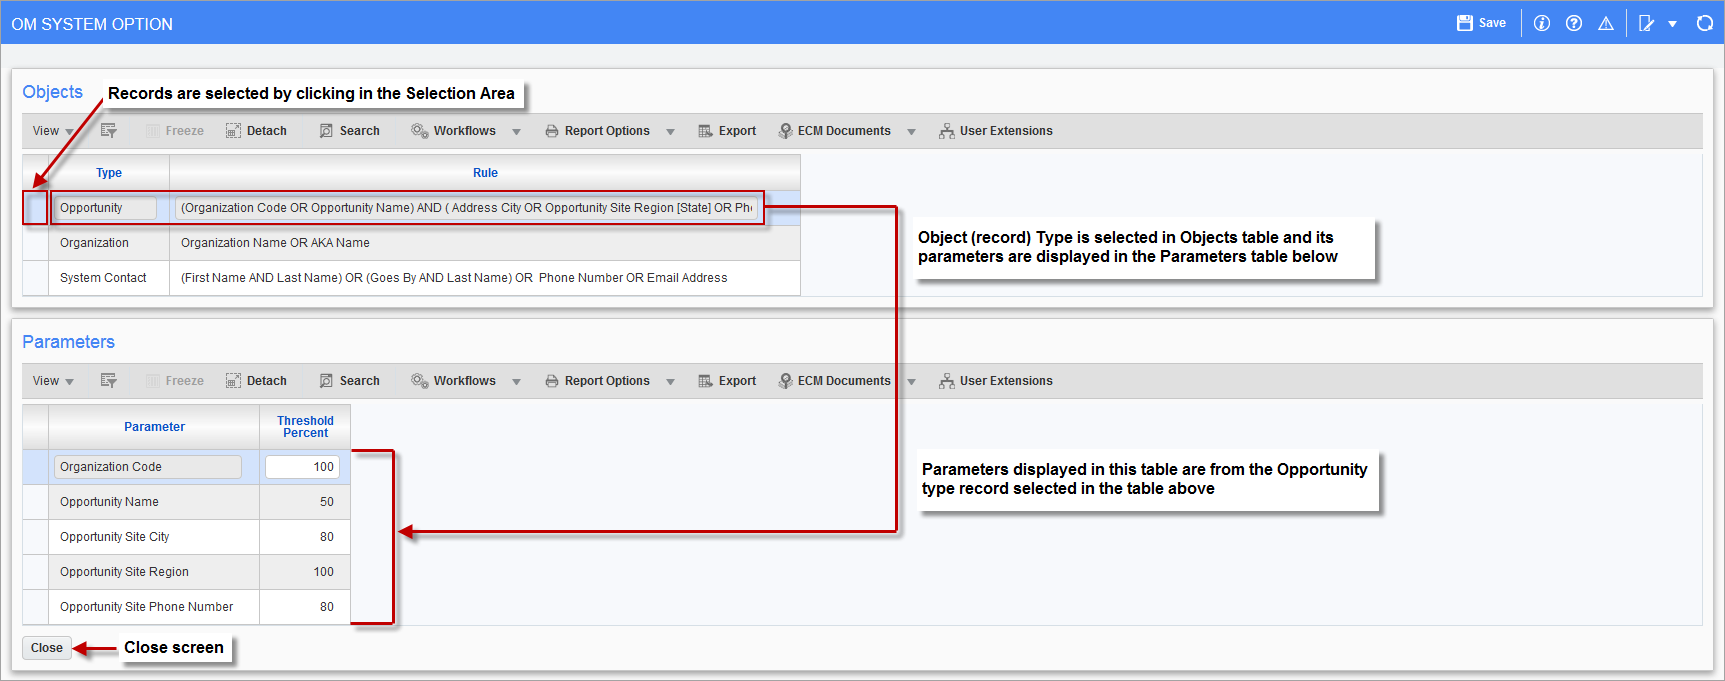
De-Duplication Parameter Screen launched by the [Parameter List] button
The De-Duplication Parameter screen, shown above, launched by the [Parameter List] button is used to configure the backend de-duplication process that checks to ensure that new opportunity, organization, and system contact records are not duplicates of existing records. The configuration only requires setting the matching thresholds (Threshold Percent column in lower section) for the fields used by a record type’s matching rule (Rule column in upper section).
In the Objects section, the Type column lists the three record types, and the Rule column shows each type’s matching rule for identifying duplicates.
For the record type selected in the Objects section, the Threshold Percent column in the Parameters section displays the matching threshold for each key field in the record type’s matching rule. The matching thresholds are used to set how closely the key fields must match between records for the records to be considered duplicates.
The following provides details about the matching rules in the Rule column of the upper section, and matching thresholds in the Threshold Percent column of the lower section:
Rule
A matching rule is a logical expression that specifies how fields between records are matched to find duplicates. Each record type has a matching rule, and each matching rule contains key fields that are relevant to finding duplicates of that record type.
Example:

For the Opportunity record type shown above, two records are considered a match if:
At least one of the following key fields match: Organization Code or Opportunity Name;
And at least one of these following key fields match: Address City or Opportunity Site Region’s State or Phone #.
How closely the fields must match is determined by the threshold percent values under the Parameters section of the screen.
Threshold Percent
Sets how similar a record type’s field between two records must be for the fields to be considered a match, on a character-by-character basis; e.g., 100% means the fields must be a perfect match, and 50% means the fields must be at least a 50% match.
NOTE: Fields can be entered quite differently by different users. With a lower threshold, more potential matches will be made, increasing the odds that a duplication is found; however, more records will be matched and require examination.
Sales Rep Roles Maintenance
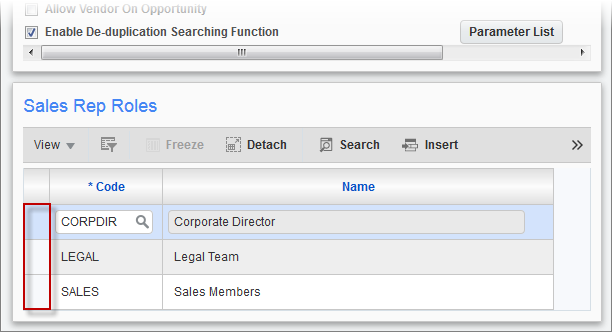
Pgm: OMOPT – System Options screen – Sales Rep Roles section
The table shown above is used to maintain the list of sales representative roles available throughout the Opportunity Management module, for the company selected in the Company field, on the Company Control screen.
Add Sales Rep Role
To add a new role type, click the [Insert] button to create a new row for entry.
Select existing role from the project management roles table launched from the Code LOV (maintenance screen’s standard Treeview path: Job Costing > Setup > Local Tables > Project Management Roles).
Click [Save] when finished.
Delete Sales Rep Role
To delete a record, select its row using the selection area, framed by the red rectangle in the screenshot above, and click the [Delete] button.