Pgm: SDCLASSIFIERS – Data Sheet Maintenance; standard Treeview path System > User Extensions > Data Sheet Maintenance

Data Sheet created from the setup in the previous screenshot
The Data Sheet Maintenance screen is reached through the following standard path: System > User Extensions > Data Sheet Maintenance. It is used to specify what groups (sections) appear on data sheets, and what user-defined fields appear under each group. It is also used to create visibility conditions, which are conditions used to determine when a group or field is to be available on an opportunity’s data sheet, based on the opportunity’s fields.
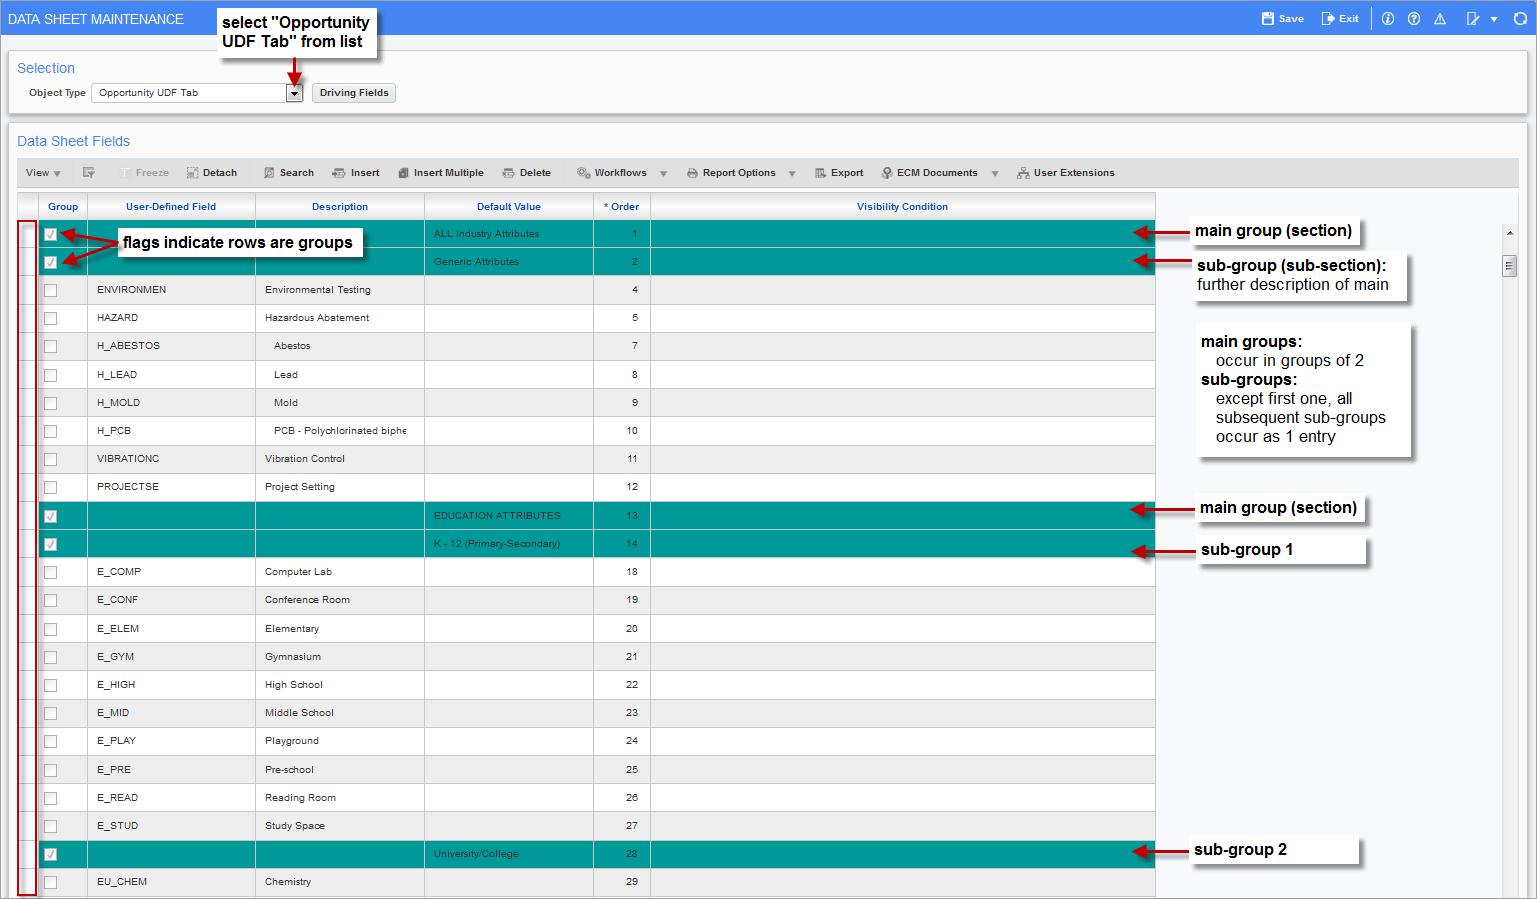
There are data sheets for various types of objects used in CMiC Enterprise. In this section, we are concerned with the data sheet for opportunity objects. To select the data sheet for opportunity objects, on the Data Sheet Maintenance screen, select “Opportunity UDF Tab” from the Object Type drop-down list, as shown in the first screenshot.
There are two types of groups on data sheets, as shown in the above screenshots: main groups and subgroups. All main groups appear in groups of two. The first group is the tile of the main group, and the second group is either just a more detailed description of the main group, if there are no subgroups, or the title of the first subgroup. Except for the first subgroup, which is under its main group, all subsequent subgroups appear as a single entry.
Create Group
To create a group or subgroup, select the row under which the new row should appear, using the selection area framed by the red rectangle. Click [Insert]. For the new row, click the ‘Group’ checkbox, to indicate that the row is for a group on the data sheet. Enter the group’s description in the Description field, enter the text that is to be displayed on the data sheet in the Default Value field, and enter the order in which the group is to appear in the Order field.
If the group is a main group, click the [Insert] button to create a second group under the main group. Recall that all main groups occur in a group of two groups. For the new row, click the ‘Group’ checkbox. If the main group has no subgroups, use this new row to provide a more detailed title or description for the main group, if it does have subgroups, use this row to detail the first subgroup. Click [Save].
Use the following instructions to help add user-defined fields to the created group.
If this group, including its fields, requires a visibility condition to control when it is available, refer to the Add Visibility Conditions step.
Add User-Defined Fields
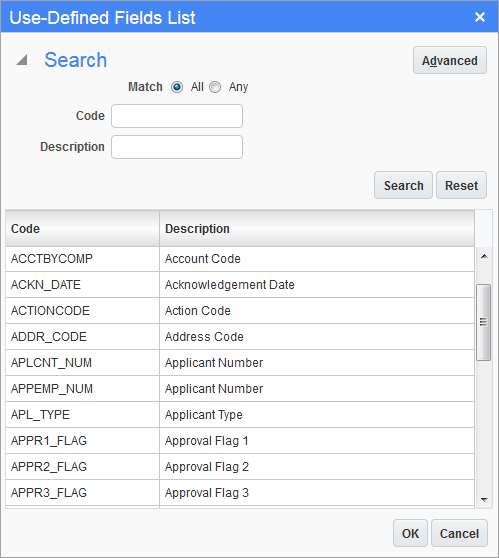
To add a user-defined field, which was created using the Field Maintenance screen, select the row under which the user wants the new row to appear, using the selection area framed by the red rectangle. Click [Insert]. For the new row, click the search icon  on User-Defined Field to bring up the above window to search for the user-defined field. Use the Search section to search for the field, by entering the field’s code or description and pressing Enter on the keyboard. When the user-defined field is found in the lower section, double-click it to select it and close the pop-up window.
Enter the field’s label, as it will be displayed on the data sheet, in the Default Value field, and enter the order in which the group is to appear in the Order field.
If this field requires a visibility condition to control when it is available, refer to the following Add Visibility Conditions step.
Create Visibility Condition
The Data Sheet Maintenance screen is also used to create visibility conditions for groups or single fields. Note, however, that the visibility condition for a group overrides the visibility conditions for the fields it contains.
Visibility conditions are based on the fields of an opportunity’s record. For instance, a data sheet’s group that contains fields that are only relevant to opportunities which have their Market Sector field set to “Educational” can have its visibility condition set so that the group will only appear for opportunities that belong to that specific market sector.
To create a visibility condition, an alias for the opportunity’s field that is to be used in the visibility condition must be declared using the Driving Fields screen. First though, the name of the opportunity field, as used within the system, must be discovered using the Main Toolbar’s About option  (detailed below).
Discover Field’s Name
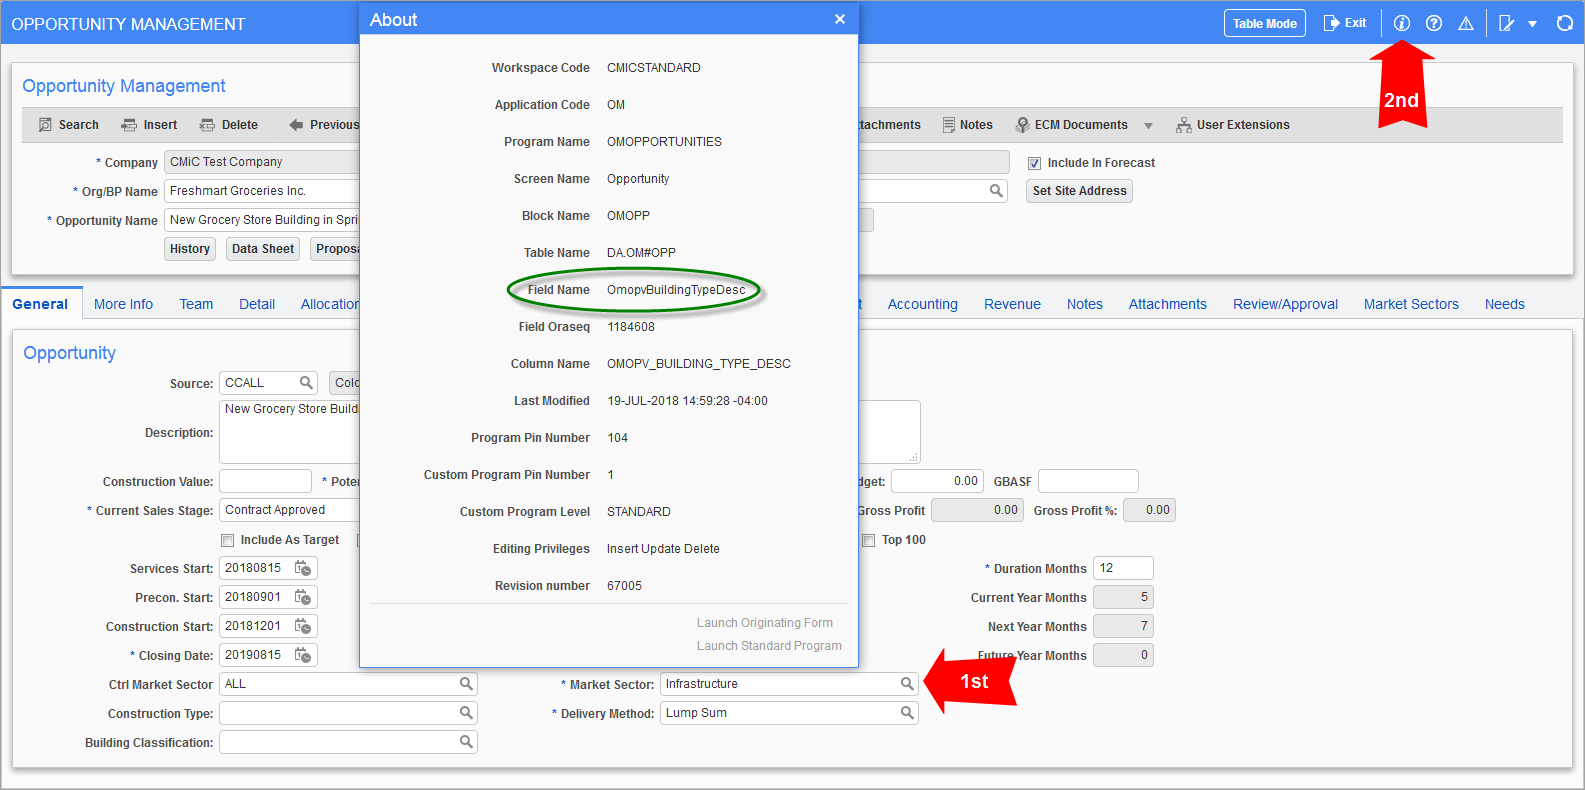
Pgm: OMOPPORTUNITIES – Opportunity Management; standard Treeview path: Opportunity Management > Opportunities
To find out what an opportunity’s field name is, as used in the system, first open an opportunity record. In the Opportunity Management screen, click the field for which its system name must be known (1st red arrow), and then click the About option on the Main Toolbar (2nd red arrow). The About pop-up window will open, as shown in the above screenshot. The field’s system name is given by the Field Name field in the About pop-up window, encircled by the green oval. Using the mouse, highlight and copy this field.
Create Alias for Field
Pgm: SDCLASSIFIERS – Data Sheet Maintenance; standard Treeview path: System > User Extensions > Data Sheet Maintenance – [Driving Fields] button
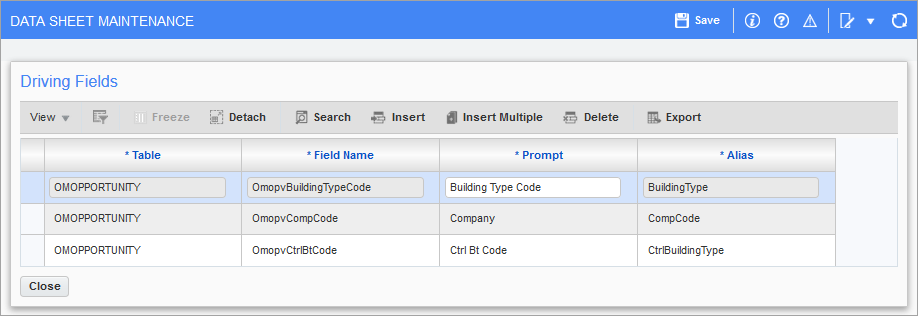
Now that the opportunity field’s system-name is known, using the previous step, an alias can be created for it. Back in the Data Sheet Maintenance screen, click the [Driving Fields] button to open the Driving Fields screen, as shown in the above screenshot. Click [Insert] to create a new entry for the alias. On the Field Name field of the new row, paste the field’s system name, or select it from the list. In the Alias field, enter a descriptive alias for the field. For instance, as shown in the above screenshot, for an opportunity’s Company field with the system name OmopvCompCode, the alias CompCode was created.
Create Visibility Condition
 Pgm: SDCLASSIFIERS – Data Sheet Maintenance; standard Treeview path: System > User Extensions > Data Sheet Maintenance
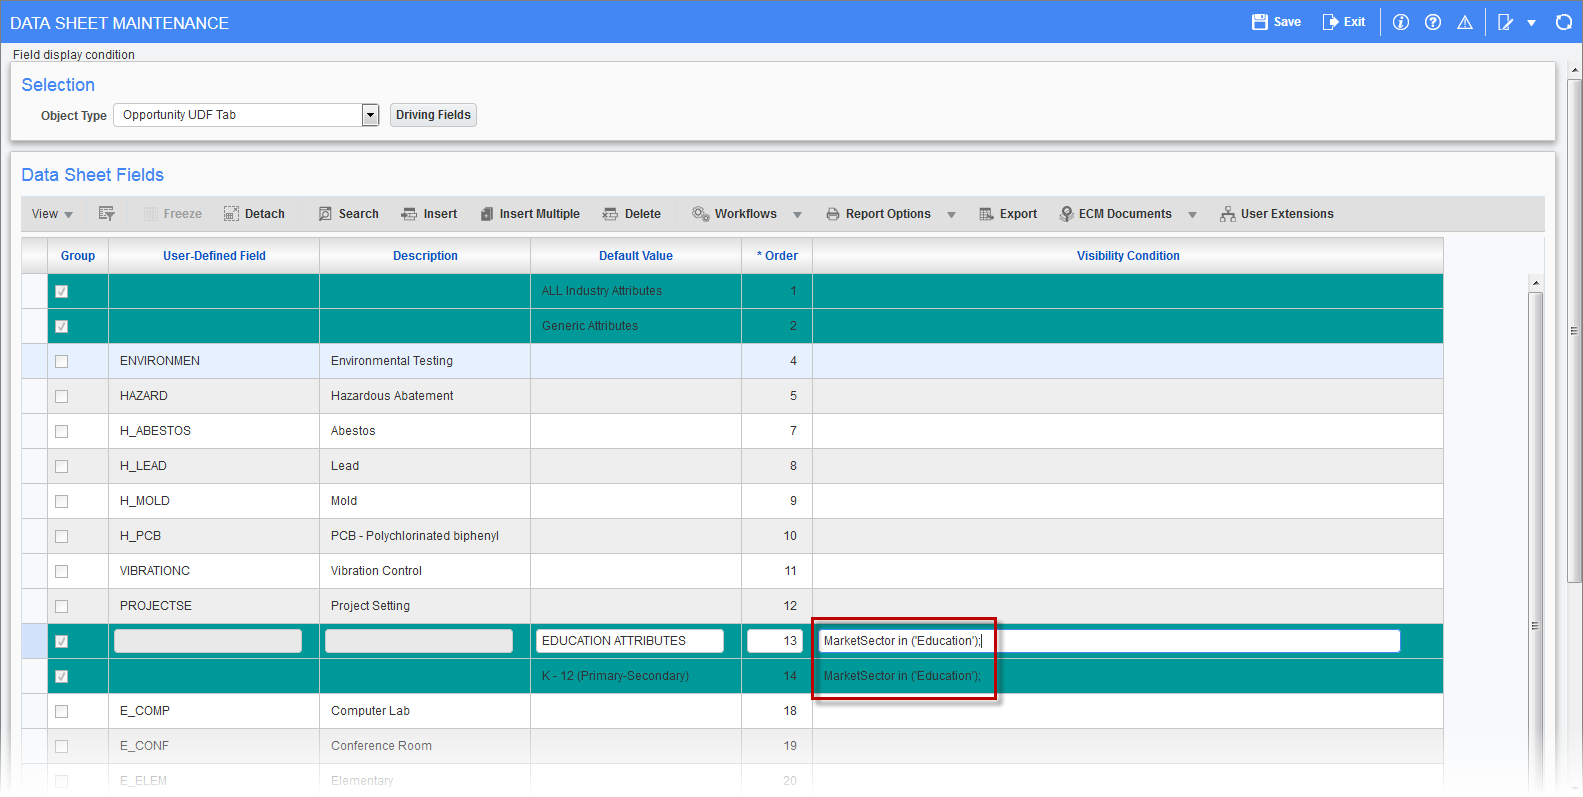
When all of the opportunity fields that are going to be used in a visibility condition are set up with an alias, their aliases can be used to create a visibility condition. Visibility conditions are added to a group or user defined field in the Visibility Condition field.
In this case, as shown above, the alias MarketSector is used to create a visibility condition for the “Education Attributes” group and its “K-12 (Primary-Secondary)” sub-group. Recall that the visibility condition of a group overrides the visibility condition of its fields, so if the visibility condition of a group evaluates to false, the group and all of its fields will not be visible in the data sheet. In this example, the alias is used to create visibility conditions that limit the visibility of the “Education Attributes” group, and the “K-12 (Primary-Secondary)” sub-group and its fields.
The visibility condition used for the two groups, “MarketSector in (‘Education’)”, states that the groups can only appear when the opportunity field specified by the MarketSector alias is set as “Educational”. The particular value to compare the alias against is found by looking at the list of values available for the field for which the alias was created. In this case, the alias was created for an opportunity’s Market Sector field. To see all of the particular values that can be compared against for this field, see the following step.
View Particular Values of Alias
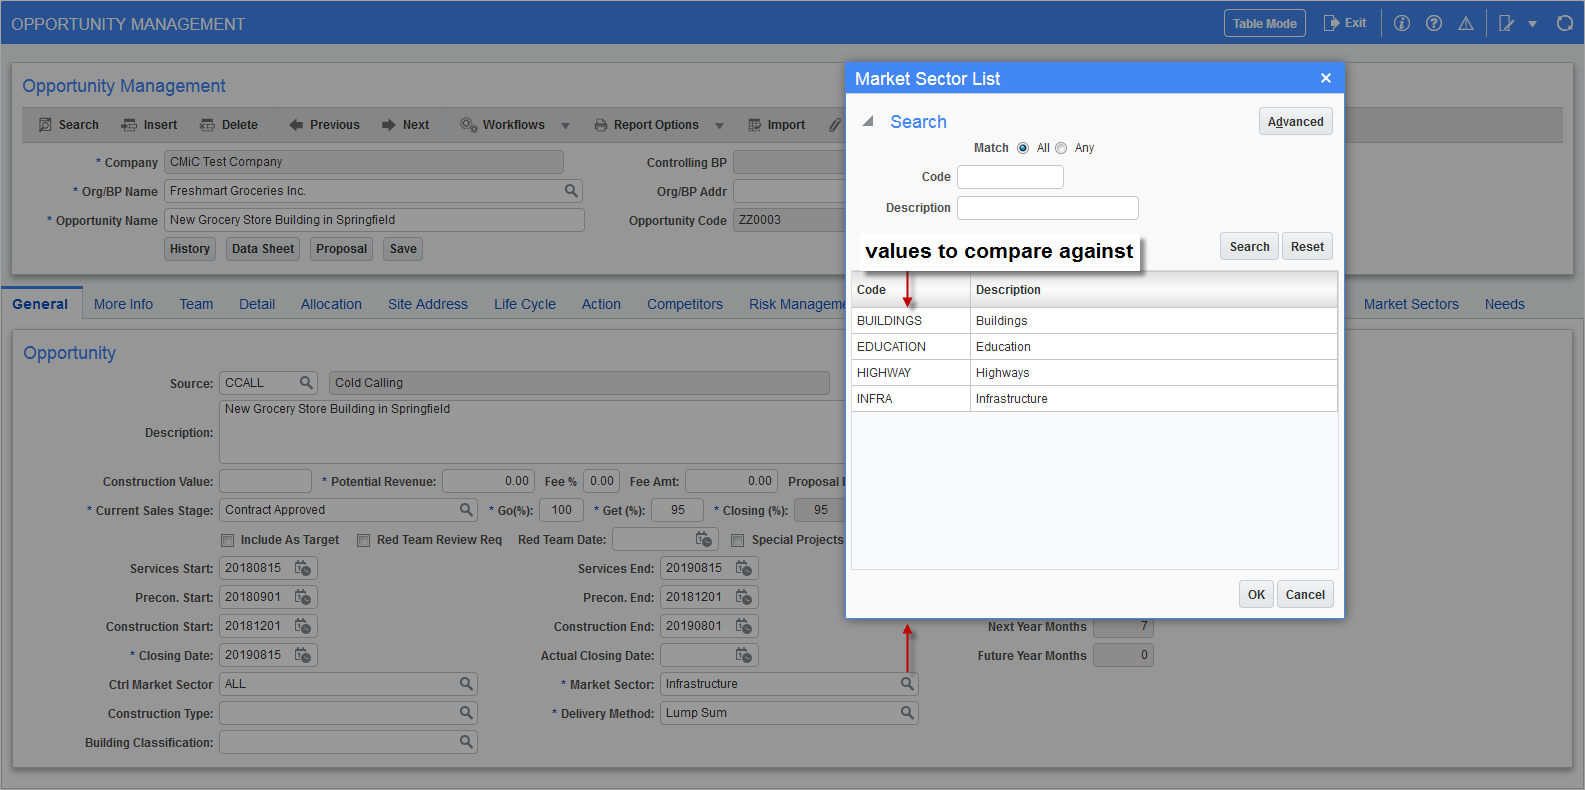
When creating a visibility condition, the values for which to compare the alias against must be known. If the alias was created for a field that uses a drop-down list, launch the Opportunity Management screen for any opportunity. Next, as shown above, click the arrow on the drop-down list to bring up the little window that lists all of the possible values for the list. The values under the Code field are used to compare against, in the visibility condition.
For the visibility condition “MarketSector in (‘Education’)”, the value the Market Sector field must be in order for the visibility condition to evaluate to true is “Education”.
Syntax of Visibility Conditions
Part 1: Simple Visibility Conditions & IN, NOT IN Conditions
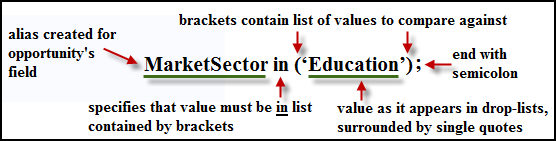
In regards to a visibility condition’s syntax, the alias appears first, as shown in the above image, followed by the IN condition. The IN condition specifies that the value of an opportunity’s field, represented by its alias, must be a value in the list contained by the brackets. In the above example, only one entry appears in the list. Each value in the list must be surrounded by single quotes. To complete the visibility condition, a semicolon is used.
To create a visibility condition that specifies that the condition can only evaluate to true if the alias’s value is not in the list contained by the brackets, use the condition NOT IN, as shown in the following example:
MarketSector NOT IN (‘Education’);
To list a series of values to compare the alias against, use a comma to separate the list of entries contained by the brackets, and recall that each entry must be surrounded by single quotes, as in the following example:
MarketSector IN (‘Education’, ‘Facilities’, ‘Infra’);
Part 2: Composite Visibility Conditions
A composite visibility condition is composed of two or more simple visibility conditions that are joined by conjunctions. The simple visibility conditions are connected using the conjunctions AND and OR, creating composite visibility conditions. The symbolization for these conjunctions are as follows:
|
Conjunction |
Symbolization |
|
AND |
&& |
|
OR |
|| |
The following is an example of a composite visibility condition, comprised of two simple conditions that are connected by the AND conjunction:
MarketSector IN (‘Education’, ‘Facilities’, ‘Infra’) && SalesStage NOT IN (‘Preliminary’);