Overview
This document describes how to import JSP user-defined fields from the OM-JSP module into the OM-ADF module.
The process consists of 2 parts:
1. Importing User-Defined Fields
After this process the imported user-defined fields will appear in the ADF program. No values will be imported at this stage.
2. Importing data (actual values)
UDF data (field values) will be imported into the ADF program.
The above processes are run using SQL scripts, which are located in the Environment folder:
\uig\utilities\PM_JSP_UDF_to_ADF_UDF
Example: D:\CM\V10X\<Environment>\uig\utilities\PM_JSP_UDF_to_ADF_UDF
Importing User Defined Fields
-
Run SQL PLUS and login as user UIG.
-
Run script clsf_to_udf.sql.
-
The script will require entering the parameter as described in Table 1 below.
-
Review the script output on the screen. The script output will also be available in clsf_to_udf.lst file for future reference.
Importing Data (UDF Values)
-
Run SQL PLUS and login as user UIG.
-
Run script clsf_to_udf_data_values.sql.
-
The script will require entering the parameter as described in Table 2 below.
-
Review the script output on the screen. The script output will also be available in clsf_to_udf_data_values.lst file for future reference.
Table 1 – Required Parameters for Importing UDFs
| Parameter | Description |
|---|---|
| Destination Program Name | ADF program name the UDFs should be imported to. Can be located using the About pop-up window in the ADF program. |
| Destination Block Name | Block (screen section) name in the ADF program UDFs should be imported to. Can be located using the About pop-up window in the ADF program. |
| Source User-Defined Fields Type Name | User-defined fields type name from the source PM JSP. Can be located using program user-defined fields from File Maintenance menu (Project Management application). |
| Enter Position Field Name | Field name in the destination ADF program that will be used as a reference to position new fields. This is required in order to place the new fields into a desired location on the screen. |
|
Enter Before/After Flag for Position Field |
Enter “A” (After) or “B” (Before) to place new fields After or Before the “Position field” entered above. |
Table 2 – Required Parameters for Importing Data into UDFs
| Parameter | Description |
|---|---|
| Destination Program Name | ADF program name the UDF data should be imported to. Can be located using the About pop-up window in the ADF program. |
| Destination Block Name | Block name in the ADF program UDF data should be imported to. Can be located using the About pop-up window in the ADF program. |
| Source User-Defined Fields Type Name | User-defined fields type name from the source PM JSP. Can be located using program user-defined fields from File Maintenance menu (Project Management application). |
IMPORTANT NOTE
CMiC recommends that this should be a one-time process. Once fields and values are imported into an ADF program, users have to use this ADF program only to maintain UDF data.
Below is what will happen if the user runs the above processes more than once:
| Process | Expected Results if run more than once |
|---|---|
| Importing User Defined Fields | If a user defined field already exists in a destination ADF program, it will be ignored. If a user defined field does not exist in a destination ADF program, it will be imported. |
| Importing data (actual values) |
New values are be imported, and existing values are updated. No values will be deleted: meaning if a JSP UDF value has been deleted since the last import, the corresponding ADF UDF value will not be deleted. |
Example of Importing OM Opportunity User-Defined Fields & Data
In this example, we import Opportunity user-defined fields from PM JSP to ADF program “Opportunities” in Opportunity Management. The fields will be imported to the General tab after the last field which is Building Classification.
The Opportunity Management screen before UDF import:
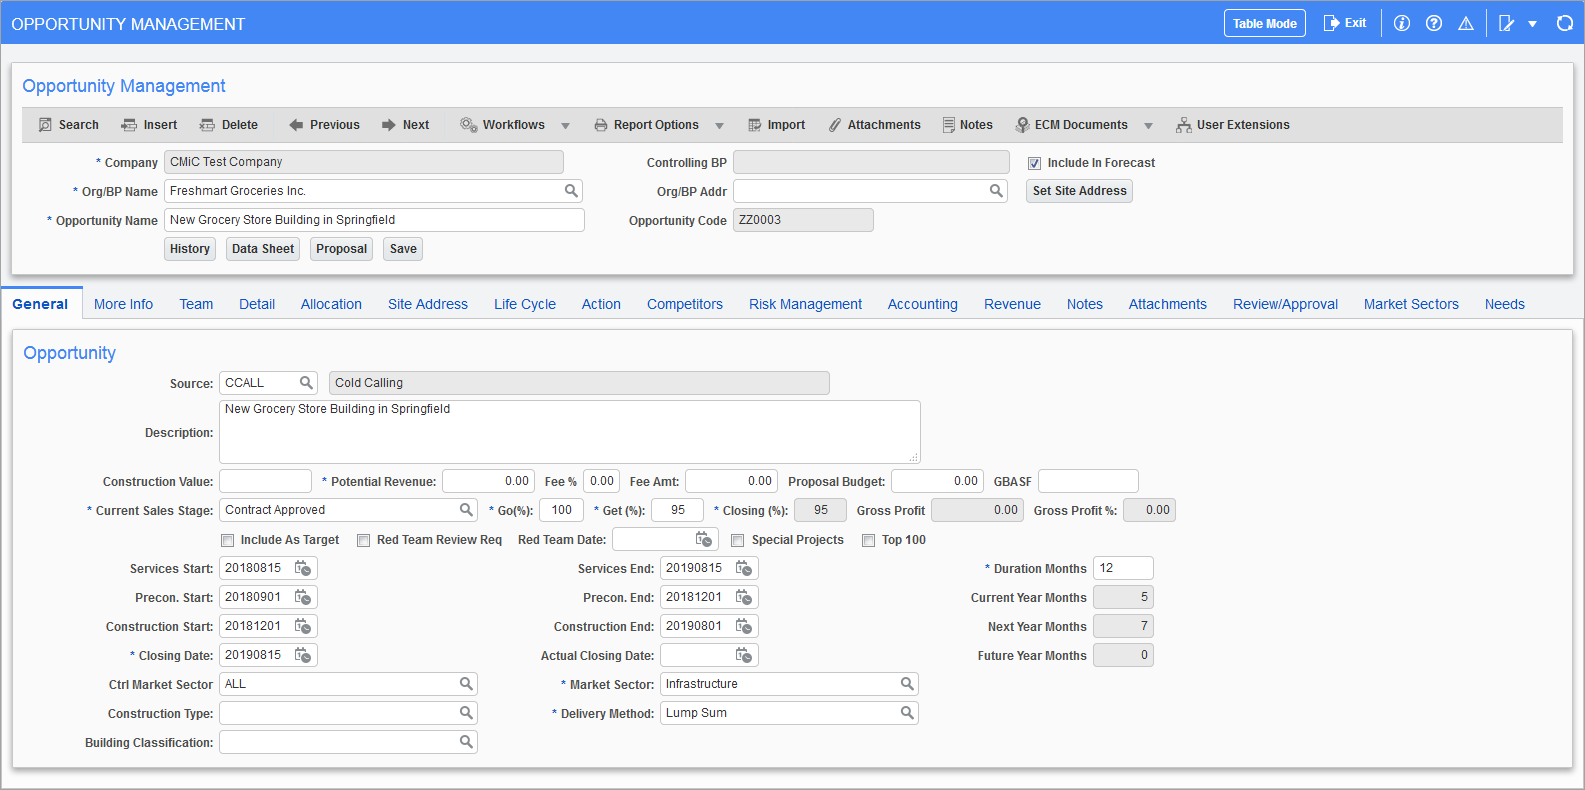
Pgm: OMOPPORTUNITIES – Opportunity Management; standard Treeview path: OM > Opportunities
Part 1: Import UDFs Using Script
1. Run SQL PLUS and login as UIG.

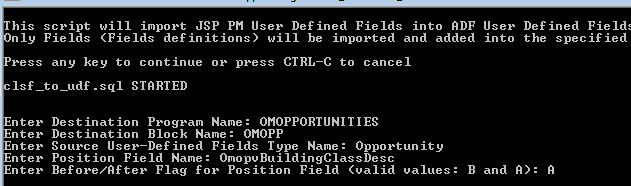
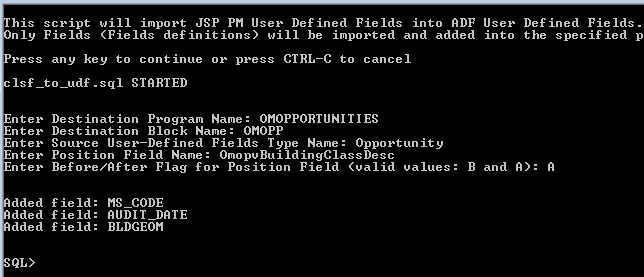
2. Run clsf_to_udf.sql script:

3. The script description will appear. Press any key to continue:

4. Enter required parameters (see below how to get the parameter values):
5. Listed 3 fields are imported:
Opportunity Management screen after fields import with imported UDFs:
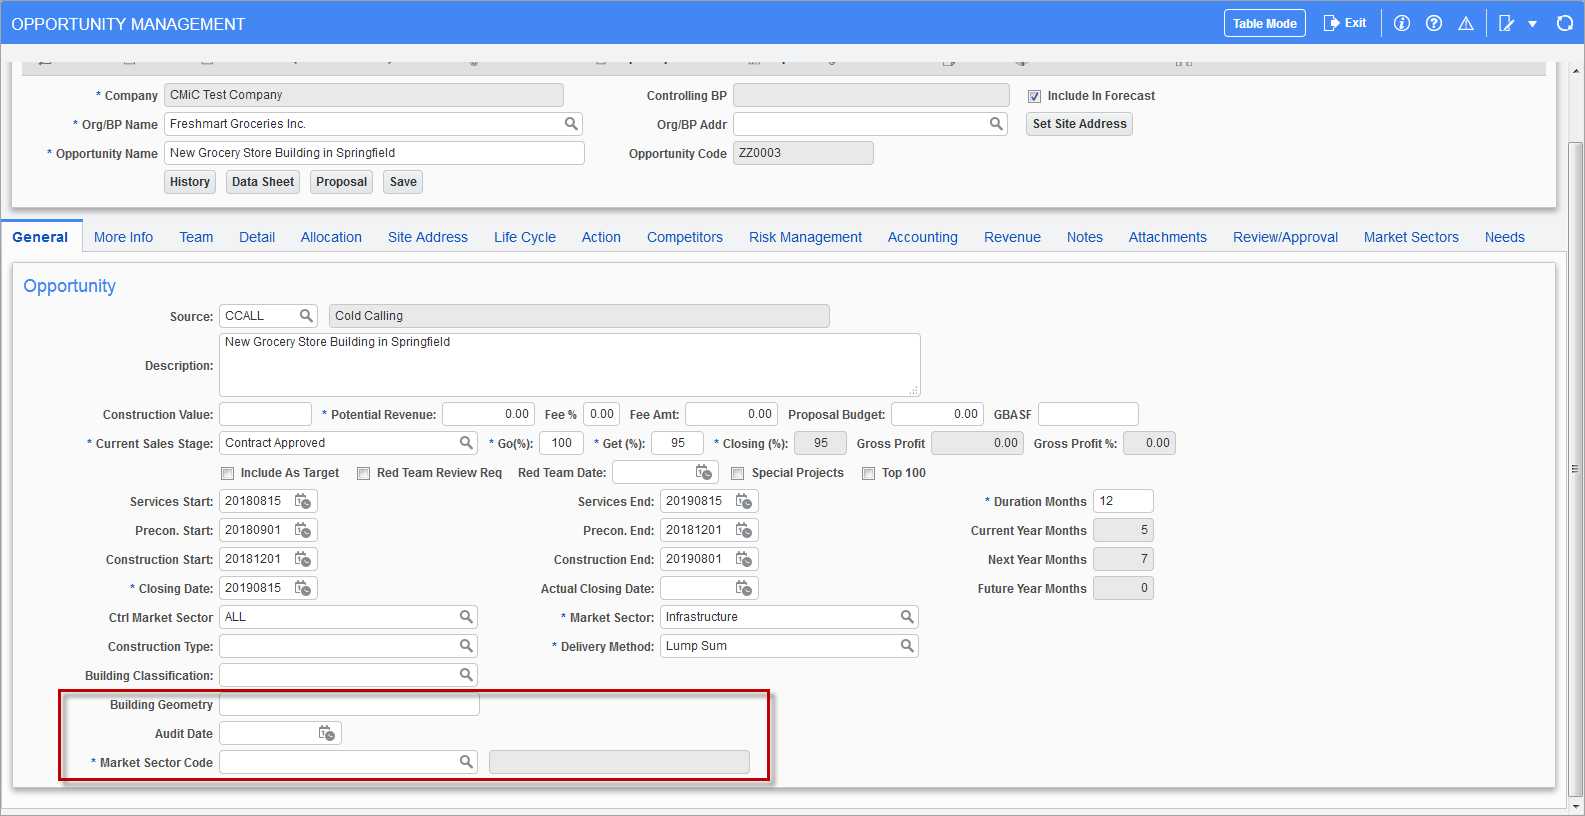
Pgm: OMOPPORTUNITIES – Opportunity Management; standard Treeview path: Opportunity Management > Opportunities
Part 2: Import Data
1. Run SQL PLUS and login as UIG.
2. Run clsf_to_udf_data_values.sql script:

3. The script description will appear. Press any key to continue:

4. Enter required parameters (see below how to get the parameter values). The data will be imported.
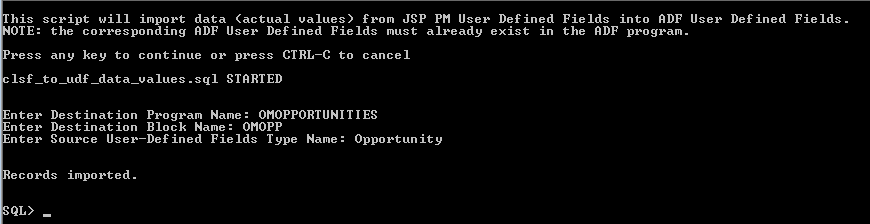
Opportunity Management screen with imported data:
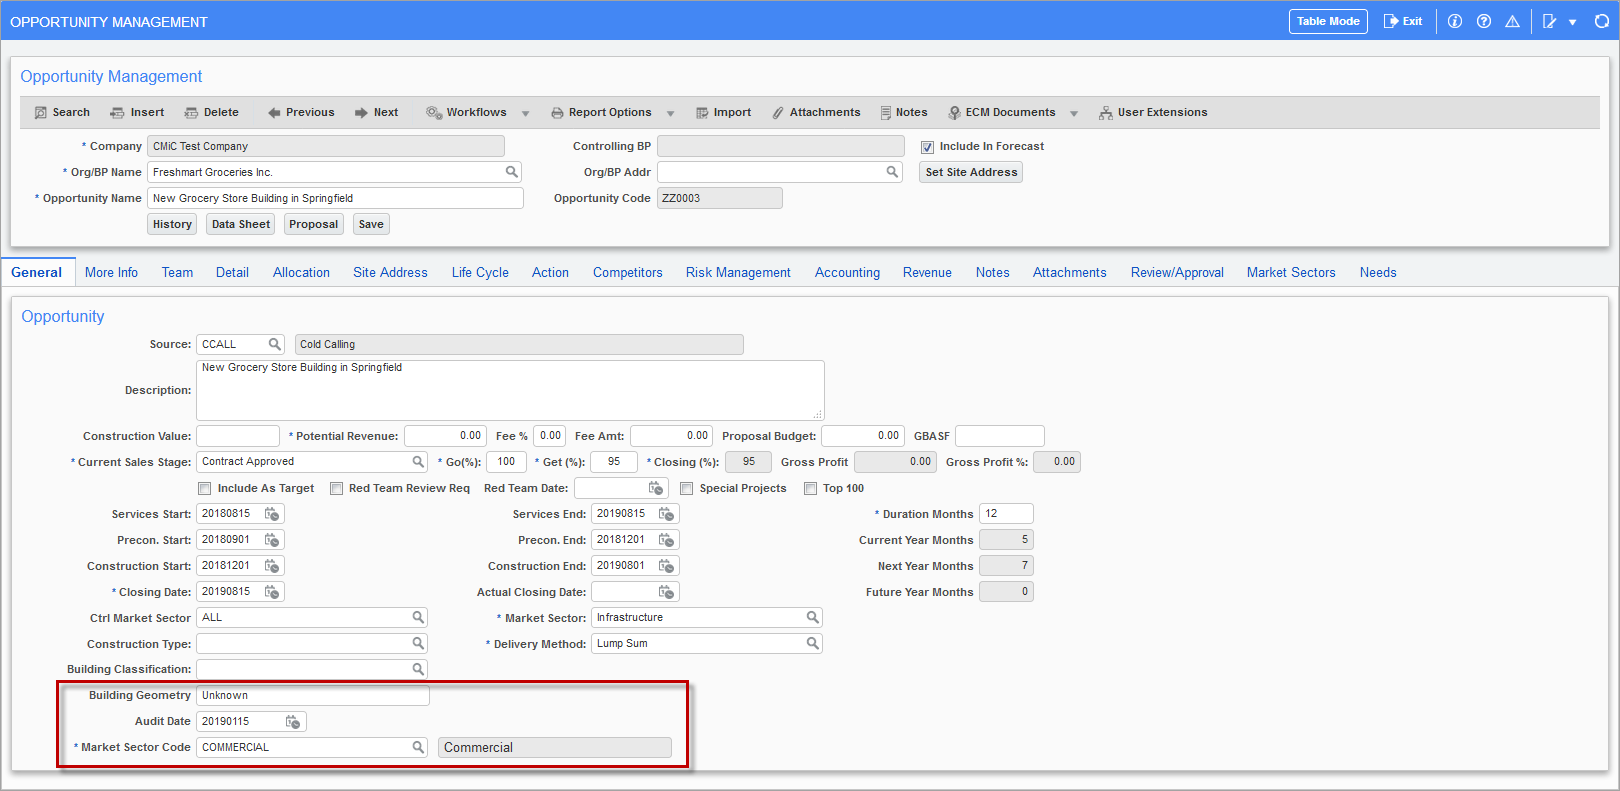
Pgm: OMOPPORTUNITIES – Opportunity Management; standard Treeview path: Opportunity Management > Opportunities
How to Get Parameters for Scripts
Part 1: Import UDFs Using Script
In order to get parameters Destination Program Name, Destination Block Name, Position Field Name for the example above, run the destination ADF program (Opportunity Management > Opportunities) and get the parameter values as described in the following screenshot:
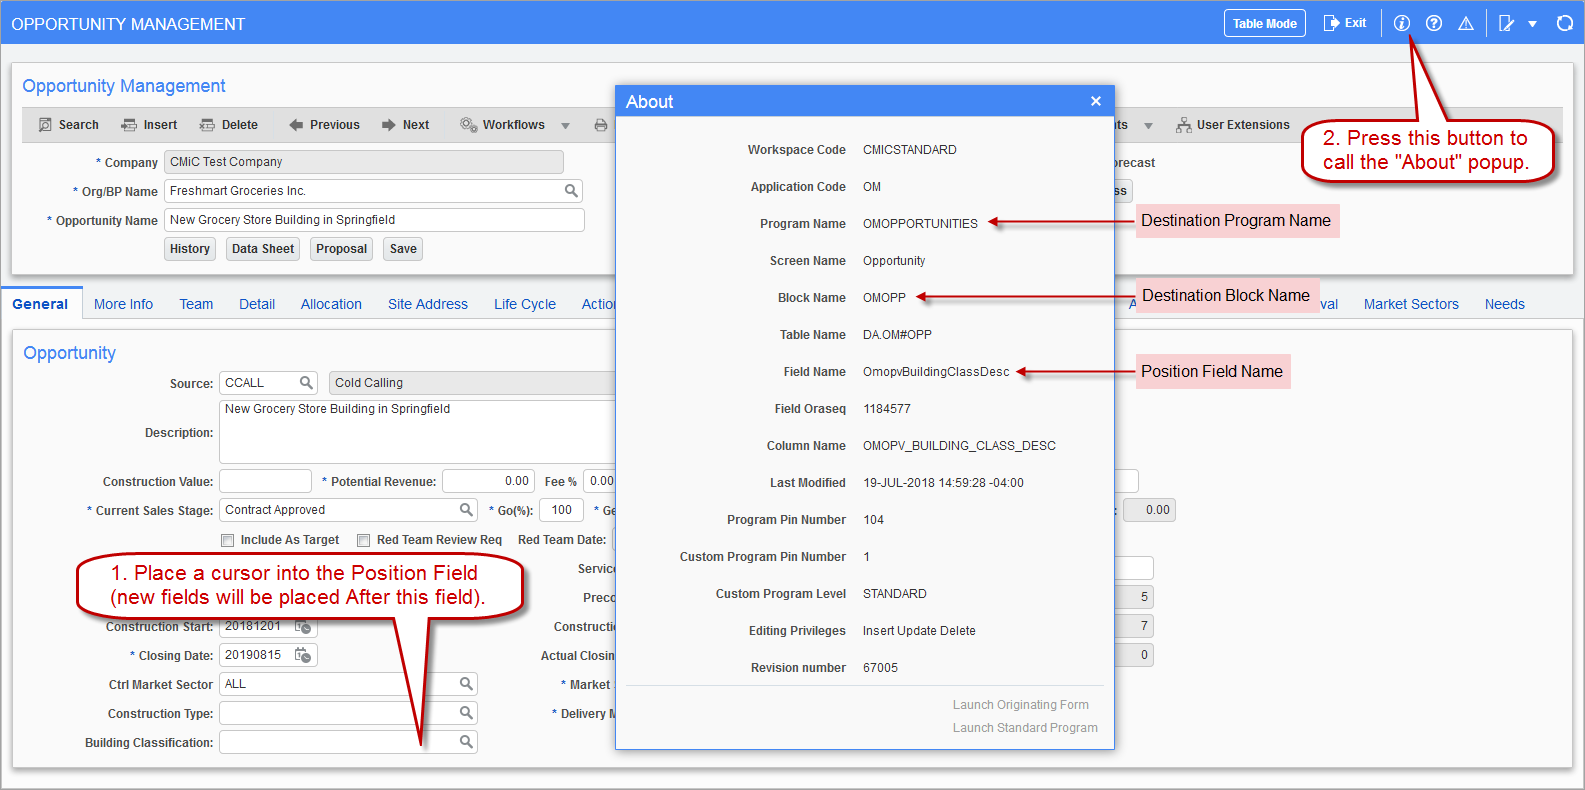
Pgm: OMOPPORTUNITIES – Opportunity Management; standard Treeview path: Opportunity Management > Opportunities
Part 2: Import Data
In order to get the value for parameter Source User-Defined Fields Type Name, open the User-Defined Fields screen from the Project Management > File Maintenance menu and copy a corresponding type name:
