Introduction
CMiC supports OAuth2 integration by delegating authentication to an external Identity Provider (IdP). After successful authentication, the IdP issues tokens, primarily the access_token, which CMiC expects to receive in order to validate the user’s identity and authorize access.
Token Details
-
access_token: In most IdPs, this is a JSON Web Token (JWT) used to authorize API calls.
-
id_token: A JWT that asserts the authenticated user’s identity (OpenID Connect).
-
Google-specific note: Google’s access_token is proprietary and intended for Google APIs. Use id_token (JWT) with CMiC.
How CMiC Uses Tokens
Include the token in the HTTP Authorization header using the Bearer scheme:
Authorization: Bearer <jwt token>User Identity Integration Considerations
When CMiC receives an OAuth token from the Identity Provider (IdP), it extracts the authenticated user’s identity, typically from the email/upn claim in the access_token (id_token for Google). This email format becomes critical for seamless integration because:
-
Username Matching: The username stored in CMiC should match the email address provided by the IdP. If they align, user authentication and session establishment occurs without additional mapping.
-
Mismatch Handling: If CMiC usernames differ from IdP email formats (e.g., CMiC uses short usernames while IdP provides full email addresses), integration will fail unless a logical translation is applied consistently across all users.
-
Custom Claim Approach: To resolve mismatches, configure the IdP to include a custom claim (e.g., cmicuser) in the token. This claim should carry the CMiC-compatible username derived from the IdP identity. CMiC can then use this claim during token validation to map the user correctly.
-
Best Practice: Define and enforce a clear identity mapping strategy during IdP application registration. If custom claims are used, document the transformation logic and ensure it applies uniformly across all users.
Supported Identity Providers
-
Microsoft Entra ID (formerly Azure AD)
-
Google (pass id_token, not access_token)
-
Okta
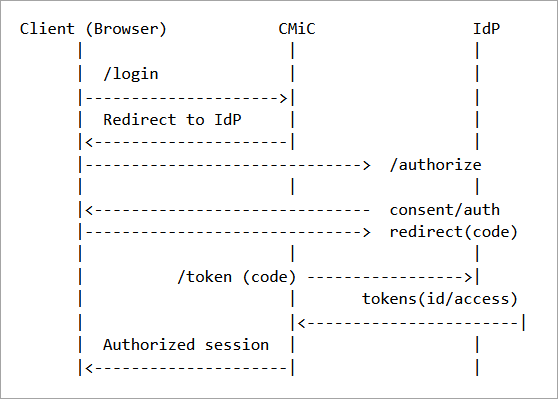
OAuth2/OpenID Connect Flow Overview
-
User initiates logging in from CMiC and is redirected to the IdP authorization endpoint.
-
User authenticates at the IdP (MFA/SSO as configured).
-
IdP redirects back to CMiC with an authorization code.
-
CMiC exchanges the authorization code for tokens at the IdP token endpoint.
-
CMiC validates the tokens (signature, issuer, audience, expiration) and establishes a session.
Sequence Diagram (simplified):
Token Validation Requirements
-
Signature verification: Validate JWT signature against IdP public keys (JWKs).
-
Claims checks: iss (issuer), aud (audience/client_id), exp (expiration), nbf (not before), iat (issued at).
-
Token lifetime & refresh: Honour exp and use refresh_token if supported by configuration.
Configuration – Microsoft Entra ID
-
Register a new application in Entra ID (App registrations).
-
Record the Application (client) ID and Directory (tenant) ID.
-
Set Redirect URIs for web flows (e.g. https://<cmic-host>/oauth/callback).
-
Expose APIs/Scopes as needed and assign user consent or admin consent.
-
Use endpoints:
-
Authorization: https://login.microsoftonline.com/<tenant>/oauth2/v2.0/authorize
-
Token: https://login.microsoftonline.com/<tenant>/oauth2/v2.0/token
-
OpenID config (JWKS): https://login.microsoftonline.com/<tenant>/v2.0/.well-known/openid-configuration
-
Configuration – Google
-
Create an OAuth 2.0 Client ID in Google Cloud Console.
-
Record the Client ID and Client Secret.
-
Configure Authorized redirect URIs (e.g. https://<cmic-host>/oauth/callback).
-
Use OpenID Connect scopes (openid, email, profile).
-
For CMiC, pass id_token (JWT) in the Authorization header. Do not use Google access_token.
Configuration – Okta
-
Create an OIDC application (Web) in Okta Admin.
-
Record Client ID and Client Secret. Keep note of your Okta domain (e.g. https://dev-xxxx.okta.com).
-
Configure Login redirect URI (e.g. https://<cmic-host>/oauth/callback).
-
Scopes: openid, profile, email. Add custom scopes if exposing APIs.
-
Endpoints:
-
Authorization: https://<okta-domain>/oauth2/default/v1/authorize
-
Token: https://<okta-domain>/oauth2/default/v1/token
-
OpenID config (JWKS): https://<okta-domain>/oauth2/default/.well-known/openid-configuration
-
Request Examples
The following is an HTTP header example:
Authorization: Bearer eyJhbGciOiJSUzI1NiIsInR5cCI6IkpXVCJ9...
Error Handling & Troubleshooting
-
401 Unauthorized: Token missing/invalid/expired
-
Verify header format and token validity.
-
-
403 Forbidden: Authenticated but not authorized
-
Check API Security in CMiC.
-
-
jwks fetch/validation failures
-
Ensure that the value in the CMiC app registration is correct and it is possible it can reach IdP well-known.
-
-
Clock skew
-
Align CMiC server time (NTP) to avoid iat/nbf/exp issues.
-
Security Best Practices
-
Prefer Authorization Code Flow with PKCE for browser-based clients.
-
Rotate client secrets and use certificates where possible.
-
Limit token lifetimes. Use refresh tokens judiciously.
-
Validate audiences and issuers. Restrict accepted IdPs in CMiC configuration.
-
Use TLS across all endpoints. Never log sensitive token contents.
Glossary
-
OAuth2: Authorization framework for delegated access.
-
OpenID Connect (OIDC): Identity layer on top of OAuth2 providing id_token.
-
JWT: Compact, signed token format carrying claims.
-
JWK/JWKS: JSON Web Key (Set) published by IdP for signature validation.
Disclaimer
These integrations are based on CMiC testing; behavior may vary with specific IdP configurations.