Pgm: MS_TICKET_ENTRY – Ticket Entry; standard Treeview path: Material Sales > Ticket > Enter/Edit
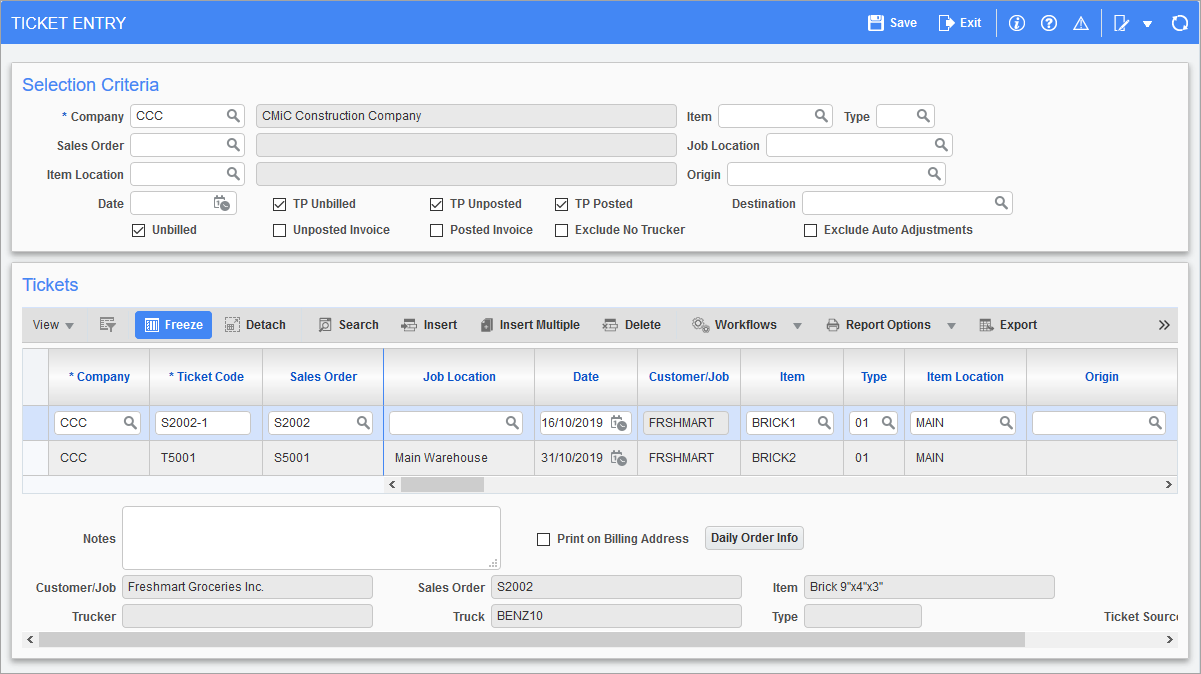
The Selection Criteria section shows the company, sales order, item, item type, item location, date, origin, and destination. The unbilled, unposted, and posted checkboxes display unbilled and posted tickets in the Tickets section. Unbilled tickets are tickets that have not yet been billed. Unposted tickets are tickets that have been billed but are not yet posted. Posted tickets are tickets that have been billed and posted. The screen automatically adjusts depending on the parameters entered in the Selection Criteria section.
Tickets
Ticket Code
Enter the ticket number.
Sales Order
Enter the sales order associated to the ticket.
Date
Enter the date of the ticket. This should be on or after the start date of the item to be selected.
Customer/Job
The customer or job will be displayed depending on the type of sales order: external or internal sales order.
Item
Select the item from the LOV. The items default from the sales order and may be inventory items or non-stock items.
Type
Type refers to an inventory item. Entering a type will limit the ticket entry to the inventory item and type. Select the item type from the LOV. For an AR non-stock item or PO non-stock item, tab past the type field and an asterisk will be displayed indicating that it is a non-stock item.
Item Location
Select the item location from the LOV.
Origin
Enter the origin.
Ticket Type
Enter the ticket type.
From Zone Code, To Zone Code
Enter the range of zone codes.
Total AC %
Enter the override AC percentage.
Max. Protection %, Min. Protection %
Enter the maximum and minimum protection percentage.
Quantity
Enter the quantity of the item being delivered.
WM
The WM code for the item is displayed. It defaults from the WM code on the sales order.
Price
Enter the price of the item. The price defaults from the customer’s price list and the search order specified for that customer. Changing the unit price in the Tickets section requires privileged access.
Amount
The amount is calculated based on the price and quantity of the item.
Tax 1, Tax 2, Tax 3
Enter the tax codes.
Trucker
Select the trucker from the LOV. This may be an employee or sub-hauler.
This column will not be available if the control setting for the ‘Trucker Payroll Not Required’ checkbox is checked.
Truck/Trailer
Select the truck from the LOV.
This column will not be available if the control setting for the ‘Trucker Payroll Not Required’ checkbox is checked.
Regular Hours
Enter the number of hours that the trucker has worked.
This column will not be available if the control setting for the ‘Trucker Payroll Not Required’ checkbox is checked.
OT Hours
Enter the trucker overtime hours.
DOT Hours
Enter the trucker double overtime hours.
Trucker Pay Rate
Enter the hourly pay rate for the trucker. The pay rate is for external truckers or sub-haulers only. The pay rate will use the WM code of the product. Internal trucker pay rate will calculate number of hours × payroll rate and should not be entered here.
This column will not be available if the control setting for the Trucker Payroll Not Required checkbox is checked.
Min. Pay Qty
Enter the minimum trucker pay quantity.
Min Pay Amt
Enter the minimum trucker pay.
Trucker Pay
The calculated trucker pay is displayed here and is calculated as follows:
-
Sub-Hauler: Trucker Pay = Qty × Pay Rate
-
Employee: Trucker Pay = (Regular Hours + OT Hours + DOT Hours ) × Pay Rate
-
Broker: Trucker Pay = Qty × Pay Rate
This column will not be available if the control setting for the 'Trucker Payroll Not Required' checkbox is checked.
Surcharge %
Enter the trucker pay surcharge percentage.
Surcharge Rate
Enter the trucker pay surcharge per WM.
Lump Sum Amt
Enter the lump sum amount for the trucker pay surcharge.
Pay Surcharge
Enter the surcharge on the trucker pay.
Service Charge – Checkbox
If this box is checked, the Material Sales service charge is applied.
Delivery Charges
Enter the delivery charges per WM.
Min Charges Qty
Enter the minimum quantity required for delivery.
Min Charges Amt
Enter the minimum amount/charge required for delivery.
Delivery Charges
Enter the delivery charges.
Tax 1, Tax 2, Tax 3
Enter the tax codes for the delivery charge.
Surcharge %
Enter the delivery surcharge percentage.
Surcharge Rate
Enter the delivery surcharge rate per WM.
Lump Sum Amt
Enter the delivery surcharge lump sum amount.
Delivery Surcharge
Enter the surcharge on delivery charges.
Tax 1, Tax 2, Tax 3
Enter the tax codes for the delivery surcharge.
Trucker Invoice, Billing Invoice
For an unbilled ticket these fields are left blank. If the ticket was billed, the invoice numbers would be displayed in these fields.
Batch #
This displays the batch number that this ticket belongs to.
Post – Checkbox
This checkbox is checked if the invoice is posted. The checkbox cannot be overwritten. The post checkbox indicates the posted or unposted invoice status for the ticket.
Cash On Delivery – Checkbox
Check this box if this is a cash ticket.
Classifier 1, 2, 3, 4, 5, 6
Enter classifier codes or leave blank.
Notes
Enter notes for the selected ticket.
Print on Billing Address – Checkbox
If this box is checked, the notes will be printed on the AR billing invoice.
[Daily Order Info] – Button
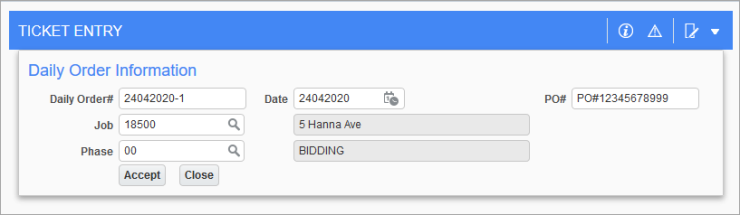
This button opens the Daily Order Info pop-up window to maintain free form information associated with a Material Sales ticket. The daily order entered here can be used when creating a Material Sales internal ticket receipt to select data related to a specific daily order number.
These values are available in Accounts Receivable and Accounts Payable ticket adjustments to filter/query data for updates.
The following describes the fields available in the Daily Order Info pop-up window:
Daily Order#
Enter the daily order number.
Date
Enter the date of the order.
PO#
Enter the purchase order number.
Job Code
Enter a valid job code or select a value from the list.
Phase Code
Enter a valid phase code or select a value from the list.
Click [Accept] to save the changes and click [Close] to close the pop-up screen.
NOTE: The following fields are hidden by default in the Ticket Entry screen and can be added using the Lite Editor: Foreman, PO Line, Sold As Item, Sold As Item Class, Sold As Item Location, and Sold as Item Type. These fields are used to support third-party software and are not mandatory to create a ticket.
Foreman
Enter the foreman's name. This field is hidden by default and can be added using the Lite Editor.
PO Line
This field is read-only and is populated from third-party integrated software. This field is hidden by default and can be added using the Lite Editor.
Sold As Item
Enter/select a sold as item. The system will use the price from the sold as item to adjust the main item's price in the Price field. The Sold As Item field is hidden by default and can be added using the Lite Editor.
Sold As Item Class
Enter/select a class if the sold as item is an inventory item. This field is hidden by default and can be added using the Lite Editor.
Sold As Item Location
If data is entered in the Sold As Item field, enter/select a sold as item location. This field is hidden by default and can be added using the Lite Editor.
Sold As Item Type
If data is entered in the Sold As Item field, enter/select a sold as item type. This field is hidden by default and can be added using the Lite Editor.