MIP based form letters (MIP Word documents) use templates that are Microsoft Word (DOCX format) documents to specify the static text and dynamic data to be outputted. Word templates for MIP Word documents are created by specifying replacement fields as form fields in the template, which the system replaces with data from the database when the MIP Word document is generated.
The output of a MIP Word document is also a Word document, which means it can be easily edited or touched up using all of the functionality of Microsoft Word.
The following outlines the steps required to create and print MIP Word documents:
-
Register data source(s) to use in the MIP Word document (if necessary).
-
Create a new document type for the MIP Word document (if necessary).
-
Create MIP Word document definition.
-
Print document merge field list.
-
Create MIP Word template to generate MIP Word document.
-
Upload MIP Word template for MIP Document definition.
-
Print MIP Word document.
Step 1: Register Data Source to use in MIP Word® Document
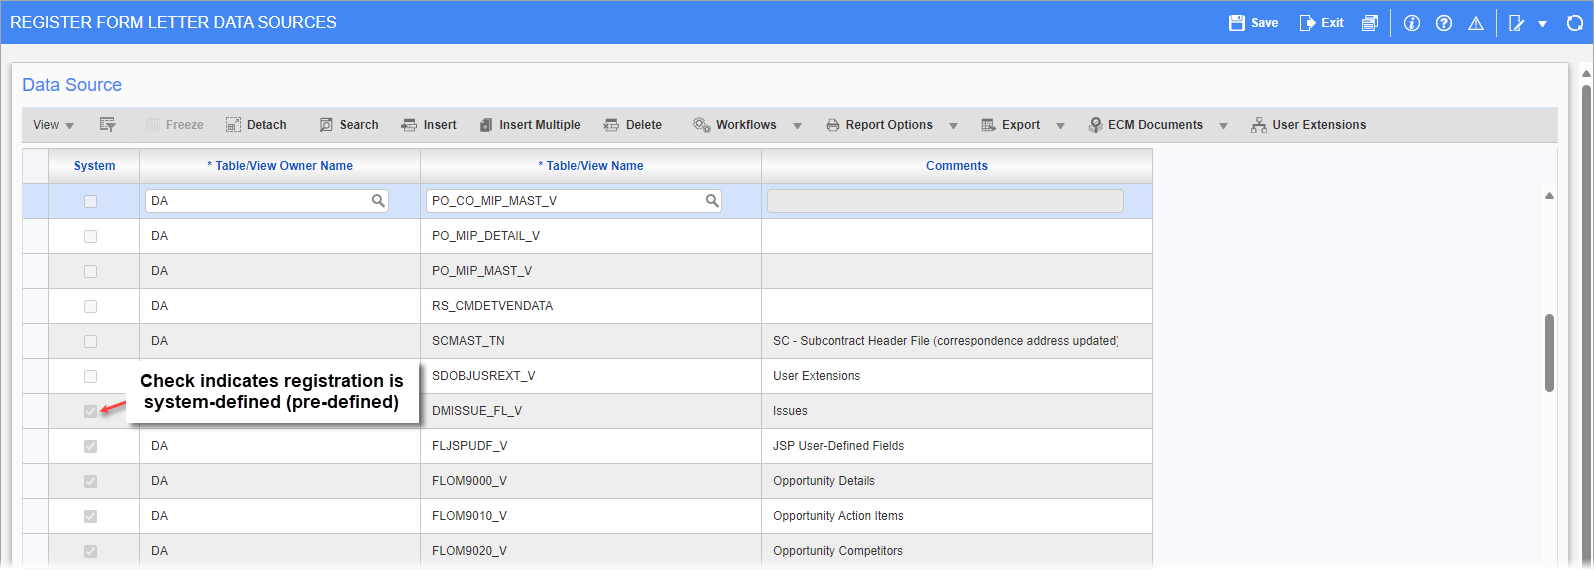
Pgm: SYSDREG - Register Form Letter Data Sources; standard Treeview path: System > Forms > Register Data Sources
If a data source is needed to be used in a MIP Word document that has not yet been registered in the system, use the Register Data Sources screen to do so. By default, when the system is initially installed, only the data sources that are used by standard CMiC form letters are registered.
Data sources are Enterprise tables or views that an administrator has made available through this registration process for the purpose of designing MIP Word documents, or forms letters.
As shown in the above screenshot, a checkmark under the System column indicates that the registered data source is system-defined (pre-defined). Registered data sources that are system-defined are not editable, as that could cause any standard form letters that use them to stop functioning.
A new data source is registered by inserting a row in the table. Enter/select the owner of the data source in the Table/View Owner Name column, and then enter/select the relevant table or view from the Table/View Name column. Next, click the [Show Columns] button to ensure that all necessary columns of the data source’s table or view are available for MIP Word documents. See the following section for details.
[Show Columns] – Button
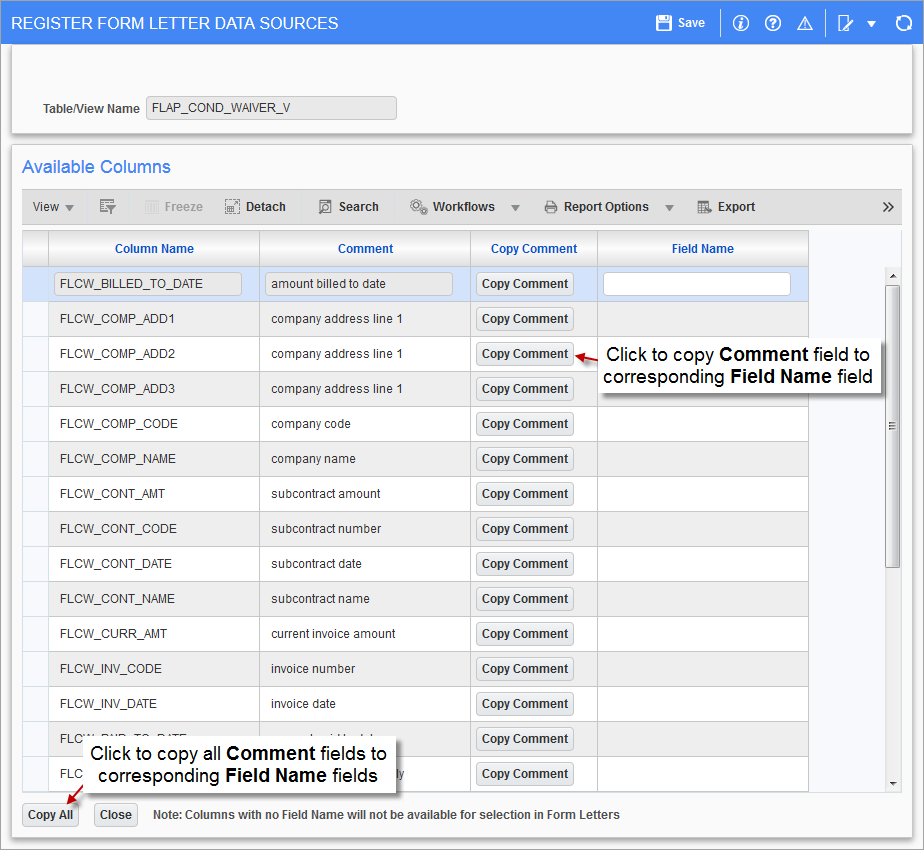
Once the table or view has been selected, the [Show Columns] button can be clicked to view the names of the table’s or view’s columns. The Field Name field for a column must be entered in order to make the column available during the creation of MIP Word documents (or form letters). As shown in the above screenshot, the [Copy Comment] button can be used to copy a Comment field to the corresponding Field Name field, and the [Copy All] button can be used to copy all Comment fields to the corresponding Field Name fields.
Step 2: Create New Document Type for MIP Word® Document
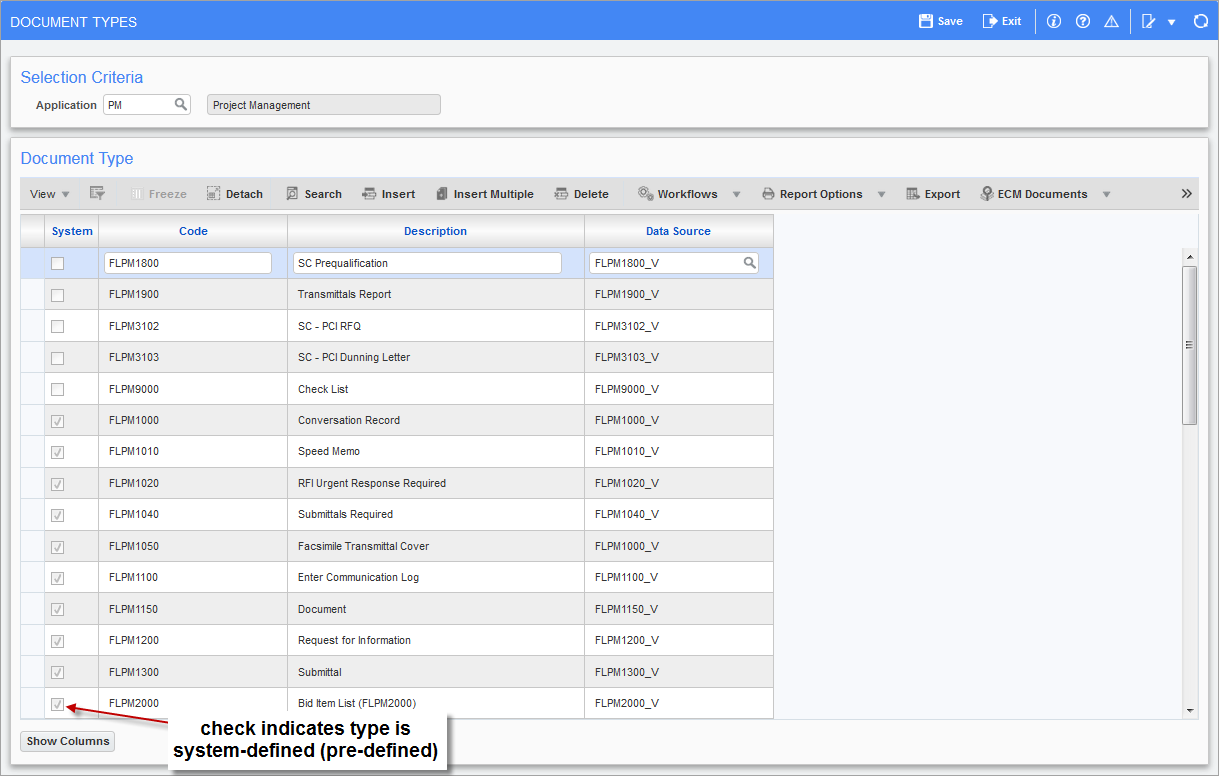
Pgm: SYSDOCTP – Form Letter Document Types; standard Treeview path: System > Forms > Form Letter Document Types
Document types (also known as form letter types) are associated to a data source, and they are used to create and group MIP Word documents and PM form letters. This step is only necessary if an appropriate document type for a new MIP Word document has not yet been defined in the system. As shown in the above screenshot, system defined document types have a check in the System column.
To create a new document type, click the Block Toolbar’s [Insert] button to insert a new row. Then, enter a code and description for the new document type, and select a data source using the Data Source field’s LOV.
[Show Columns] – Button
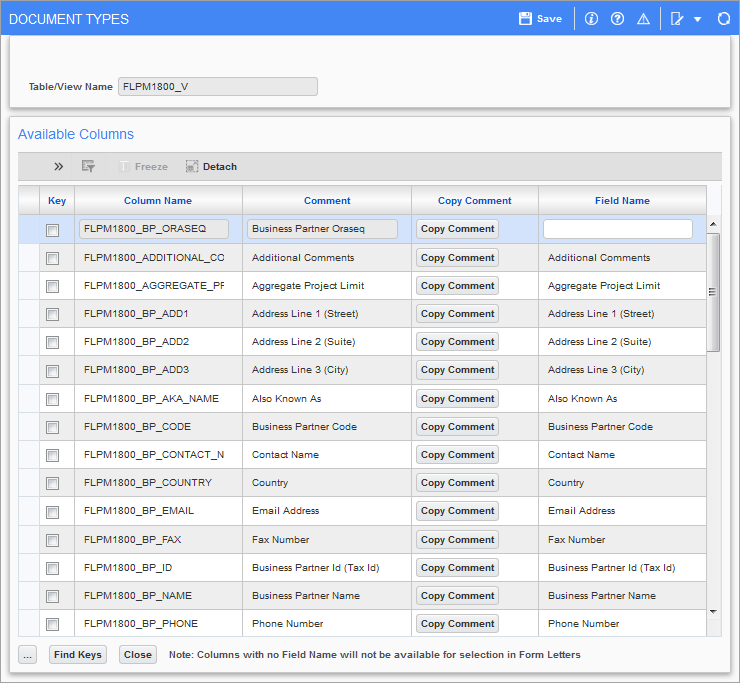
The [Show Columns] button on the Form Letter Document Types screen shows the columns of the data source specified for the document type.
The ‘Key’ checkbox is used to indicate which columns can be used to link rows from one data source to another (e.g. link a project record to its corresponding opportunity record in order to display information from both).
The following table provides details about the buttons on this pop-up window:
|
Button |
Description |
|---|---|
|
|
Replaces the value in the Field Name field with the value from the Comment field. |
|
|
Used to replace all the values of the Field Name fields with the values from the Comment fields. |
|
|
Provides a list of all primary and unique keys for the data source’s table or view. However, it should be noted, primary or unique keys cannot be identified for all views. Keys are used to link rows (records) from one data source to another. |


Step 3: Create MIP Word® Document Definition
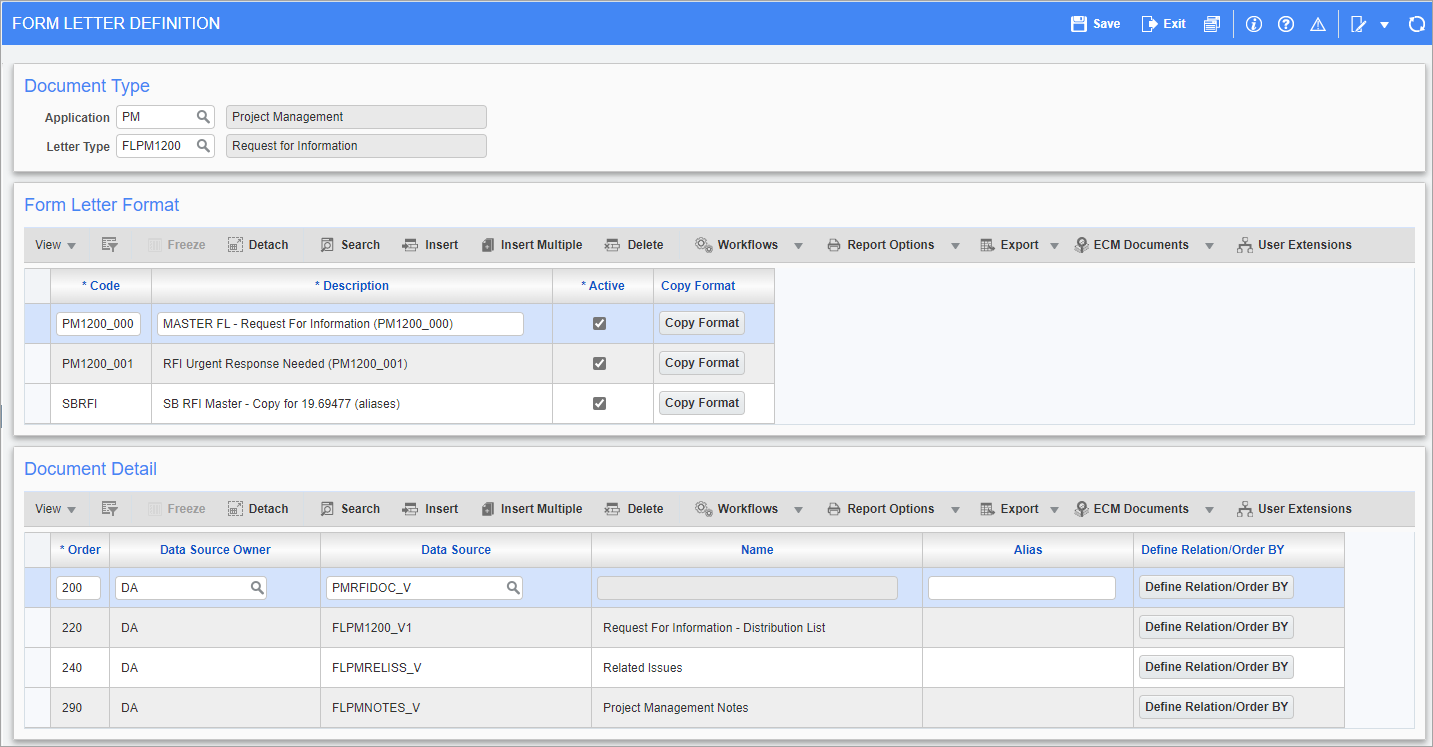
Pgm: SYSRPDOC – Form Letter Definition; standard Treeview path: System > Forms > Form Letter Definitions
The next step in creating a MIP Word document is to use the Form Letter Definition screen to define the MIP document in the system.
Document Type
This section is used to select the Enterprise module in which the new MIP Word document will be available, using the Application field, and the document type (aka form letter type) of the new MIP document using the Letter Type field. Recall, the primary data source for the MIP document is specified by the document type of the MIP document.
Form Letter Format
This section is used to enter the name and code for the MIP Word document in the system, and to indicate if the MIP document is active.
Rename MIP Document
This screen is also used to change a MIP document definition’s Description field, which is used to identify its associated MIP Word document from a list (see following screenshot of the Select Report pop-up window), when going to print it.
NOTE: For Enterprise users, definitions are shared by all companies, so this must be kept in mind when coming up with formats for the identifying Description field. For CMiC Cloud users, each tenant gets their own definitions, so changes to them will not affect other tenants.
Make MIP Document Available for Printing
To make the MIP document available for printing, the ‘Active’ checkbox must be checked. If it is active, it will be available through the pop-up window used to select the MIP document to print, as shown below.

To select a report or form letter to print, the description entered in the Description field on the Form Letter Definition screen also serves as the name of the MIP Word document, and its name will be pink and have the prefix “WORD:” to indicate that its generated output is a Microsoft Word document.
[Copy Format] – Button (Create Variants of Existing MIP Word Document Definitions)
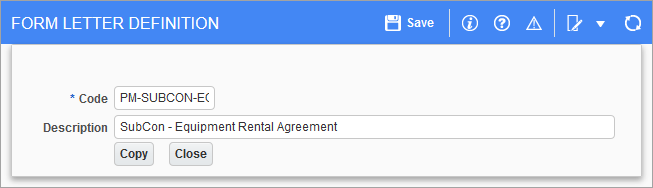
The [Copy Format] button of this section can be used to create a copy of an existing MIP document definition, such as that for a standard, system MIP word document.
NOTE: For Enterprise users, definitions are shared by all companies, so this must be kept in mind when coming up with formats for the identifying Description field. For CMiC Cloud users, each tenant gets their own definitions, so changes to them will not affect other tenants.
The pop-up window launched by this button, shown above, is used to enter a code and description for the new MIP document definition. The new MIP document definition will have the following copied:
-
Document type, which is associated to a particular data source.
-
Any joined data sources, joined through the Document Detail section (relations between primary data source and additional data sources are specified).
Document Detail
If required, this section is used to specify additional data sources, and to specify which columns to use, as keys, in matching and linking a row (record) from the primary data source to a corresponding row in an additional data sources (e.g. link a project record to its corresponding opportunity record in order to display information from both).
To specify an additional data source, click [Insert] on this section’s Block Toolbar, then using the new row, enter the order and select the data source. Use the Data Source Owner field to specify if the data resides in the DA or CMIC_REPORT_VIEWS schemas and, if desired, use the Alias field to enter a substitution reference name for the original registered data source. Then click [Define Relation/Order By] to define the relation (link) between the primary data source and this additional data source.
[Define Relation/Order By] – Button
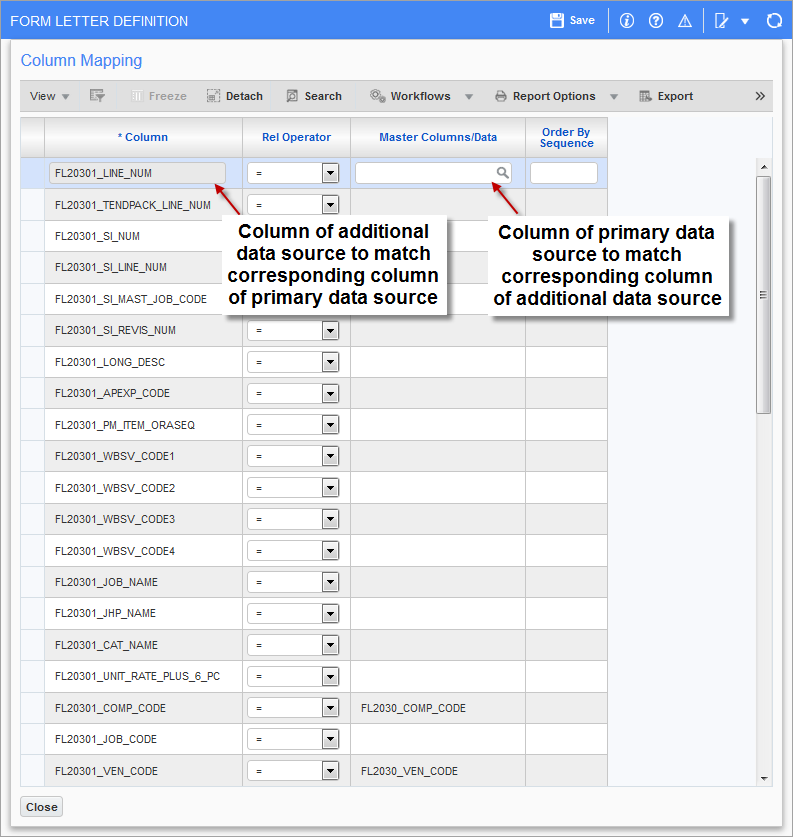
This launched screen is used to specify which columns to use in matching and linking a row (record) from the primary data source to a corresponding row in an additional data source. For instance, it can be used to link a project record to its corresponding opportunity record in order to display information from both.
The following provides details about the columns in this screen’s table:
|
Column |
Description |
|---|---|
|
Column |
Columns of additional data source. |
|
Rel Operator |
Relational Operator: operator used in matching column values (exact matches, partial matches, etc.). |
|
Master Columns/Data |
Columns of primary data source. |
|
Order By Sequence |
Sets the order in which the comparisons are made in matching a row (record) from one data source to another. |
Step 4: Print Document Merge Field List

Create Fields For Use In Document Merge; standard Treeview path: Project Management > File Maintenance > Document Merge > Document Merge Field List
Through the Document Merge Field List screen, shown above, the columns of the primary and any additional data sources specified for the MIP document, specified during the previous steps, are printed as replacement fields (printout shown below).
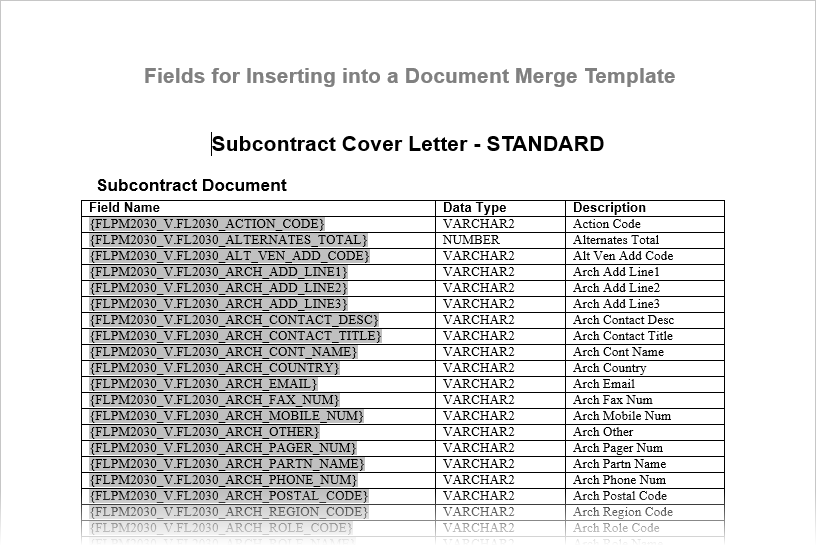
Replacement fields are identifiers for columns in a data source’s table or view, surrounded by the “{ }” brackets (shown under Field Name column of table in the above screenshot). When creating the template for the MIP document, they can be cut and pasted from the printout into the template, and when the MIP document is generated, the replacement fields will be replaced with the specified column’s value.
To print the fields for the data sources used by the MIP document, select the name of the MIP document defined in the previous step using the Report Type field, then click [Create].
Step 5: Create MIP Word® Template to Generate MIP Word® Document
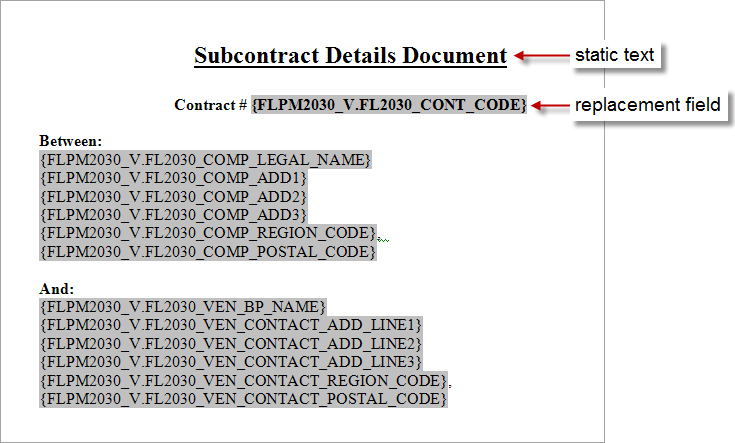
Sample of Word based MIP template, composed of static text and replacement fields.
To create a MIP template, either use Microsoft Word to create a new template from scratch or create a copy of an existing template in order to use Word to create a variant of it.
As shown in the above screenshot, a template is composed of static text and replacement fields, however, it can also be composed of tables, pictures or any other objects in Word. To create a template, simply include any necessary text or object (table, picture, etc.) and format it in any way allowable by Word. Also, copy and paste any necessary replacement fields from the Merge Field List document, printed in the previous step, to an appropriate position in the template. When the MIP document is generated using the template, the replacement fields will be replaced by the values of the specified data source’s columns. When the template is finished, save it using the DOCX format.
Additional special fields may optionally follow a replacement field (MIP field) and are treated as modifiers for the replacement operation.
NOTE: These modifiers must be added just after a replacement field, as per the following example:
{REPLACEMENT_FIELD} {Currency} ¬ replacement field modifier
If a modifier is being used, the replacement field needs to be copied from the Mergefield list so MS Word can treat it as a separate field (grey box/field). If the replacement field and the modifier was copied from Notepad directly, MS Word will treat both the replacement field and the modifier as one field and will not apply the modifier to the replacement field.
The following provides details about the available replacement field modifiers.
|
Modifier |
Description |
|---|---|
|
{NumToText} |
Convert the numeric value to words. |
|
{Currency} |
Format the numeric value as currency. |
|
{Number} |
Format the numeric value with commas and a decimal point (new) |
|
{Percent} |
Multiply by 100 and append a percent sign. |
| {Date} |
Modify the date formats. It is also a conditional modifier that can be appended next to the field to have it print to the date format set under your username for the Date Report Format field found in the User Preferences screen of the System Data module. NOTE: When using a UDF on a PM object with a date data type, the date display format set in the Classifiers screen of the System Data module for a selected PM object takes precedence over the date display format set in the User Preferences screen of the System Data module. For more information, see System Data - Classifiers. |
NOTE: Only a single level of detail will be supported – as is currently the case with CMiC form letters.
Troubleshooting Broken Replacement Fields
-
Sometimes Microsoft Word can insert metadata in the document that can cause the replacement fields to break. If the modifiers aren't working, you may be able to get them to work by copying and pasting your document content into a new document.
-
A replacement field in a template should not be broken between two pages. A replacement field should always be on the same page of the document to avoid potential issues.
Step 6: Upload MIP® Word Template for MIP Document Definition
Document Merge Maintenance; standard Treeview path: Project Management > File Maintenance > Document Merge > Document Merge Maintenance
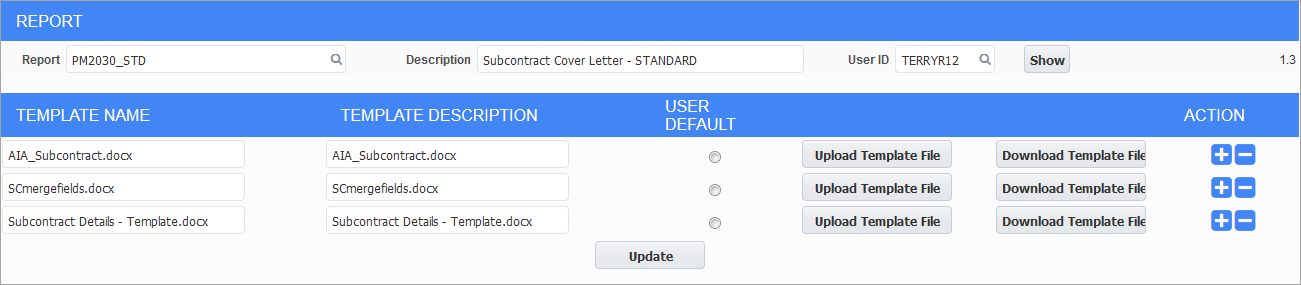
Completed MIP templates must be uploaded into the system through the Document Merge Maintenance screen, shown above, so that they can be used to generate MIP Word documents. This step links the MIP template with the MIP Word document defined through the Form Letter Definitions screen (step 3). For each defined MIP document, multiple MIP template variants may be associated to it (three templates are associated to the MIP document shown in the above screenshot), then when going to print the MIP document, the relevant template can be selected. If desired, a template can be associated to a user ID so that it will automatically be selected for the user when the user goes to print the MIP document.
This screen is also used to download a MIP template in order to use it as a starting point (base) to create a new variant of a MIP document. See the description for the [Download Template File] button in the below table.
The following provides details about the fields and buttons on this screen.
Report
Select the MIP document defined in step 3, for which the template will be uploaded. All MIP documents defined through the Form Letter Definitions screen will be available through this list.
Description
This is a display-only field, displaying a description for the selected report type (document type).
User ID
Optionally, the template to upload can be assigned to a user. If a user ID is selected and the [Show] button is clicked, the User Default radio button will become available to set whether or not the template is to be the user’s default for the MIP document.
Template Name
This is a display-only field, displaying the file name of the DOCX MIP template file.
Template Description
Identifies the MIP template in the system. After a template is uploaded, this field can be used to change the templates description. The description is used to identify the MIP document in the system, such as identifying it from the Report Name LOV of the Select Report pop-up window used to select the document to print.
User Default – Radio Button
If a user ID is selected for the User ID field, this radio button will become available to set whether or not the template is to be the user’s default for the MIP document.
[Upload Template File] – Button
Used to browse for and select the Word template to upload. Once uploaded, the Template Description field, which identifies the template in the system, can be changed if desired.
[Download Template File] – Button
Used to download a Word template in order to use it as a starting point for the creation of a variant version of it. This is the easiest way to create a new MIP document.
Associate/Disassociate – Icons ( )
)
Used to associate a new MIP template to the MIP document, or to disassociate a template from the MIP document.
[Update] – Button
Click to update any changes.
Step 7: Print MIP Word® Document (JSP)
-
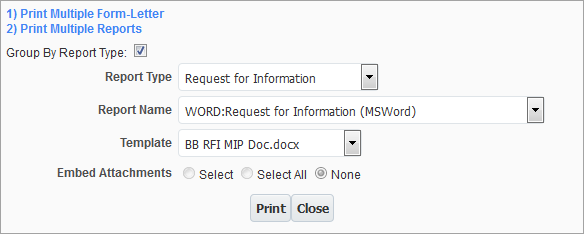
Select the document to be printed, and then click the [Print] button. The Print Options pop-up window, shown above, will appear.
-
From the Report Type drop-down list, select desired report type. Word based MIP templates will appear as pink entries in the list, and will be preceded by the identifier “WORD:”.
-
After selecting a Word template, a drop-down list for Template field will appear. Select the desired template from the drop-down list and click [Print].
-
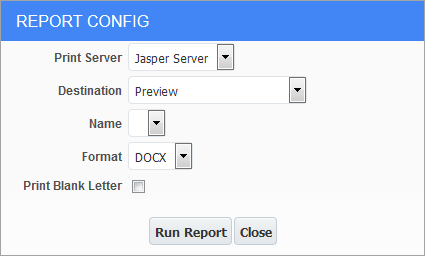
In the Report Configuration pop-up window, shown above, select the destination and click [Run Report].
NOTE: The only format available for Word templates at present is the DOCX format. Also, the 'Print Blank Letter' checkbox only applies to Jasper reports.
Reports with the destination set to preview will be created as DOCX documents, which can be saved as required on the workstation. Reports with the destination set to cold storage will be written directly to the Imaging server using parameters inherited from the cold storage setup on the client’s system. Reports with the Destination field set to “Preview With Cold Storage” will be written directly to the Imaging server using parameters inherited from the cold storage setup on the client’s system, and the resulting document will be opened in Image Manager for preview purposes.
When the output is opened via Word in a DOCX format, all fields that were merged will display with a gray background – this is a view only feature – when the document is actually printed, the gray will not be printed.