Overview
CMiC Enterprise Software allows users to execute Jasper reports against an alternate database. This feature decreases the load on the primary database and the secondary database can be a standby database, or just a different database altogether, if that serves the organization’s purpose.
Prerequisites
-
Patch v12-019-2 and correspondent hotfixes for Patch level v12-019-2 must be installed before implementation of alternate Data Sources for Jasper Server that is pointing to the DataGuard DB instance.
-
DataGuard DB instances needs to be running in Active DataGuard Mode.
-
There has to be DB/TNS connectivity between the App Servers running Weblogics and DataGuard DB instances.
High Level Steps of the Implementation
These are the five major steps required for this implementation.
-
Create Data Sources Inside the Weblogic to Point to the DataGuard DB instance.
-
Creation of alternative-resource-config.xml under D:\cm\ias\j2ee\ENV\jasper\config.
-
Register Reports That Should be Run Against the Alternate Data Source.
-
(Optional) Choose the Data Source for Each Report from the Report Parameters Pop-Up Window.
Steps 2 and 3 are done on every application server. Steps 4 and 5 are done only once on any of the App Servers that was configured for this setup.
Examine Jasper Repository for Custom Reports
This is a preparation step. You need to log in to the Jasper Console to see if there are any custom reports that exists in this environment. Custom meaning that these were not written by CMiC. If you are certain that there are no custom reports then this step can be skipped.
-
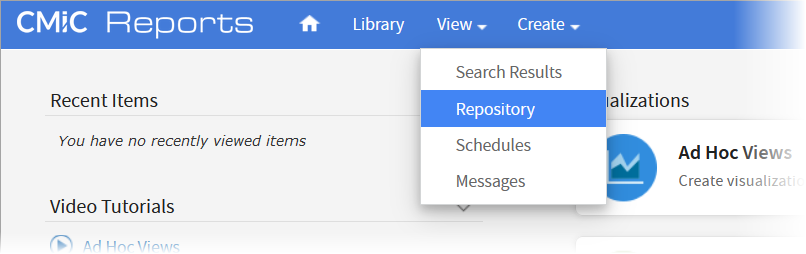
Login to the Jasper Server Console from the Launch Page.
-
Select View > Repository.
-
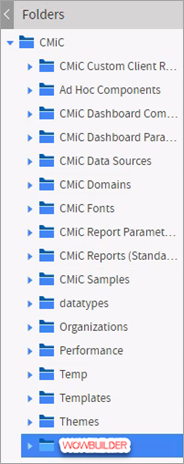
Look for a folder that would have a name of the company.
Example, if there is a company called WOWBUILDER, you are looking for folder with this name and if it exists.
Folder name might be:
-
Name of the Company
-
Custom_CompanyName
-
Contains the company name in the folder name.
You will need to know the name of this custom folder name for future steps.
-
Having Difficulty With This Step?
If you are unable to identify the custom folder or you are having issues with this task, then the following steps can be used as it is more reliable.
-
Run an export of Jasper and then search through the output of it.
-
Copy
cd /d D:\cm\v12\ENV\jasperserver\buildomatic
js-export.bat  --uris /organizations/cmic --output-zip  <path_to_dir>\<export_file_name>.zip > <path_to_dir>\Export_output.txt 2><path_to_dir>\Export_errors.txt
Example:
Copycd /d D:\cm\v12\PROD\jasperserver\buildomatic
js-export.bat --uris /organizations/cmic --output-zip D:\jasper_dataguard_changes\FULL_Jasper_Export_PROD.zip > D:\jasper_dataguard_changes\Export_output.txt 2>D:\jasper_dataguard_changes\Export_errors.txt -
Review the output of Export_output.txt for anything that starts with "/organizations/cmic/<COMPANY_IDENTIFIER>/".
Create Data Sources Inside the Weblogic to Point to the DataGuard DB instance
This step needs to be done on every single JSP Server that this environment has.
NOTE: CMiC supports up to 10 DataGuard DB instances of alternative Data Sources in Weblogic. This article will concentrate on the implementation of just one DataGuard DB instance as the most common option. Additional steps for more instances are shown in the Multiple DataGuard DB Instances section.
Creating Data Sources using the Weblogic Console
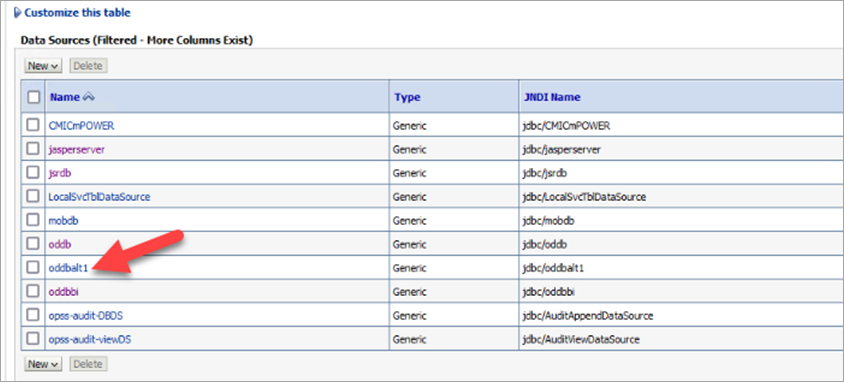
Each registered data source from the Registered Data Sources screen in the System Data module needs a corresponding data source service set up in Weblogic. The default data source is called "oddb", with its JNDI Name field set to "jdbc/oddb". Do not change the definition of this data source. For every alternate data source registered in the Registered Data Sources screen, create a Weblogic data source also with the "alt#" suffix, as detailed in the steps below.
-
Login to the Weblogic Admin Console.
-
Click on Lock & Edit.
-
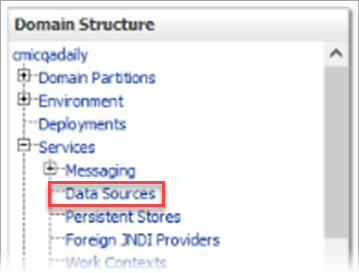
Select Services > Data Sources.
-
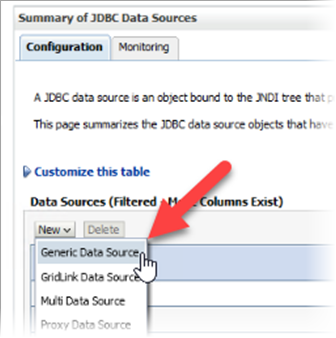
Select New > Generic Data Source.
-
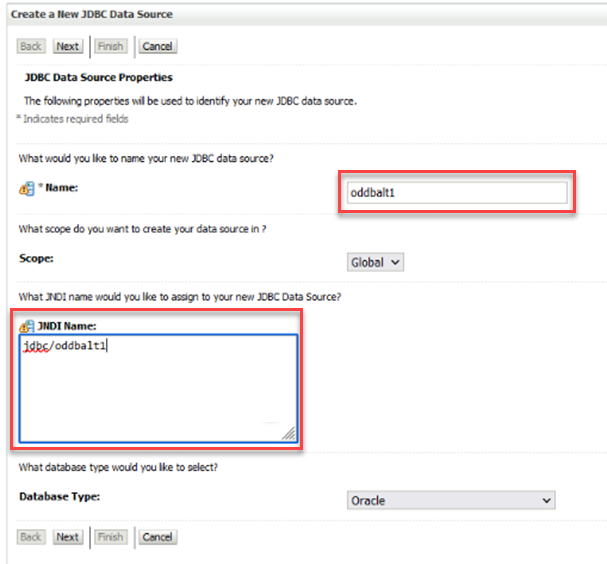
Fill the fields for Name and JNDI Name.
-
oddbalt# (e.g. oddbalt1)
-
jdbc/oddbalt# (e.g. jdbc/oddbalt1)
-
-
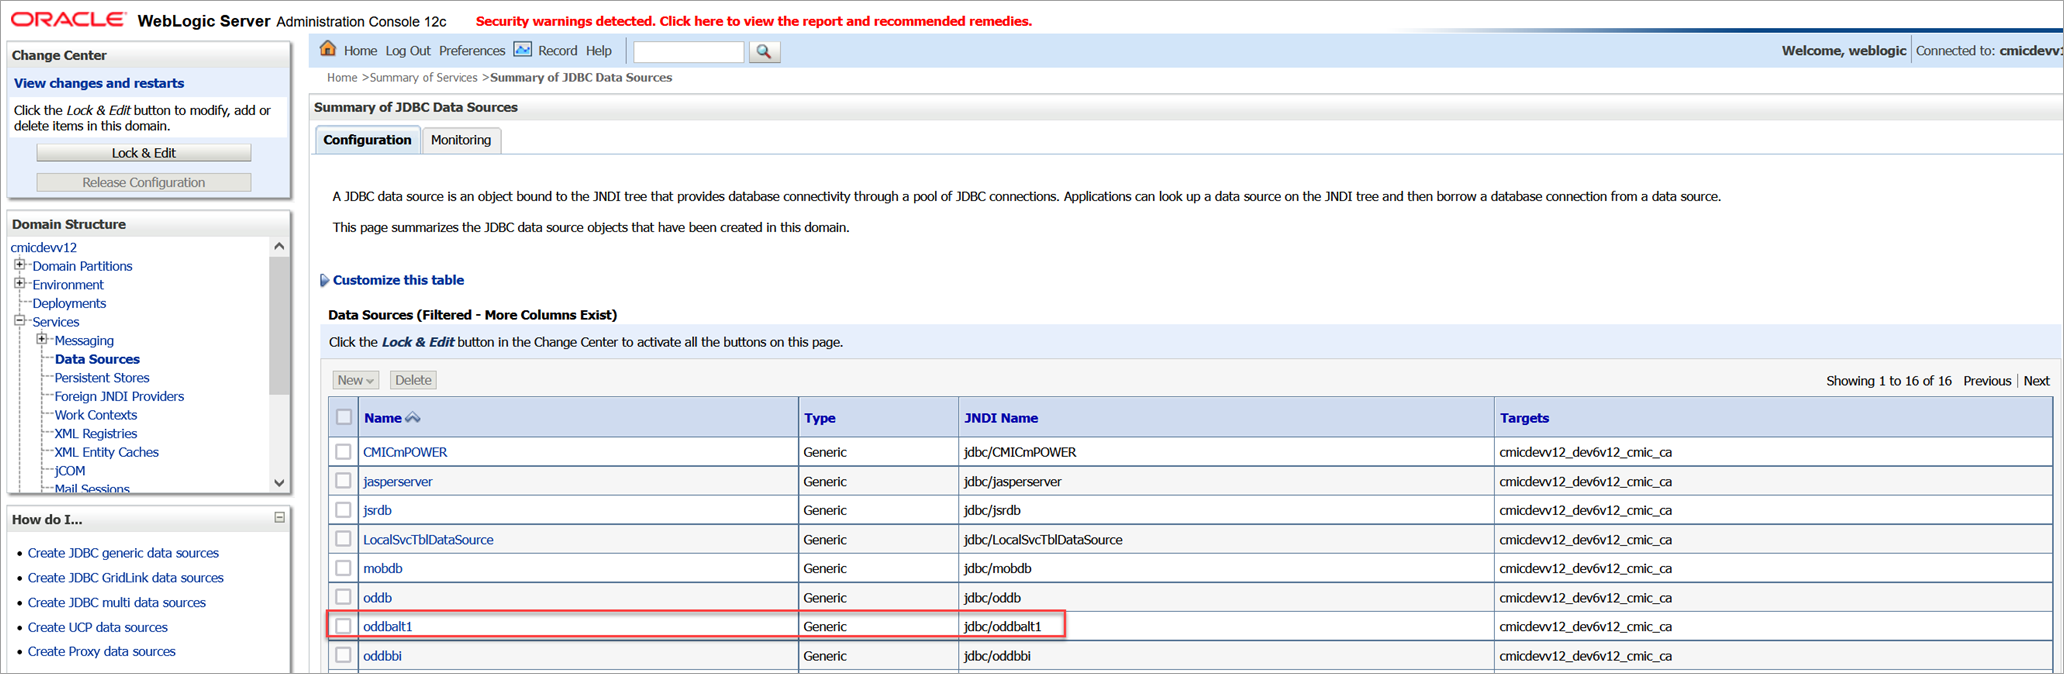
When finished, the data source will be available under the Data Sources table, as shown in the screenshot below.
Multiple DataGuard DB Instances
-
If you have multiple DataGuard DB instances, enter "oddbaltN" and "jdbc/oddbaltN" where "N" would be the identification of the DataGuard DB instance.
-
Click [Next].
-
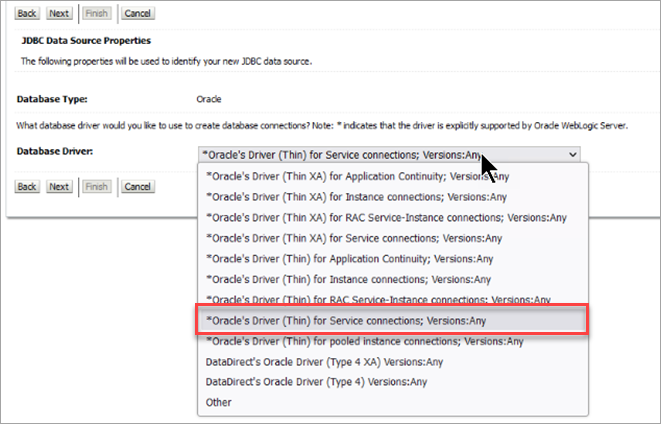
Select an option for the Database Driver field. By default, you should be selecting "Oracle’s Driver (Thin) for Service Connections; Versions:Any". If you have advance setup on the DataGuard Instances, such as Oracle RAC or some high-availability features, you might need to select something else.
-
Click [Next].
-
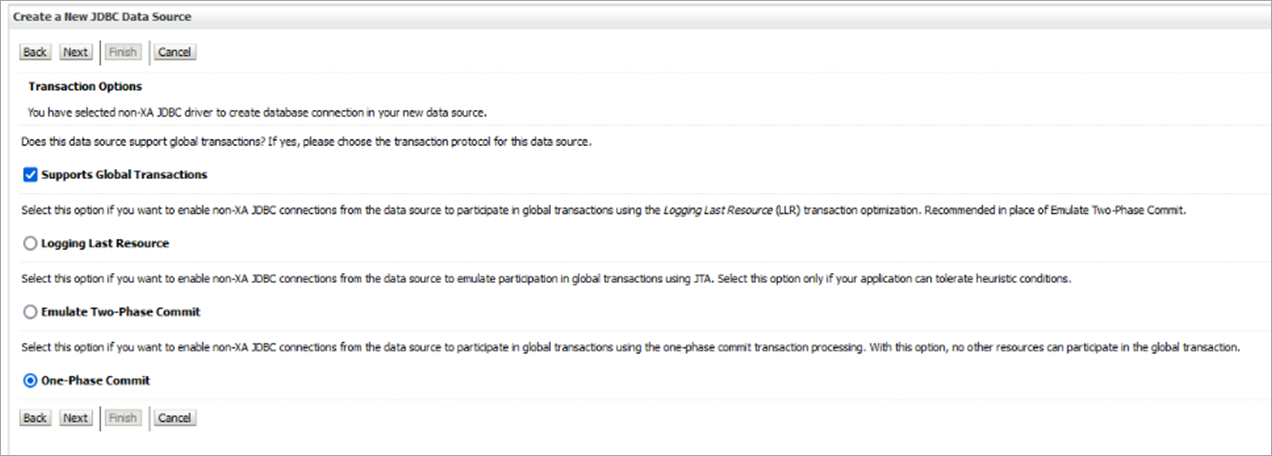
Leave the default settings as shown in the screenshot below:
-
Click [Next].
-
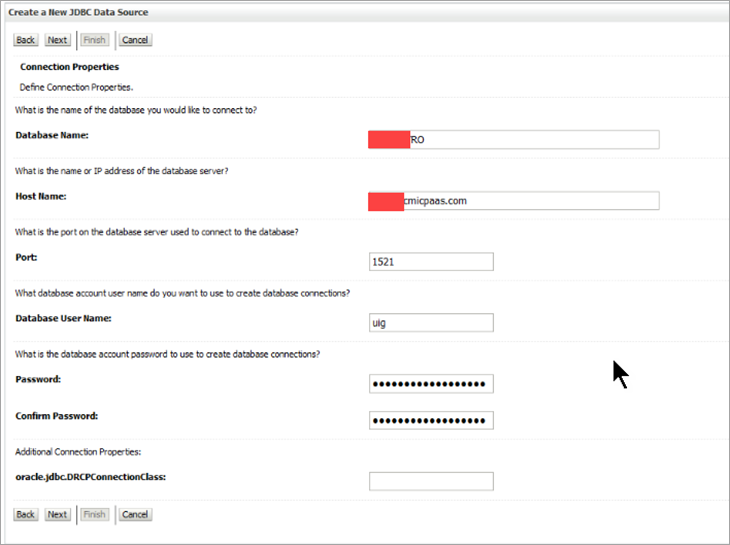
Fill in the properties of the Database connection:
-
Database Name – The Service Name that is running on the DataGuard Standby Server. PRODSTB or PRODRO is the default Service Name for PROD Oracle Active DataGuard.
-
Host Name – Hostname/IP of the Database Server where Oracle Active DataGuard is running.
-
Port – 1521 is the default. If your connection to the DataGuard database is only available over TCPS 2484 encrypted port, this article does not cover this option as this is considered a rare option. There are multiple ways on how to archive such setup, and Oracle documentation on how to archive is available if needed.
-
Database User Name – UIG
-
Password – Password of the UIG user
-
oracle.jdbc.DRCPConnectionClass – Empty
-
-
Click [Next].
-
(Optional) Test the connection to confirm that the connection is working.

-
Click [Next].
-
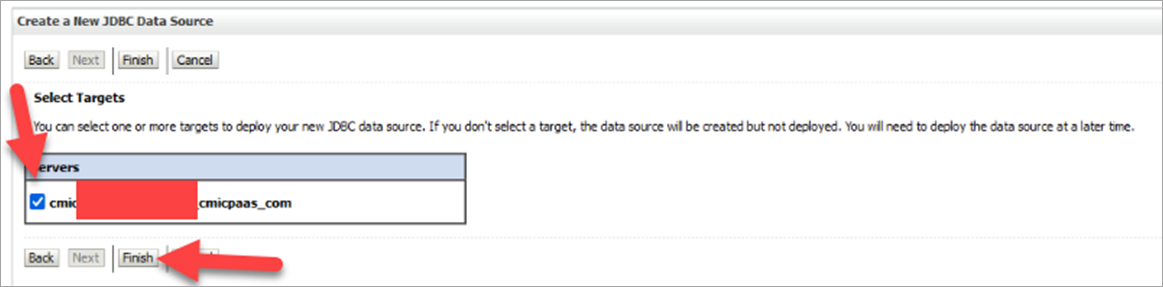
Select the Weblogic Target which is the Weblogic that will come up.
-
Click [Finish].
-
You will see the new Data Source in the list of the all data sources.
(Optional) Configure the JDBC Connection Pool
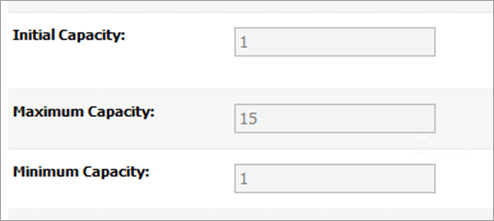
The following screenshot is the default JDBC Connection Pool Settings of oddbalt1:
The following screenshot is the typical default of JDBC Connection Pool Settings of oddb:
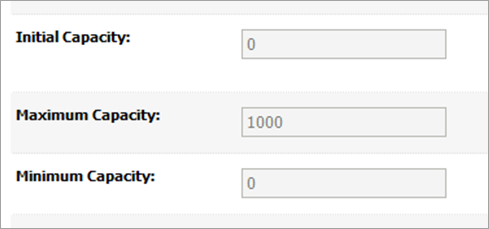
At this stage you want to configure the oddbalt1 connection setting close to the same as what they are for the real oddb connection pool.
This is probably a good starting point for the data source:
Creation of alternative-resource-config.xml under D:\cm\ias\j2ee\ENV\jasper\config
This step needs to be done on every single JSP Server that this environment has.
-
Go to D:\cm\ias\j2ee\ENV\jasper\config or CM_HOME\ias\j2ee\ENV\jasper\config
By default, this is an empty folder, and it can be populated and modified manually only.
-
Create empty file: alternative-resources-config.xml
This XML will need to list all Pointers to the DataGuards being used and to any specific custom Jasper folders that environment might be using.
-
Add content according to:
-
How many alternate Data Sources are planned to be used?
-
Existence of specific Custom Reports (Examine Jasper Repository for Custom Reports).
-
The easiest way to explain this process is through the following examples:
Example 1: One DataGuard or Alternate Data Source is used, no Custom Reports.
The file will look like this:
<?xml version="1.0" encoding="UTF-8"?>
<command-configuration>
<alt-list altlist="ALT1" customfolder=""/>
</command-configuration>
Example 2: One DataGuard or Alternate Data Source used and Custom Reports exist.
Company SUPERCONSTRUCTION has Custom Reports stored in Jasper under /organizations/cmic/SUPERCONSTRUCTION_CUSTOM.
The file will look like this:
<?xml version="1.0" encoding="UTF-8"?>
<command-configuration>
<alt-list altlist="ALT1" customfolder="SUPERCONSTRUCTION_CUSTOM"/>
</command-configuration>
Example 3: Two DataGuard or Alternate Data Source used and Custom Reports exist.
Company SUPERCONSTRUCTION has Custom Reports stored in Jasper under /organizations/cmic/SUPERCONSTRUCTION_CUSTOM.
The file will look like this:
<?xml version="1.0" encoding="UTF-8"?>
<command-configuration>
<alt-list altlist="ALT1,ALT2" customfolder="SUPERCONSTRUCTION_CUSTOM"/>
</command-configuration>IMPORTANT: Alternate Data Sources must be separated by commas without white spaces.
The correct value for "customfolder" is the relative path to Custom Reports. For example, the root path is "/organizations/cmic" and the full path to the custom folder is "/organizations/cmic/SUPERCONSTRUCTION_CUSTOM". Therefore, the value for "customfolder" will be "SUPERCONSTRUCTION_CUSTOM".
IMPORTANT: Only one folder is allowed for Alternate Data Sources with Custom Reports. The file can not have leading spaces in front of it.
Exporting All CMiC Standard Reports and Custom Reports
This needs to be done only once on any JSP Server that this environment has.
The following steps describe how to export all reports.
-
Open command line as Administrator. Navigate to D:\cm\v12\ENV\jasperserver\buildomatic or CM_HOME\v12\ENV\jasperserver\buildomatic using the following:
Copycd /d D:\cm\v12\ENV\jasperserver\buildomatic -
Run the following:
Copyjs-export.bat --uris /organizations/cmic/CMIC_CUSTOM,/organizations/cmic/CMIC_REPORT_PARAMETERS,/organizations/cmic/CMIC_REPORTS,/organizations/cmic/<RELATIVE_PATH_TO_CUSTOM_REPORTS> --output-zip <path_to_dir>\<export_file_name>.zipwhere
<RELATIVE_PATH_TO_CUSTOM_REPORTS> - (Optional) This path is specific to Custom Reports. This was gathered in Examine Jasper Repository for Custom Reports and customized in Creation of alternative-resource-config.xml under D:\cm\ias\j2ee\ENV\jasper\config.
<path_to_dir> - This is the path to a folder where this temporary export will be done. This will be used in the next step.
<export_file_name> - The ZIP file name of the export. This will be used in the next step.
IMPORTANT: Pay attention to URIs separated by comma and without any spaces in between. These three values must be there for all cases: /organizations/cmic/CMIC_CUSTOM, /organizations/cmic/CMIC_REPORT_PARAMETERS, and /organizations/cmic/CMIC_REPORTS. The fourth value is there only if there are custom reports.
Example 1
-
PROD environment
-
No custom reports
-
exporting to d:\jasper_dataguard_changes\
-
file JasperPRODExport.zip
The following is the export command:
js-export.bat --uris /organizations/cmic/CMIC_CUSTOM,/organizations/cmic/CMIC_REPORT_PARAMETERS,/organizations/cmic/CMIC_REPORTS --output-zip d:\jasper_dataguard_changes\JasperPRODExport.zipExample 2
-
TEST Environment
-
Custom report folder SUPERCONSTRUCTION_CUSTOM
-
exporting to d:\jasper_dataguard_changes\
-
file JasperTESTExport.zip
The following is the export command:
js-export.bat --uris /organizations/cmic/CMIC_CUSTOM,/organizations/cmic/CMIC_REPORT_PARAMETERS,/organizations/cmic/CMIC_REPORTS,/organizations/cmic/SUPERCONSTRUCTION_CUSTOM --output-zip d:\jasper_dataguard_changes\JasperTESTExport.zipRe-Importing All Reports Back into Jasper Server
This needs to be done only once on any JSP Server that this environment has. Preferably, it should be done on the same JSP Server where Exporting All CMiC Standard Reports and Custom Reports was completed.
This should be performed after hours.
Performing a full database backup is also recommended prior to performing this process.
Importing all reports back into Jasper Server is going to use the alternative-resources-config.xml config file to setup all required configuration in the system to have additional pointers in Jasper to point to the DataGuard DB instance.
-
Open the command line as Administrator.
-
Navigate to D:\cm\ias\j2ee\ENV\jasper\bin or CM_HOME\ias\j2ee\ENV\jasper\bin using the following command:
Copycd /d D:\cm\ias\j2ee\ENV\jasper\bin -
Run the following:
Copycmic-js-import.cmd --input-zip <path_to_dir>\<export_file_name>.zip --update --skip-user-updatewhere
<path_to_dir> - The path to a folder where the temporary export will be done. Use the path from Step 2 of Exporting All CMiC Standard Reports and Custom Reports.
<export_file_name> - The ZIP file name of the export. Use the file name from Step 2 of Exporting All CMiC Standard Reports and Custom Reports.
Example:
Copycmic-js-import.cmd --input-zip d:\jasper_dataguard_changes\JasperPRODExport.zip --update --skip-user-update -
This will re-import previously exported reports and will create subfolders for all Data Sources used for DataGuard DB instances with standard CMiC Reports and specific Custom Reports.
Examine the Output
What you want to do is to examine the output of the import. Sometimes it fails and you need to spot that and escalate this.
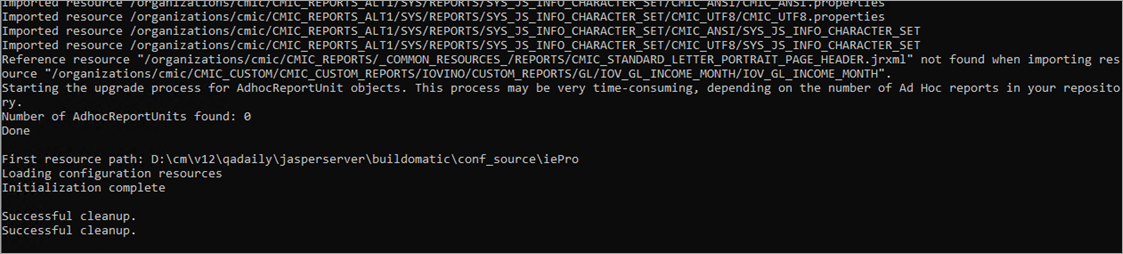
Example of Successful Import
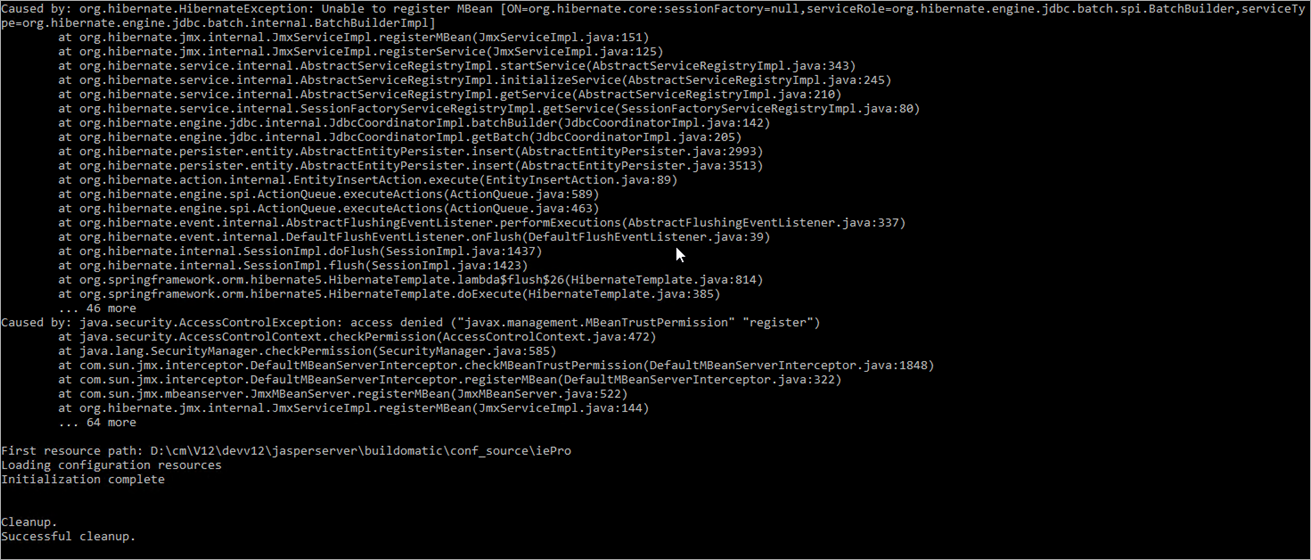
Example of Problematic Import
Validation in Jasper Server Console
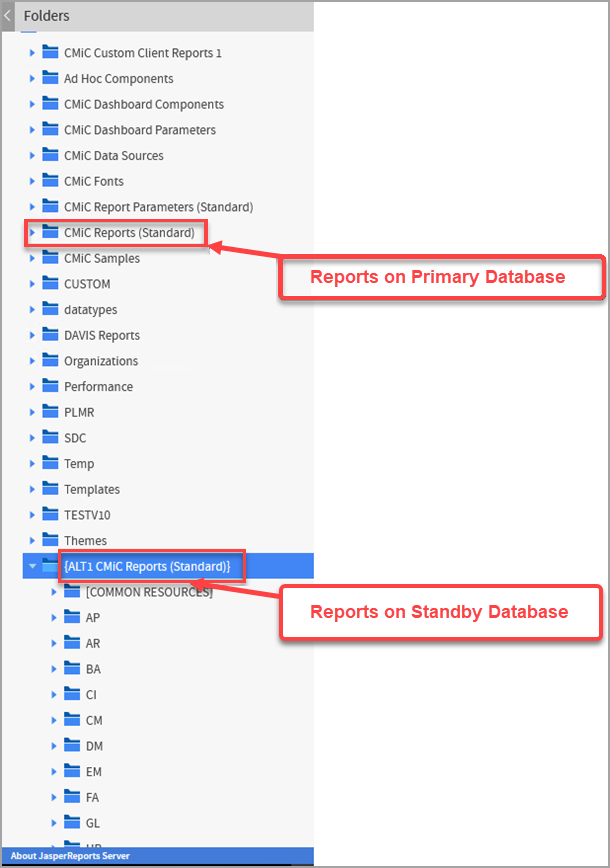
Login to Jasper Server console to confirm that everything is fine. There will be an ALT1 Subfolder with all of the reports. The following screenshot is an example of the ALT1 subfolder for standard CMiC reports.
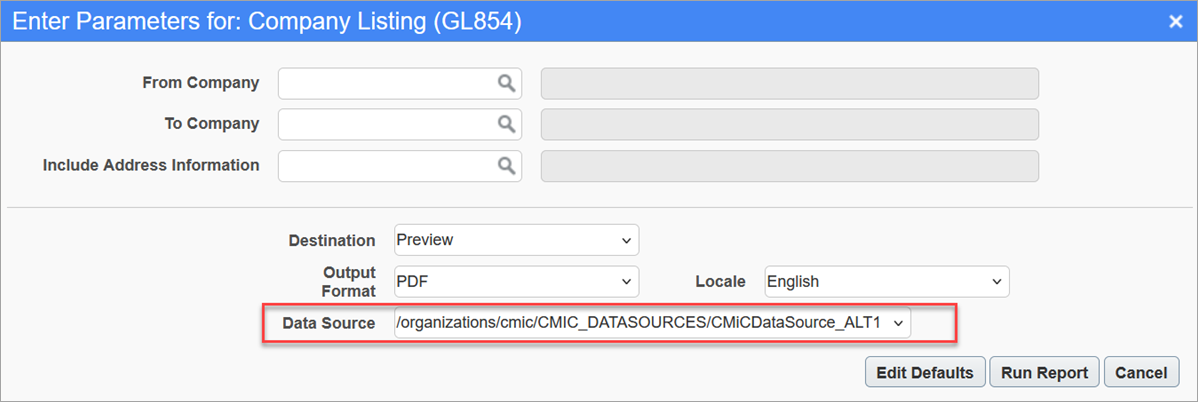
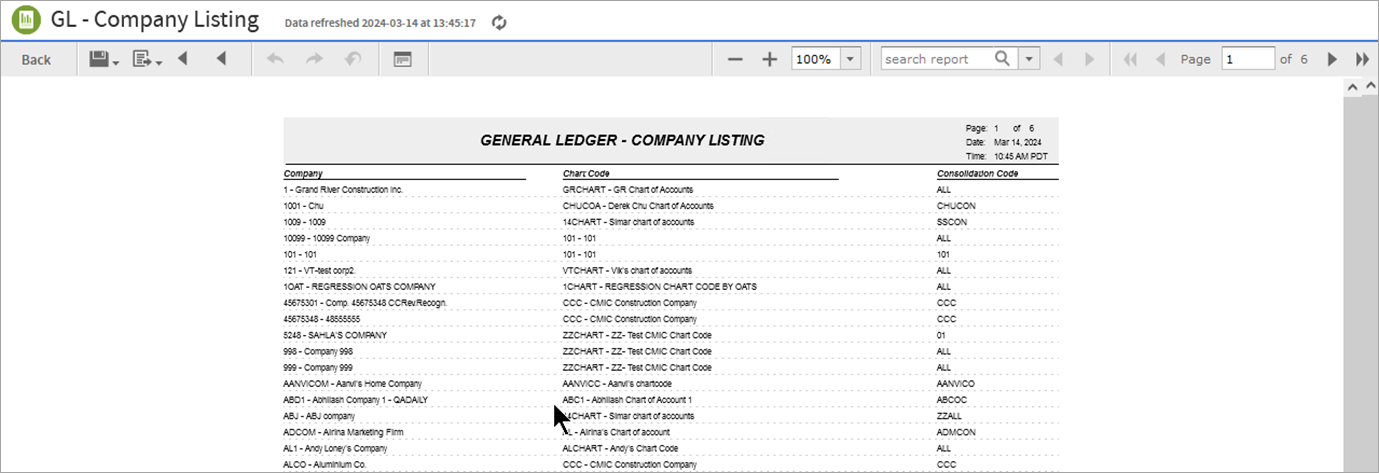
Running a Sample Report
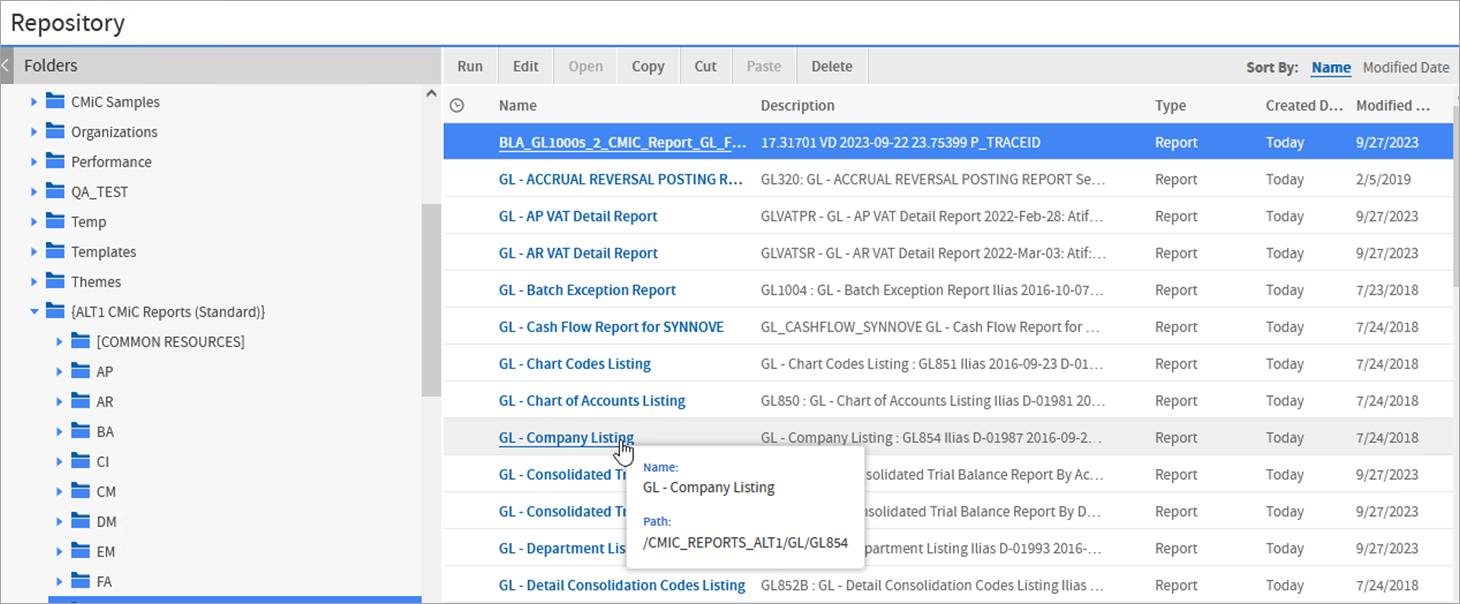
Try to run a sample report, such as GL854 (GL Company Listing), against the Active DataGuard instance to confirm that it is working. To run it, type "GL854" in the search bar and then click on the report.
If the report appears as shown in the screenshot below, the connection is established to the DataGuard instance and implementation is complete.
Register Data Sources Used by Jasper Reports
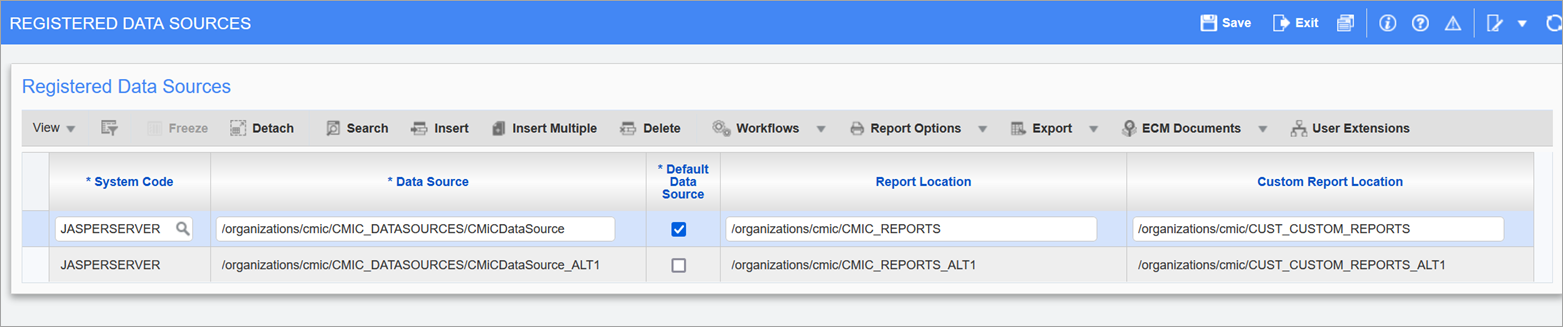

Pgm: SDDATASOURCES - Registered Data Sources; standard Treeview path: System > Reports > Registered Data Sources
Data sources used by Jasper reports can be registered in the Registered Data Sources screen, as shown in the above screenshot. For each data source we specify the locations of the standard and custom reports in the Jasper repository.
The system is pre-configured with the standard (default) data source. The data source marked as default will be used for all reports unless specified otherwise.
Additional data sources for alternate databases can be added using the naming convention, where the "_ALT#" suffix is added. CMiC supports up to 10 alternate data sources.
Register Reports That Should be Run Against the Alternate Data Source


Pgm: SDALTERNATEDATASOURCES - Register Program Alternate Data Sources; standard Treeview path: System Data > Reports > Register Program Alternate Data Sources
In the Register Program Alternate Data Sources screen you can specify which reports should be run against which data source.
For each record entered here, specify the path to the report in the Jasper repository and choose the data source to be used by that report.
(Optional) Choose the Data Source for Each Report from the Report Parameters Pop-Up Window
-
In order to use the Data Source field, the user needs to have the UIRPDSSEL system privilege, which can be added using the User Maintenance screen.
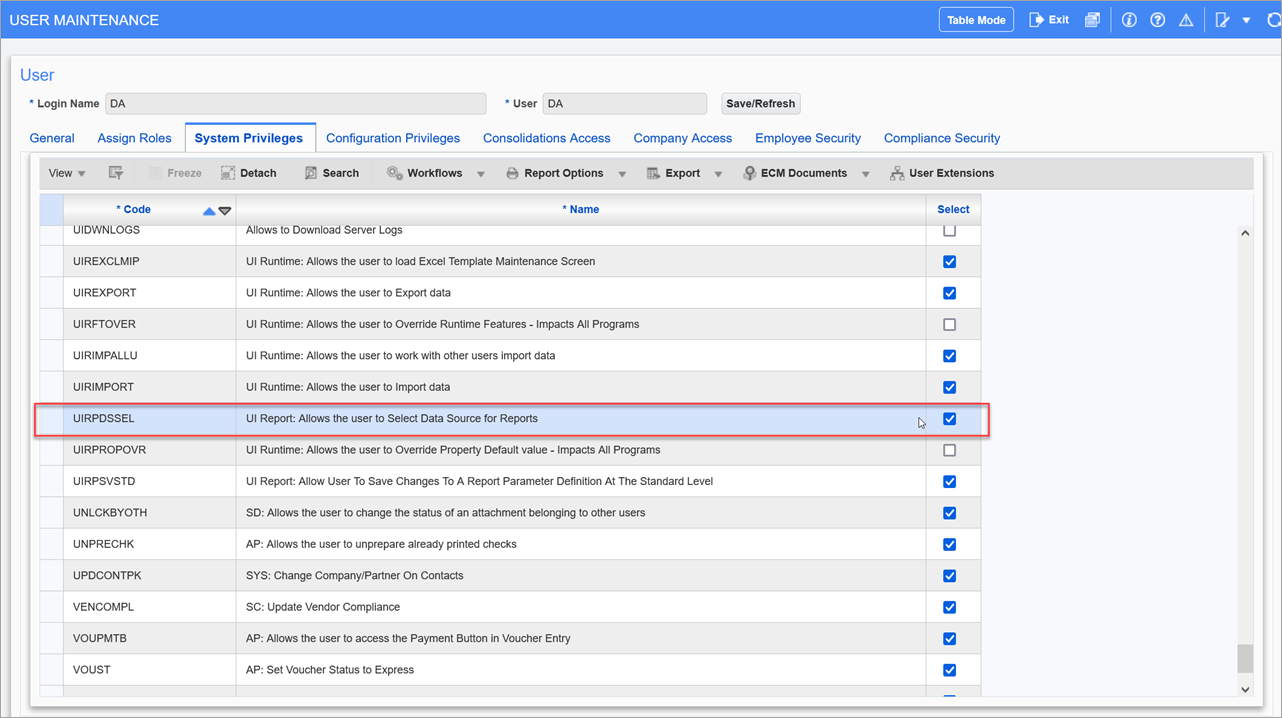
-
The Data Source field on the Report Parameters pop-up window can be used in combination with (or instead of) the individual report registration from the Register Program Alternate Data Sources screen.