This section’s table is populated by the cost codes for this job. It is used to delete or add cost codes and categories to the job as required. Users are also able to add attachments and notes against a particular cost code entry using the [Attachments] and [Notes] button found on the block toolbar.
Locked − Checkbox
The 'Locked' checkbox allows users to view or manage the lock status of cost codes assigned to a job based on the system privilege. Only users with the 'JC: Allows User to Modify Locked Cost Code Category' system privilege are allowed to change the state of the 'Locked' checkbox on the Assign Cost Code screen. Users with this privilege can modify the lock status, whereas those without it can only view the lock status.
Projection Threshold %
This is a percentage value which is part of a mechanism that will suppress the calculation of the straight line forecast final cost algorithm until a certain percentage of physical work (from either actual units/estimated units or input percentage of completion – as opposed to a cost to cost calculation of percent complete) is achieved.
Billing − Checkbox
The default state of this checkbox is determined by the 'Mark New Cost Codes on Jobs As Billing' checkbox on the Job Setup tab of the JC Control File.
If unchecked, the unit phase billing (UPHS) will not consider this cost code (phase) for billing, and a change order entry line will populate the amount only on the change order, and the billing quantity and rates will be ignored. The amount will not be carried forward to the JB Contract and billed to the owner.
If checked, a change order entry will populate the Billing Quantity, Rate, and Amount fields; and the JB contract will be updated with the cost code unit entry.
Factorable − Checkbox
This checkbox is only applicable to cost codes for public sector jobs. If checked, cost code quantity factoring (forecasting based on a factor) is allowed for this cost code. Also, the job’s 'Allow Cost Code Qty Factoring' checkbox must be checked on the Settings tab of the Enter Job screen.
Active − Checkbox
If checked, the cost code is active; otherwise, it is not.
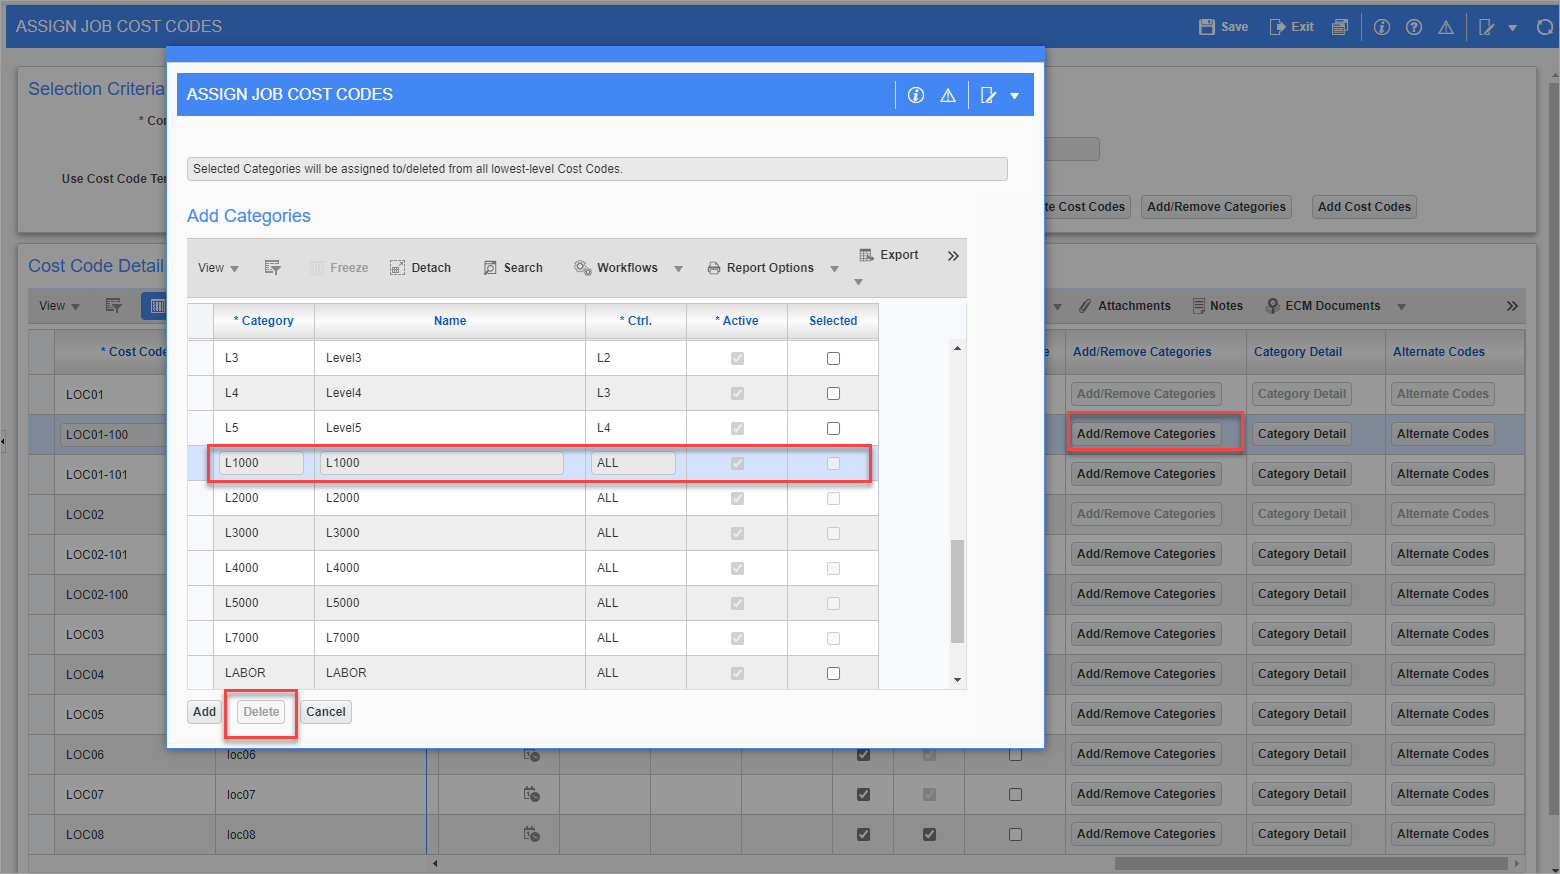
[Add/Remove Categories] − Button
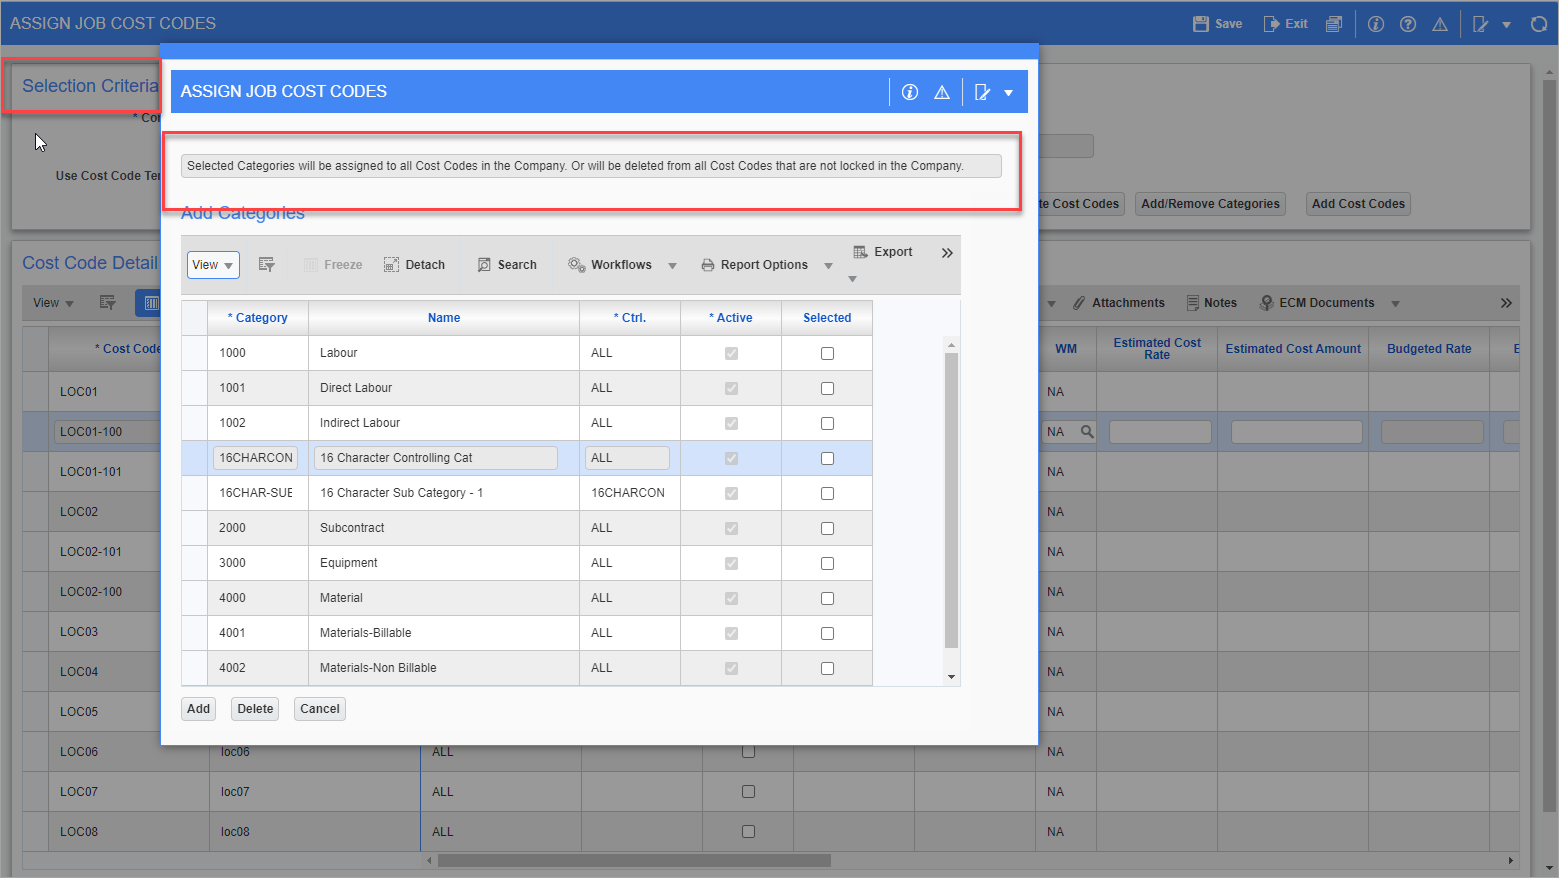
![Sample of pop-up window launched by [Add/Remove Categories] button](../../../../../Resources/Images/JC_12c/Assign_Cost_Codes_Phases_Screen_1.png)
This button’s pop-up window is used to add or remove categories to or from the selected cost code assigned to the selected job. This button is not enabled for control cost codes, as only the lowest level cost code can have categories.
NOTE: Controlling categories and subcategories cannot be assigned to the same cost code.
To add categories to the job’s cost code, select them using the 'Selected' checkbox and click [Add]. The categories added to the job’s cost code can be viewed via the [Category Detail] button on the main screen.
To delete categories from the job’s cost code, select them using the 'Selected' checkbox and click [Delete].
[Category Detail] − Button
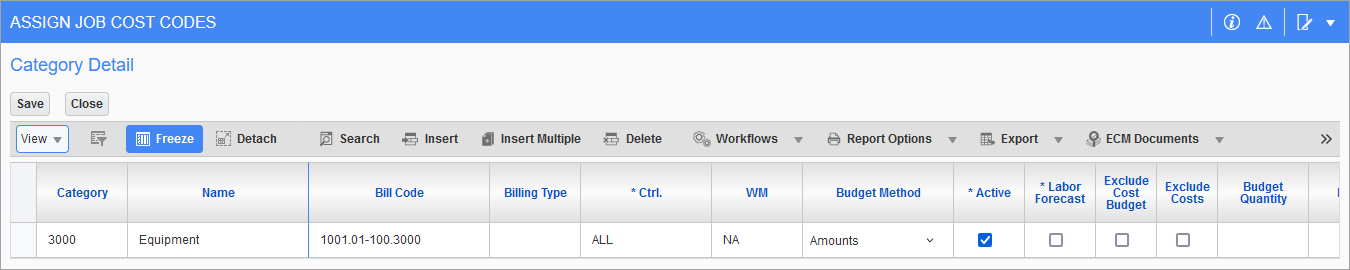
This button is enabled for cost codes that are not controlling cost codes, as controlling cost codes cannot have categories.
NOTE: Controlling categories and subcategories cannot be assigned to the same cost code.
This button’s pop-up window is used to view a job’s cost code categories, and it can be used to maintain a job’s cost code categories by using the block toolbar’s [Insert] and [Delete] buttons. Alternatively, the [Add/Remove Categories] button can be used to add or remove categories to or from the job’s cost code.
If the 'Labor Forecast' checkbox is checked, the corresponding bill code is to be used for labor forecast lines in PM JSP Contract Forecasting and GC Monitor. In PM JSP Contract Forecasting, forecast lines with the bill code will be green to indicate that the labor forecast line can be drilled down using GC Monitor.
[Alternate Codes] − Button
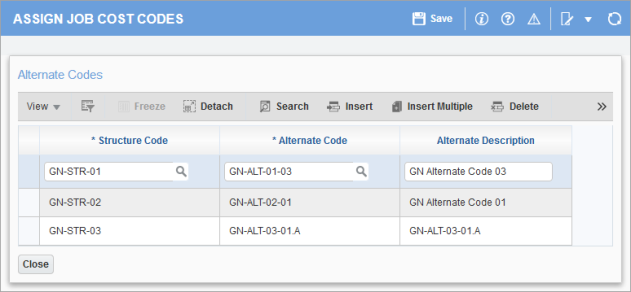
This button's pop-up window is used to associate the selected enterprise cost code to its corresponding cost code(s) in a different system (entered via the Setup Alternate Cost Code Structure screen).
Alternate cost codes are not used by the Enterprise system, but they can be a useful reference when converting cost codes from a different system to cost codes in Enterprise.
Valid
This is a display field that will read "Y" unless mandatory user extensions are being used and an extension has not been entered for the cost code, in which case it will read "N" and the cost code will not be available for entry until a user extension has been entered. When a budget is imported, this field, for each cost code, will read "N" until a user extension has been entered. If the Assign Cost Codes screen has been created as a result of a won bid job, the cost codes that were valid on the bid job will default as valid on the won job and those cost codes that were invalid on the bid job will be invalid on the won job.
[Funding Source] − Button
This button is used to select funding sources.
The Funding Source Maintenance screen is reached through the following standard Treeview path: Project Management > File Maintenance > Local Tables > Funding Source Maintenance.
Once a funding source is selected, a percentage for that funding source can be entered. An amount will then be calculated based on the total budget of the job.
[Validate Cost Codes] − Button
The validation of the structure will process the cost codes and categories as defined and identify any incomplete or incorrect setup for the current job.
[Apply Budgets] − Button
If using single category budgeting and the Default Budget Category field is entered on the Budget tab of the Control File screen, the [Apply Budgets] button can be used to automatically populate the category level budgets based on the information entered into the budget for the job.
This function will create the category on each cost code if it does not already exist, and it will overwrite any existing values on the existing category rows. If the user makes changes to the cost code budgets and does not update the categories, the system will prompt “Do you want to apply budget changes?” when attempting to exit the screen.
[Update Dates] − Button
The Update Dates pop-up window is used to mass update the start and end dates of all the existing cost codes.
[Create Contract] − Button
This is enabled only when a job is set with the billing method as "Job Billing" and that there is no billing contract already existing for the job. Once the job cost code/category and budget setup is complete, users may choose to create a JB contract right from this screen by pressing this button. Access to this button may be restricted by enabling field security against specific user roles.
[Budget] − Button
This button launches the Enter Budget (Job Budget Maintenance) screen to enter the amounts to be budgeted for the cost elements of the job. The budget elements entered on this screen are known as the original budget and can be modified using this screen as long as the job is pending. For further details, please refer to the Job Budget Maintenance section in this user guide.
NOTE: When using the UPHS billing type, the budget is taken from the Assign Cost Codes screen and not the Enter Budget screen.
Single Category Budgeting
If the 'Single Category Budgeting' checkbox is checked on the Budget tab of the Control File screen, check the 'Single Cat Budget' checkbox for the cost codes that require this type of budgeting. If you check this box, the budget amount entered on the cost code will automatically be transferred to the single budget category when the [Apply Budgets] button is pressed. For more details, see Job Costing - Using Single Category Budgeting.
Entering Unit Estimates (or UPHS Budget) at Cost Code Level
This only needs to be done if you are using the productivity budgeting method. For all other types of budgeting, this is reference data only. Details must be entered when using the UPHS (unit phase) billing type.
Budgeted Units, Rate and Cost
Enter/modify the budgeted unit estimate, rate and WM. If you are using productivity these numbers will be utilized in percent complete calculations, otherwise these numbers are for reference only.
NOTE: The heading for this column is user defined within the Custom System Data/Boilerplates screen. The system default for this column is set to “Units”.
Once a rate has been entered, the system will automatically calculate the estimated cost amount as follows:
Estimated Cost Amount = Budgeted Units × Estimated Cost Rate
If the rate is not known, the system can automatically calculate the estimated cost rate from the entry of the estimated cost amount/budgeted units.
Budgeted Cost Rate and Amounts
The Budgeted Cost and Rate Amount fields are display only and will only show data if budgets have been specified at the category level.
Estimated Revenue Rate and Amount
Enter the estimate revenue rate or amount for the unit price estimate that is being defined at this cost code level. Once a rate has been entered the system will automatically calculate the estimated revenue amount as follows:
Estimated Revenue Amount = Budgeted Units × Estimated Revenue Rate
If the rate is not known, the system can automatically calculate the estimated revenue rate from the entry of the estimated revenue amount ÷ budgeted units.
If a value exists in the Estimated Cost Rate field, the estimated revenue rate will default from the value within that field. The amount displayed may be modified, as required.
Budgeted Revenue Rate and Amount
These fields are display only fields and will only show data for revenue budgets that have been specified at the category level.
Other Cost Code (Phase) Level Options
WC (Workers Compensation)
The WC field declares the workers compensation code applicable to the type of work done at this phase of the job. This field is updatable via this screen and via the Payroll module.
Whether or not this field is required is controlled by the Control File screen’s setting the 'Mandatory Workers Compensation For Job Cost Codes' checkbox (found on Job Setup tab). Regardless of the setting, only a valid workers compensation code as defined in the Payroll module will be accepted.
If the Control File setting is activated after cost codes have already been defined on a job, the mandatory rules will not apply retroactively to existing cost codes. The mandatory rules will apply if the WC field is edited on an existing cost codes or navigation away from this field occurs. Mandatory rules will apply to all new cost codes.
-
All workers compensation codes must be valid with company, country, and state entered in payroll workers compensation setup. When assigning cost codes, the country and state will come from the job work location. The job work location country and state are retrieved when a job code is entered.
-
If the WC code is required, but the field is either null or the country and state of the job location do not correspond to the WC code company, country, and state, an error message will be given and the background for the incorrect WC codes will appear in red. A valid workers compensation code will have to be entered. Once a correct code is entered the cursor will go to the next incorrect code
-
Validation of the WC code only occurs when the cost code is a low level cost code (i.e., not a controlling cost code).
Estimated Start Date
Record the estimated start and end dates for the cost code. These fields are for reference only.
Billing Rate Table and Maximum Revenue Caps
If this job is a job billing type job, then you may set a unique rate table and maximum revenue cap at the cost code level if required.
Active − Checkbox
Cost codes can be made inactive by checking this checkbox. Inactive cost codes are not available for transaction entry, but do show on all reports and queries. If you have cost codes that will not be utilized at the start of the job, and want to prevent any transactions from being miscoded to them, you may want to make them inactive at this time.
Using a Template with Locked Cost Codes
When a template with locked cost codes is assigned to the job, then those cost codes cannot be deleted from the job. An Alert pop-up window is displayed when a user tries to delete the locked cost codes from the job, as shown in the example below.
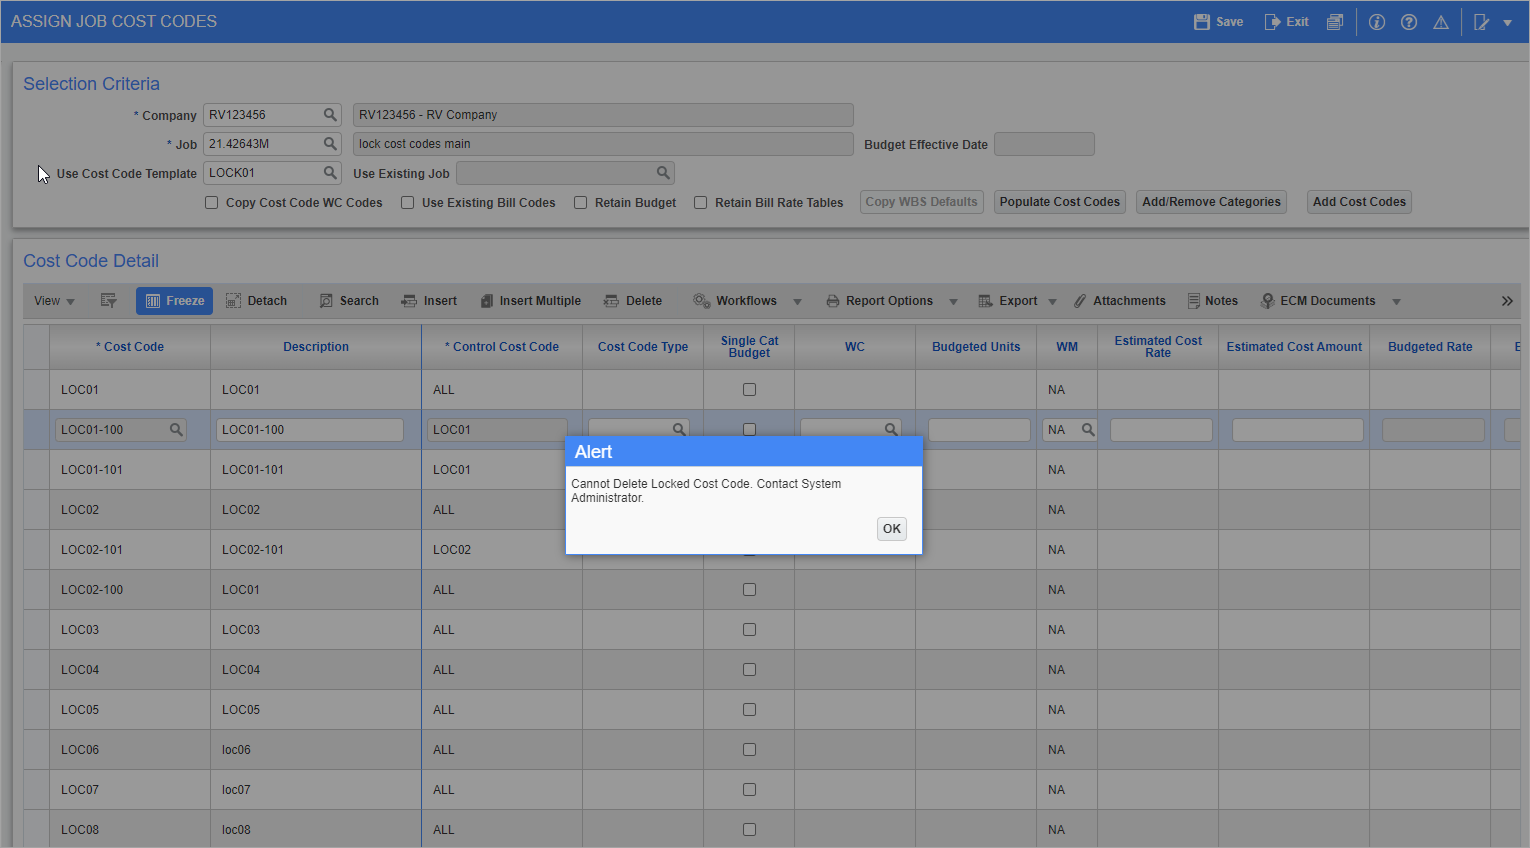
For locked cost codes in a template, the 'Active' checkbox will be disabled for both the cost codes and the categories associated to the cost codes. The [Delete] button will also not be available for those categories.
When using the [Add/Remove Categories] button, categories that are included in a locked cost code will not be allowed to be deleted and the 'Selected' checkbox will be disabled, as shown in the example below.
If the categories are added manually (not available in the template) to a locked cost code on the Assign Cost Code screen, then the 'Selected' checkbox and [Delete] button will be enabled for those categories.
When the 'Locked' box is checked, then a different message will appear when using the [Add/Remove Categories] button on the Selection Criteria section, as shown in the example below. Only categories that are not included in a locked cost code will be removed from the cost codes.