Overview
Invoice formats allow for the user to define printing criteria at the contract level, group code level, bill code level and detail level. The same format code can be applied to the complete contract or can be mixed and matched as required at the different levels.
NOTE: The Invoice Format field on the Description tab of the Enter Contract screen is used to find and/or change which contract is set up with which invoice format. This defaults from the Job Setup screen, and can also be viewed/modified on the Job Billing screens during progress draw preparations.
An invoice format (identified by the format code) can be thought to contain two parts: the invoice report and the setup.
The invoice report is the CMiC programmed report, which is either AIA Progress Billing or Free Form (T&M invoices). This is determined in the Invoice Report field. The Invoice Report for Free Form typically starts with "JBINVP" and CMiC has three standard reports: JBINVPRT, JBINVPRT2, and JBINVPRT3. The Invoice Report for Progress Billing invoices generally follow the AIA style. CMiC has several different versions of these formats, and their codes typically start with JBPB. The main ones being JBPB_U10, JBPB_U11, JBPB_C10 and others.
The following Progress Billing invoice formats provide support for up to five separate levels of grouping:
|
|
|
|
|
|
|
|
|
|
|
|
|
|
|
|
|
|
|
|
|
After the invoice report is selected, next is setup for the invoice format, such as creating group summaries, invoice backup sheets, hint text, and more. Different tabs within the Invoice Formats screen have different setup options. Further details on each of these tabs can be found in the sections below.
NOTE: Refer to Job Billing - Invoice Report Layouts for more details on the standard invoice layouts provided.
Invoice Formats
Format Code, Name
Enter a new format code and name (description) of the code. To view an existing code, click on the [Table Mode] button on the console to provide a list of the formats in table mode and enter/execute query.
Active − Checkbox
When creating a new format code make sure that the code is marked as active. Uncheck the 'Active' box to inactivate an existing code so that it is no longer available for new contracts. An inactive format code has no effect on existing contracts using the code.
Description (Invoice Format)
In some cases, an invoice format may be specifically required for one customer. In that case, you may want to put in a detailed description about the format code.
Defining the Formats
The formats are broken into six tabs: Invoice, Invoice Options, Group, Bill Code, Detail, and Backup Sheet.
At each of these levels there are specific functions that may be turned on or off. Each function is applicable to the level it is described under.
Invoice – Tab

Pgm: JBINVFMT – Invoice Formats; standard Treeview path: Job Billing > Setup > Local Tables > Invoice Formats
The Invoice tab is for defining how many group level totals are to be seen on the invoice, and what backup sheet format, if any, is to be used.
Show Bill Code Level on Billing Invoices − Checkbox
Check this box to have the bill code levels showing on the invoice.
Invoice Report
Enter/select the type of report your invoice format is for, such as AIA progress bill or Free Form (CMiC's version of T&M invoices).
NOTE: Refer to Job Billing - Invoice Report Layouts for more details on the standard invoice layouts provided.
Group Summary
Enter group column number to be used on the invoice when it is printed. A group code is a printing function. The first group listed is your main heading that will be subtotaled and the second group is the detail that will be subtotaled. The level of detail is driven by the group code (or codes) assigned to the invoice format.
Group codes control the level of detail you provide to the customer. They allow you to re-group bill code lines in alternate Free Form invoice formats. Using multiple groups subtotals your information.
NOTE: An AIA Job Billing draw can only handle up to three group codes (it doesn’t matter which is used, e.g. Group Codes 1, 3, and 5 can be used for an AIA), and a Free Form invoice can have up to five group codes. However, it is uncommon for an AIA to have more than two group codes. Usually one group code is common for both AIA and Free Form invoices.
Backup Sheet Report
There is only one standard backup sheet format to be selected. If you do not want a backup sheet to print leave this field as null.
Hint Text
The text entered in this field will appear on the last page of the JBINVPRT2 and JBINVPRT3 invoice reports.
Invoice Options – Tab
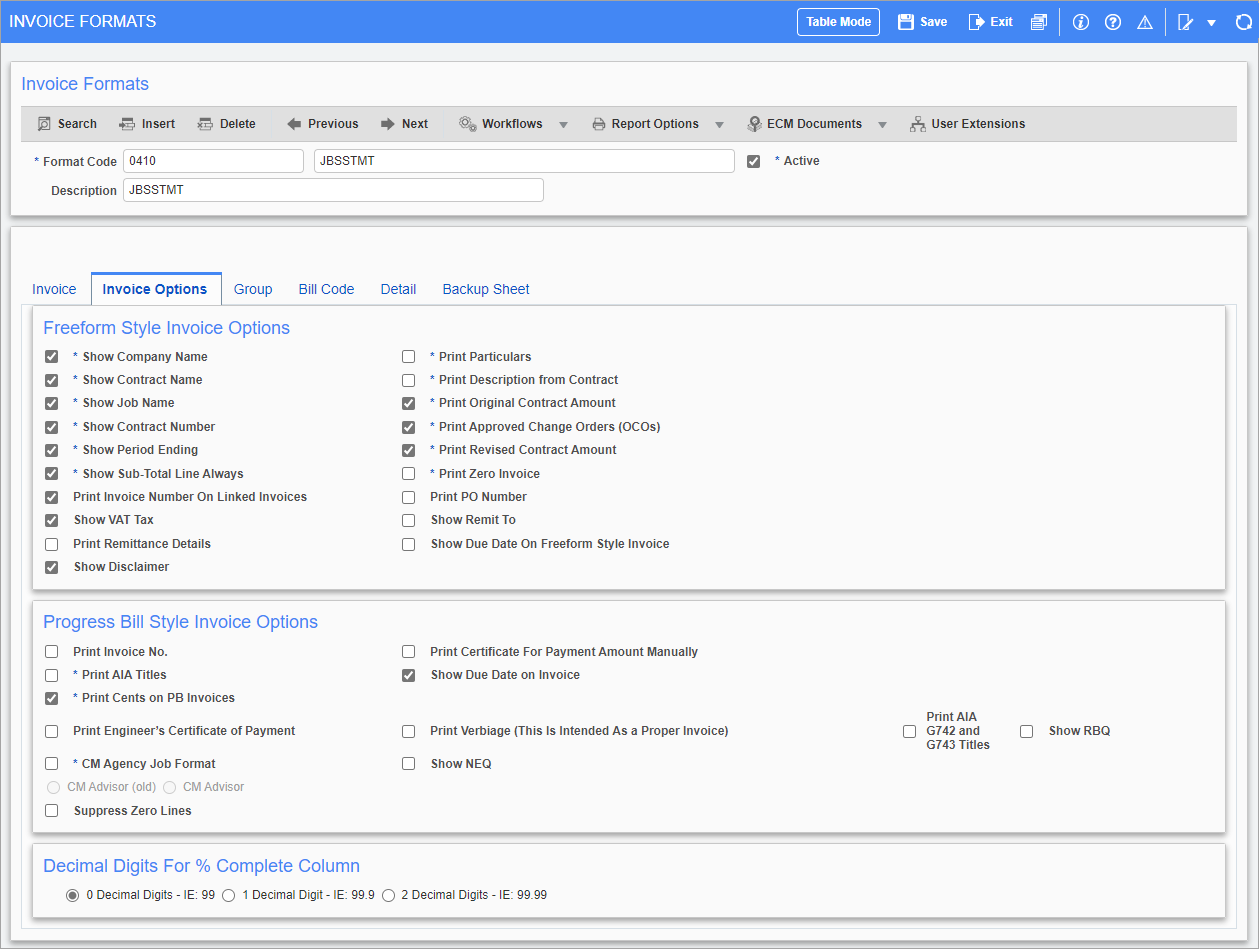
Pgm: JBINVFMT – Invoice Format; standard Treeview path: Job Billing > Setup > Local Tables > Invoice Formats – Invoice Options tab
This tab is used to define overall rules for both free form and progress billing style invoice formats. It is divided into three sections.
The first section of the tab is for free form invoice selections only and the next section is for AIA progress billing style invoices only. The last section is for defining decimal digits in the percent complete column that appears on all progress style invoices.
Freeform Invoice Style Options
The checkboxes available under this heading will control the information printed on the Free Form invoice. A selection of checkboxes are explained below to provide a sense of how these printing options are used.
Show Contract Name − Checkbox
Check this box to show the Job Billing contract name.
Print Invoice Number on Linked Invoices − Checkbox
Check this box to repeat the current invoice number on the link. Unchecked, the linked invoice will not show an invoice number in the heading of the linked invoice.
Show VAT Tax − Checkbox
This box is unchecked by default. When checked, it shows the VAT tax on the JBINVPRT free form invoice format.
Print Remittance Detail − Checkbox
Check this box to print remittance details. If checked, the system will print remittance details entered against the contract (standard Treeview path: Job Billing > Contracts > Enter Contract – Defaults tab). Otherwise, if no details exist at the contract level, it will print remittance details entered at the company control level (standard Treeview path: Job Billing > Setup > Local Tables > Control - Invoice tab).
Show California Notary − Checkbox
Check this box to print the California G702 Notary invoice format. This checkbox is hidden by default, and can be added using Lite Editor.
Print Zero Invoice − Checkbox
Check this box to print a zero dollar free form invoice.
Print PO Number − Checkbox
When checked, the selected PO/WO number will be printed on the header upon billing generation for the free form invoice format JBINVPRT and during invoice printing.
The PO/WO number defaults to the value set in the PO/WO Number field under the Selection Criteria section of the G/C Prepare Billing (JBBILL2) screen if it’s been set to be the default in the PO/WO tab of the Job Setup screen in the Job Costing module (standard Treeview path: Job Costing > Job > Enter Job - PO/WO tab).
NOTE: There can only be one default PO/WO number at a time. If it is a revision, then the system will retrieve the previous PO/WO number from the previous draw. If it is a new draw, then the system will retrieve the default PO/WO number from the job.
Show Remit To − Checkbox
This checkbox is available when the JBPB_U10 invoice format is selected in the Invoice tab. When checked, this will display "Remit to" instead of the default "Architect/Engineer" for the standard formats.
Progress Bill Style Invoices Options
The checkboxes for this style allow the user to show cents on the invoice, to print the invoice number, to print G702 and G703 or G742 and G743 titles (JBPB_G742
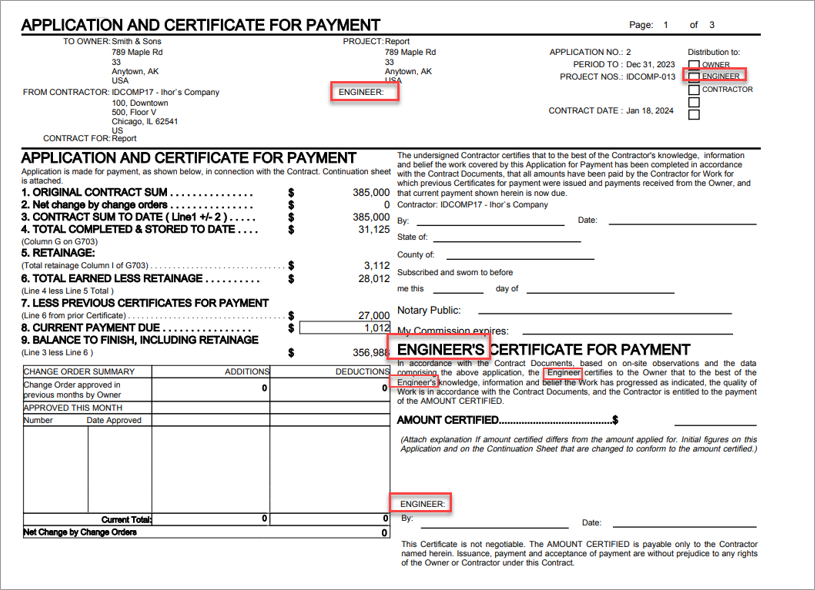
Print Engineer's Certificate of Payment − Checkbox
Check this box to print standard AIA invoices with the term "Engineer" in place of the default term "Architect". For example, check this box to print the "Engineer's Certificate for Payment", as shown in the example below. This checkbox is hidden by default, and can be added using Lite Editor.
Show NEQ, Show RBQ − Checkbox
These checkboxes are hidden by default, and can be added with Lite Editor. These fields are used for the JBPB_C11 report when the business is operating in Quebec and are unchecked by default.
Print Certificate For Payment Amount Manually − Checkbox
If the 'Print Certificate For Payment Amount Manually' box is checked, the current pay due amount will be added to the right section of the billing invoice, under Certificate For Payment replacing the line on the right side of the Amount field. The modification is made to all JBPB standard formats, including JBPB_U10, JBPB_U11, and JBPB_U14.
Example of report with this box checked:

Print Verbiage (This is Intended as a Proper Invoice) − Checkbox
For the JBPB_C10 report, the 'Print Verbiage (This is Intended as a Proper Invoice)' checkbox is hidden and unchecked by default. It can be added to this tab via the Lite Editor. When this box is checked on the Invoice Format screen for the JBPB_C10 report, the verbiage, “This is intended as a proper invoice”, will be printed on the invoice.
Decimal Digits For % Complete Column
Used to set how many decimals to show for the percent complete column that appears on all progress style invoices. There are three options available:
-
0 Decimal Digits - IE: 99
-
1 Decimal Digit - IE: 99.9
-
2 Decimal Digits - IE: 99.99
Group – Tab
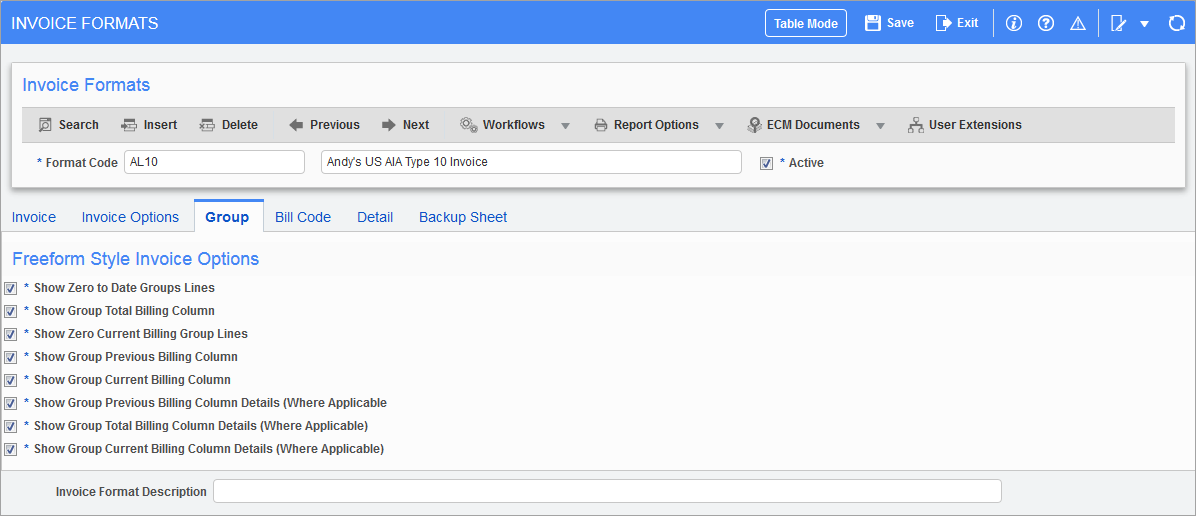
Pgm: JBINVFMT – Invoice Format; standard Treeview path: Job Billing > Setup > Local Tables > Invoice Formats – Group tab
Use this tab to define how the group details are to be defined.
Settings on this tab only apply to Free Format invoicing.
Bill Code – Tab
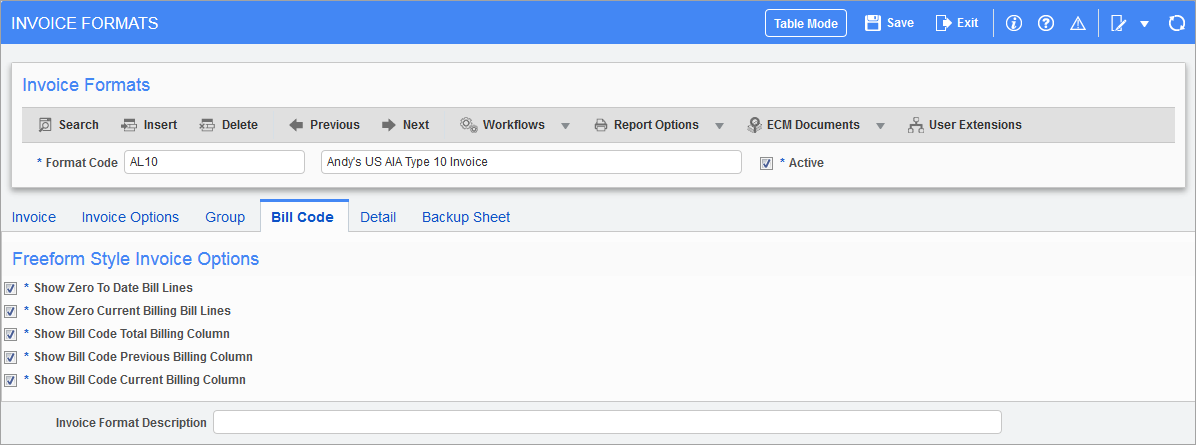
Pgm: JBINVFMT – Invoice Format; standard Treeview path: Job Billing > Setup > Local Tables > Invoice Formats – Bill Code tab
Use this tab to define the rules for printing bill code information.
Settings on this tab only apply to Free Format invoicing.
Detail – Tab
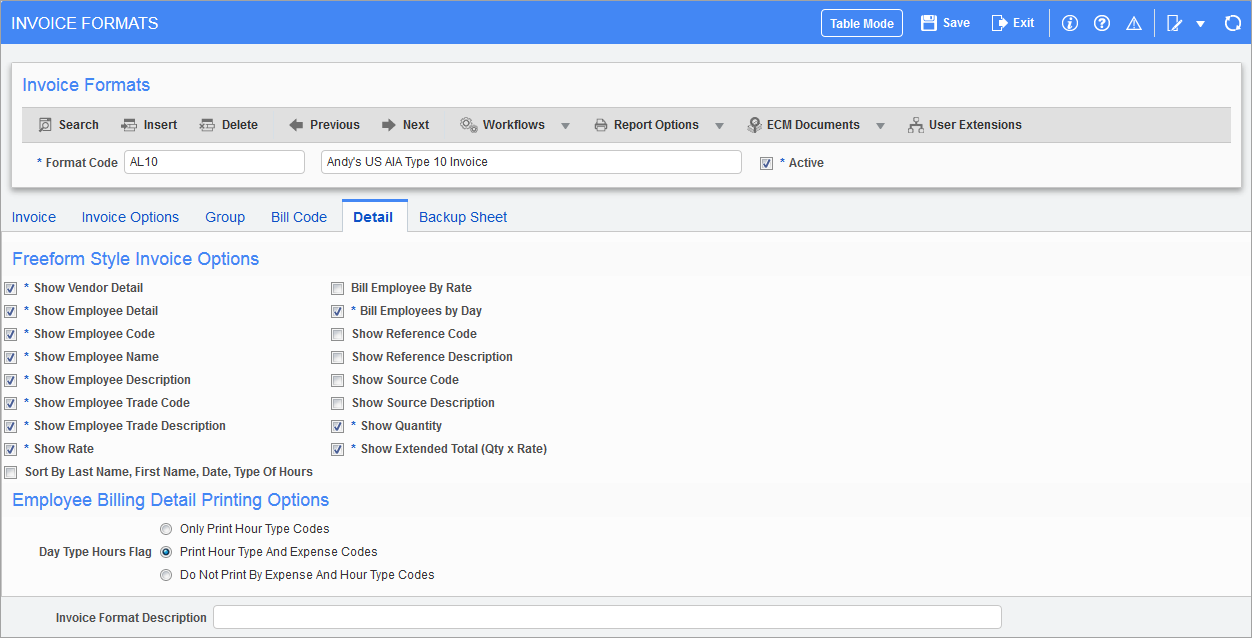
Pgm: JBINVFMT – Invoice Format; standard Treeview path: Job Billing > Setup > Local Tables > Invoice Formats – Details tab
This tab defines what details show for each line on a Free Form invoice style format.
NOTE: To comply with DCAA (defense contractor audit association) requirements that the invoice be per person per trade per day, you must check the 'Bill Employees by Day' checkbox on this tab.
Backup Sheet – Tab

Pgm: JBINVFMT – Invoice Format; standard Treeview path: Job Billing > Setup > Local Tables > Invoice Formats – Backup Sheet tab
This tab allows for definition of what type of data will be seen on the invoice backup sheets. The breakdown is by each billing type. The choices are as is which means that you will print the original JC cost transactions on the backup sheet, replace revenues which means that the backup sheet will create a transaction for the billing amount for every bill line or top up which will create a line for the difference when the job cost transactions do not match the billings.
As Is – Radio Button
When used, the back up sheet will show only the job cost transactions calculated potential revenue (CPR). This may not match the actual billing if overrides have been used or a billing type other than cost has been used.
Replace Revenues – Radio Button
This option will ensure that the backup sheets match the billing to the penny, while the 'As Is' radio button only includes the original JC transactions and such items as milestones may not have any transactions and therefore the backup sheet will not match the bill.
Top Up Revenues – Radio Button
Will add a line for the difference between Job Costing transactions and the actual billing. This would be used when the backup sheet should show overrides, milestones, or billing burdens.