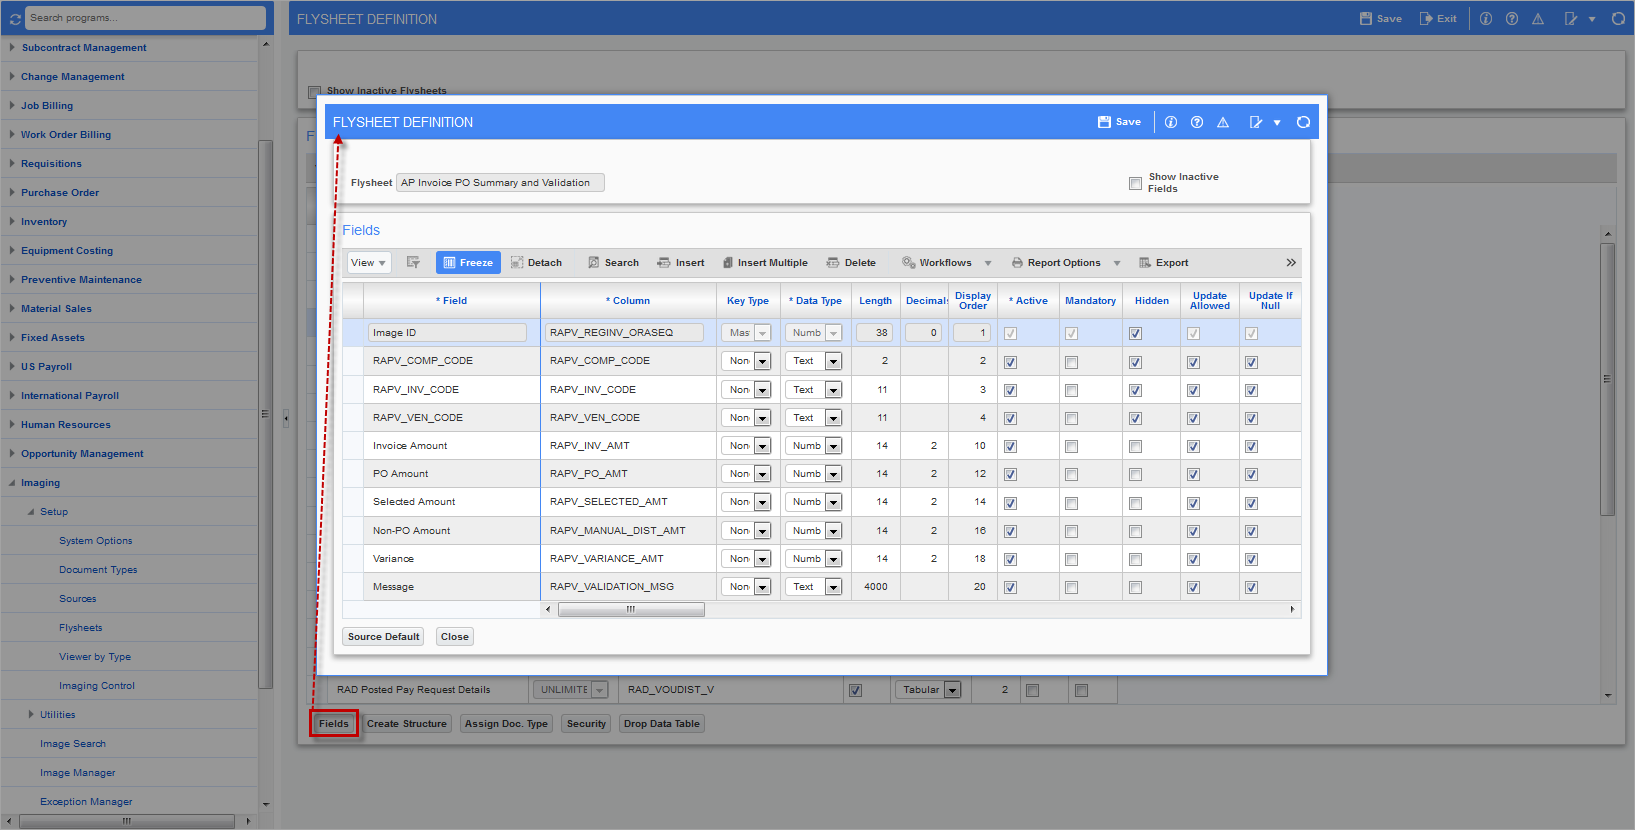
Pgm: IMGFLYFM – Flysheet Definition; standard Treeview path: Imaging > Setup > Flysheets – [Fields] button
Once the flysheet table has been created columns must now be created in the table. These columns and their definitions define the layout of the flysheet and the user interface required for each field. The first field, Image Id, which is always shown in yellow, is a system defined field that must be there and cannot be changed. This field will not be enterable on the flysheet.
Field
Name of the field the user will see.
Column
Name of the actual column in the table. This must be in a format that is a valid Oracle database column name, therefore blanks cannot be left in the name. If the name needs to be split, use underscores (e.g. Invoice_number, Invoice_desc)
Key Type
Select either “None” or “Detail” from the drop-down list. Only the standard field, Image ID, can have the type “Master”. Fields comprising the unique key for the document have the type “Detail”. All other fields should be set to “None”.
If the table has a cardinality of 1 then the value must be “None”.
-
None - Indicates that the field is not part of any discriminator key.
-
Detail - Indicates that this field is part of the key that discriminates detail records from each other. This can only be used when the table cardinality is set to “UNLIMITED”.
Data Type
This is the type of data that will be stored in this column.
-
Text - An open field that allows any type of data to be entered.
-
Date - This field will only accept a valid date. If the field is a date type it will automatically display on the flysheet with a calendar icon next to it.
-
Number - A number field will only accept valid numbers.
Length
Enter the length of the column being created. This is the length of the field. If the field is numeric, make sure that the field is defined large enough to handle decimals.
NOTE: This field may be left blank if the type is date.
Decimals
This is the number of decimal places for the number. For example, if the length is 18 with 2 decimals then the field allows 16 digits (including sign) before the decimal plus 2 decimal places.
NOTE: This field is only required on number type fields.
Display Order
This field indicates the order the field will display on the flysheet. This field is very important when defining lists of values. The list can only be available on a field if the key to the data is a field above. For example, a job list can only be created if a Company Code field exists before it is in the display order.
Active – Checkbox
If unchecked this field will not display on the flysheet.
NOTE: By unchecking a field, it becomes hidden from the user interface on the flysheet, but predefined data can still be passed into CMiC by setting the Default Value column.
Mandatory – Checkbox
If a field is marked as required, the user will not be able to save the flysheet record without entering data in this field. Also, the field will have a small blue triangle next to it on the flysheet indicating required.
Hidden – Checkbox
This checkbox should be used on detail type records, where the key fields are entered in the master record and are to be copied down to the detail without the user knowing that this is happening. The user will not see these fields in the detail record if they are marked as hidden.
Update Allowed – Checkbox
Checked indicates the field can be updated after data has been saved
Update If Null – Checkbox
Checked indicates the field can only be updated once the record has been saved if the field is empty (null).
Display Only – Checkbox
Checked indicates field cannot be updated at all. It is view only regardless if the ‘Update Allowed’ or ‘Update if Null’ boxes are checked.
Currency – Checkbox
This field is only applicable if the field is numeric. If checked the module will automatically display the number with 2 decimal places at all time, and will comma-group numbers greater than 1000. For example, if the value is 98, the module will display it as 98.00, and a value of 10998 will display as 10,998.00. Also, if checked, this field will display right aligned.
Case
This field indicates the how the data entered will be stored. This is only applicable for text type fields – use the default for number and date type fields.
-
Mixed - Will save the data as entered.
-
Upper - Will convert all data entered to upper case when saving the record.
-
Lower - Will convert all data entered to lower case when saving the record.
-
Init Cap - This will convert all entered data to have the first letter of each word capitalized and the rest lower case.
List Of Values
-
None - If selected this indicates that the field will not have an LOV available. This is the default.
-
Valid Data List - If this option is selected, this means that there will be an LOV available on this field, and the data for the LOV is manually entered via this screen in the next step.
-
CMiC Data Object - This refers to all other values in the drop-down list. An LOV will be attached to the field which will list the data associated with the selected option. For example, a CMiC company list.
[Valid Data] – Button
If the List of Values field was set to “Valid Data List” then the valid data needs to be entered. This button opens a window where valid data for this field is entered.
[LOV Properties] – Button
If the LOV is against a defined table, the system requires the key to the table to be defined. The Flysheet field must be matched to the pre-defined key fields. This is used to link parameters in the LOVs to preceding fields in this flysheet. For example, a Phase LOV should have the company code and job code as part of the lookup for the LOV.
Code Size
This field is used to determine how large the display of the Code field on the JSP will be. For example, the phase code in Job Costing can be up to 16 characters, but if you only use a maximum of 8 then enter an 8 here. It will make the Code field smaller on the flysheet. If only the description is desired to be displayed, not the code, then enter a 0 in this field.
Desc Size
This field is used to determine how large the display of the Description field will be.
Validate Using LOV – Checkbox
If checked, the module will ensure the data entered in the field is valid by the list of values. If unchecked it means that the field may have an LOV of suggested data, but the user does not have to enter a value that exists in the LOV.
Display Type
This field determines the look of the field when displayed on the flysheet.
-
Drop Down List - This is usually used when there is a very limited list of valid values.
-
List of Values Pop-Up Window - This type of list should be used when there could be a lot of data, such as a vendor list or a project list.
-
Single Line Text - This should be used for fields that are limited in length, such as invoice codes where there is not a valid set of values.
-
Multi Line Text - This should be used for description type fields where the user is expected to enter quite a bit of free form information.
-
Date With Calendar Pop-Up Window - This should only be applied against a date field. This will automatically display the Calendar pop-up window next to the date field.
Display Columns
This field determines how wide the data entry field should be.
NOTE: Only required if the display type is multi line text.
Display Rows
This field determines how many rows of the length defined in the previous field will be displayed.
When the display columns and rows are combined, they make a single text entry area.
NOTE: Only required if the display type is multi line text.
Lower Bound
Enter the lowest/smallest value allowed in this field. This field restricts the values that can be entered. For example, in a numeric field, if 1 is the lower bound value, then the user may not enter .05 or –1 in the field. This can be used for character fields as well.
Upper Bound
Enter the upper/largest value allowed in this field. This field restricts the values that can be entered. For example, in a numeric field, if 99 is the lower bound value, then the user may not enter 99.5 or 100. This can be used for character fields as well.
Default Data
Enter a default value for the field. Data entered here will automatically display on the flysheet. Default data should only be used if it is unlikely that the user will need to change the value. Make sure the default data entered is not larger than the field definition.
Help Message
Enter hint line text for this field. The message entered in this field will display on the flysheet entry screen when the user puts the cursor on this field.
Position
Indicates where in the flysheet the field should be located (in a display order).
Colspan
Indicates how many columns in the flysheet the field should occupy.
[Source Default] – Button
Allows the default value of the current field to be dependent of the Imaging source where the document resides.