Imaging - Defining the Search
Defining a search is done directly in the CMiC Enterprise screen that requires the search to be added. The ability to define the search has been added to the Block Toolbar of each screen.
This facility has been designed to be as simple to use as possible, but it still requires that the user be familiar with table joins, functional operators, plus and/or statements.
-
Open the screen that the image search is to be defined for.
-
Move to the section of the screen that the search is to be functional on. This may require entering or querying data.
-
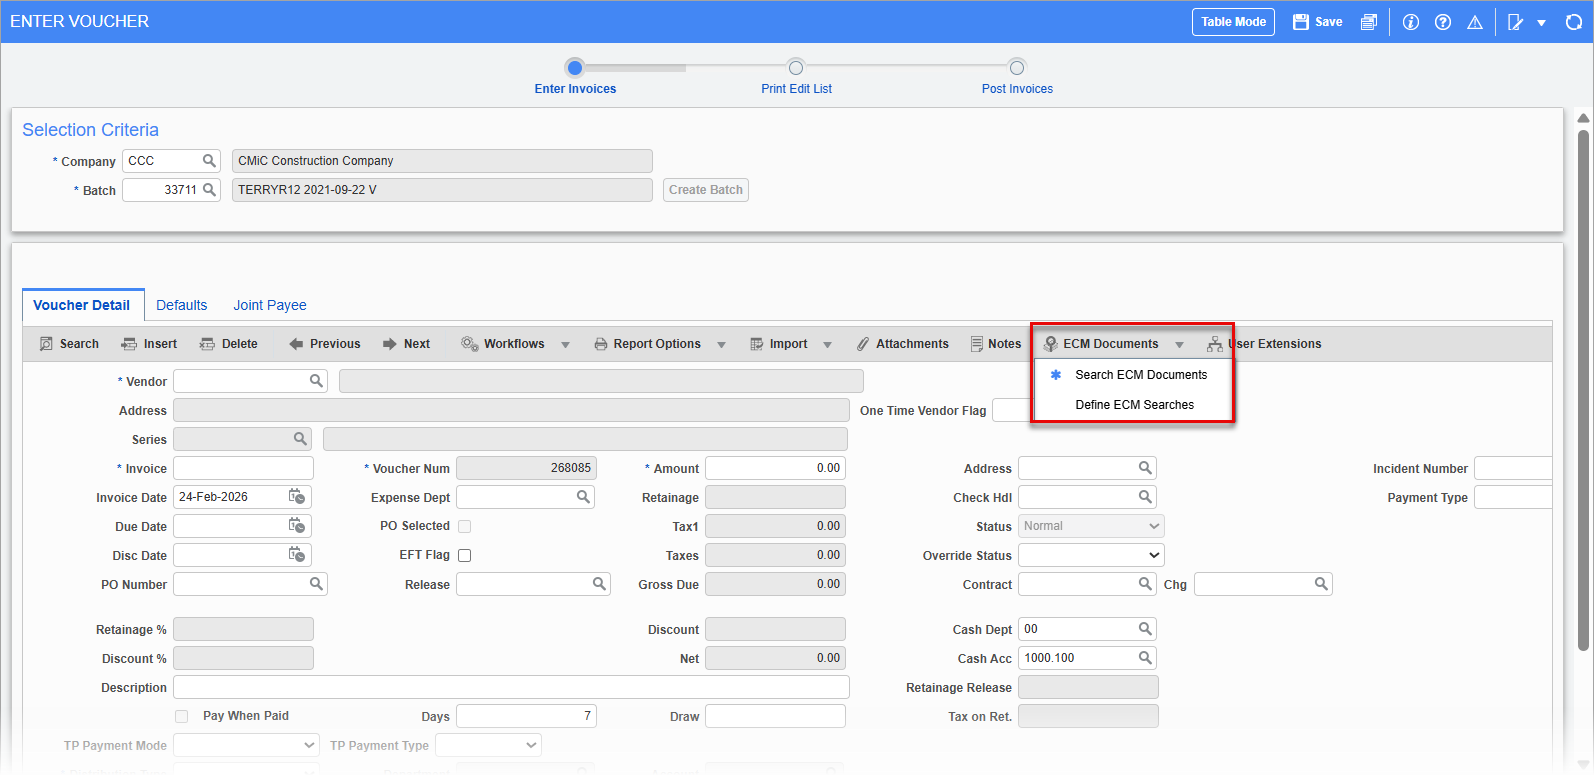
Click the [ECM Documents] button and select "Define ECM Searches".
This is the screen that is used to define/create the image searches required for the screen. The system allows for more than one image search per screen.
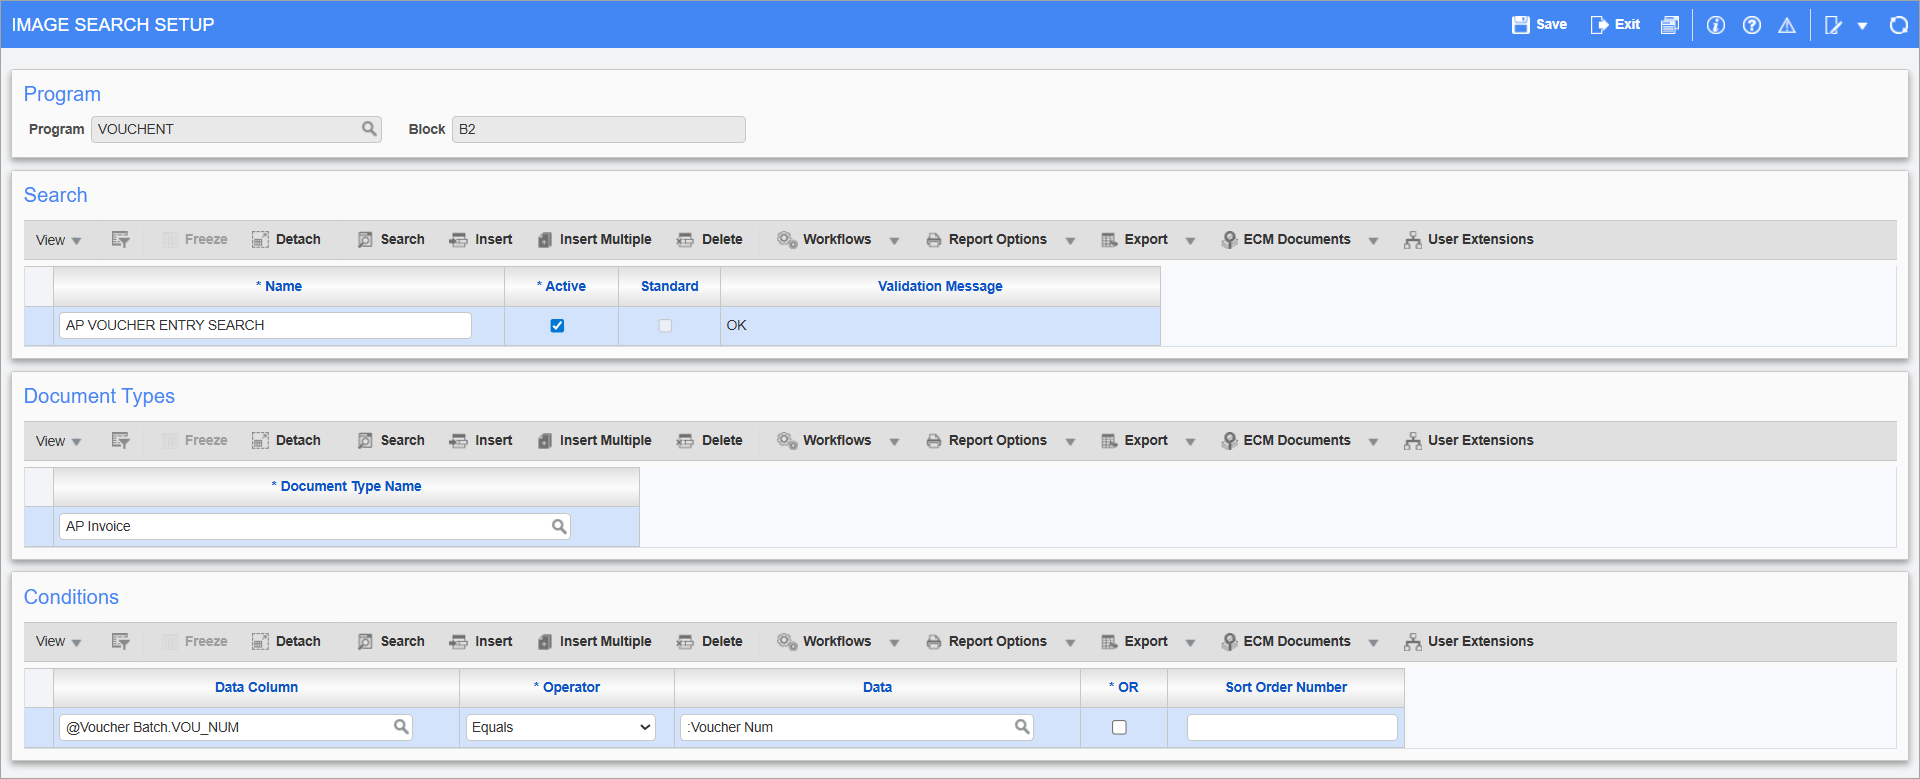
Pgm: SYSSRCH – Image Search Setup; standard Treeview path: Accounts Payable > Voucher > Enter Voucher – [ECM Documents] button – Define ECM Searches option
The screen is split into four main sections.
Program
This will display the program name and block that the search is being defined for.
Search
This is the name of the search being defined.
Document Types
This is the document type(s) included in the search.
Conditions
This is the area that contains the where clause for the search.
Step 1: Naming the Search
The system requires that each search defined be given a unique name. This is the name that the end user will see when they are asked to select a search if more than one is defined. This name need only be unique within the screen/section combination.
The system will automatically mark the search as active when a new search is created. If this field is marked as inactive, users will not be able to see this search when in the screen.
Step 2: Applying Document Types
Each search can have multiple document types included. For example, there may be multiple types of document associated with a job code, contracts, invoices, insurance certificates, etc.
Only one document type can be entered at a time, as the conditions must be applied when the document type is entered. Select the document type from the list of values then move on to step 3.
Step 3: Defining the Search Conditions
In this step, the user creates the required where statements to return the expected data. An AND between each definition line is assumed unless the 'OR' checkbox for the line has been checked. In order for a line to be valid, it must contain data in all three Data Column, Operator, and Data columns.
Use the list of values pop-up window to populate the Data Column and Data fields with the appropriate Block Field source. Users should be looking for fields in their flysheets (in either column) and comparing them against the ADF screen to define how the query validates. For example, as per the screenshot above, the B2 block of the VOUCHENT program will look at the fields in the Voucher Details tab of the AP Enter Voucher screen. You can also manually type in a value in the Data field if necessary.
The Operator field can be one of any of the values in the list which are mostly standard math operators, such as equal, greater than, less than, etc. See the table below for details on each operator and its function.
|
Operator |
Function |
|---|---|
|
Equals (=) |
Column A must be an exact match to column B. |
|
Not Equal (!=) |
Column A cannot match column B. |
|
Greater Than (>) |
Column A is a larger value than column B (using either a numeric or text ordering depending on the type of field). |
|
Less Than (<) |
Column A is a smaller value than column B (using either a numeric or text ordering depending on the type of field). |
|
Greater Than or Equals (=>) |
Column A is a larger value than or is an exact match to column B (using either a numeric or text ordering depending on the type of field). |
|
Less Than or Equals (=<) |
Column A is a smaller value than or is an exact match to column B (using either a numeric or text ordering depending on the type of field). |
|
Is Null |
Column A has no value. |
|
Is Not Null |
Column A has some value. |
|
Contains |
Column A matches a literal that automatically is wrapped with “%” on either end, or the value of column B that is automatically wrapped with %'s on either end. |
|
Ends With |
Column A matches a literal with a “%” at the beginning or the value of column B with a “%” at the beginning. |
|
Starts With |
Column A matches a literal with a % on the end or the value of column B with a % on the end. |
|
In |
Column A matches one of a fixed list of values. This field can only be used with a literal string. |
|
Not In |
Column A does not match one of a fixed list of values. This field can only be used with a literal string. |
|
Like |
Column A matches a literal that uses standard oracle pattern matching of “%” or “_”. |
|
Not Like |
Column A does not match a literal that uses standard oracle pattern matching of “%” or “_”. |