Overview – ACA Compliance Reporting
Form 1095-C is how employers should report employee-eligible benefits for the calendar year to the IRS. By January 31 of each year, employers must provide a Form 1095-C to each of their full-time employees. A full-time employee is defined by the IRS as:
Full-time employee: A full-time employee is an employee who, for a calendar month, is employed an average of at least 30 hours of service per week with the employer. For this purpose, 130 service hours in a calendar month is treated as the monthly equivalent of at least 30 hours per week. An employer must complete information for all twelve months of the calendar year for any of its employees who were full-time employees for one or more months of the calendar year. (www.irs.gov/instructions/i109495c/ar01.html):
A single Form 1094-C should also be filed, providing company totals to the IRS.
Security Setup
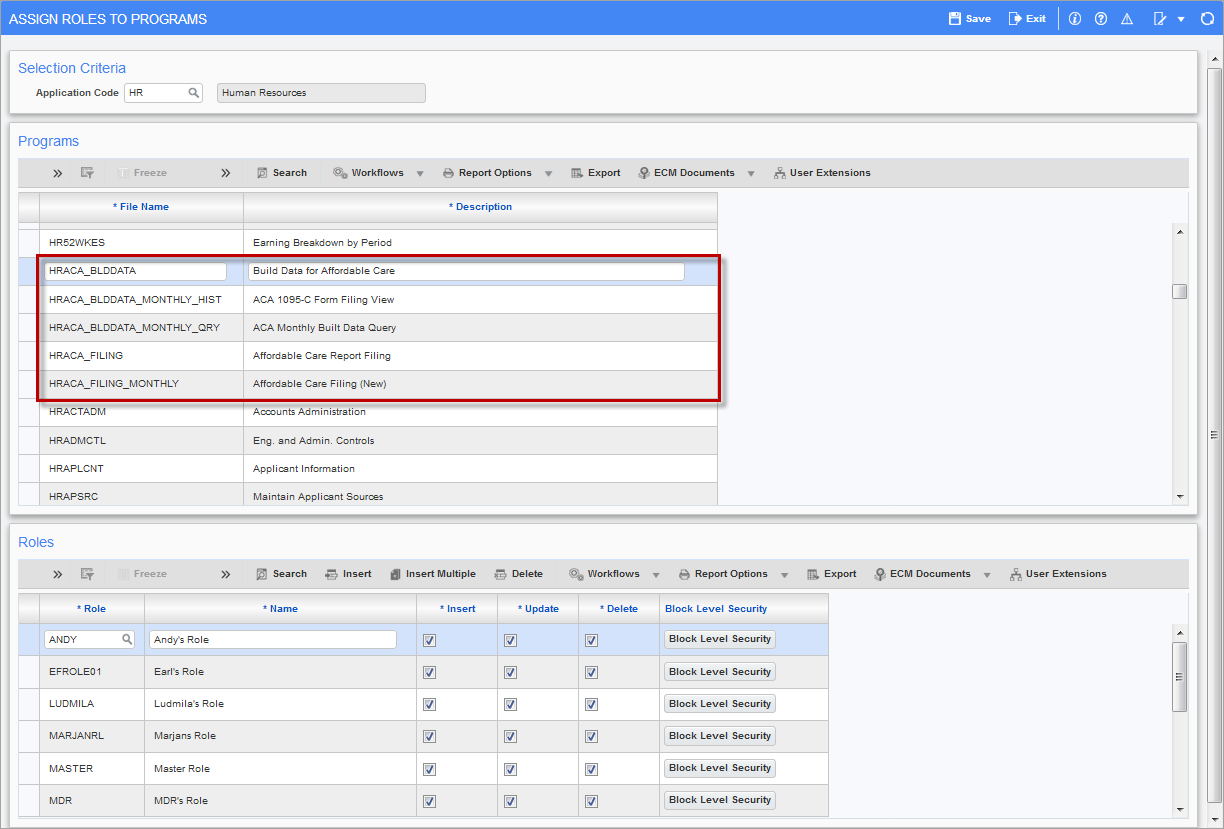
Pgm: FORMROLE – Assign Role to Programs; standard Treeview path: System > Security > Roles > Assign Roles to Programs
To set up user security rights for ACA related programs, use the Assign Role to Programs screen.
In the Application field, select “HR”. Then, in the Programs section, scroll down to the ACA related programs, framed in red in the above screenshot, and select a program. The Roles assigned to the program are listed under the Roles section. Next, navigate to the Roles section and click the [Insert] button in the menu bar. In the Role field of the new row, press the F9 keyboard key and select the user’s role via the pop-up window. Then, use the ‘Insert’, ‘Update’, and ‘Delete’ checkboxes to set the relevant user-privileges.
Required Employee Information for Lines 14, 15, and 16 of Form 1095-C
For the system to correctly produce ACA compliance data for lines 14 to 16, administrators should maintain the following information:
-
Health plan start and end dates each year.
-
Employee start and end dates within each year.
-
Employee hire, termination, and other dates relevant to ACA compliance, such as those related to spouses and dependents.
-
Union status and union status change dates.
-
Eligibility rules for benefits available in the HR module so the system can correctly generate monthly ACA compliance data for employees.
The system uses the above employee information to automatically generate monthly ACA compliance data for employees. For more detail, please refer to the Monthly Builds of ACA Compliance Data & Screens to View/Edit Data .
NOTE: Administrators should not change for plan rates without ending and re-starting the benefits.
Part 1 of Form 1095-C (Lines 1-13)

The first part of Form 1095-C concerns basic information about the employee and their employer. This information is already in the Enterprise system, so no modifications or additional data entry is required for these fields.
Part 2 of Form 1095-C (Lines 14-16)

The second part of the form requires companies to report information for every full-time employee, for each of the following lines:
Line 14 – Offer of Coverage
For each full-time employee, employers must designate, by month, whether coverage was offered. Please note that what is asked is not whether it was elected, but simply if the employee was eligible.
To report the offer of coverage for each month, the IRS provides a set of nine possible codes referred to as Code Series 1. These codes tell the IRS not only whether coverage was offered, but also if dependents were eligible, whether it met minimum coverage requirements, etc.
Code Series 1: Offer of Coverage
The Code Series 1 indicator codes specify the type of coverage, if any, offered to an employee, the employee’s spouse, and the employee’s dependents. In regards to an employee’s dependents, an offer of coverage is treated as having been made only if the offer of coverage is made to an unlimited number of dependents regardless of the actual number of dependents, if any, that an employee has during any particular calendar month.
The following URL lists the Code Series 1 indicator codes and their descriptions, as of 2018: www.irs.gov/instructions/i109495c/ar01.html#d0e365.
CMiC Modification for Affordable Care Act Reporting
The Benefit And Deduction Setup screen has been modified to allow assigning of Code Series 1 codes to each plan option offered for health-care benefits.
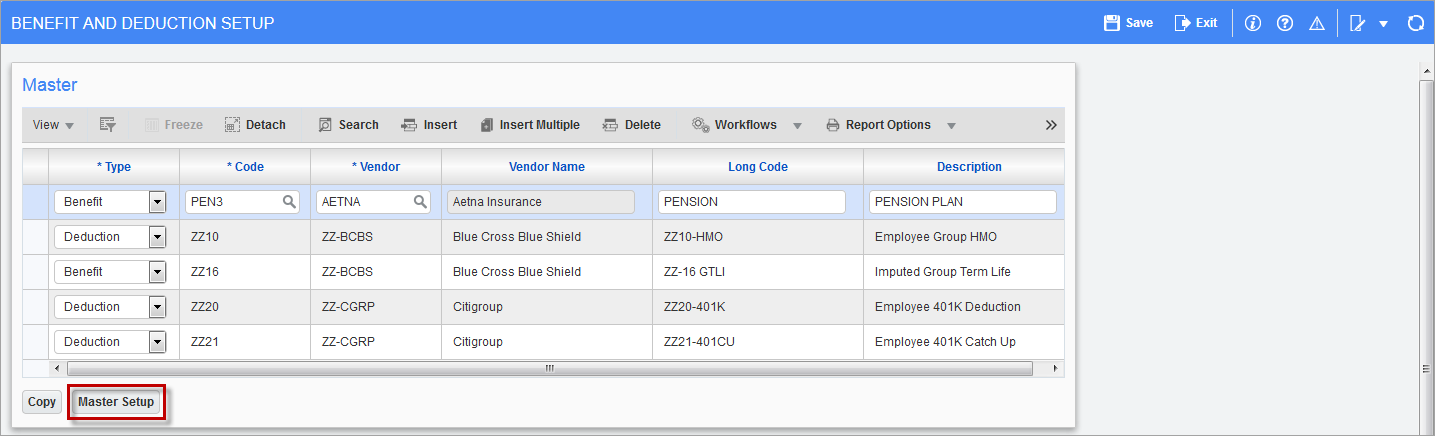
Pgm: HRBDADM – Benefit And Deduction Setup; standard Treeview path: Human Resourcs > Benefit Administration > Benefit/Deduction Administration > Benefit/Deduction
Pressing the [Master Setup] button, highlighted in red above, to launch the following screen:
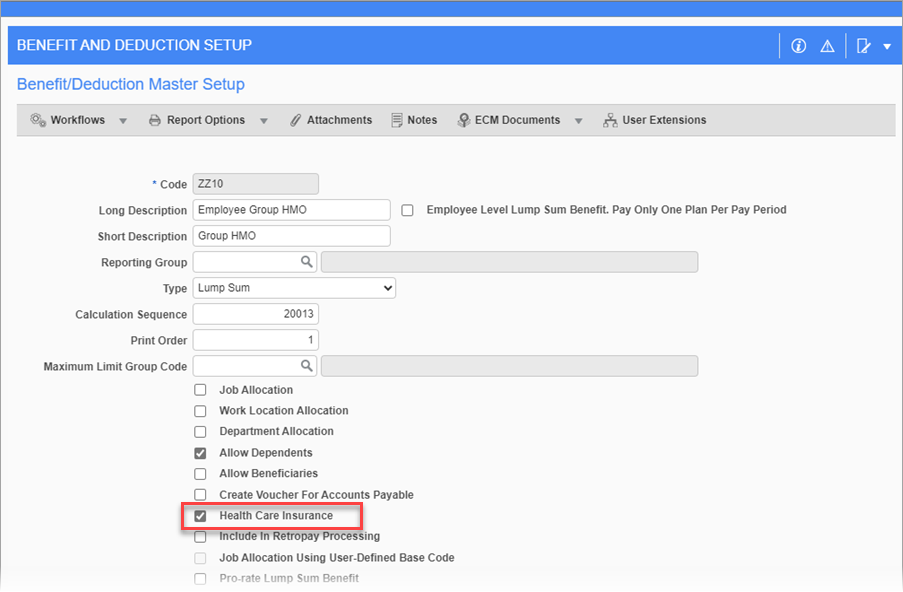
Pgm: HRBDADM – Benefit And Deduction Setup; standard Treeview path: Human Resourcs > Benefit Administration > Benefit/Deduction Administration > Benefit/Deduction – [Master Setup] button
Check the ‘Health Care Insurance’ checkbox, highlighted above. This causes the Health Care tab to appear in the Detail section of the Benefit And Deduction Setup screen. It is in this section that Code Series 1 codes can be assigned to the plan of a health-care benefit (as shown in the screenshot below). If the employer provides self-insured health coverage for a plan, then the ‘Employer Provides Self-Insured Health Coverage’ checkbox should be checked.
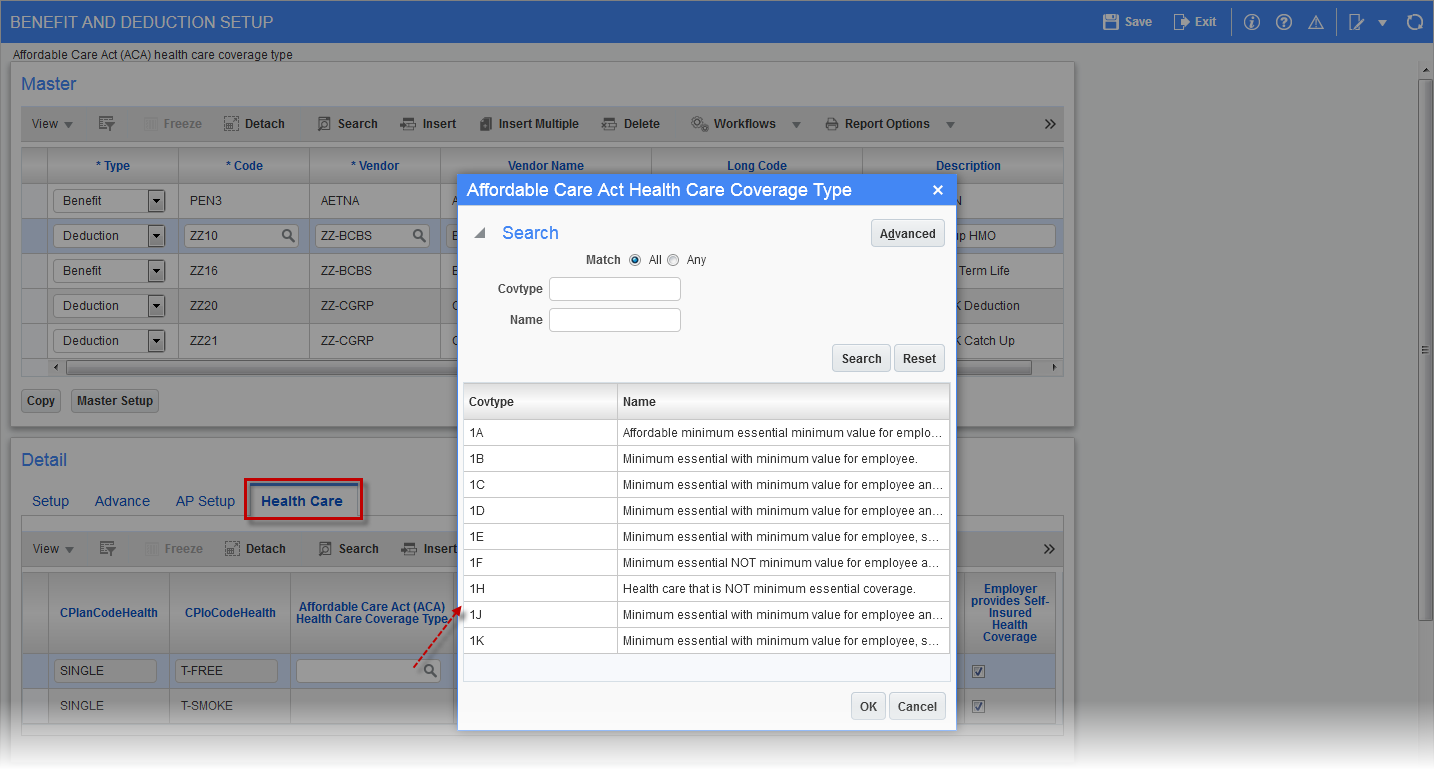
Pgm: HRBDADM – Benefit And Deduction Setup; standard Treeview path: Human Resourcs > Benefit Administration > Benefit/Deduction Administration > Benefit/Deduction
Line 15 – Employee Share of Lowest Cost Monthly Premium, for Self-Only Minimum Value Coverage
Line 15 should only be completed if any of the codes 1B, 1C, 1D, or 1E appear on line 14, either in the “All 12 Months” box or in any of the monthly boxes. This line is used to enter the amount of the employee share of the lowest-cost monthly premium for self-only minimum essential coverage providing minimum value that is offered to the employee. If the employee is offered coverage but is not required to contribute any amount towards the premium, “0.00” should be entered and the line should not be left blank.
Enterprise records an employee’s current and past eligibility for all benefits and produces data for Line 15 based on the employee’s eligibility for the entire year. No setup is required for Line 15, as the Enterprise system automatically defaults the dollar value based on CRA descriptions and information found in employee records.
For the system to correctly produced data for Line 15, administrators must maintain the correct start and end dates for an employee’s eligibility record, along with the other dates and information, as outlined in the previous section, Required Employee Information for Lines 14, 15, & 16 of Form 1095-C.
Line 16 – Applicable Section 4980H Safe Harbor
Line 16 is used to enter Code Series 2 indicator codes to report for one or more months of the calendar year for which one or more of the following situations applied to the employee:
-
The employee was not employed or in full-time employment.
-
The employee enrolled in the minimum essential coverage offered.
-
The employee was in a Limited Non-Assessment Period with respect to section 4980H(b).
-
Non-calendar year transition relief applied to the employee.
-
The employer met one of the section 4980H affordability safe harbors with respect to this employee, or the employer was eligible for multi-employer interim rule relief for this employee.
Be advised that more than one situation can apply to the same employee in the same month. For example, an employee could have been enrolled in health coverage for one month, during which they were not a full-time employee. However, only one code may be used in this line for each calendar month. For any month in which an employee enrolled in minimum essential coverage, indicator code 2C should be used. For an employee who did not enroll in health coverage, there are some specific ordering considerations. For details, consult the descriptions of the Code Series 2 indicator codes as given by the instructions from the IRS: www.irs.gov/instructions/i109495c/ar01.html#d0e365:
Line 16 also does not require a special setup, as the Enterprise system automatically determines the Code Series 2 code for each month, for each employee, based on each employee’s start and end dates of employment, number of hours worked per month, and health coverage information.
Part 3 of Form 1095-C (Lines 17-34)

The last section of ACA reporting is required for companies that are self-insured. Such companies should report information about their employees’ dependents that were covered by the plan.
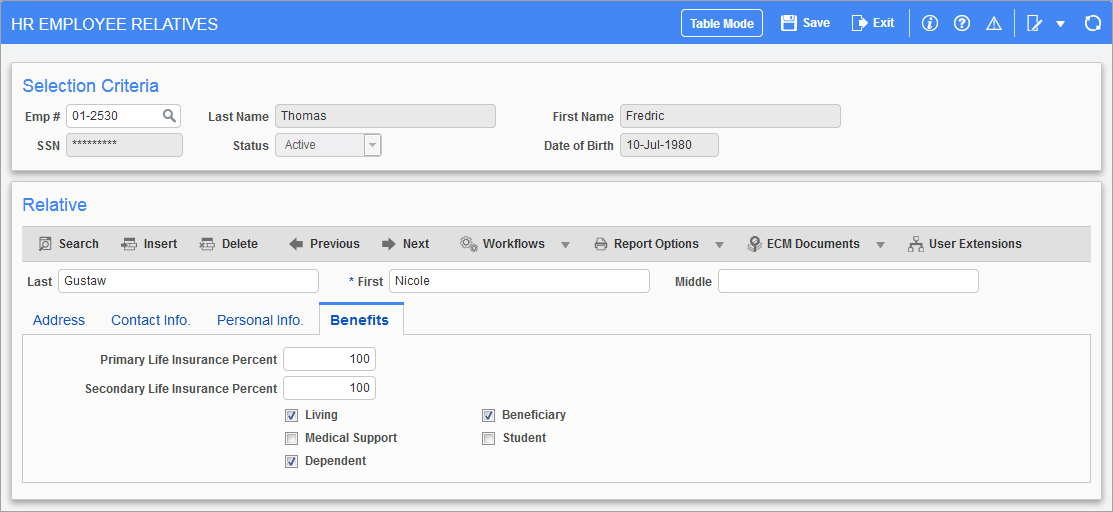
Pgm: HREMPREL – HR Employee Relatives; standard Treeview path: Human Resources > Personnel > Employee Relatives
Enterprise’s functionality allows administrators to track an employee’s relatives. For instance, the Employee Relatives screen, shown above, can store a relative’s address, contact information, personal information, and basic benefit information.
There are also screens which either administrators or employees can use to enroll employee dependents for specific plans. HR personnel can use either the Dependent Deductions/Benefits screen (shown below) to enroll dependents to specific plans, and Employee Self Service allows employees to enroll their dependents themselves.
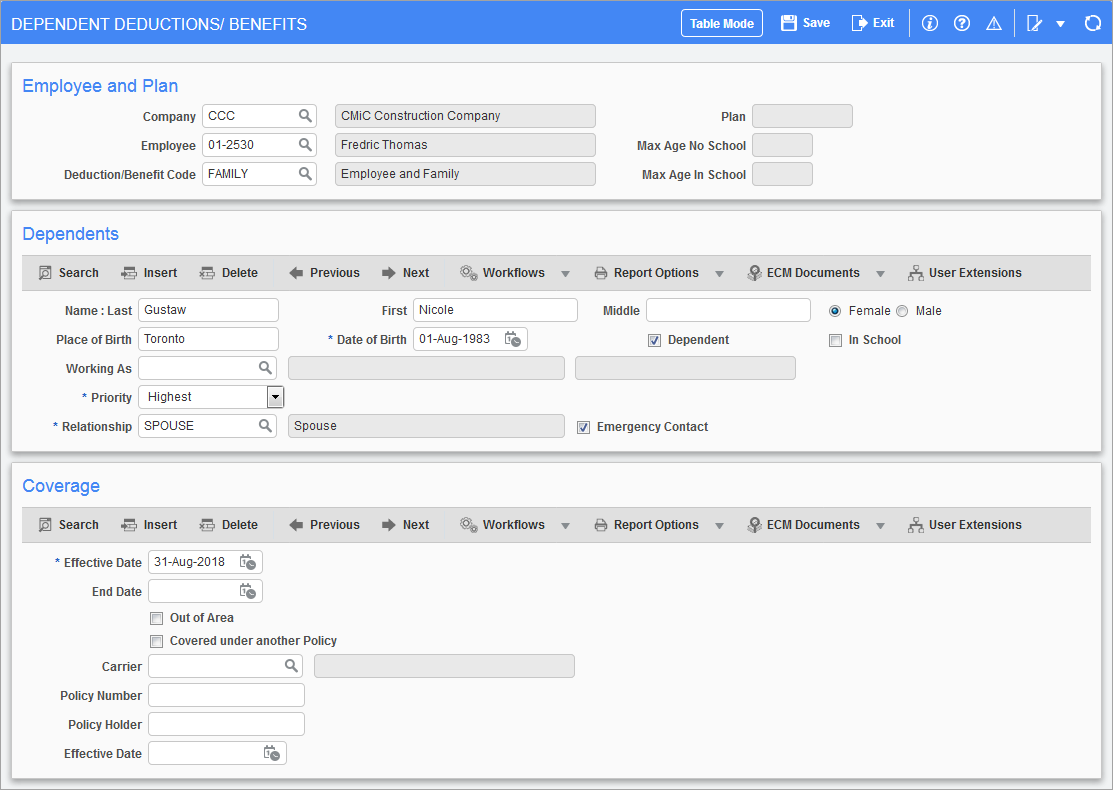
Pgm: HRDEPDED – Dependent Deductions/Benefits; standard Treeview path: Human Resources > Benefit Administration > Benefits > Dependent
HR personnel can also use the [Enroll Dependents] button on the Eligibility Administration screen for the same purpose.
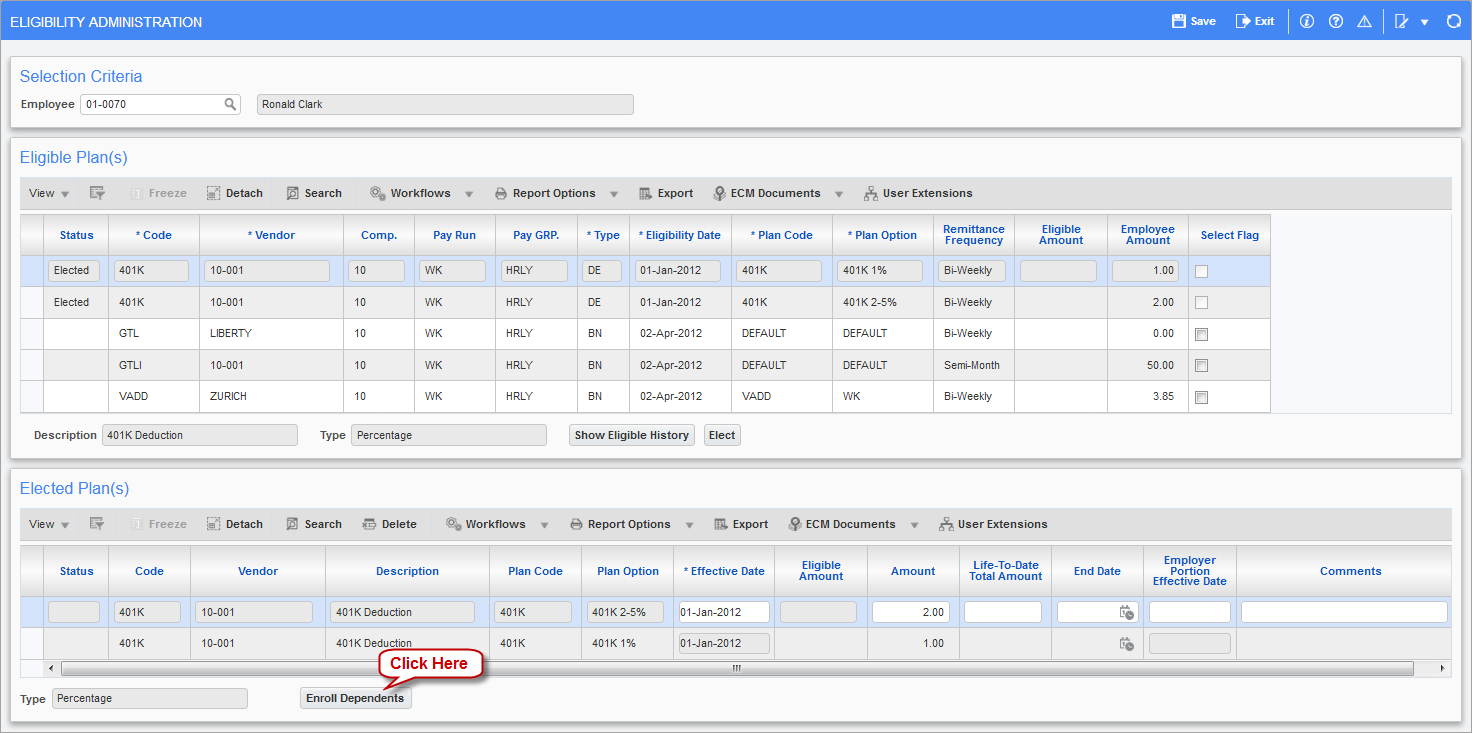
Pgm: HRELGADM – Eligibility Administration; standard Treeview path: Human Resources > Benefits Administration > Benefit/Deduction Administration > Election By Employee
Monthly Builds of ACA Compliance Data & Screens to View/Edit Data
An automatic process has been added to CMiC Enterprise to build ACA compliance data for each employee, for the previous month, using the employee information outlined in the Required Employee Information for Lines 14, 15, & 16 of Form 1095-C section of this guide.
To view or edit previously generated ACA compliance data, the ACA Monthly Build sub-menu has been added to the Human Resources module (standard Treeview path: Human Resources > Reports Affordable Care Act > ACA Monthly Build).
Enable Monthly ACA Process to Automatically Build ACA Compliance Data
To allow the system to automatically build ACA compliance data, launch the System Options screen, shown below, and on the General tab, click the [Job Queues] button.
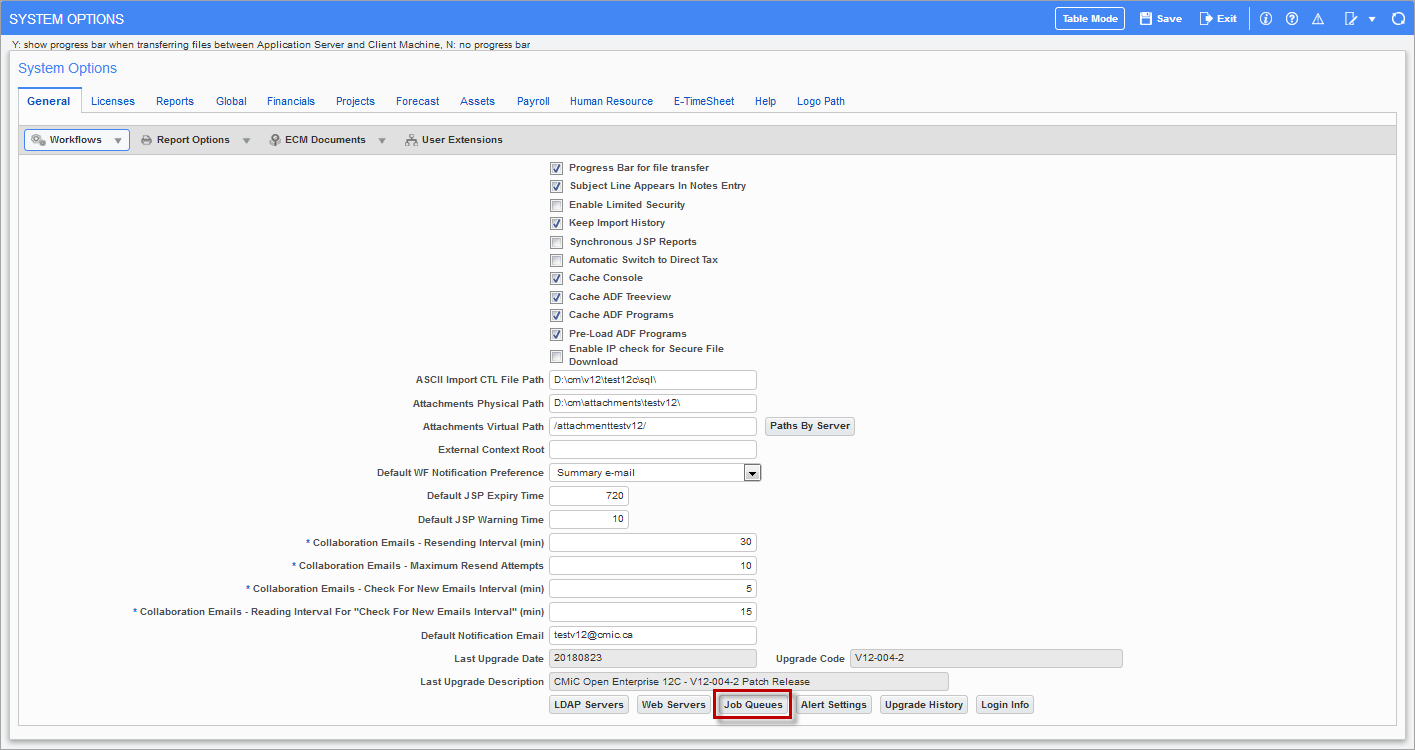
Pgm: SYSOPT – System Options; standard Treeview path: System > Setup > System Options – General tab
In the launched pop-up, shown below, search for the Payroll ACA Build Monthly Utility option (framed in red) and check the ‘Enabled’ box if it is not checked already.
![Screenshot of System Options – General Tab – [Job Queue] button.](../../../../../Resources/Images/Greenshades_12c/Step_3_CMiC_Setup_for_Integration_33.png)
Pgm: SYSOPT – System Options; standard Treeview path: System > Setup > System Options – General Tab – [Job Queue] button
ACA Monthly Built Data Query
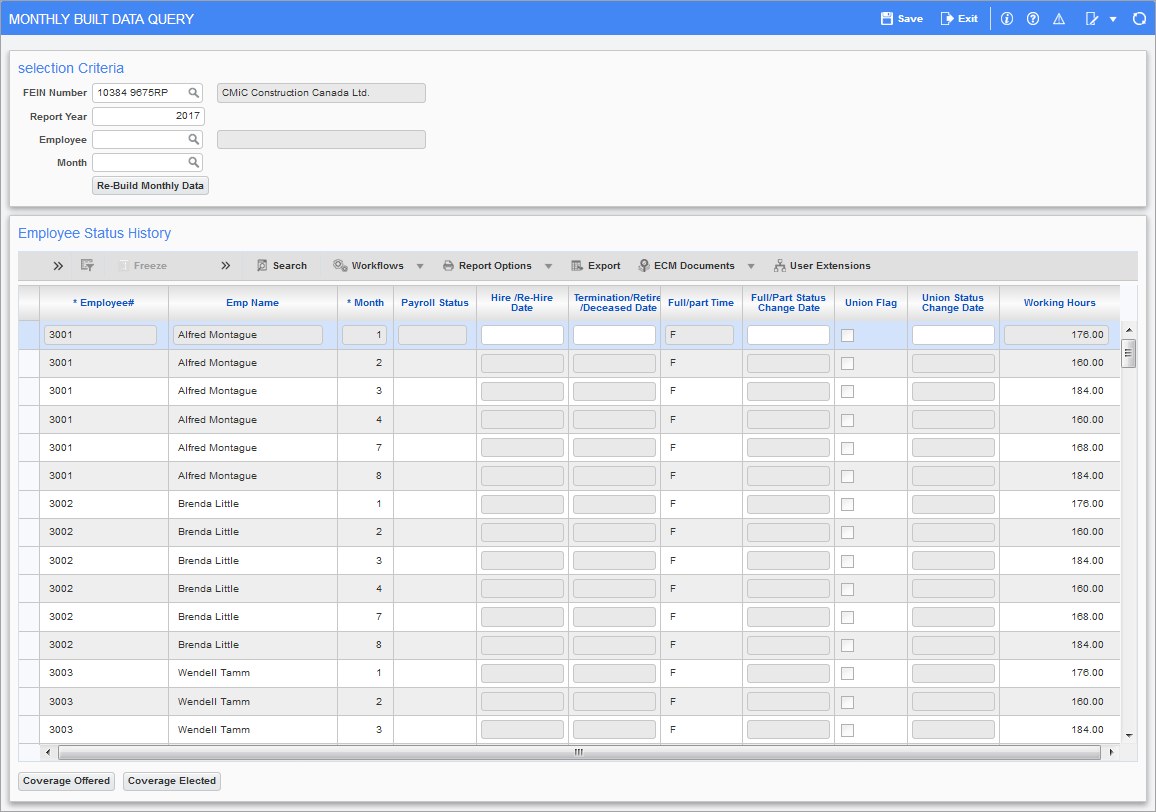
Program: HRACA_BLDDATA_MONTHLY_QRY – ACA Monthly Built Data Query; standard Treeview path: Human Resources > Reports > Affordable Care Act > ACA Monthly Build > ACA Data Query
This screen is used to view all changes made to employee information that are relevant to ACA compliance reporting, as this could impact what gets reported for the employee.
Selection Parameters – Section
FEIN
Enter/select the FEIN for the employee company.
Report Year
Enter the year for ACA compliance reporting.
Employee
Enter/select a particular employee or leave this field blank to run the report for all employees.
Month
Enter/select the month for which ACA compliance data has been built or leave this field blank to select all months with built data.
[Re-Build Monthly Data] – Button
Click this button to run the Payroll ACA Build Monthly utility to rebuild the ACA compliance data for the specified parameters. In the popup, enter the month to rebuild the data for and click the [Build Data] button.
Employee Status History – Section
This section displays relevant information for all months with ACA data. The following table provides details about the columns found in this section:
|
Column |
Description |
|---|---|
|
Employee# |
The employee number. |
|
Month |
The calendar month. |
|
Payroll Status |
Entries appear in this column only if the employee’s payroll status changed, in which case the new status is displayed. |
|
Hire/Re-Hire Date |
Entries appear in this column only if the employee was hired or re-hired. |
|
Termination/Retire/ Deceased Date |
Entries appear in this column only if the employee was terminated, retired, or deceased. |
|
Full/Part Time |
This column indicates whether the employee was full-time (F) or part-time (P) for the month. |
|
Full/Part Status Change Date |
Entries appear in this column only if the employee’s full-time or part-time status changed, in which case the date of the change is displayed. |
|
Union Flag |
This column indicates whether the ‘Union’ box for the employee was checked or not for the month. |
|
Union Status Change Date |
Entries appear in this column only if the employee’s union status changed, in which case the date of the change is displayed. |
|
Working Hours |
Hourly Employees: displays the number of all wage hours worked for the corresponding month, as per the employee’s timesheets. Salaried Employees: the system does not include any timesheet hours posted against Normal hours worked. |
[Coverage Offered] – Button
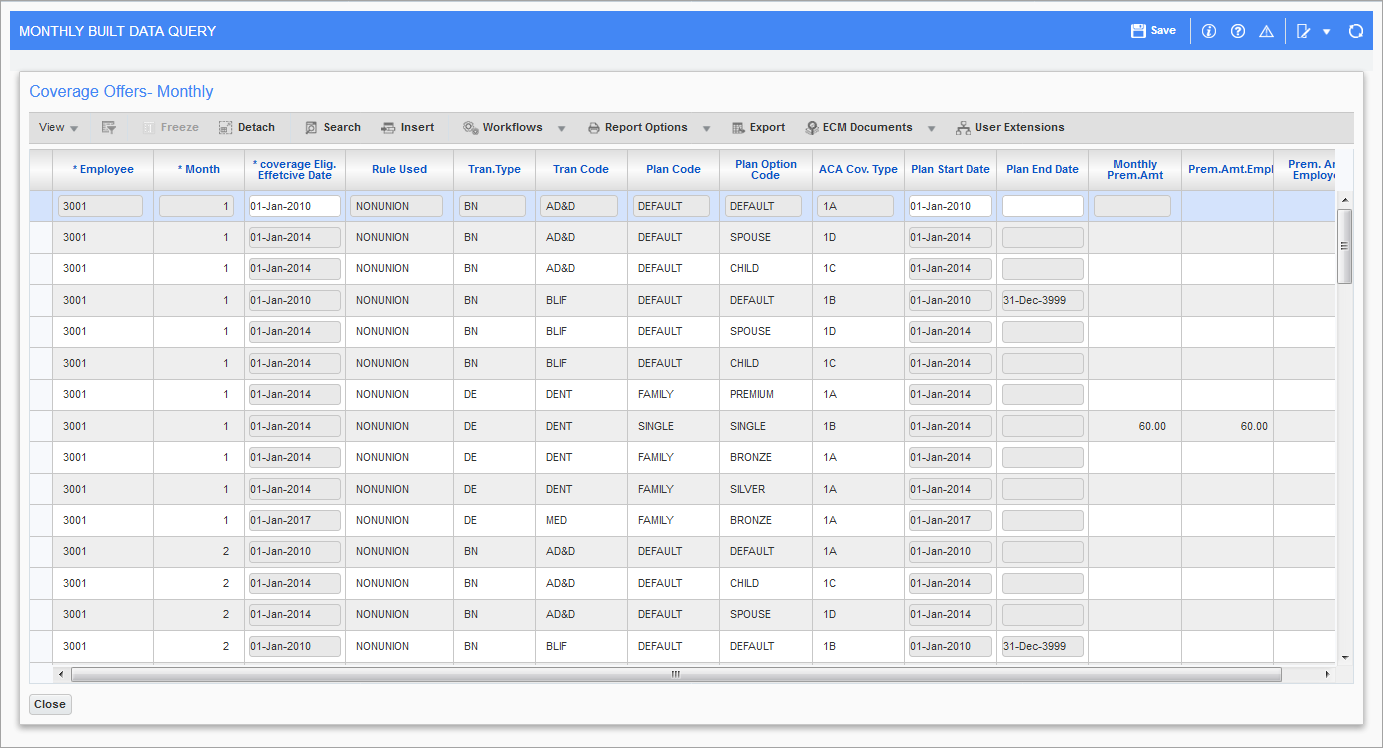
Program: HRACA_BLDDATA_MONTHLY_QRY – ACA Monthly Built Data Query; standard Treeview path: Human Resources > Reports > Affordable Care Act > ACA Monthly Build > ACA Data Query – [Coverage Offered] button
This button launches the Coverage Offered pop-up which displays all of the plans the Employee was eligible for, for each month, as automatically determined by the Payroll ACA Build Monthly utility.
[Coverage Elected] – Button

Program: HRACA_BLDDATA_MONTHLY_QRY – ACA Monthly Built Data Query; standard Treeview path: Human Resources > Reports > Affordable Care Act > ACA Monthly Build > ACA Data Query – [Coverage Elected] button
This button launches the Coverage Elected pop-up which displays information, such as effective coverage start and end dates, about the elected plans for the employee and their dependents, by month.
ACA 1095C Query (Yearly)
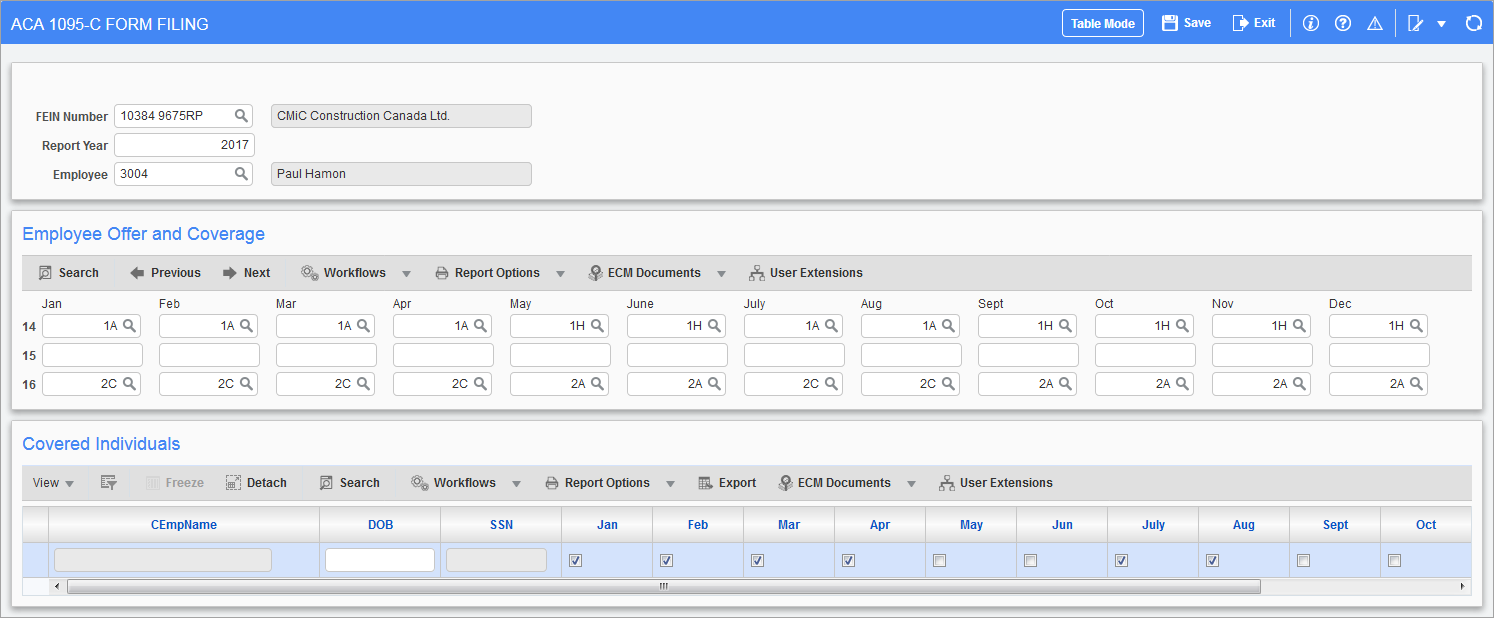
Pgm: HRACA_BLDDATA_MONTHLY – ACA 1095-C Form Filing; standard Treeview path: Human Resources > Reports > Affordable Care Act > ACA Monthly Build > 1095C Query (Yearly)
This screen is used to view and edit generated ACA compliance data for lines 14 to 16, under the Employee Offer and Coverage section. Only data from previous months is available to edit.
This screen is also used to view and edit ACA compliance data for the covered individuals under the Employee’s plan, under the Covered Individuals section. Again, only data from previous months is available to edit.
Employee Self Service – Enrolling Dependents

CMiC Open Enrollment; standard Treeview path: Employee Self-Service > Payment Administration > Benefit Enrollment
Employees can use the Employee Self Service module to enroll their dependents themselves. The Family screen is available to enroll dependents, as show below:
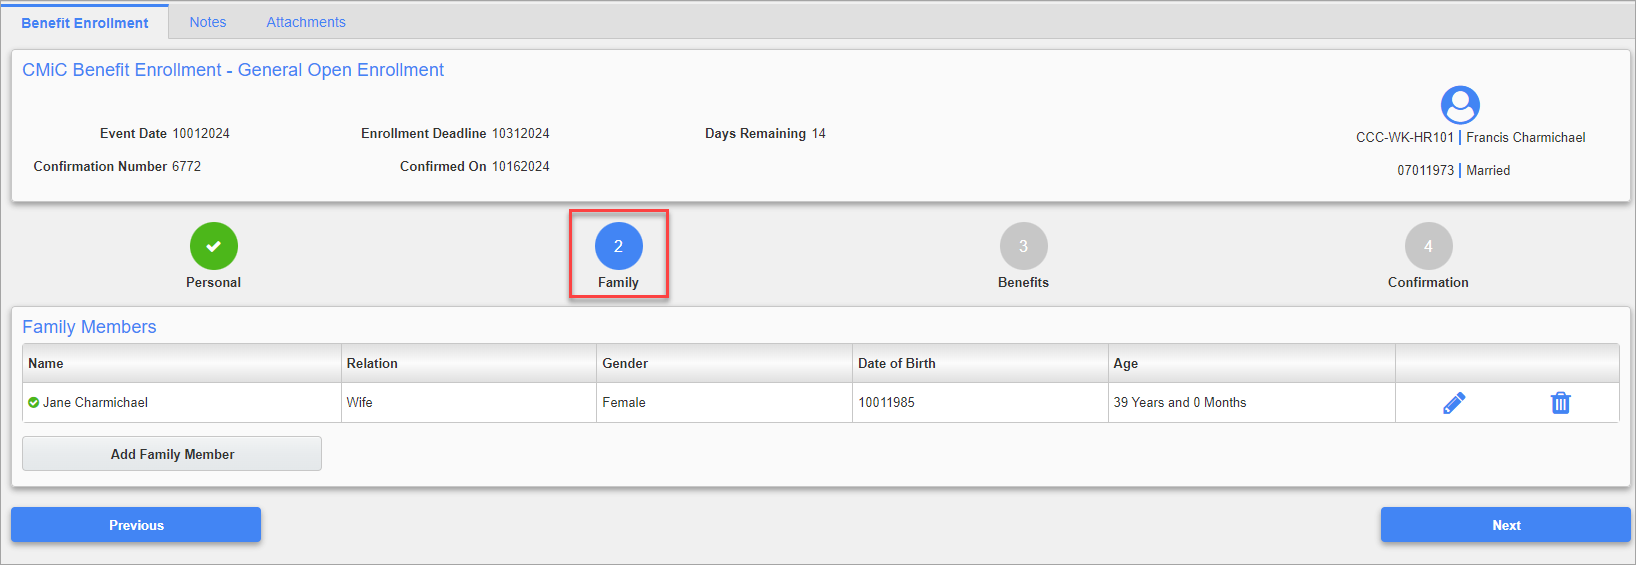
CMiC Open Enrollment; standard Treeview path: Employee Self-Service > Payment Administration > Benefit Enrollment - Family tab
Convert Health Care Plan from Payroll to HR
Enterprise can convert benefits and deductions set up in Payroll to the Human Resources module. To achieve this, the following should be completed:
-
Existing payroll data for HR should be prepared prior to running utility.
-
All plans requiring conversion should have a vendor code set up at the company level, using the Company Benefits Maintenance screen:
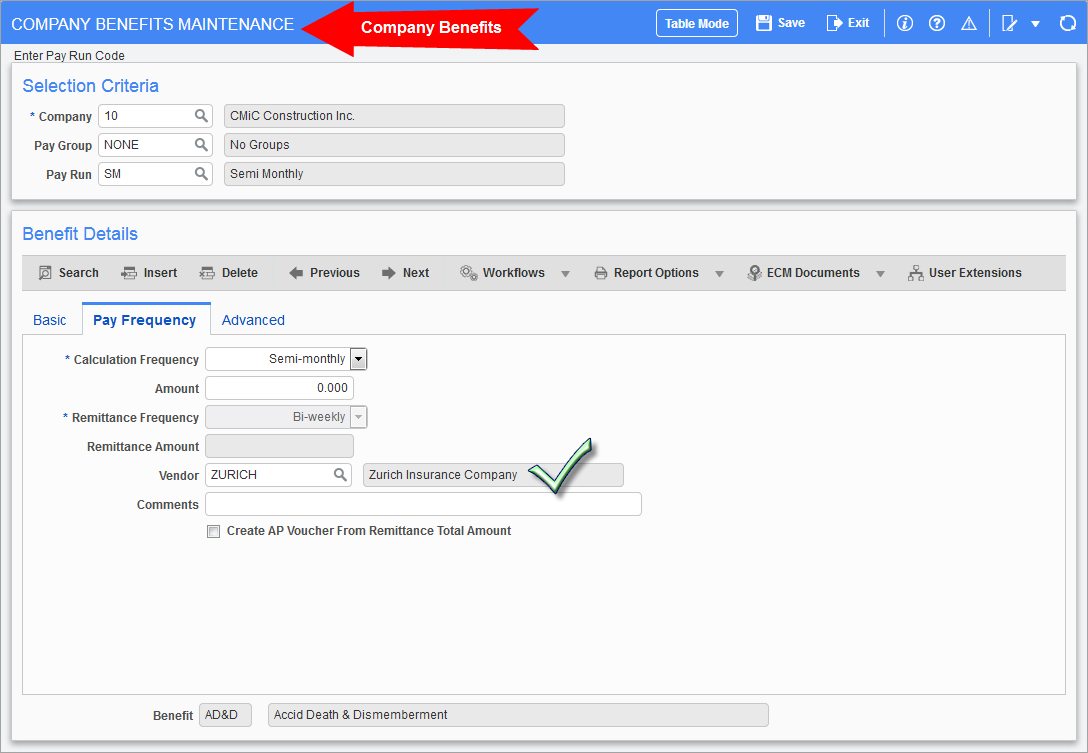
Pgm: PYCOMBEN – Company Benefits Maintenance; standard Treeview path: Human Resources > Benefit
Administration > Benefits > Company
-
Rule ID for plans should be set up using the Rules Administration screen:
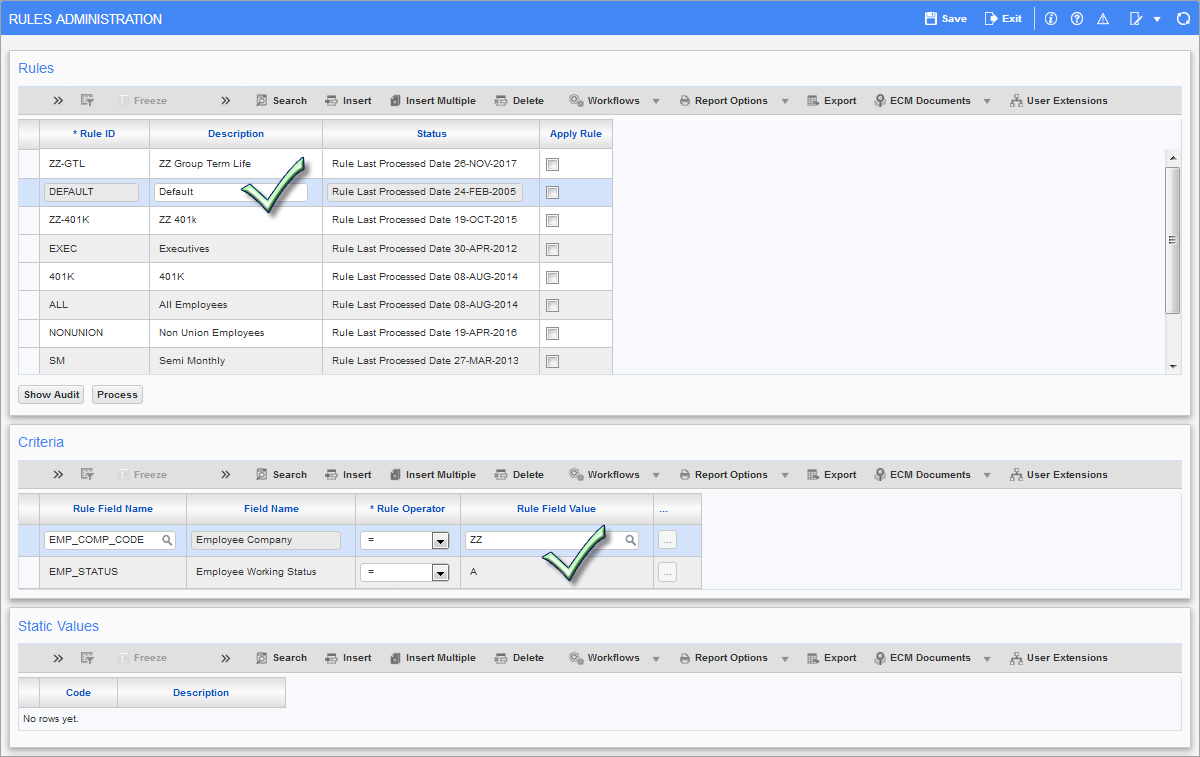
Pgm: HRRULADM – Rules Administration; standard Treeview path: Human Resources > Benefit Administration > Benefit/Deduction Administration > Rules
-
Eligible IDs should be set up for plans using the Benefit/Deduction Table Base screen:
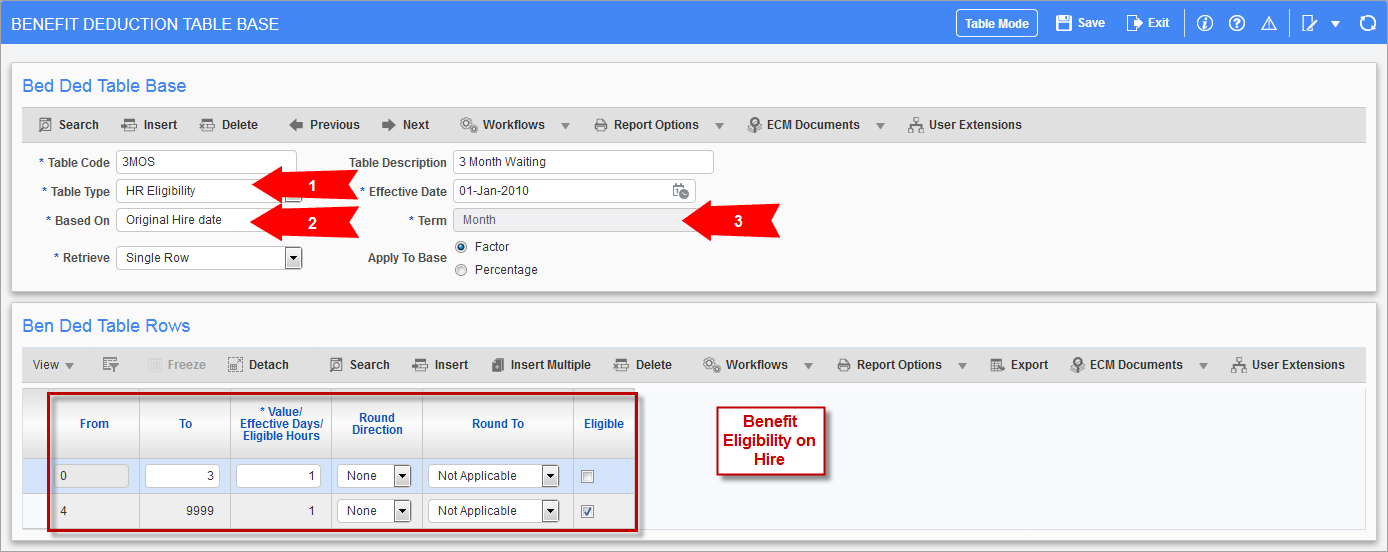
Pgm: PYBDTAB – Benefit Deduction Table Base; standard Treeview path: Human Resources > Benefit Administration > Benefit/Deduction Table Base
Utility: Plans Conversion from Payroll to Human Capital
After the above steps have been completed, this utility can be run to convert benefits and deductions from Payroll to Human Resources):

Pgm: PYBDCONV – Plan Conversion From Payroll to HR; standard Treeview path: Human Resources > Utilities > Plans Conversion From Payroll to Human Capital
Creating 1095 Export File for Greenshades
The first step in creating 1095 export files to import into Greenshades, is to build its ACA data. This can be done in the Build 1095C Report Data screen, shown below:
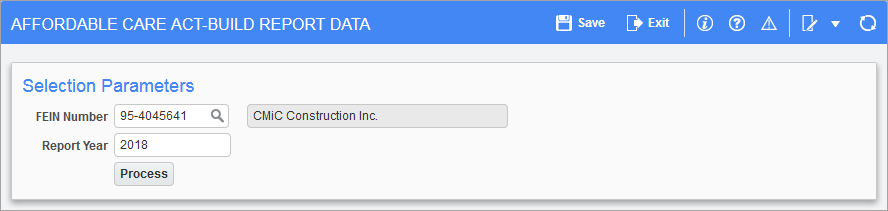
Pgm: HRACA_BLDDATA – Affordable Care Act-Build Report Data; standard Treeview path: Human Resources > Reports > Affordable Care Act > Build 1095C Report Data
This screen processes relevant data for all employees, for a specified year, including data from all subsidiaries under the FEIN for which the employees worked. The resulting ACA data is stored into a separate table, by year, for audit history.
The next step is to export the ACA data into an XML file for Greenshades. This is done through the ACA 1095C Filing screen, shown below:
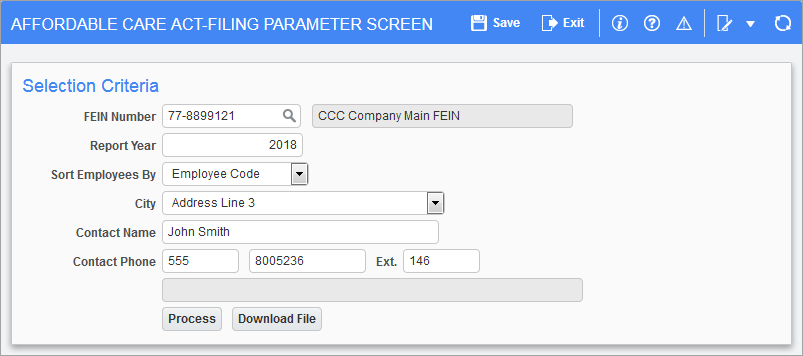
Pgm: HRACA_FILING – Affordable Care Act-Filing Parameter Screen; standard Treeview path: Human Resources > Reports > Affordable Care Act > ACA 1095C Filing
In this screen, enter the parameters, including the file path and file name for the XML file, then click the [Process] button to create the file. Once the file is successfully processed, press the [Download File] button. Enter the file name and press [Download] to download the 1095-C export file.
This concludes the work necessary in Enterprise for Form 1095-C reporting. The next step is to use Greenshades to import the created XML file of ACA data. For details about this next step, please refer to the 1095 Reporting sub-section in the Reporting via Greenshades section of this guide.