All Enterprise modules that handle records have a Reports menu option that lists the module’s reports. This section covers the running of reports for JSP based screens.
Printing Reports

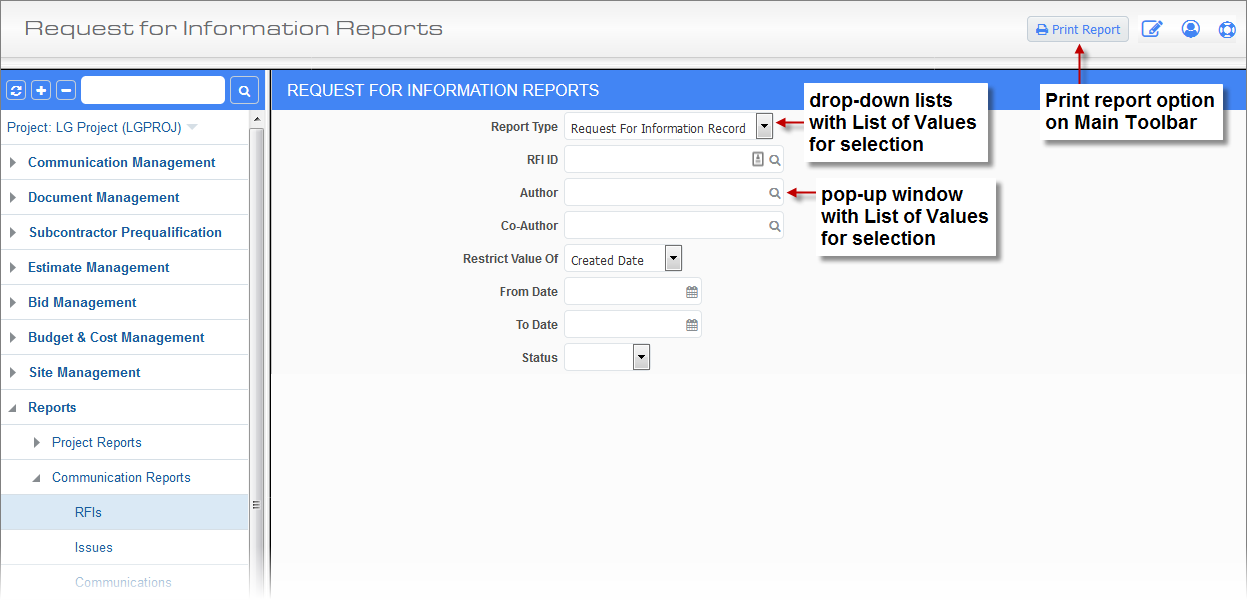
Enterprise Console: JSP based printing options screen
Above is a screenshot of a particular JSP based printing options screen, after choosing a report from a module’s Reports menu. Printing options screens contain drop-down lists with preloaded values (list of values) and other entry fields to set the parameters for restricting the records that get printed on the report.
After selecting the parameters, click the [Print Report] button on the Main Toolbar, as shown in the above screenshot.
NOTE: Ensure the web browser is set to allow pop-up windows for the server running CMiC Enterprise, as reports are displayed on new browser tabs.
Reporting

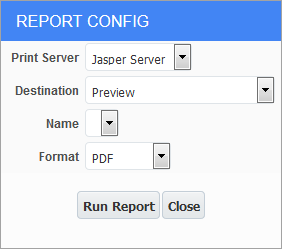
Reporting Configuration window to select the report’s destination and file format
The Reporting Configuration pop-up window is used to select the report’s file format and reporting option. Select the file format using the Format field and use the Destination drop-down list to choose the reporting option, such as: preview, print, email, send to cold storage, or fax. The fields of the Report Configuration pop-up window are explained in the table below, and each reporting option is detailed in the following Reporting Options section.
Print Server
Name of the print server that the report will be sent to. There is a list of values available.
Destination
Drop-down list for choosing to preview, print, email, create a file of, or fax the report. Each option is detailed below, under the Reporting Options section.
Name
Name of the printer that the report will be sent to, if “Printer” is chosen from the Destination drop-down list.
Format
Format to use when creating the report as a file. The options vary for different reports and options of the Destination drop-down list. The possible formats are: PDF, HTML, HTMLCSS, XLS (tab-delimited), CSV (comma-delimited), and RTF.
Reporting Options
Preview: Preview, Print, or Save Report
Select “Preview” from the Destination field and use the [Run Report] button. The report will be displayed on a new browser window. The browser window displaying the report can also be used to print or save the report to a desired location.
Preview with Cold Storage: Preview Report Using Cold Storage Software
This option is only available if the third-party software, Cold Storage Software, has been purchased and integrated with Enterprise.
Select “Preview with Cold Storage” from the Destination drop-down list. In the window that pops up, select the document type, and edit the description fields as preferred. Use the [Send] button to create and preview the report through cold storage.
Printer: Print Report
Select “Printer” from the Destination field and use the [Run Report] option to print the report using the printer specified by the Name field in the Report Configuration window.
E-Mail: Email Report

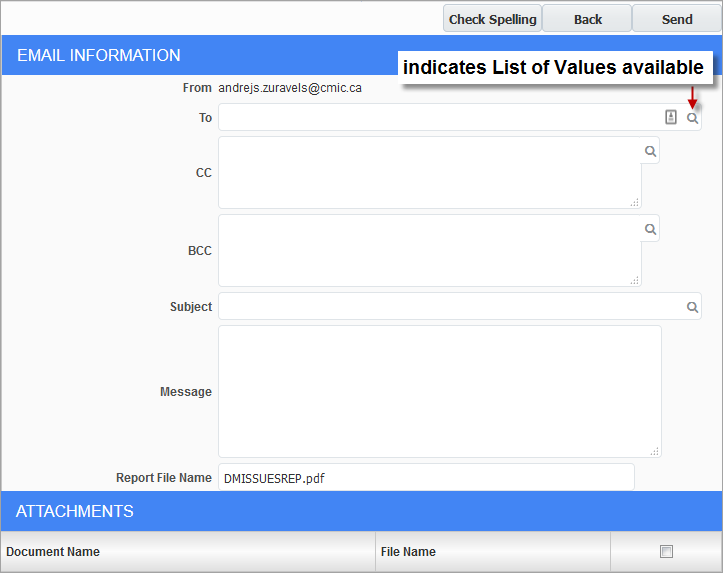
Select “E-Mail” from the Destination drop-down list of the Reporting Options window, and the above window will pop up for you to enter in the e-mail information, and edit the report’s file name, if desired. The From field will automatically be set to the user’s e-mail address. To enter more than one address, use a comma or colon as a separator. Finally, click [Send] to send the report via e-mail.
Fax: Fax Report
Select “Fax” from the Destination drop-down list to bring up the Faxing Information screen. If necessary, enter a subject and message for the fax’s cover page. Under the Action column of the Recipients section, click the following icon:  , to create a row to enter a recipient’s name, company, and fax number. Finally, choose the system’s faxing software using the Fax Software drop-down list and use the [Send] button along the top-right of the window to send it.
Cold Storage: Send Report to Cold Storage
This option is only available if the third-party software, Cold Storage Software, has been purchased and integrated with Enterprise.
Select “Cold Storage” from the Destination drop-down list. In the window that pops up, select the document type, and edit the description fields as preferred. Use the [Back] button to go back to the Reporting Options window and use the [Send] button to create and send the report to the configured cold storage destination.