A batch can be thought of as a file folder of work. The General Ledger module requires that a batch number be associated with all transactions. Whether entering journal transactions, accruals, bank transfers or closing the year, a batch number must be entered for the transactions being entered. This batch number can be used to track the transactions in queries and reports.
NOTE: A system option is available to control transaction batch postings in the Accounts Payable and General Ledger modules by implementing segregation of duties to restrict users who create AP/GL transaction batches from posting their own batches, reducing the risk of unauthorized transactions. The ‘Restrict Posting of Current User’s Own GL/AP Batch’ checkbox that controls this functionality is located on the Financials tab of the System Options screen in the System Data module (standard Treeview path: System Data > Setup > System Options – Financials tab). For more detailed information on this option, please refer to the System Data guide.
[Create Batch] – Button

Sample of a screen in which batches are created.
In all programs where a batch is required, next to the Batch and Description field, a [Create Batch] button will display. When this button is pressed, the module will automatically generate a batch number, name, date, type, and if required, a control total. A batch also belongs to the user that created it.
If a custom batch name needs to be created, simply enter it into the description field and click [Save]. Only the batch description name can be customized, not the batch number.
When transactions are created and saved, they do not immediately update the module; this allows for their review and verification. Once a batch has been verified, it is then ready to post (update the system). Posting transactions updates the AP sub-ledger, it creates General Ledger transactions, and it updates the Job Costing and Equipment sub-ledgers if required.
For data correction or adjustment purposes, batches used in the Enter Transactions screen may contain transactions with different post dates, as each transaction record has an editable Post Date field.
[View Batch] – Button
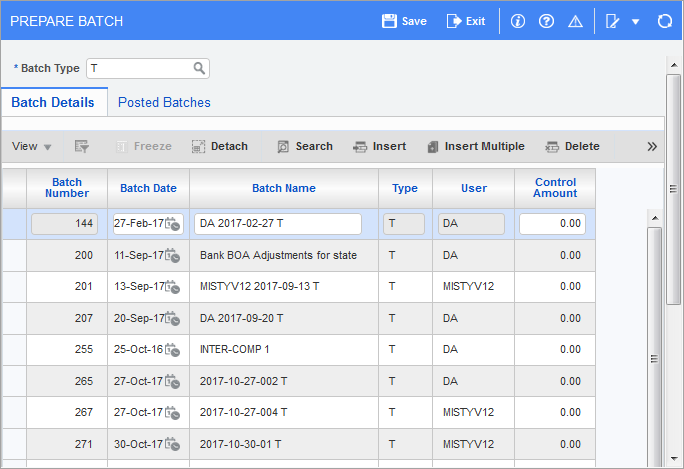
Pgm: BCHENTRY – View Batch
This program is available via the [View Batch] button that displays next to each Batch field in any data entry screen. As the screen opens, it automatically displays all the unposted batches for the current user. If the current user has the privilege to see other user's batches, then all unposted batches will display.
If the current user has the privilege to see other user's batches, then all unposted batches for the company will display.
Batch Date, Batch Name
The batch date is the creation date of the batch, and it will automatically default to the system date. This field may be modified if required. This field is for reference only, and it is not the posting date of the batch. The batch name entered may depend on corporate policy. The batch name should be informative and meaningful, not just to the creator, but other system users as well. This is usually a descriptive name that includes a date, and the type of transactions to be entered into the batch.
Type
The batch type will always be “T” if the screen is called directly from the menu. If it is called via the [Create Batch] button in a screen, the type will automatically be set to the correct type.
|
Code |
Description |
|---|---|
|
T |
Standard Transactions |
|
B |
Bank Transfers |
|
Y |
Year End Transactions |
|
X |
Interest Allocation |
Control Amount
The Control Amount field is a data verification field. If this field is not 0.00 or blank before the system posts the batch, it will verify that the total of the transactions within the batch matches this control total.
User Name, Batch Number
The User Name and Batch Number fields are automatically populated by the system.
Select Existing Batch
Since all transactions must be entered into a batch, it is important to know how to access a previously created batch for entry and editing purposes. The easiest way is to use the Batch LOV available on the Batch field in all transaction screens.
Post Batches
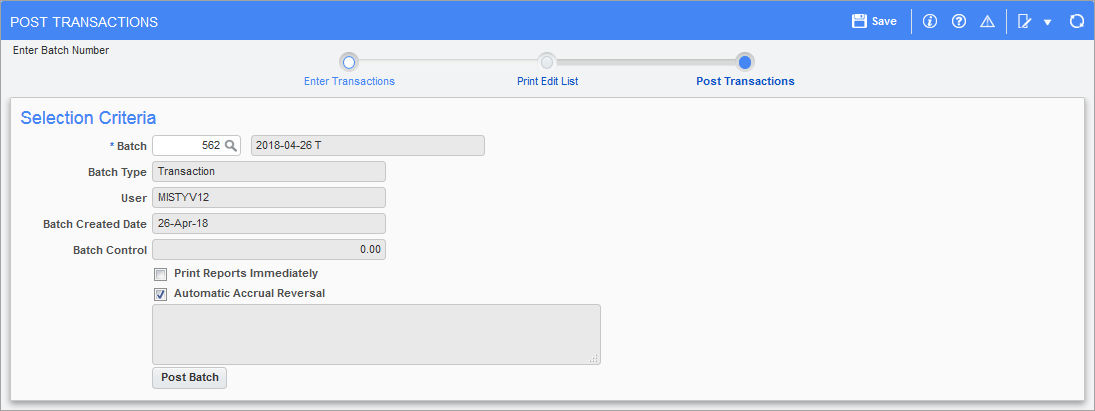
Pgm: GLPOST – Post Transactions; standard Treeview path: General Ledger > Transactions > Enter Transactions – Post Transactions node
When transactions are created and saved, they do not immediately update the module; this allows for their review and verification. Once a batch has been verified, it is then ready to post (update the system). Posting transactions updates the AP sub-ledger, it creates General Ledger transactions, and it updates the Job Costing and Equipment sub-ledgers if required.
This screen will automatically default to the user’s default company. Verify that the company code matches the company code of the batch being posted.
Batch Number
Enter/select the batch number to be posted.
Print Reports Immediately – Checkbox
Check this box to print the posting report immediately after posting. If left unchecked the posting report will not print during the posting process but can be printed later using the posting utility.
Automatic Accrual Reversal – Checkbox
By default, this checkbox is checked. This means that if there are any accrual transactions within the batch, the module will automatically create the reversal at the start date of the next non-adjustment period as part of the posting process. If this is unchecked, the accrual reversal will be stored, and have to be manually selected and posted at a later date.
NOTE: The setting of the default for this field is set via the ‘Automatic Accrual Reversal’ checkbox in the GL Control File Options screen.
Delete Batch

Pgm: DELBAT – Delete Uposted GL Batches; standard Treeview path: General Ledger > Utilities > Delete Batches
A batch can only be deleted if it is not posted. If the batch has transactions entered, then the deletion must be done via the Delete Unposted GL Batches screen on the Utilities submenu (standard Treeview path: General Ledger > Utilities > Delete Unposted GL Batches). The Delete Unposted GL Batches screen allows the user to remove old, unposted batches from the system. This routine will remove the batch and its related unposted transactions from the system.
The user is only allowed to delete their user batches. Only users who have the privilege to see other user's batches will be able to delete batches created by other users.