NOTE: The GE Fleet Mapping screen has been deprecated.
Overview
GE Fleet Import allows the user to import equipment transactions from the GE Fleet application (external to CMiC).
To see and edit imported GE Fleet data of other users, the current user will require the system privilege “GEIMPUSRIV: EM: Allows the user to see and edit the imported GE Fleet data by other users”.
GE Fleet Mapping
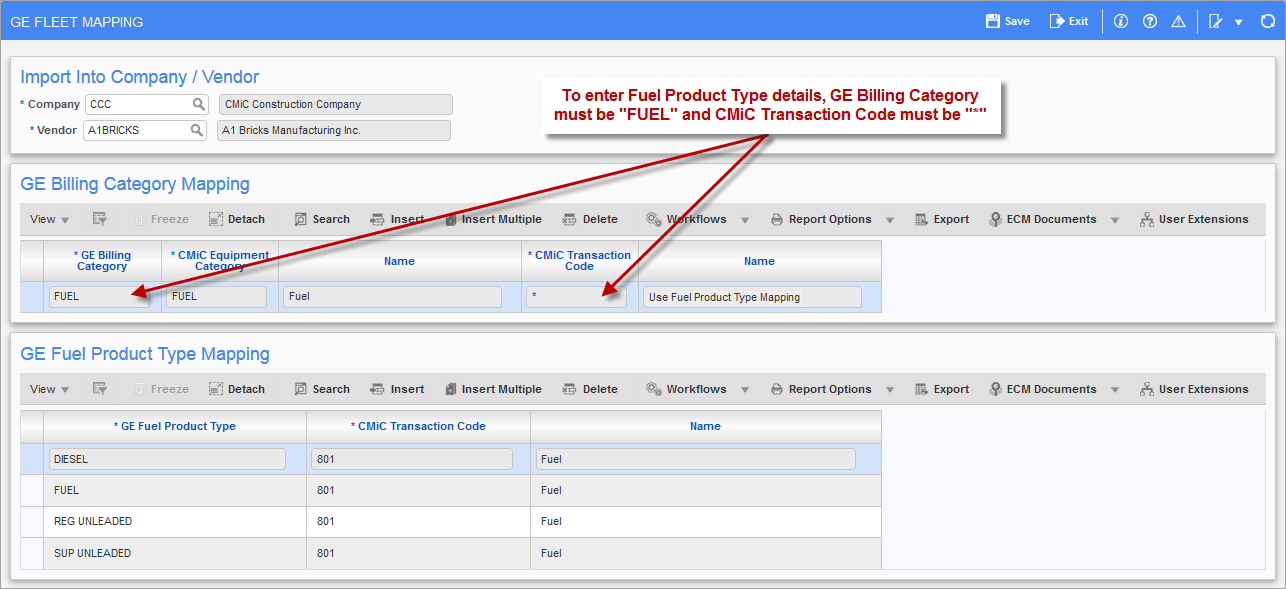
Pgm: EMGEMAPPING – GE Fleet Mapping; standard Treeview path: Equipment Costing > Utilities > GE Fleet Interface > GE Fleet Mapping
A mapping process is first required to map the GE Fleet Billing Categories and Fuel Transaction Types against the CMiC Equipment Category Codes and Transaction Codes. This mapping is defined on the GE Fleet Mapping screen.
Import Into Company / Vendor
Company
Enter/select company code. By default, the user's default company will be displayed.
Vendor
Enter/select vendor code.
GE Billing Category Mapping
GE Billing Category
Enter GE Billing Category. To enter Fuel Product Type details, billing category must be “FUEL” and CMiC Transaction Code must be “*”.
CMiC Equipment Category and Name
Enter CMiC Equipment Category. The name will default into the Name field.
CMiC Transaction Code and Name
Enter CMiC Transaction Code. Transaction Code must be “*” if GE Billing Category is “FUEL”. The name will default into the Name field.
GE Product Type Mapping
GE Fuel Product Type
Enter GE Fuel Product Type.
CMiC Transaction Code and Name
Enter CMiC Transaction Code. The name will default into the Name field.
GE Fleet Import
Once the mapping is in place, the GE Fleet records can be imported. The GE Fleet Import screen is used to import, edit and create GE Fleet invoices. Invoices will only be generated for valid records. The user can re-validate imported data after any changes. LOVs are available for some fields to help enter valid values more efficiently.
Two files need to be imported: the GE Combined file and the GE Fuel file.
[Import File] – Button
Clicking on the [Import File] button opens a pop-up window. Use the [Browse] buttons to select the GE Combined File and the GE Fuel File to be imported. When finished, click the [Import] button to begin importing.
The user interface of the import program is similar to other CMiC Enterprise imports. Click on the 'Select' checkbox next to the import file and use the buttons along the bottom of the screen.
[Validate Imported Data] – Button
This button will run the validation process on the current record. Once the user has updated a record and saved the changes, this button should be utilized to verify that the changes made are valid.
[Edit Imported Data] – Button
This button should be used to update or delete imported records. The records can be edited and re-validated until they are all valid.
[Delete Imported Data] – Button
This option allows for the mass deletion of all the imported records. This is a useful option if the data imported is incorrect, or the wrong ASCII file was imported. This option does not need to be run as part of the normal processing procedure. The system will display a message saying how many rows will be deleted and ask for confirmation before actually deleting the records.
[Erase Import File] – Button
This option will remove the import file (ASCII file) from the system. This step does not need to be run as part of the normal processing procedure.
Use the [Browse] button to select the file to be erased. When done, use the [Erase] button to start the removal process.
[Create Invoices] – Button
Invoices can then be created from the valid records by clicking the 'Select' checkbox next to the import file and clicking on the [Create Invoices] button. An AP batch is created with the batch description: “Auto Batch – GE Fleet Import”. This batch can be viewed and modified in the AP Voucher Entry screen. The AP transactions created are of E-type Distribution lines and are created for each GE Combined line.