Location transfer is a vital part of Equipment Costing used primarily for equipment location tracking. During the setup of the equipment items, the “Home” and “Actual” location must be indicated. The “Home” location determines where a piece of equipment originated. The “Actual” location indicates where an equipment item is stationed or being operated.
The Automatic Charge-Out screen is completely reliant on the actual location transfers for the appropriate job cost allocations for billing purposes. An actual transfer must occur for an automatic charge-out to be created. The initial transfer would be from home to job.
A further extremely important function of actual location transfers is location tracking, as it gives a location history of where the equipment item has been used, as well as where it is currently located.
Location transfers may be performed individually or by group transfer.
Group Location Transfer Entry
![]()
Pgm: EMGRLOC – Equipment Group Location Transfer; standard Treeview path: Equipment Costing > Transactions > Actual Location Transfer > Group Transfer Selection
The Equipment Group Location Transfer screen automatically generates location transfer transactions for a group of equipment items from one location to another. The program requires a date to be entered in the Transfer Date field and locations in the From and To Location fields. The system will display all equipment pieces that are currently at the From Location, with the option of checking all or some of these items for transfer to the To Location.
Once the equipment items are selected for transfer, press the [Process] button and the system will generate the individual transactions that make up each location transfer.
If a review is required of any of the transactions generated through the group process, go to the Actual Location Transfer screen.
Selection Criteria
Company
Enter/select company code. By default, the user's default company will be displayed.
Batch
Enter/select a valid batch number, use the [Create Batch] button to create a new batch, or use the [View Batch] button to launch the Equipment Costing Batch Entry pop-up window to create a new batch.
Transfer Date
Enter the transfer date. The automatic charge-out will work from the entered transfer date and forward. Therefore, accuracy is very important in this field.
Transfer Time
This field is defaulted to "19:00". Users can enter the transfer time along with the transfer date if needed.
From Location/Company/Customer/Job/Cost Code/Category
For the From Location field, there are three options: enter a specific location code, enter “*” for ALL, or leave blank to indicate Home Location only.
The From Company field is automatically populated.
For the From Customer field, enter a specific customer code or enter “*” for ALL customers.
For the From Job, Cost Code and Category fields, there are three options: enter a specific job code/cost code/category code, enter “*” for ALL jobs/cost codes/categories, or leave blank to indicate Yard.
To Location/Company/Customer/Job/Cost Code/Category
For the To Location field, enter a specific location code or leave blank to indicate Home Location.
The To Company and Customer fields are automatically populated.
In the To Job field, enter the job code the equipment will be transferred to or leave blank to indicate Yard.
In the To Cost Code and Category fields, enter the cost code and category the equipment will be transferred to.
For example:
-
If “*” is used for the To Cost Code and Category fields in the Selection Criteria section of the screen for the To Location, the Cost Code and Category fields in the Equipment Selection section will default as follows:
-
Values will default from the From Cost Code and Category fields of an equipment’s From Location in the Equipment Selection section.
-
Otherwise, values will default from the Job Cost Code and Category fields from the equipment setup if defined on the General tab of the Equipment Maintenance screen (standard Treeview path: Equipment Costing > Setup > Enter Equipment – General tab).
-
If validation does not complete successfully, then the default value will be set to null.
-
-
If the equipment location has no defaults set for Job, Cost Code, and Category fields on either the Assign Job Phases screen (standard Treeview path: Job Costing > Job > Assign Cost Codes) or the Equipment Maintenance screen (standard Treeview path: Equipment Costing > Setup > Enter Equipment – General tab), then once a job is selected in the Job field for the To Location, the Cost Code and Category fields for the To Location will automatically default to “*”. When “*” is populated in the To Location Cost Code and Category fields in the Selection Criteria section of the screen, then the cost codes and categories from the From Location will be copied to the Cost Code and Category fields for all the equipment listed in the Equipment Selection section of the screen for the To Location, if the selected To Job has those specific cost codes and categories assigned. If the To Job does not have the same cost codes and categories assigned as the From Job, then those Cost Code and Category fields will be left blank in the Equipment Selection section for the To Location and will be available for users to define as required.
-
If the Actual Locations screen has defaults defined for the Job, Cost Code, and Category fields for a specific location (standard Treeview path: Equipment Costing > Setup > Local Tables > Actual Locations), then when that location is selected in the To Location field of the Selection Criteria section of the Equipment Group Location Transfer screen, those values will default to the Job, Cost Code, and Category fields for the To Location. The cost code and category will be populated in the equipment listed in the Equipment Selection section of the screen for the To Location. However, if cost code and category have been defined in the Equipment Maintenance screen (standard Treeview path: Equipment Costing > Setup > Enter Equipment – General tab), they will override the cost code and category in the Equipment Selection section.
From/To Location, From/To Job Name, From/To City, From/To State – Display-Only Fields
The From Location/To Location fields default automatically from information entered in the From and To fields previously entered.
The fields From Job Name and To Job Name will be populated for any job (if the job name was defined during the job setup) regardless of whether it is connected to a project.
If the job is related to a project, the fields From City, From State, To City, To State will be automatically populated with the values from the Address tab of the corresponding projects in PM Projects. If the job is not associated with a project, these fields will not be populated.
[Go] – Button
When finished entering the fields in the Selection Criteria section, click the [Go] button to display the equipment pieces which are presently at the From Location in the Equipment Selection section of the screen.
If subsequent updates are made to the Selection Criteria section, for example the To Location is updated, clicking on the [Go] button will refresh the details in the Equipment Selection section of the screen.
Equipment Selection
In the Equipment Selection section, all the equipment pieces, which are presently at the From Location in the previous section, will default.
Check the Sel box of the equipment items to be transferred. To select all the equipment items, use the Sel checkbox at the top of the column instead of checking all of the boxes.
When an equipment item is selected, the From Transaction Code column will show the transaction code defined for the related equipment code and the To Transaction Code column will default to the transaction code set in the Equipment Costing Control File. Upon saving and processing, these transaction codes will be carried over into the same numbered batch in other related screens, e.g. Enter Transfer Transactions.
NOTE: The Equipment Quantity field displays the equipment quantity at the current location. The user may override this and can enter a required quantity. For all other regular equipment, the display is “1” and cannot be modified.
Click the [Process] button to process the transfer.
[WBS] – Button
Throughout the transaction entry screens, the [WBS] button may be active. This is carried forward from the Job Costing module and is associated with the job via job, category or cost code. WBS stands for Work Breakdown Structure. If a WBS code is desired but not available on the entry screen, setup must be done through the Job Costing module.
Actual Location Transfer Entry
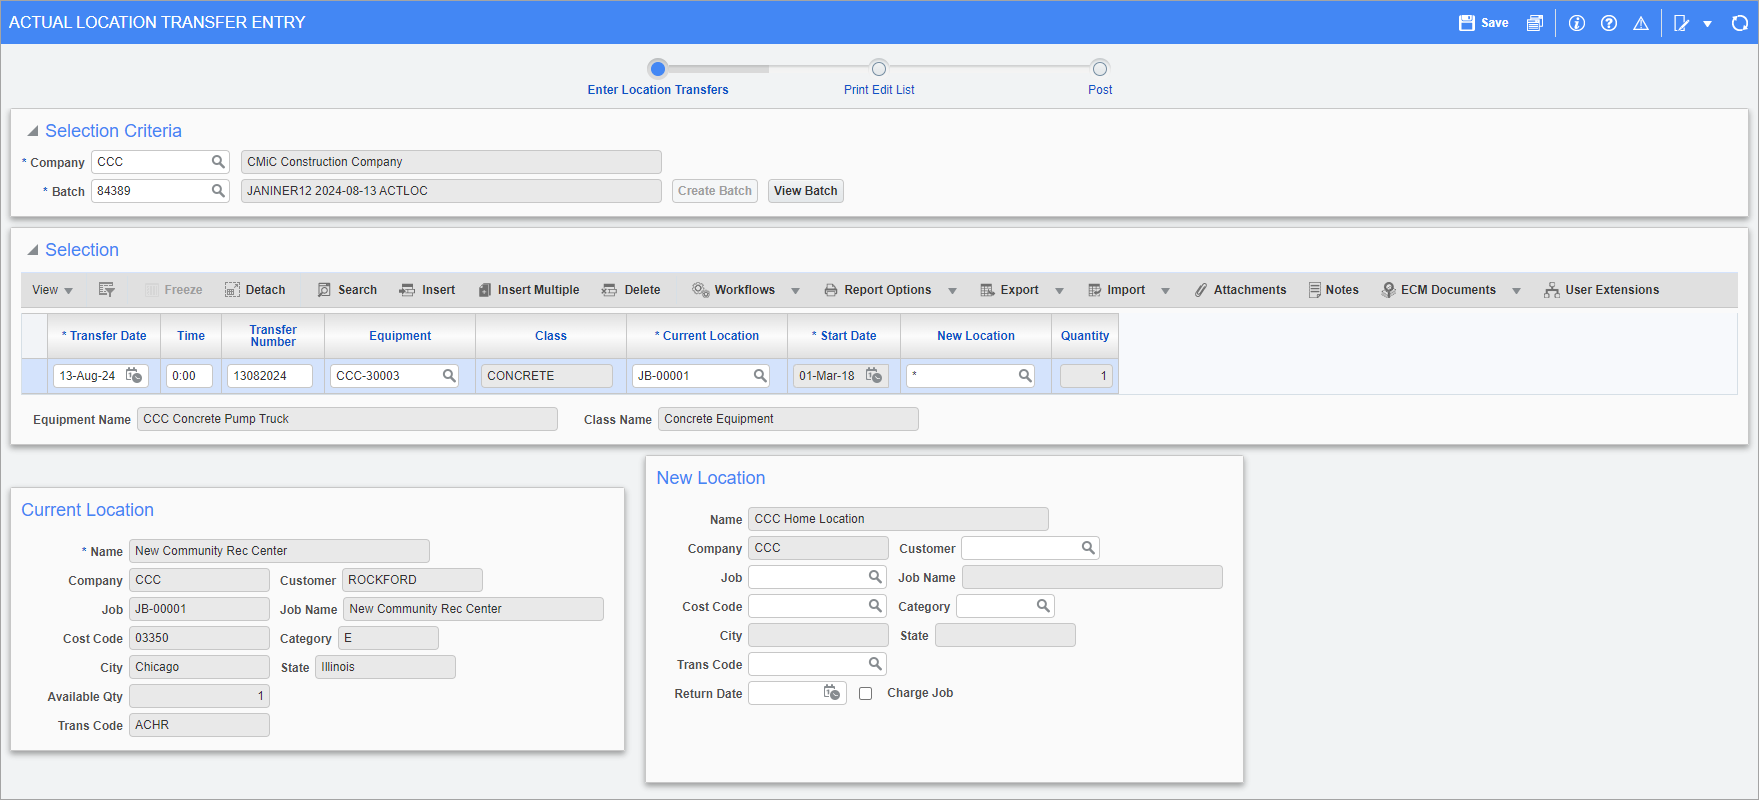
Pgm: EMALTR – Actual Location Transfer Entry; standard Treeview path: Equipment Costing > Transactions > Actual Location Transfer > Enter Transfer Transactions
The Actual Location Transfer Entry screen differs from the Group Location Transfer screen in that it allows for the transfer of an individual piece of equipment from one location to a new location by individual entry of an item.
NOTE: To reverse and/or correct a posted entry, use the Actual Location Adjustment screen (standard Treeview path: Equipment Costing > Transactions > Enter Location Transfer Adjustments).
Location transfer can be performed for all or part of bulk equipment quantity from a current location.
NOTE: A bulk data import can be performed by using the [Import] button on the Block toolbar. Users can bulk import fields, such as Current Location, New Location, Quantity, etc. to the Actual Location Transfer screen.
If a piece of equipment is a primary unit, only the primary unit will be allowed entry in the location transfer screen; however, when posting occurs both the primary and all secondary units assigned for the date of the transfer will be transferred. The report will show only the primary unit transfer.
Users can upload attachments using the [Attachments] button on the toolbar. Attachments will be displayed in the pop-up window launched from the [Revenue Trans] button on the Executive Query screen.
Company
Enter/select company code. By default, the user's default company will be displayed.
Batch
Enter/select a valid batch number, use the [Create Batch] button, or use the [View Batch] button to launch the Equipment Costing Batch Entry pop-up window to create a new batch.
Transfer Date and Time
The automatic charge-out will work from the entered transfer date and forward. Therefore, accuracy is very important in this field.
The transfer date will be used to determine what secondary unit is assigned and must be transferred with the primary unit.
Transfer Number
Enter the transfer number used to track this transaction. If the ‘Equipment Transfer Number Is Required’ checkbox is checked in the Control file, this field will be required (standard Treeview path: Equipment Costing > Setup > Local Tables > Control – Control tab).
Equipment
Enter/select the equipment code.
Once the equipment code has been selected, the current location and date will default in the display-only fields Current Location and Start Date.
If an equipment code has been used in an actual location transfer entry and the entry is not yet posted, the equipment code may not be used again in actual location transfer until the original entry has been posted.
Secondary units will not be allowed entry in location transfer, only primary units.
Current Location, Start Date
The values for these fields are populated from the Equipment/Location Query screen which shows the audit history of an equipment. A record with no To Date value is the current location of an equipment. Once the actual location transfer entry batch is posted, the To Date field in this query will show a value one day before the Transfer Date value.
New Location
Enter/select the new location. The new location and date entered are paramount in creating an automatic charge-out. Use “*” if the equipment is being returned to the home location.
Quantity
The Quantity field defaults to the total quantity of the equipment at the current location. The bulk equipment quantity may be overridden by changing the quantity. For regular equipment, the quantity field displays “1” and cannot be modified.
Current Location
The fields in this section of the screen are display-only. They provide detailed information on the current location and status of the equipment.
The Trans Code field provides the current equipment operating status. Location transaction codes can be set up to describe the status of the equipment such as In Use, Down, Moved, Available, etc.
New Location
Customer
Equipment may be transferred to a customer only or the customer and the job. A piece of equipment transferred to a customer only will be used in the Material Sales module. The Equipment LOV will have a “Y” beside it in Material Sales Ticket Entry if the equipment has been transferred to a customer.
Job/Cost Code/Category
The system will default the Job Code, Cost Code, and Category fields, as well as the ‘Charge Job’ checkbox and Trans Code field if this information was entered on the equipment item. These fields can be updated as required.
Job Name, City and State
Job Name, City and State fields are automatically populated. While the Job Name field is always populated (if the Job Name was defined during the job setup), the fields City and State are populated only if the corresponding Location is associated with the job (or a sub-job with Controlling job) that is tied to a project. City and State fields will be populated from the PM Project (Address tab) tied either to a sub-job or controlling job.
NOTE: When sub-job is used for the transfer, the system will look for the controlling job linked to the sub-job. If the controlling job is associated with a project, the system will populate City and State fields from the Project settings (Address tab); otherwise, these fields will not be populated.
When a job is used for the transfer, the same rule will apply. If the job itself is tied to a project, then the system will populate City and State fields from the Project settings. If the job is not associated with a project, then these fields will not be populated.
Trans Code (Transaction Code)
The Trans Code field can be used as a means of tracking where equipment is and the status. Only Revenue Type transaction codes are allowed for this field. For example, when the equipment is idle, down, available to the pool, out of service, or in service.
Charge Job – Checkbox
If the new location is going to use auto-charge, check the ‘Charge Job’ checkbox. The ‘Charge Job’ checkbox will automatically default as checked if ‘Default Charge Job To Be Auto Checked’ is checked on the Equipment Costing Control File (standard Treeview path: Equipment Costing > Setup > Local Tables > Control – Control tab).
Return Date
Enter the anticipated return date.
[WBS] – Button
Throughout the transaction entry screens, the [WBS] button may be active. This is carried forward from the job costing module and is associated with the job via job, category or cost code. If a WBS code is desired but not available on the entry screen, setup must be done through the Job Costing module.
Print Edit List
![]()
Pgm: EMTRNLST – Actual Location Transfer; standard Treeview path: Equipment Costing > Transactions > Actual Location Transfer > Enter Transfer Transaction – Print Edit List
The Print Edit List is used to review the Actual Location Transfer Edit List before posting the batch.
Company
Enter/select company code. By default, the user's default company will be displayed.
Batch Type
Batch Type automatically defaults to “Actual Location Transfer Batch”.
Transaction Type – Radio Button
Select the required Transaction Type. Choices are “Unposted” or “Posted”.
Multiple unposted transactions are allowed, if the total quantity of un-posted transactions does not exceed the quantity on location.
Batch
Enter/select a valid batch number.
From Equipment / To Equipment
Enter/select a valid equipment code or leave blank to indicate “All”.
[Print] – Button
Click on the [Print] button to preview the posting report.
Post Location Transfer
![]()
Pgm: EMPST – Actual Location Transfer; standard Treeview path: Equipment Costing > Transactions > Actual Location Transfer > Enter Transfer Transaction – Post
This screen is used to post the Actual Location Transfer Batch.
Company
Enter/select company code. By default, the user's default company will be displayed.
Batch Type
Batch type automatically defaults to “Actual Transfer Batch”.
Batch
Enter/select batch number.
Post Date
Enter post date. The system defaults to the current date but this can be updated.
Journal
Enter/select journal. The system defaults the journal code indicated on the Equipment Costing Control File (standard Treeview path: Equipment Costing > Setup > Local Tables > Control – Control tab).
Preview Posting – Checkbox
To preview the posting report(s) before posting, check the ‘Preview Posting’ checkbox and click the [Post] button.
Print Reports Immediately – Checkbox
Check the ‘Print Reports Immediately’ checkbox to print the posting reports immediately after the process completion.
Use the [Post] button to post the batch.
Entering Actual Location Adjustments
![]()
Pgm: EMUTALTR: Actual Location Adjustment; standard Treeview path: Equipment Costing > Transactions > Actual Location Transfer > Enter Location Transfer Adjustment
The Actual Location Adjustment screen is used to change location history and charge-outs that have been entered incorrectly. Adjustments can change the location history, undo previous charges, and create new charges for the adjustment period. For more details, see Equipment Costing - Entering Actual Location Adjustments.
Company
Enter/select company code. By default, the user's default company will be displayed.
Batch
Enter/select a valid batch number or use the [Create Batch] button to create a new batch.
Start / End Dates and Transfer Time
After creating the actual location adjustment batch, enter the start/end dates and transfer times for the correction/adjustment.
The system will display the location of the equipment on the start date entered and the location on the end date entered. These are the only two locations to be displayed, regardless of whether the equipment was at another location between these two periods.
The start and end date will be used to determine if a piece of equipment is a secondary unit or a primary unit used in an assembly. A secondary unit will not be allowed a location adjustment entry, only the primary unit. However, a secondary unit may also be a primary unit on a different date.
Transfer Number
Enter the transfer number used to track this transaction. If the ‘Equipment Transfer Number Is Required’ flag is set in the Equipment Costing Control File (standard Treeview path: Equipment Costing > Setup > Local Tables > Control File – Control tab), this field will be required.
Equipment
Enter/select the equipment item requiring an adjustment to posted information.
An equipment item can only be adjusted once within a batch. For this reason, once an entry is made, the item will not be available for use until the batch is posted.
Only primary unit equipment codes may be entered.
Location
Enter/select the correct location for the equipment item. If returning the equipment item to Home Location, enter *.
Undo, Create, Edit Charges – Checkboxes
For each adjustment, specify if the charges created by the original transactions are to be reversed, if new charges are to be created for the adjustment period and if the charges are to be edited prior to posting.
Click one or all of the charge selections required for the equipment item.
Click the ‘Undo’ box if the previously posted charges are to be reversed.
Click the ‘Create’ box if new charges are to be created based on the information entered on the adjustment line.
Click the ‘Edit’ box if the adjustment is to be shown in the ‘Review Transaction’ option of automatic charge-out before posting.
Job, Cost Code, Category, Trans Code
Enter job code, cost code, category and transaction code, if required, for the adjustment period.
Charge Job – Checkbox
Check the ‘Charge Job’ checkbox if new charges are to be created for the adjustment period.
Customer
Equipment may be transferred to a customer only or the customer and the job. A piece of equipment transferred to a customer only will be used in the Materials Management module. The Equipment LOV will have a “Y” beside it in Materials Management Ticket Entry if the equipment has been transferred to a customer.
NOTE: Location adjustments are not allowed for bulk equipment.
Location Transfer Category
![]()
Pgm: EMALTRANCAT: Location Transfer Category; standard Treeview path: Equipment Costing > Transactions > Actual Location Transfer > Location Transfer Category
The Location Transfer Category screen displays all the categories set up in the Job Costing module for the specified company. This screen is used to select category codes to limit the location transfer categories to equipment transfers only.
The Actual and Group Location Transfer screens will restrict the Cost Code field’s LOV to list only cost codes with categories selected in the Location Transfer Category screen. The Category field’s LOV will also be restricted to only display the categories selected in the Location Transfer Category screen.
NOTE: The category restriction is a company level setup. When categories are selected under a company, the restriction applies to the jobs under this company during location transfer and group location transfer entry. The transfer screens allow the entry of locations of other companies and therefore jobs that belong to the location company. The user must repeat the setup of restricted categories under each company as required.
![]()
Example of Cost Code LOV launched from Actual Location Transfer Entry screen when cost codes are limited to only categories selected in Location Transfer Category screen
![]()
Example of Category Code LOV launched from Actual Location Transfer Entry screen when category codes are limited to equipment only