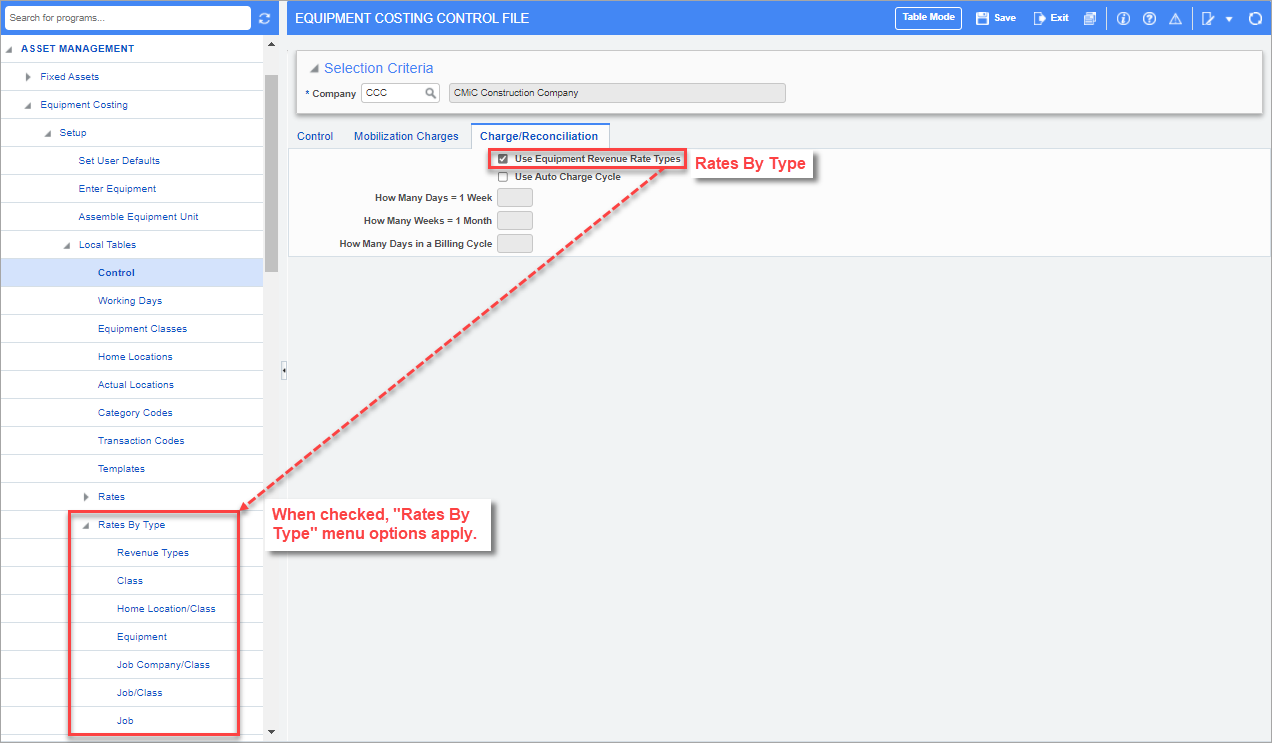
Pgm: EMCTRL – Equipment Costing Control File; standard Treeview path: Equipment Costing > Setup > Local Tables > Control – Charge/Reconciliation tab
Rates by Type works with Revenue Transactions only and allows the functionality of adding a detail level with the breakup of hourly, daily, weekly and monthly rates as per the Rate Type for the combination of Equipment/Job/Transaction Code, Job/Equipment Class/Transaction Code, Job Company/Equipment Class/Transaction Code, Equipment/Transaction Code, Home Location/Equipment Class/Transaction Code, and Equipment Class/Transaction Code.
To use Rates By Type, check ‘Use Equipment Revenue Rate Types’ checkbox on the Equipment Costing Control File (standard Treeview path: Equipment Costing > Setup > Local Tables > Control – Charge/Reconciliation tab). If left unchecked, standard Rates will be used.
Rates By Type is either on or off for the company and can't be used selectively for a piece of equipment.
NOTE: When Rates By Type is being used, Auto Charge will ignore sliding scale regardless of the checkbox on Equipment Maintenance.
Rate Types are associated to both Revenue and Job Expense Allocations.
Revenue Type Entry
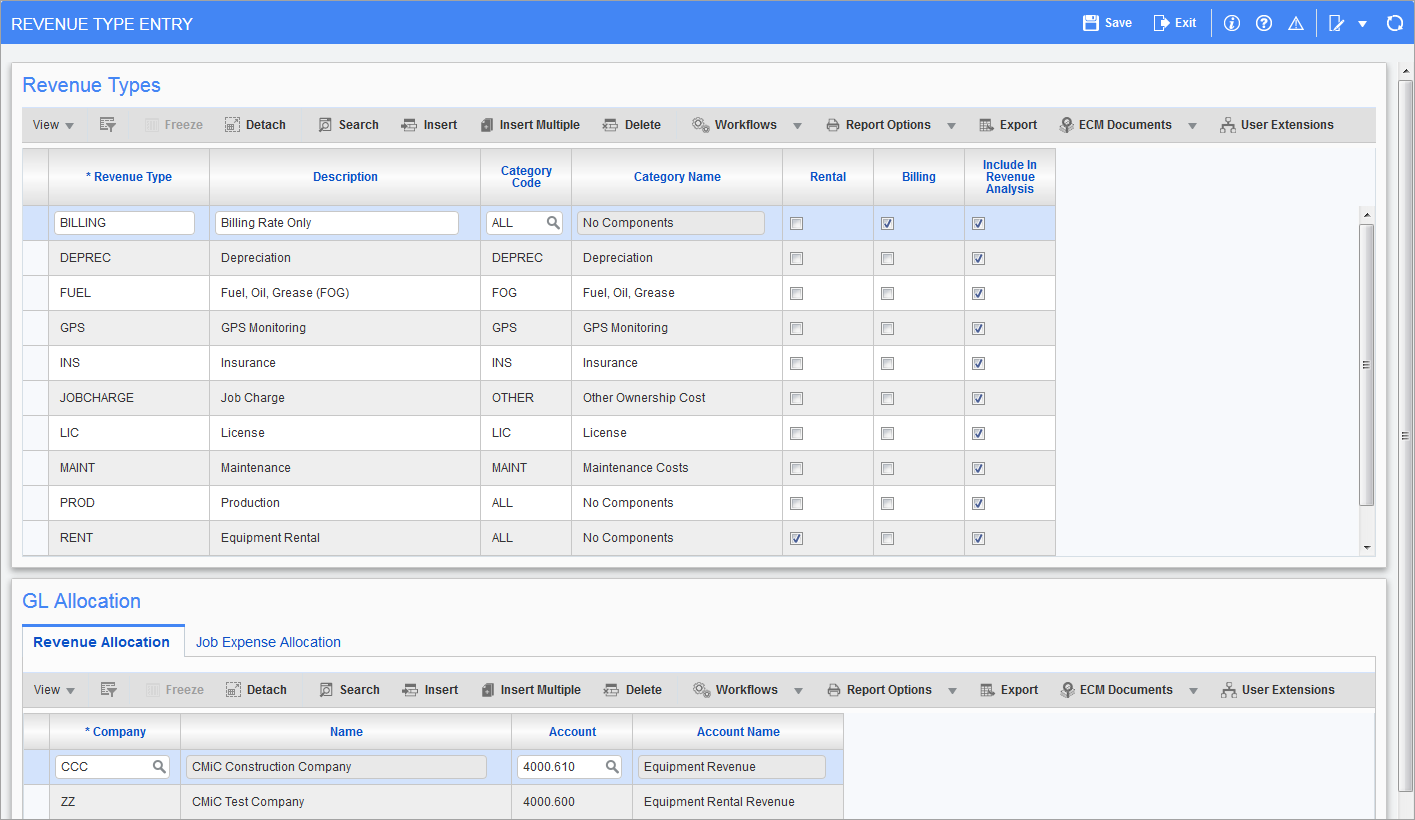
Pgm: EMRATETYPES – Revenue Type Entry; standard Treeview path: Equipment Costing > Setup > Local Tables > Rates By Type > Revenue Types
Revenue Types represent the breakdown of a charge-out. The Revenue Type Entry screen is used to define the Revenue Types and their corresponding accounting mapping.
Defined Revenue Types are ultimately entered in the pop-up window launched from the [Revenue Types] button on Revenue Type Detail screens. An example of the Class Revenue Type Detail screen is shown below.
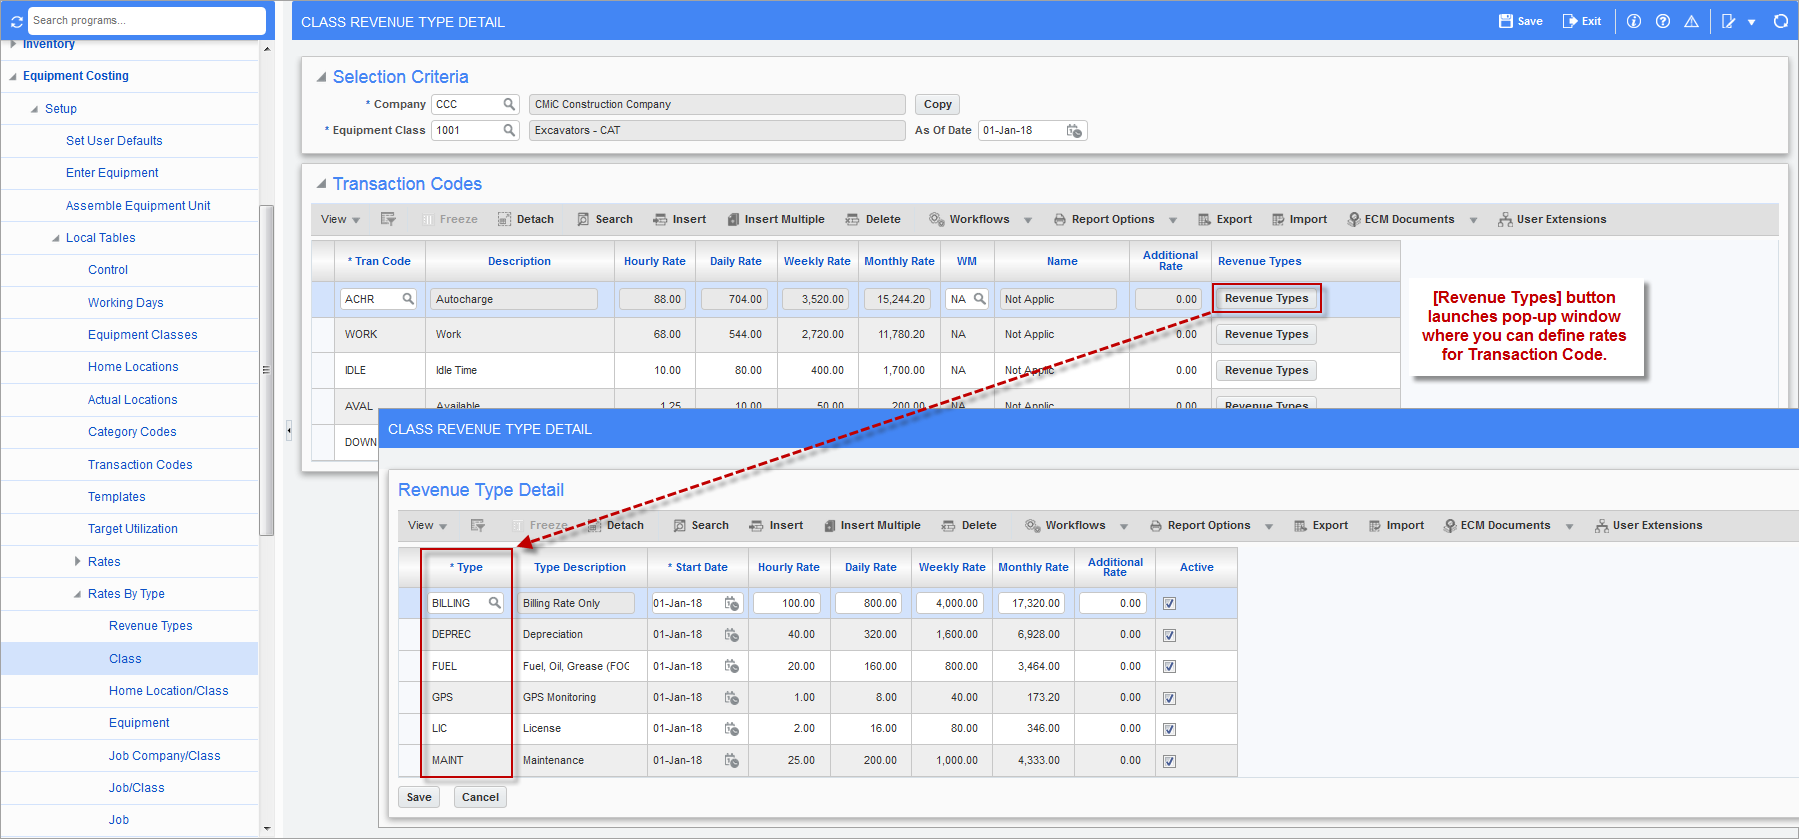
Example showing pop-up window launched from [Revenue Types] button on Revenue Type Detail screen. Revenue Types defined on the Revenue Type Entry screen are entered in this pop-up window.
Revenue Types
Pgm: EMRATETYPES – Revenue Type Entry; standard Treeview path: Equipment Costing > Setup > Local Tables > Rates By Type > Revenue Types
The Revenue Types section allows the user to see existing revenue types or to create a new revenue type.
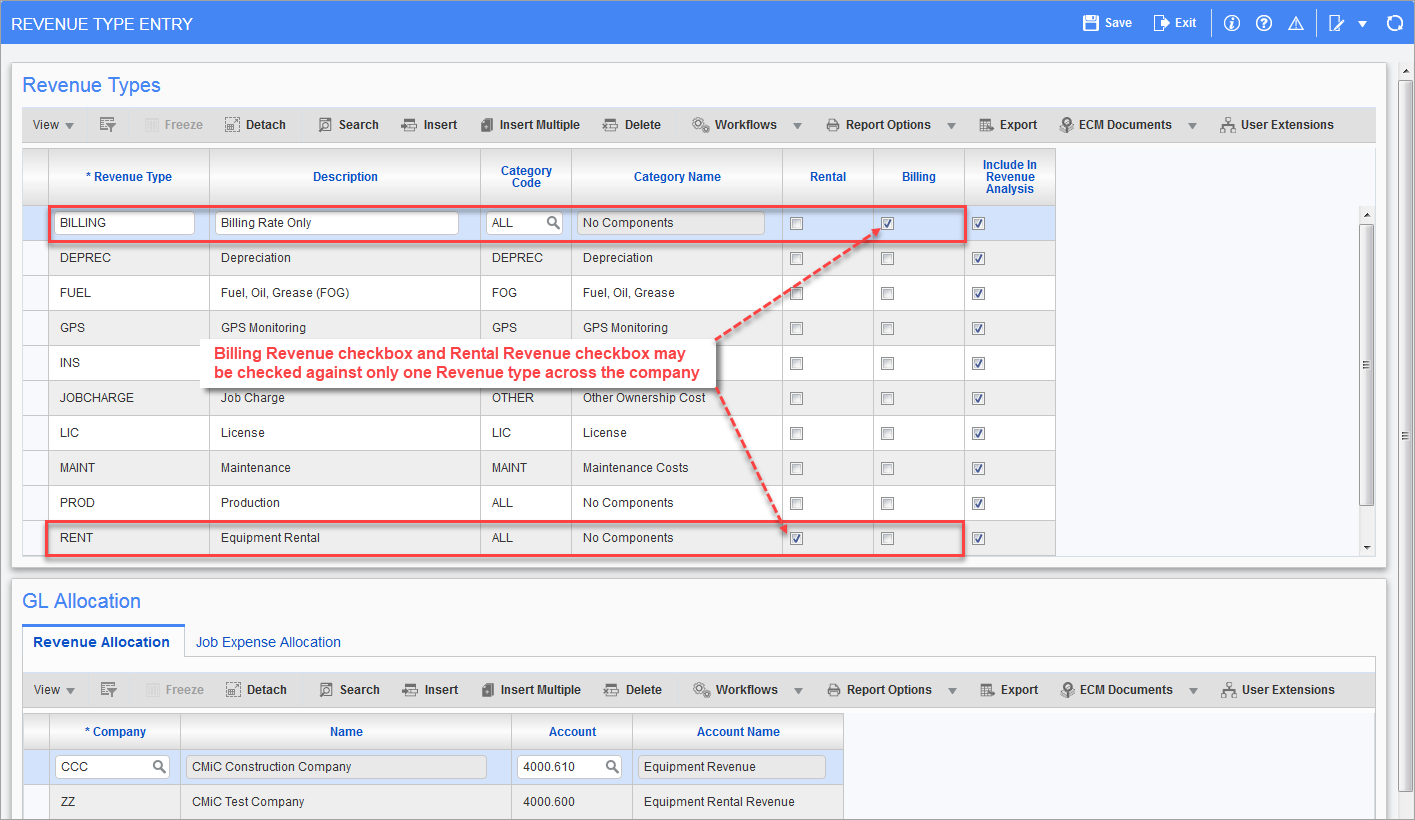
NOTE: Billing and Rental Revenue checkboxes can only be checked against one Revenue Type across the company.
Revenue Type, Description
Enter the revenue rate type and description.
Category Code, Category Name
Enter/select the category code or leave blank. This is used in Equipment Status Query only.
Rental – Checkbox
The 'Rental' revenue checkbox may be checked against only one Revenue Type across the company. This Revenue Type may be used if Rental Revenue is to be recognized.
Billing – Checkbox
The 'Billing' revenue checkbox may be checked against only one Revenue Type across the company. Also, ‘Rental’ and ‘Billing’ checkboxes are not allowed to be checked at the same time against the same Revenue Type.
Include in Revenue Analysis – Checkbox
When the 'Include In Revenue Analysis' checkbox is checked, it includes these Revenue Types in Equipment Revenue & Cost Analysis Query.
NOTE: Revenue Type with Billing checkbox checked, has no relation to Category Code and the ‘Include In Revenue Analysis’ checkbox. Therefore, they may be left blank / unchecked.
GL Allocation
This section of the screen contains two tabs: one for Revenue Allocation and one for Job Expense Allocation.
The Revenue Allocation is where, by Company, the Revenue account code must be entered.
The Job Expense Allocation tab sets the GL side by Charge-out type: G, J or E. By Company, the user needs to enter the Account Code for “G” type, the Job Cost Category Code for a “J” type, and the Equipment Transaction Code for an “E” type.
All of these values are defaults and can be changed when the actual rates are entered.
Revenue Allocation – Tab
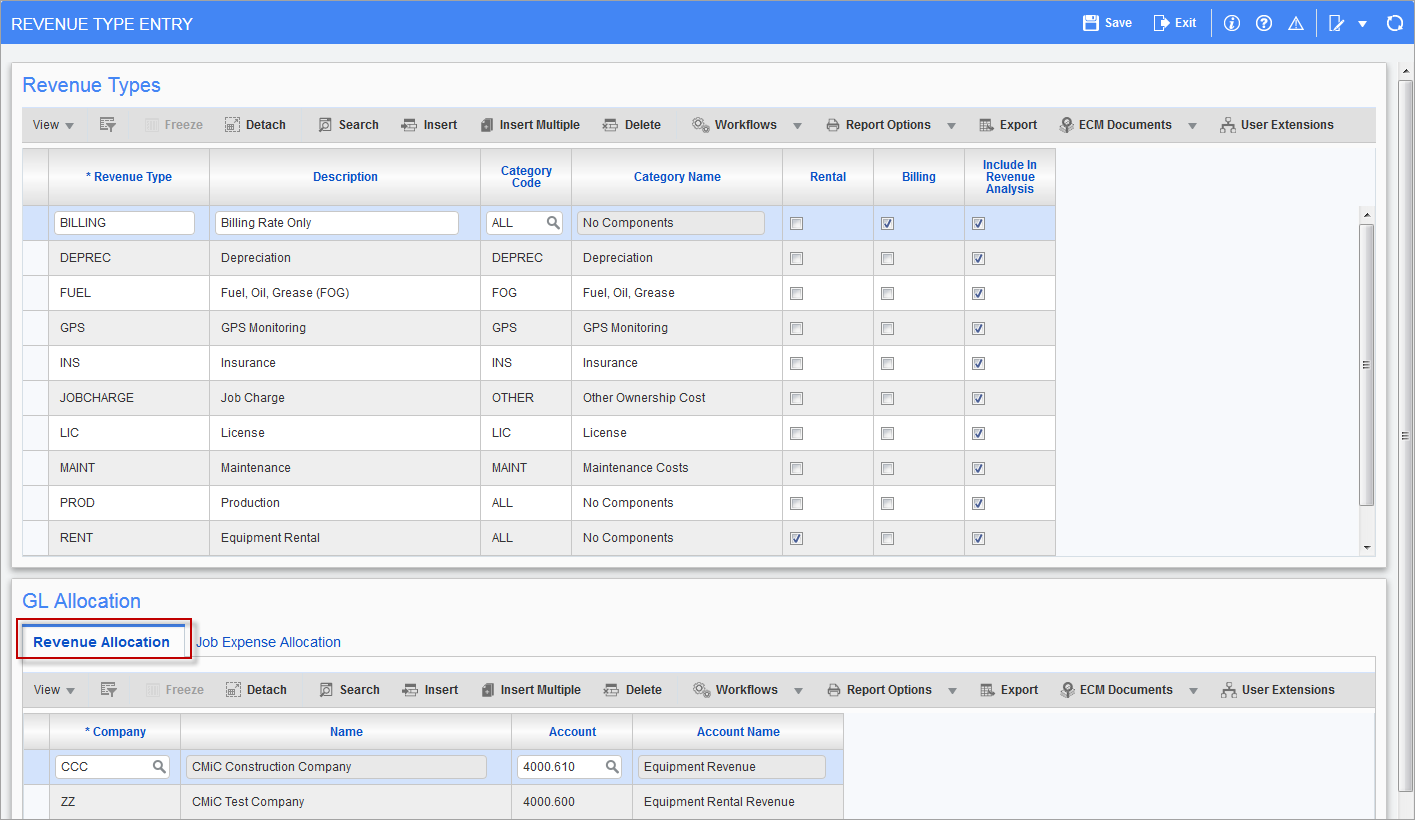
Pgm: EMRATETYPES – Rate Types – Revenue Allocation; standard Treeview path: Equipment Costing > Setup > Local Tables > Rates By Type > Revenue Types – Revenue Allocation tab
Associate revenue GL account as to each rate type. The GL revenue allocation will be used for posting the breakup for Equipment/Job/Equipment Class/Revenue Type combinations.
Company and Name
Enter the company code the rate type is to be associated to.
Account and Account Name
Enter the Revenue Account the rate type is to be credited to.
Job Expense Allocation – Tab
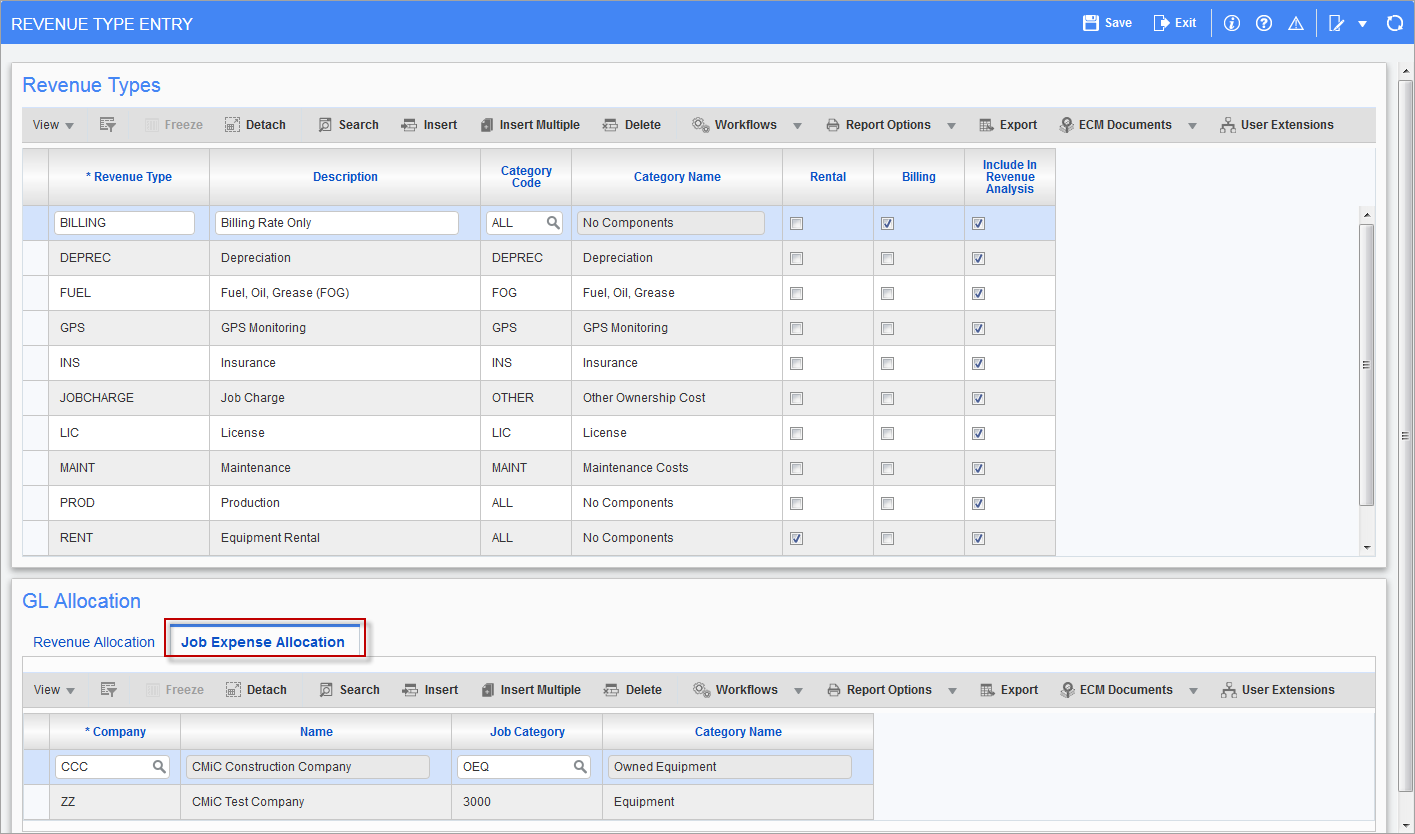
Pgm: EMRATETYPES – Rate Types – Job Expense Allocation; standard Treeview path: Equipment Costing > Setup > Local Tables > Rates By Type > Revenue Types – Job Expense Allocation tab
The detail level will be used for setting up the J line, G line and E line allocations. For an accurate rate calculation and expense allocation, all three levels J, G and E must be complete.
Company
Enter/select the company codes to be associated to the revenue type.
Job Category
Enter/select the job category to be assigned to the job expense.
Rates By Type By Class
Pgm: EMCLRATEDET – Rate By Type By Class; standard Treeview path: Equipment Costing > Setup > Local Tables > Rates By Type > Class
There are several screens where Rates by Revenue Type can be entered. Each of these screens is very similar. The Selection Criteria section is where each of the screens is slightly different.
Rates by Type follows the same hierarchy as Rates. If rates are set up at the job level, this rate will be used. If rates are not set up at the job level but are set up at the equipment level, this rate will be used. If neither the job level nor equipment level have a rate set up, rates by class will be used.
In rates by class, enter rate distribution for Equipment Class/Revenue Transaction Code/Revenue Type. In this screen, the breakdown of total hourly, daily, weekly and monthly rates will be defined for a particular class for a particular date range. The sum of all revenue type distribution will be presented.
When entering a time entry, the rate will not be updateable if the system finds a rate breakup for the entered date.
Company
Enter/select the company code for which the rates are being defined.
Equipment Class
Enter/select the equipment class for which the rate breakup is being entered.
As Of Date
Enter the date when the rate will take effect. The system will take the As Of Date and automatically make the end date Dec. 31 of the same year or the last day before the next As Of Date begins where more than one rate exists for the same class.
[Copy] – Button
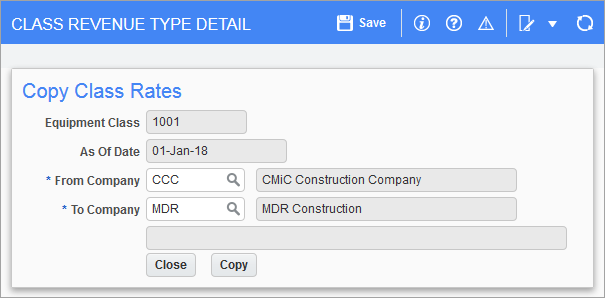
Example of Copy Class Rates pop-up window launched from [Copy] button on Class Revenue Type Detail screen
The [Copy] button is used to copy the equipment class rates from one company to another.
The pre-requisite for a full copy is that the target company must have the same Revenue Transaction Codes as the source company (standard Treeview path: Equipment Costing > Setup > Local Tables > Transaction Codes), and the same Revenue Types defined with Revenue Allocation (standard Treeview path: Equipment Costing > Setup > Local Tables > Rates By Type > Revenue Types). If the target company does not have all transaction codes or revenue allocation, then only those matching in both source and target companies will be copied over.
NOTE: If there are any rates that are ‘inactive’, then they will not be copied over. ‘As of Date’ and those ‘active’ rate definitions will be copied over.
Transaction Codes
Tran Code and Description
Enter the revenue transaction code against which the user wants to define Revenue Types and their associated rates.
WM (Additional Rates)
Enter a WM code to be used with Additional Rate in the calculation of Material Sales production equipment charges.
[Revenue Types] – Button
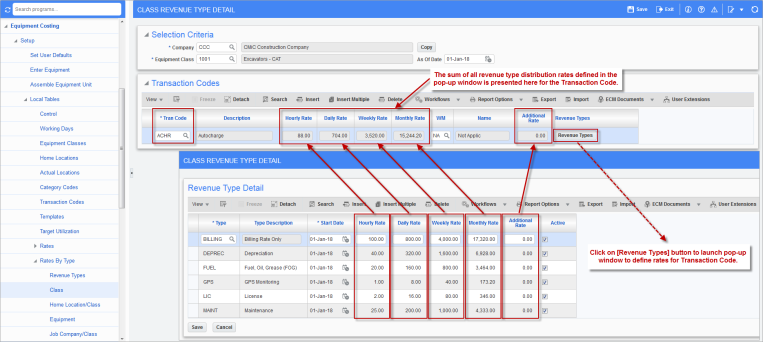
Example of Class Revenue Type Detail pop-up window launched from [Revenue Types] button
Click on the [Revenue Types] button to open a pop-up window to select Revenue Type codes for the Transaction Code. Enter the Start Date to be associated with the rates, as well as the charge-out rates for Hourly, Daily, Weekly and Monthly charges. The sum of the rates entered in this Revenue Type pop-up window will be displayed for the Transaction Code on the Class Revenue Type Detail screen.
Type
Enter the Rate Types as defined in Rates By Type (standard Treeview path: Equipment Costing > Setup > Local Tables > Rates By Type > Revenue Types).
Start Date
Enter the Start Date. Enter the same start date as the As Of Date. If the user enters a new start date, the rate will commit to this screen after exit but will appear with an As Of Date.
Rates (Hourly, Daily, Weekly, Monthly)
Enter rate for Hourly and/or Daily, Weekly or Monthly. When entering time entry, only the rate associated to the WM code will appear. If no rate is found for the rate type, 0.00 will appear in JC and EM posting. The accumulated rate from the Revenue Type Detail pop-up window will be shown in the Transaction Codes section. This accumulated total is what will be used when entering a posting time entry.
If the job setup has the ‘Use Equipment Bill Rates’ checked, then the billing rates entered here against the ‘Billing’ revenue type will be retrieved during the equipment, crew time and mechanic time transaction postings.
NOTE: The accumulated total displayed in the ‘Transaction Codes’ section does not include the billing rates defined against the ‘Billing Revenue Type’. Note that, in the screenshot above, only the Revenue rates are accumulated to show total amounts against the transaction code.
Additional Rates
Enter additional rates if Material Sales production equipment charges will be used.
Active − Checkbox
Check the 'Active' checkbox to mark the revenue type as active and have the rate included in the Transaction Code rate. Uncheck the checkbox to exclude the rate from the Transaction Code rate.
NOTE: Access to the 'Active' checkbox is privileged using privilege EMACTRATE (standard Treeview path: System > Security > Users > User Maintenance – System Privileges tab). If the user does not have access, the 'Active' checkbox will be disabled.
Rates By Type By Home Location/Class
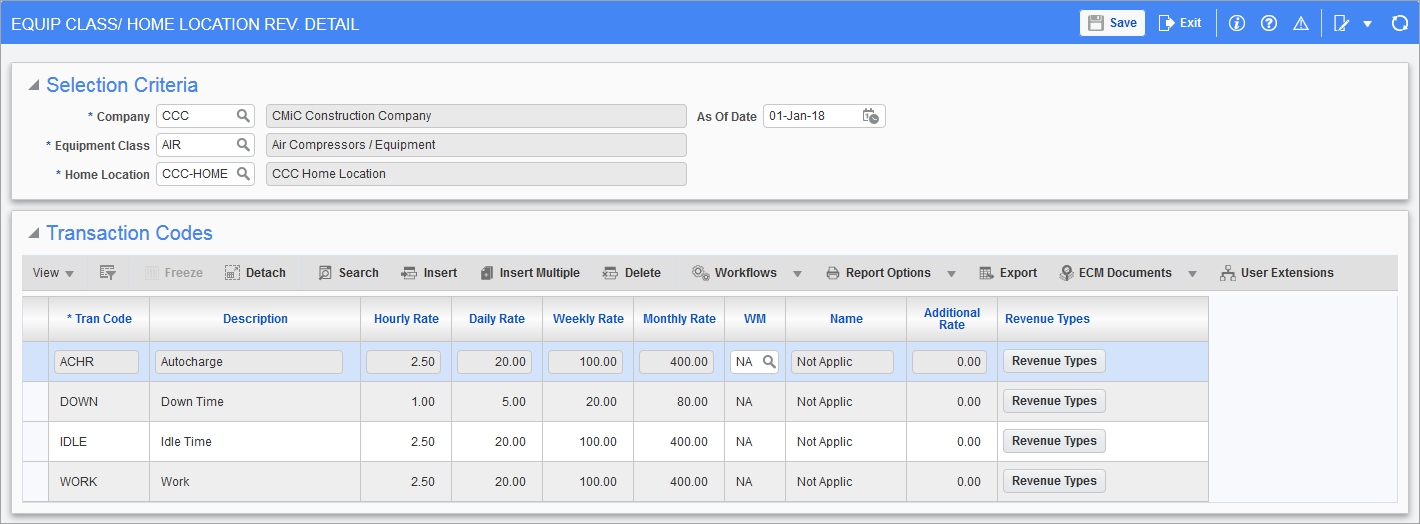
Pgm: EMCLLOCRATEDET – Rate By Type By Equipment Class/Home Location; standard Treeview path: Equipment Costing > Setup > Local Tables > Rates By Type > Home Location/Class
Company
Enter company code for which the rates are being defined.
As Of Date
Enter the date when the rate will take effect. The system will take the As Of Date and automatically make the end date Dec. 31 of the same year or the last day before the next As Of Date begins where more than one rate exists for the same class.
Equipment Class
Enter the equipment class for which the rate breakup is being entered.
Home Location
Enter the Home Location for which the rate breakup is being entered.
Transaction Codes
This section of the screen will follow the same rules as Rates By Type By Class.
Rates By Type By Equipment
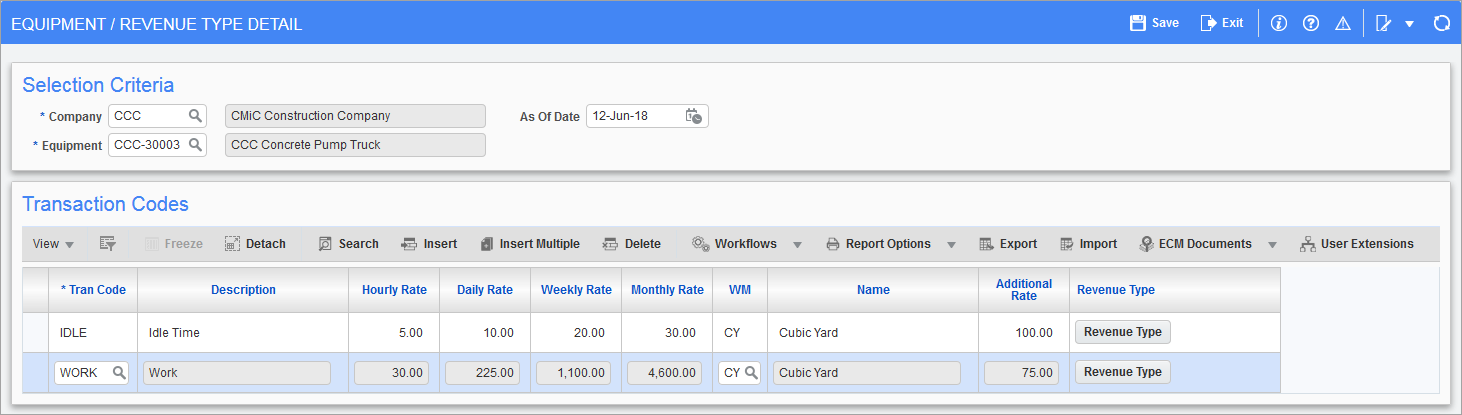
Pgm: EMEQRATEDET – Rates By Type By Equipment; standard Treeview path: Equipment Costing > Setup > Local Tables > Rates By Type > Equipment
Company
Enter Company code for which the rates are being defined.
As Of Date
Enter the date when the rate will take effect. The system will take the As Of Date and automatically make the end date Dec. 31 of the same year or the last day before the next As Of Date begins where more than one rate exists for the same class.
Equipment
Enter the Equipment code the rate breakup is being entered for.
Transaction Codes
This section of the screen will follow the same rules as Rates By Type By Class.
NOTE: Entries for Crew Time and Mechanic Time will give an error if no rate is found when equipment rate by type is used. Here again, note that this section of the screen shows the sum of the revenue rates which does not include the rates defined against ‘Billing’ revenue type.
Rates By Type By Job Company/Class
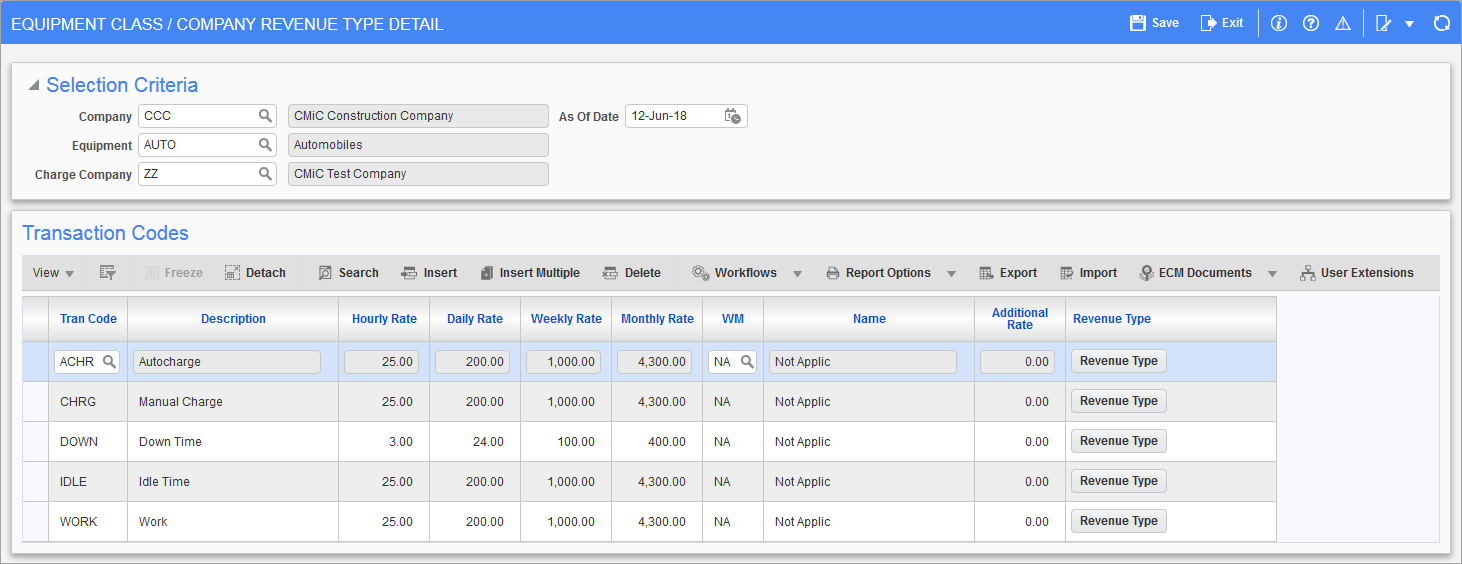
Pgm: EMCLCOMPRATEDET – Rates By Type By Job Company/Class; standard Treeview path: Equipment Costing > Setup > Local Tables > Rates By Type > Job Company/Class
Company
Enter Company code for which the rates are being defined.
As Of Date
Enter the date when the rate will take effect. The system will take the As Of Date and automatically make the end date Dec. 31 of the same year or the last day before the next As Of Date begins where more than one rate exists for the same class.
Equipment (Class)
Enter the Equipment Class code for which the rate breakup is being entered.
Charge Company
Enter Charged Company code. Equipment rates by class for all jobs within the Charge Company will be used.
Transaction Codes – Section
This section of the screen will follow the same rules as Rates By Type By Class.
Rates By Type By Job/Class
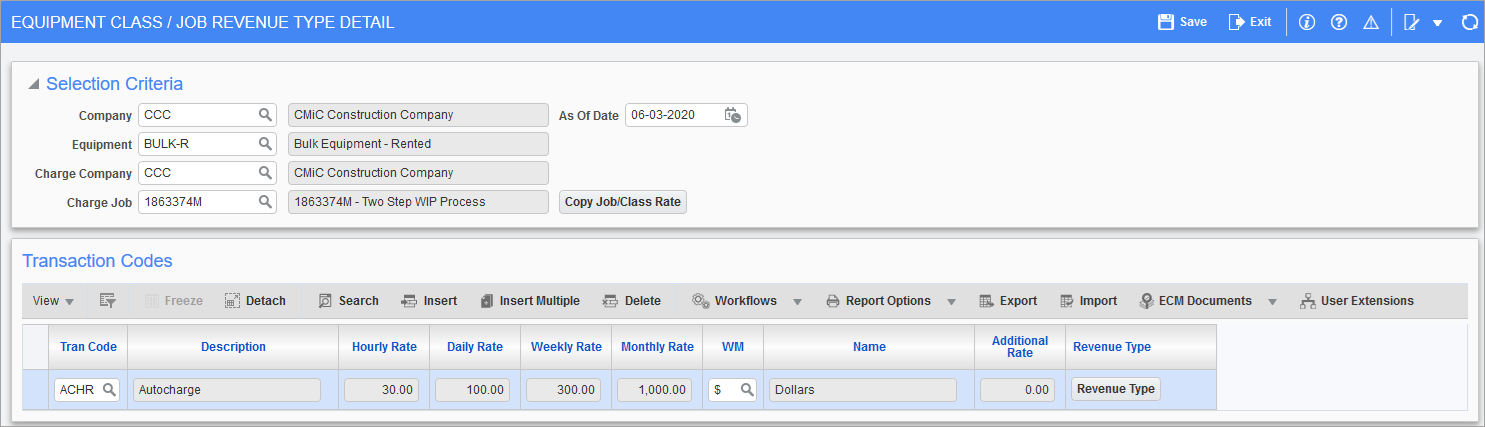
Pgm: EMCLJOBRATEDET – Rates By Type By Job/Class; standard Treeview path: Equipment Costing > Setup > Local Tables > Rates By Type > Job/Class
Company
Enter/select company code for which the rates are being defined.
As Of Date
Enter the date when the rate will take effect. The system will take the As Of Date and automatically make the end date Dec. 31 of the same year or the last day before the next As Of Date begins where more than one rate exists for the same class.
Equipment (Class)
Enter/select the equipment class code for which the rate breakup is being entered.
Charge Company
Enter/select the charged company code.
Charge Job
Enter/select the charged job code. Equipment rates by class for specific company and specific job will be used.
[Copy Job/Class Rate] – Button
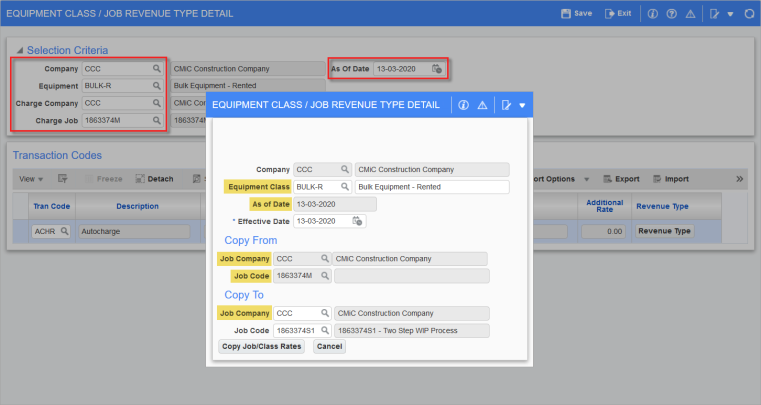
Pop-up window launched from [Copy Job/Class Rate] button on the Equipment Class/Job Revenue Type Detail screen
The [Copy Job/Class Rate] button is used to copy job/class rates from one job to another job.
Before using this button, the fields in the Selection Criteria section on the Equipment Class/Job Revenue Type Detail screen must be completed. The values entered in this section of the screen default into the pop-up window, as highlighted in the screenshot above. For example, equipment class defaults from the main screen. The date in the Effective Date field is the date from which the copied rates would be effective in the new job. In the Copy To section, users must enter the same company and the job to which rates are to be copied.
The following are a list of enterable fields in this pop-up window:
Equipment Class
The equipment class defaults from the main screen.
Effective Date
Users must enter a date, from which the copied rates would be effective in the new job.
Job Company/Job Code
Enter the company/job code to which the rates are to be copied.
When finished, click the [Copy Job/Class Rates] button in the pop-up window to copy the job/class rates to the new job. Clicking the [Cancel] button will exit the screen without copying the rates.
NOTE: The [Copy Job/Class Rates] button is not enabled in the pop-up window until a date is entered in the Effective Date field.
After the copy process has successfully completed, the following message will be displayed: “Rates copied successfully to job”. If rates are already set up in the Copy To section’s company/job, the records will be added to the existing set of records.
Transaction Codes
This section of the screen will follow the same rules as Rates By Type By Class.
Rates By Type By Job
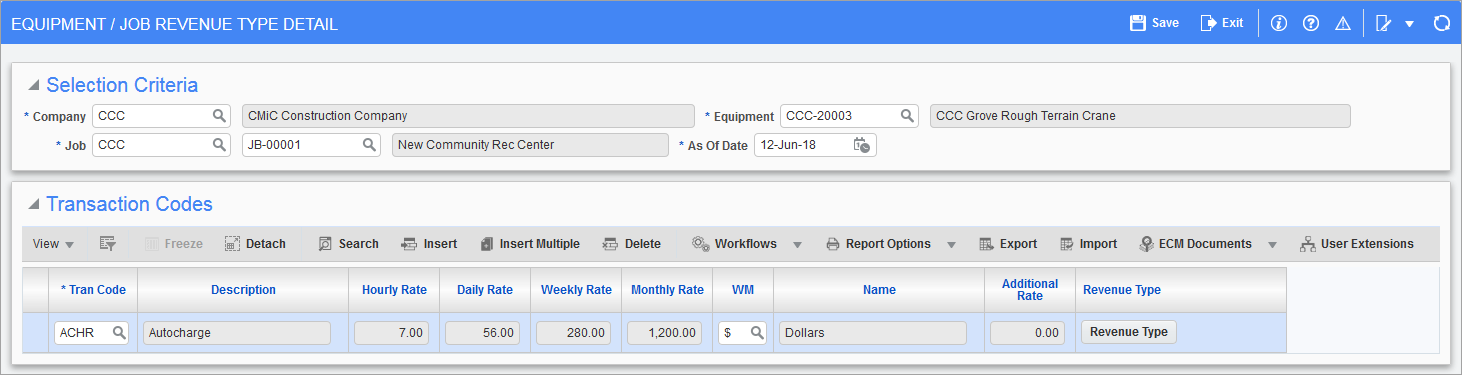
Pgm: EMEQJBRATEDET – Rates By Type By Equipment/Job; standard Treeview path: Equipment Costing > Setup > Local Tables > Rates By Type > Job
Company
Enter/select company code the rates are being defined for.
Equipment
Enter/select the equipment code the rate breakup is being entered for.
Job (Company and Job Code)
Enter/select the job company code and job code.
As Of Date
Enter the date when the rate will take effect. The system will take the date in the As Of Date field and automatically make the end date Dec. 31 of the same year or the last day before the next As Of Date begins where more than one rate exists for the same class.
Transaction Codes
This section of the screen will follow the same rules as Rates By Type By Class.
NOTE: Entries for Crew Time and Mechanic Time will give an error if no rate is found when Equipment Rate by Type is used.