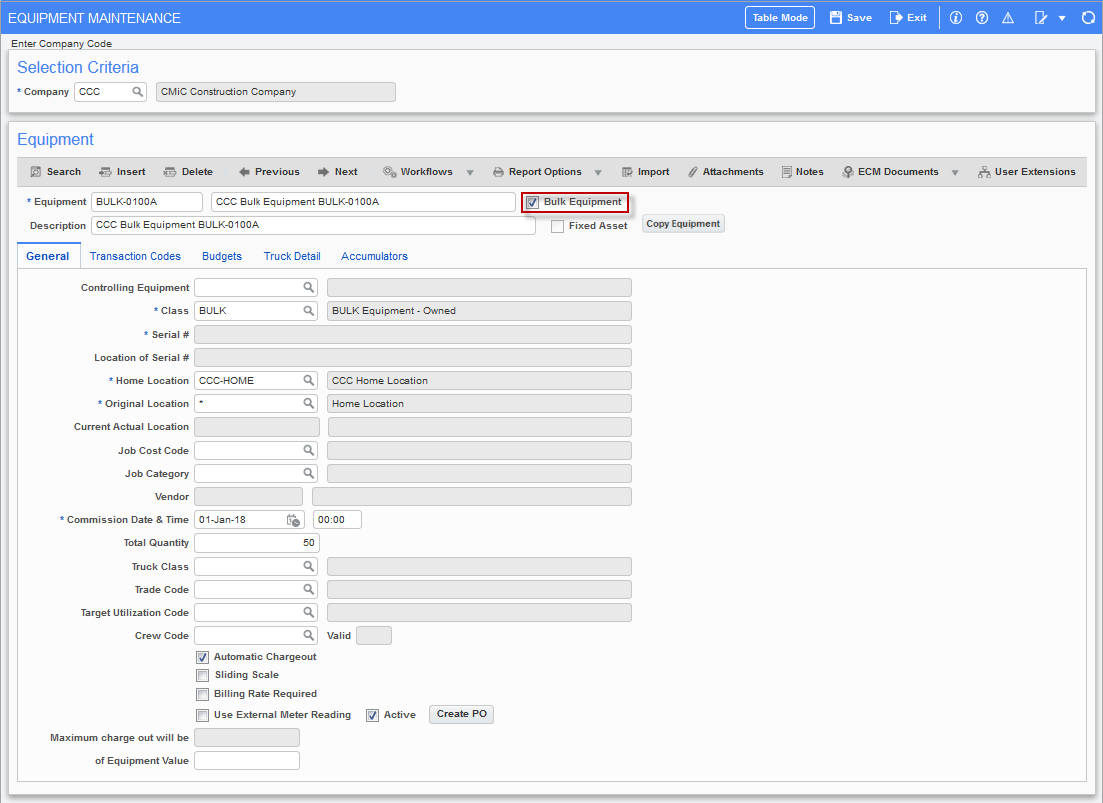
Pgm: EMEQUIP – Equipment Maintenance (Bulk Equipment Entry); standard Treeview path: Equipment Costing > Setup > Enter Equipment – General tab
NOTE: Most of the fields are not editable after the equipment has been saved. The user can delete and recreate the equipment item if it has not been referenced on transactions.
NOTE: When an equipment code is created and workflow approval is started by clicking on the [Workflow] button on the Block Toolbar of the Equipment section, the Equipment Maintenance screen will disable all fields and buttons to prevent any changes from being made.
Equipment Code, Name and Description
Enter user-defined equipment code. Code may consist of a maximum of 10 characters. The name can be up to a maximum of 30 characters and the description is a free-form field that allows 2000 characters.
Bulk Equipment – Checkbox
If quantities of the same equipment such as steel props, ladders, and fencing, etc., are entered, then check the ‘Bulk Equipment’ checkbox. By default, this box is unchecked.
NOTE: Bulk quantity is only applicable to revenue transactions.
If the ‘Bulk Equipment’ checkbox is checked, the ‘Fixed Asset’ checkbox is automatically disabled. Bulk Equipment and Fixed Asset cannot be checked at the same time. The Serial Number, Location of the Serial Number and the Vendor fields will also be disabled. The Vendor field is disabled because bulk equipment cannot be treated as rented equipment. As long as the value in the Total Quantity field is more than one, bulk equipment cannot be made ‘non-bulk’ equipment.
Other restrictions on bulk equipment include:
-
Charge cap cannot be specified
-
Cannot be associated with a production item
-
Cannot be used in Crew/Mechanic Time Entry programs
-
Cannot be used in Primary/Secondary Units
-
Transfer Adjustments program cannot be used
NOTE: For more information on restrictions on using the bulk equipment functionality, refer to Equipment Costing - Bulk Equipment - Additional Information .
The user can specify the home location and total quantity for bulk equipment, but once the record is saved, the Total Quantity field will be non-updatable. To change the quantity, the user will need to use the Bulk Equipment Quantities Entry screen (standard Treeview path: Equipment Costing > Utilities > Bulk Equipment Quantities > Bulk Equipment Quantities Entry).
NOTE: For information on writing off damaged or lost bulk equipment, refer to Writing Off Bulk Equipment Quantities.
Fixed Asset – Checkbox
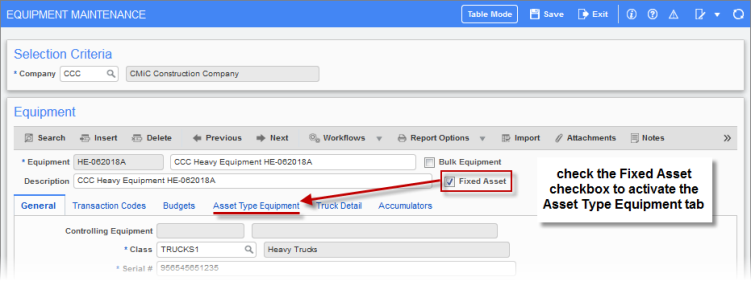
If the piece of equipment is also to be part of the user’s corporate Fixed Asset system, then check the ‘Fixed Asset’ checkbox to activate the Asset Type Equipment tab.
If the user clicks the ‘Fixed Asset’ checkbox, they will need to complete all the required information on the General tab for the equipment asset, as well as enter the Asset Category on the Asset Type Equipment tab before saving the record. Asset Categories are maintained in the Fixed Assets module (standard Treeview path: Fixed Assets > Setup > Local Tables > Asset Categories).
NOTE: Bulk equipment cannot be marked as a fixed asset as well, in the system. Therefore, the user cannot check the 'Bulk Equipment' and ‘Fixed Asset’ checkboxes at the same time.
[Copy Equipment] − Button
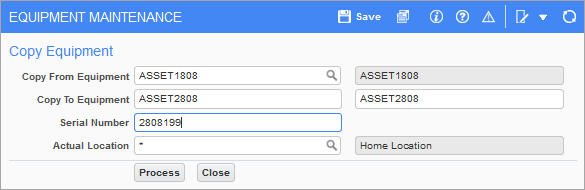
Pop-up window launched from [Copy Equipment] button on the Equipment Maintenance screen
This button allows users to easily create new equipment pieces when they already hold the same type of equipment within their inventory.
NOTE: Equipment code must be entered in upper case.
Copy From Equipment
Enter/select the equipment code which is to be copied. The equipment from which the [Copy Equipment] button is clicked will default in this field. The equipment code must be in uppercase.
Copy To Equipment
Enter the new equipment code and equipment name.
Serial Number
Enter the unique serial number for the equipment.
Actual Location
Enter/select the actual location of the equipment.
[Process] − Button
When finished entering the details for the new equipment, click on [Process].
Quick Links
General – Tab
Controlling Equipment
Leave null/blank unless using a hierarchy.
Create a hierarchy by entering a controlling equipment code in this field for two or more equipment items. The hierarchy will group the items together for different degrees of detail.
Class
Enter/select the equipment class.
For more information on classes, see Equipment Costing - Equipment Classes
Serial Number
Enter the equipment serial number. A unique serial number must be entered. When a serial number is not available, a unique number must be entered regardless. An error message that this code has already been used will be generated.
The Serial Number field is not applicable for bulk equipment and is disabled.
Serial Number Location
Enter the location of the serial number, if applicable. This is where the serial number is located on the piece of equipment.
The Serial Number Location field is not applicable for bulk equipment and is disabled.
Home Location
The field may already have a defaulted location. This defaulted from the setup on the Set User Defaults screen (standard Treeview path: Equipment Costing > Setup > Set User Defaults).
The location can be changed if required.
NOTE: This field cannot be modified once the record has been saved.
Original Location
Enter an asterisk (*) if the current location of the equipment item is not known at this time or select an actual location from the LOV. The original location is the location of the equipment at the current time.
Current Actual Location
The actual location will change as the equipment is transferred through a local transfer or transfer adjustment. Transfers are transactions that can be processed in the Equipment Costing module. This field is display-only.
For bulk equipment, the display will be "multiple".
Job Cost Code, Job Category
Enter/select a job cost code and job category, if applicable. In most cases, the user has standard categories for jobs and therefore a default value is applicable and a time saver when entering transactions.
Vendor
Enter/ select a vendor code if the equipment is to be associated to a vendor for rental invoicing. This is the vendor code of the owner of the rented equipment. The vendor must be already set up under the same company as the equipment.
For Bulk Equipment, this field is not applicable and hence, disabled.
Commission Date & Time
Change the date to the correct commission date. Entering a value for the commission time is optional.
Equipment items are given the current date of entry as their commission date. The commission date is vital, as the system will prohibit the entry of a transaction against an equipment item if the transaction date is earlier than the commission date. A change can be made to the commission date only if the piece of equipment has not yet been used.
Total Quantity
This field by default is disabled for regular equipment and fixed assets. The system automatically enters a quantity of "1" and it is display-only.
When the 'Bulk Equipment' checkbox is checked, then the Total Quantity field is enabled, and the user can enter the desired quantity. The user can enter the quantity while defining bulk equipment for the first time and once committed, the field is display-only. Any change in quantity can only be done through the Bulk Equipment Quantity Entry screen (standard Treeview path: Equipment Costing > Utilities > Bulk Equipment Quantities > Bulk Equipment Quantities Entry).
Truck Class, Trade Code, Target Utilization Code
These fields apply only to customers using the Dispatch module, which has been deprecated.
Crew Code
Equipment can be assigned directly to a crew by entering/selecting a crew code.
This field is only available when creating a new piece of equipment.
Valid
Valid is a display field that will read "Y" unless mandatory user extensions are being used and an extension has not been entered for the equipment in which case it will read "N" and the equipment will not be available for entry until a user extension has been entered.
Automatic Chargeout – Checkbox
Check the box if automatic charge-out will be used for this piece of equipment.
Auto charge-out is for equipment left on site for the duration of the job. If the piece of equipment will be moved frequently and charged by the hour or day, use the manual charge-out feature.
If 'Automatic Chargeout' is checked, set the Job Category field as well (e.g. "E" for Equipment).
NOTE: Tag one transaction code for auto charge-out transactions on the Transaction Codes tab. This transaction code should belong to the category code "ALL".
Sliding Scale – Checkbox
If the 'Sliding Scale' checkbox is checked, the system will calculate the best rate available based on daily, weekly and monthly rates for auto charge. Also, when the 'Billing Rate Required' checkbox is checked along with the 'Sliding Scale' checkbox, then the best billing rates will also be determined using the sliding scale.
If the box is not checked, then only the daily rate will be used for auto charge.
NOTE: When the 'Use Equipment Revenue Rate Types' checkbox is checked on the Equipment Costing Control File (standard Treeview path: Equipment Costing > Setup > Local Tables > Control – Charge/Reconciliation tab), the 'Sliding Scale' checkbox will be disabled, and the sliding scale rule will be ignored even though the checkbox is checked. Daily rates will be the only rate considered. In addition, if 'Use Auto Charge Cycle' checkbox is checked on the Equipment Costing Control File, sliding scale will be disabled on the Enter Equipment screen.
Billing Rate Required (Owner) – Checkbox
Check the box if owner billing rates are applicable to this piece of equipment. If checked, the system will not allow a usage transaction unless there is an Owner (Job) Billing Rate defined.
When this checkbox is checked along with 'Sliding Scale' checkbox, then the system will apply best billing rate using the sliding scale as well. This allows users to determine whether billing rates to be applied with daily rates always follow sliding scale.
Use External Meter Reading – Checkbox
If checked, the External Meter Reading will be used to update the Accumulator Meter Reading and will not be automatically updated through Equipment Posting Transaction. The default value for this field is unchecked.
This checkbox should be checked for equipment that will be updated via the External Meter Reading Import utility (standard Treeview path: Equipment Costing > Utilities > External Meter Reading Import).
Active – Checkbox
Check this checkbox if the equipment is in active use. Equipment can be entered in the system prior to delivery, but the 'Active' checkbox is not set until receipt.
Uncheck the checkbox for obsolete equipment.
[Create PO] – Button
The [Create PO] button allows the Purchase Order Entry screen to be launched from the Equipment Maintenance screen, using the equipment home company to default as the purchase order company.
For more information on creating purchase orders (POs), please refer to the Purchase Order reference guide.
Charge Cap Fields
A piece of equipment can have either a charge cap or billing cap setup at the equipment level but not both. The following charge cap fields are enabled if the 'Use Billing Revenue Cap' box is unchecked on the Assets tab of the System Options screen (standard Treeview path: System > Setup > System Options – Assets tab). For more information, please refer to System Data - System Options - Assets - Tab.
Maximum charge out will be (Percentage)
Enter equipment charge-out percent.
This is the percentage of the equipment value that may be charged to a job. The maximum permissible percentage is 999.99%. If a charge cap is defined at a higher level, for example at the job level, then the job level charge cap will take precedence over the charge cap defined at the equipment level.
-
Exceeding the cap will result in the transactions not being posted.
-
Time Entry will flag the amount as needing a “Cap Reduction”. The edit list will print an exception report. A manual correction will have to be entered in the Time Entry program before posting.
-
Auto Charge will cap the amount. The reduced amount will be posted and flagged.
NOTE: A maximum charge out cannot be specified for bulk equipment.
of Equipment Value
Enter equipment value.
Transaction Codes – Tab
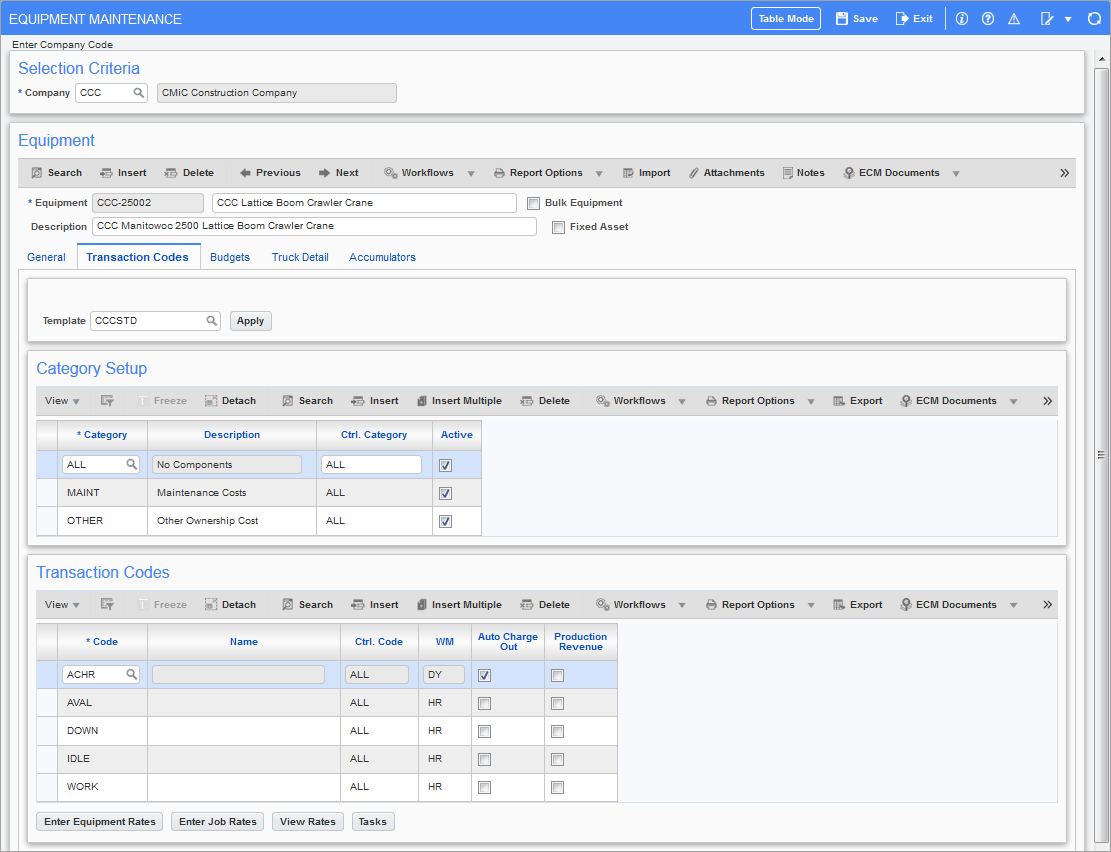
Pgm: EMEQUIP – Equipment Maintenance; standard Treeview path; Equipment Costing > Setup > Enter Equipment – Transaction Codes tab
Each active piece of equipment must have categories and transaction codes assigned to it. A template may be used, or transaction codes may be entered manually. The transaction code will show either auto charge-out or charge for revenue allocations, and all expense codes for cost allocation.
Tag one transaction code for auto charge-out transactions. This transaction code should belong to the category code “ALL”.
Auto Charge-Out Rules
-
The transaction code must be a revenue transaction code.
-
The transaction code must be at the highest level of the hierarchy.
-
The transaction code must not be used as a controlling code for another transaction.
-
The category “ALL” must be used for the ‘Auto Charge Out’ checkbox to activate.
Template
Enter/select a template and click on the [Apply] button or leave this field blank if the transaction codes will be entered manually.
Templates are created to simplify setting up an equipment item. Many transaction codes can be associated to a category via a template (standard Treeview path: Equipment Costing > Setup > Local Tables > Templates).
If a template is used, transaction codes will default into the Transaction Codes section of the screen.
Category Setup
Category
Enter “ALL” or select a Category from the LOV. If using a controlling category, enter the controlling category first in the next field (Ctrl. Category), then return to this field and enter the sub-category.
Ctrl. Category (Controlling Category)
Two-level hierarchies are allowed. If a Sub-Category is entered before the Controlling Category, an error message that the Controlling Category has not been entered yet will appear. Clear the Category field and enter the Controlling Category first, then the Sub-Category. If not using a two-level hierarchy, then enter “ALL”.
Active – Checkbox
This checkbox is applicable to cost categories only. Category “ALL” will always be active and cannot be changed to inactive. The checkbox will default from the master level Category Codes screen (standard Treeview path: Equipment Costing > Setup > Local Tables > Category Codes) but may be overwritten for this specific equipment code. If checked, the category code is active and if unchecked, the category code is inactive and cannot be used in transaction entry.
When the 'Active' checkbox is activated or inactivated, the change will take effect immediately. Any existing unposted transactions where the category has been used may still be posted; however, the user will not be able to apply the category to the unposted transaction after it has been inactivated.
Transaction Codes
Code
If a template was used, the transaction code(s) will have defaulted into this section. The code(s) can now be adjusted to suit the piece of equipment, as required.
If a template was not used, enter/select transaction codes. Transaction codes are set up in the Transaction Codes screen (standard Treeview path: Equipment Costing > Setup > Local Tables > Transaction Codes).
NOTE: A transaction code can be deleted (i.e., removed) from a piece of equipment as long as there are no unposted transactions using this transaction code. If unposted transactions exist, the user will be prevented from deleting the transaction code.
Auto Charge Out – Checkbox
When checked, use this revenue transaction code when generating auto charge-outs.
NOTE: The ability to select multiple transaction codes for the auto-charge process is controlled by the 'Allow Multiple Auto Charge Transaction Code' checkbox, located on the Control tab of the Equipment Costing Control File screen. Refer to Control File for more information.
Production Revenue – Checkbox
If checked, this revenue transaction code will be used when generating an equipment revenue charge from the Production Quantity Entry and Post screen in the Material Sales module (standard Treeview path: Material Sales > Production > Enter and Post Production). This will be the transaction code the rate will be drawn from when the [Create/Review Equipment Charges] button is pressed.
For more information on Quarry Production and Equipment Utilization, please refer to the Material Sales reference guide.
NOTE: This checkbox will not be enabled for Cost Transaction Codes.
[Enter Equipment Rates] – Button
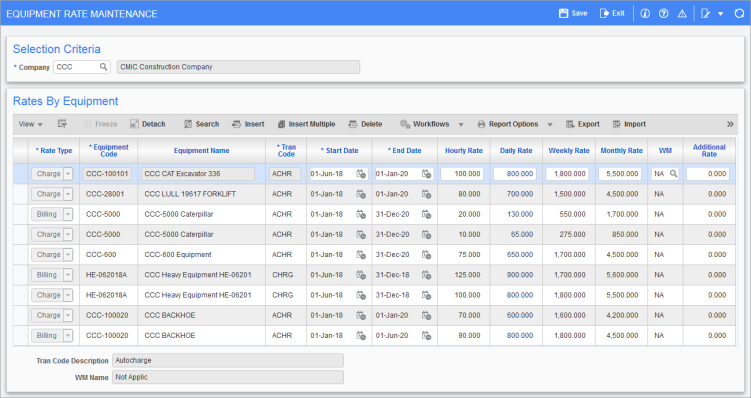
Pgm: EMEQRATE – Equipment Rate Maintenance pop-up window launched from [Enter Equipment Rates] button
Click on the [Enter Equipment Rates] button to directly enter rates against the piece of equipment from the Transaction Codes screen.
NOTE: This is the same Equipment Rate Maintenance screen as the one launched from the standard Treeview path.
[Enter Job Rates] – Button
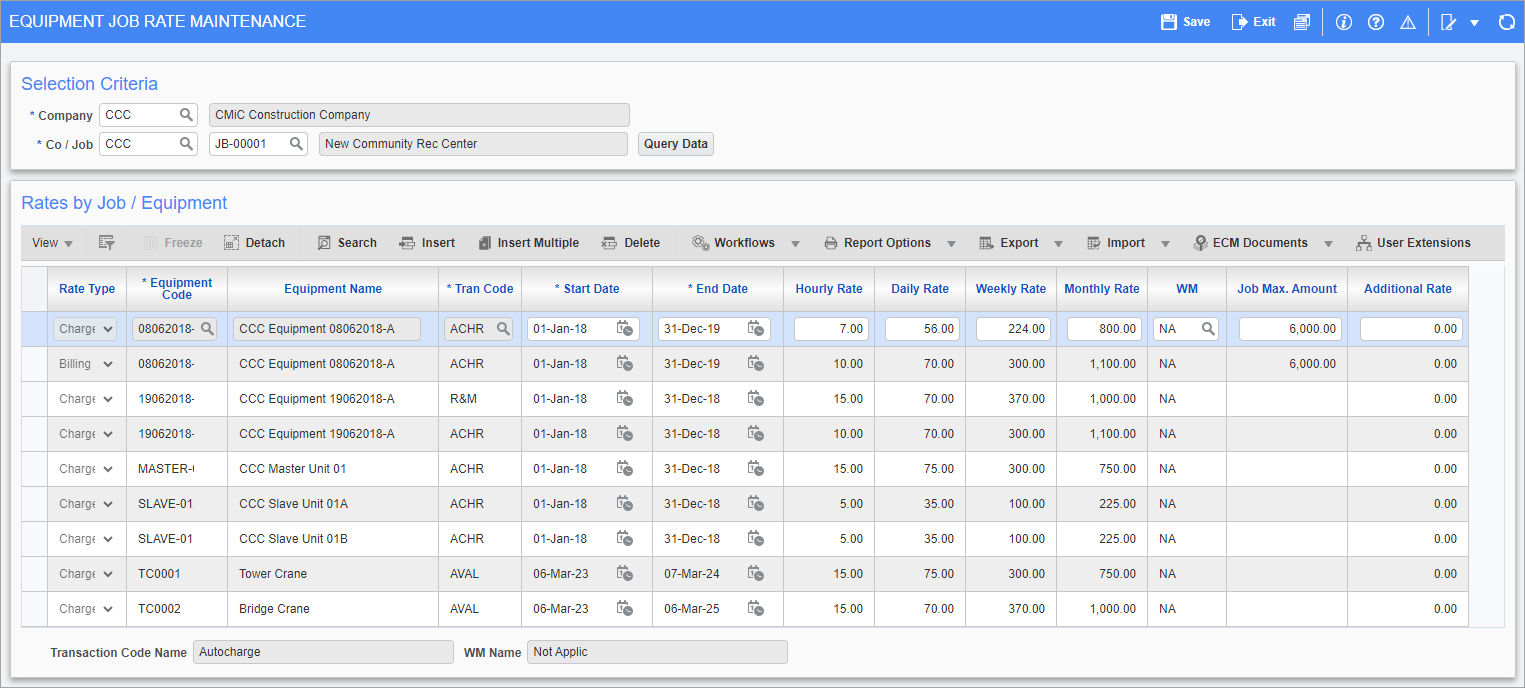
Pgm: EMEQJBRT – Equipment Job Rate Maintenance pop-up window launched from [Enter Job Rates] button
Click on the [Enter Job Rates] button to directly enter rates against equipment/job from the Transaction Codes screen.
NOTE: This is the same Equipment Job Rate Maintenance screen as the one launched from the standard Treeview path.
[View Rates] – Button
Clicking on the [View Rates] button will show the rates, as well as whether the rate is being read from the Class, Equipment or Job Rate level.
NOTE: Bulk equipment is not allowed to be associated with a production item in Material Sales module (standard Treeview path: Material Sales > Production > Assign Production Items).
The pop-up window that opens depends on if ‘Use Equipment Revenue Rates Type’ is checked on the Equipment Costing Control File (standard Treeview path: Equipment Costing > Setup > Local Tables > Control – Charge/Reconciliation tab). If it is checked, the Revenue Type Detail pop-up window will open. If it is unchecked, the Rate Query pop-up window will open.
This feature is either on or off for a company and cannot be used selectively for a piece of equipment.
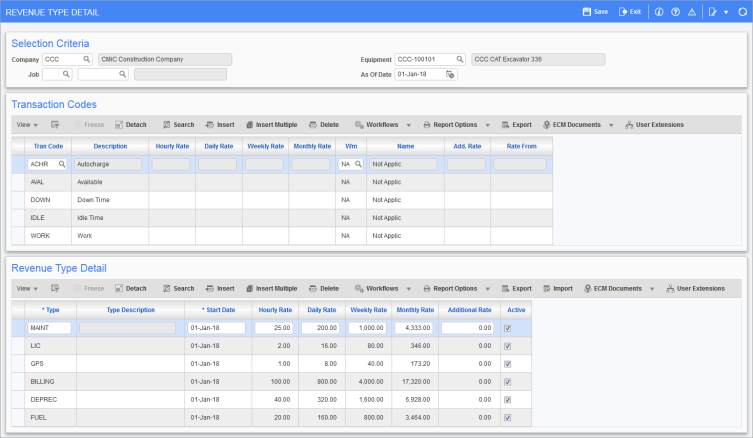
Pgm: EMRATEDET – Revenue Type Detail pop-up window launched from [View Rates] button
The Revenue Type Detail pop-up window will display rate information the equipment is currently using depending on the options entered. If the job code is entered, then the system will check rates first at the job then on equipment and then on class. The Rate From field will indicate from which level the rates were picked up. This pop-up window will only show active rates on the bottom section of the screen, which will be lying within the date range of the As Of Date field in the top section of the screen. All the data displayed in this window is strictly for query and cannot be manipulated.
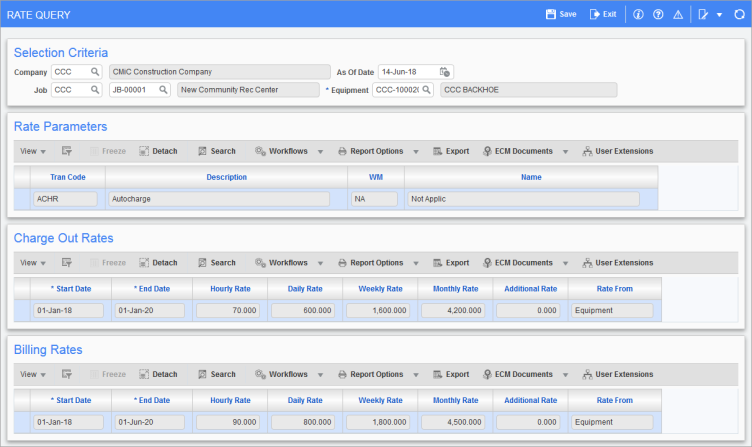
Pgm: EMRATE – Rate Query pop-up window launched from [View Rates] button
The Rate Query pop-up window will display rates for all dates defined for the equipment. The options in this pop-up window will work the same way as the Revenue Type Detail pop-up does. This pop-up window will only open if the system is not using revenue types. Data in this window is query-only and cannot be manipulated.
[Tasks] – Button
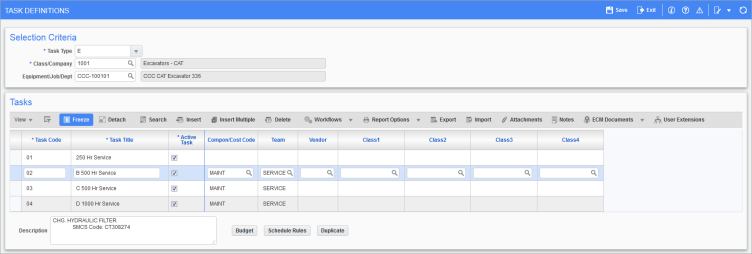
Pgm: PRMTASKE – Tasks Definitions pop-up window launched from [Tasks] button
Clicking on the [Tasks] button launches the Tasks Definitions pop-up window. This screen is used to define new tasks and to modify task definitions in the Preventative Maintenance module.
NOTE: Bulk equipment cannot be used with tasks.
Tasks are generic descriptions of what must be done in performing service activities. They can be associated with specific pieces of equipment or with classes of equipment. Associated with each task are a budget and a schedule.
-
The budget breaks costs down by expense types.
-
The schedule consists of rules for how often the task must be performed, based on dates and/or accumulators.
Task definitions do not specify exactly when the service must be performed. This is the function of work items, which may be thought of as the performance of a task at a specific point in time. The tasks’ scheduling rules are used to create work items automatically when the conditions specified by any rule in the schedule have been met. Over the life of a task, it will generate many work items.
For more information on defining tasks, please refer to the Preventative Maintenance reference guide.
Budgets – Tab
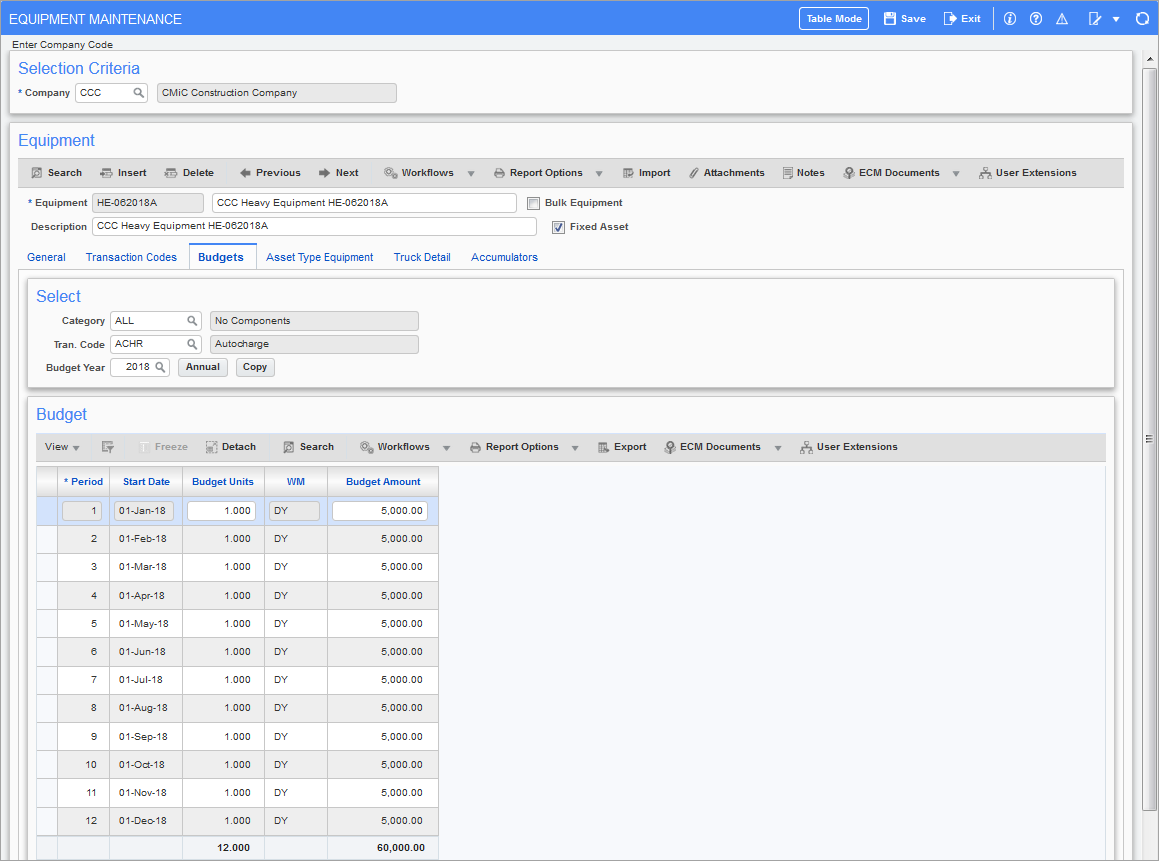
Pgm: EMEQUIP – Equipment Maintenance; standard Treeview path; Equipment Costing > Setup > Enter Equipment – Budgets tab
An equipment budget is used when the budgets will not be set through Fixed Assets, Preventive Maintenance or Payroll entry. Although it is not mandatory, it is advised if all entries will be made through the equipment module only. Use budgets to project both revenues and costs.
Budget Entry Rules
Budgets may be entered as follows:
-
By manually entering figures into each individual period.
-
By estimating the annual budget figure and allowing the system to automatically split that amount into each period.
-
By copying a budget from another equipment item.
The year needs to be defined as a fiscal year in the General Ledger module.
Category
Enter/select category code.
Tran. Code (Transaction Code)
Enter/select transaction code.
Budget Year
Enter fiscal year for this budget. This must be a four-digit number.
[Annual] – Button
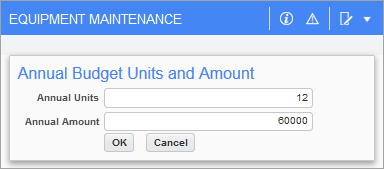
Pop-up window launched from [Annual] button
The [Annual] button allows the user to define the number of months and dollar amount to be dispersed.
[Copy] – Button
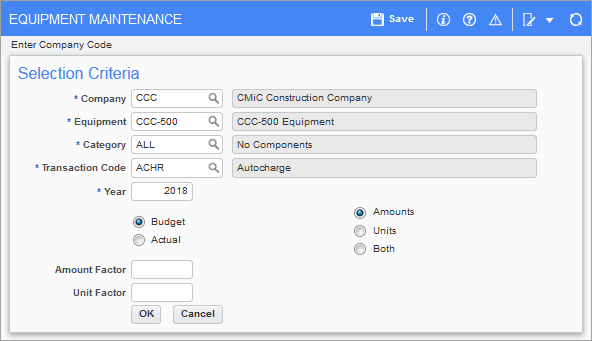
Pop-up window launched from [Copy] button
The [Copy] button allows the user to copy a budget from a different piece of equipment.
Asset Type Equipment – Tab
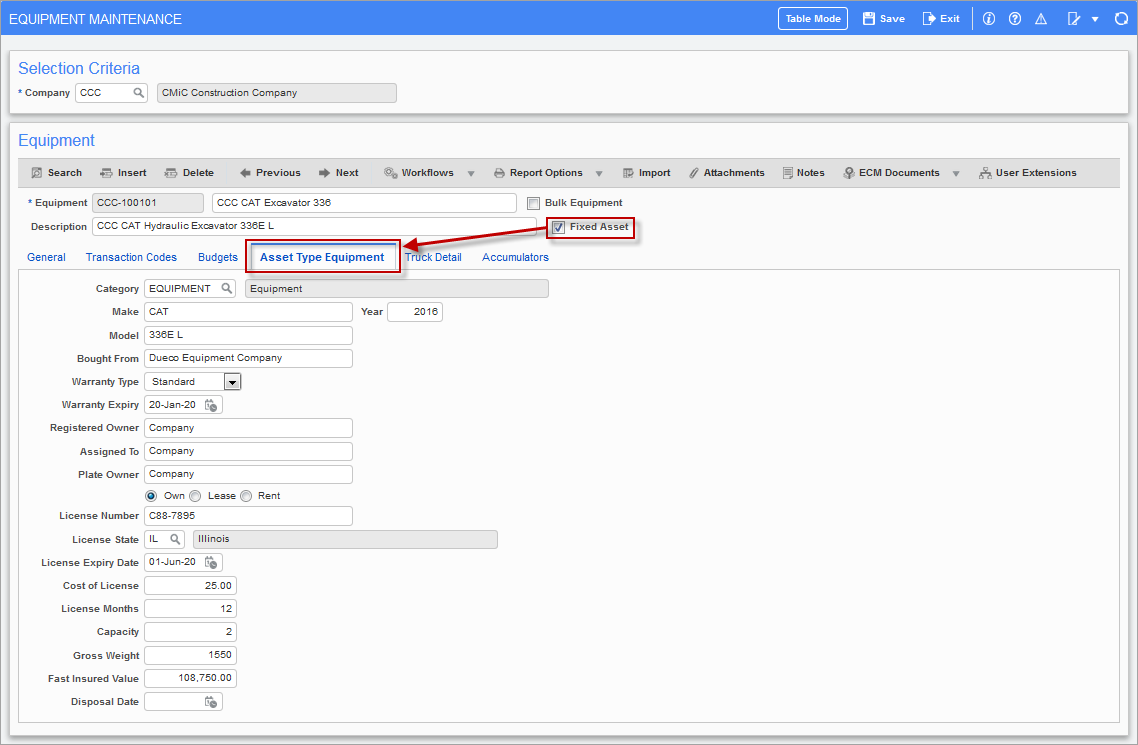
Pgm: EMEQUIP – Equipment Maintenance; standard Treeview path; Equipment Costing > Setup > Enter Equipment – Asset Type Equipment tab
If the piece of equipment is also to be part of the user’s corporate Fixed Asset system, then check the ‘Fixed Asset’ checkbox on the Equipment Maintenance screen to activate the Asset Type Equipment tab.
The Fixed Assets module is used to keep track of regular expenses attributable to major assets. Strictly speaking, the assets tracked need not be “fixed” because they may be movable equipment such as cars and trucks. However, they must be tangible and must not be consumable.
The information entered into this tab will default into the Asset Maintenance screen when entering this item into Fixed Assets (standard Treeview path: Fixed Asset > Assets > Enter Assets – Equipment Detail tab).
Category
Enter/select fixed asset category code.
Asset categories are maintained in the Fixed Assets module (standard Treeview path: Fixed Assets > Setup > Local Tables > Asset Categories).
Make
Enter manufacturer or brand name of the equipment.
Year
Enter the equipment’s model year, if applicable.
Model
Enter the model number or name of the equipment, as applicable.
Bought From
Enter information about where this equipment was bought.
Warranty Type
Select warranty type for the asset. Choices are “Standard” or “None”.
Warranty Expiry
Enter the expiry date of the warranty.
Registered Owner
Enter the registered owner of the equipment’s license. This is the (corporate) entity that legally owns the equipment asset.
Assigned To
Enter the name of the person or entity who is currently assigned the equipment or is using the equipment.
Plate Owner
Enter the owner (corporate entity) in whose name the license plate is registered.
Ownership Status – Radio Buttons
Select the ownership status of the asset. Choices are “Own”, “Lease” or “Rent”.
License Number
Enter the license plate number of the equipment.
License State
Enter/select the license plate state code.
License Expiry Date
Enter the expiry date of the license plate.
Cost of License
Enter the cost of the most recent license. This is used in conjunction with the License Months field to calculate the monthly license cost for the equipment.
License Months
Enter the number of months that the current license covers.
Capacity
For trucks and earth moving equipment, this is the tons that the equipment is capable of transporting.
Gross Weight
For trucks and earth moving equipment, this is the total of the capacity and the weight of the equipment.
Fast Insured Value
Enter the insured value of the equipment.
Disposal Date
Enter equipment’s disposal date.
Truck Detail – Tab
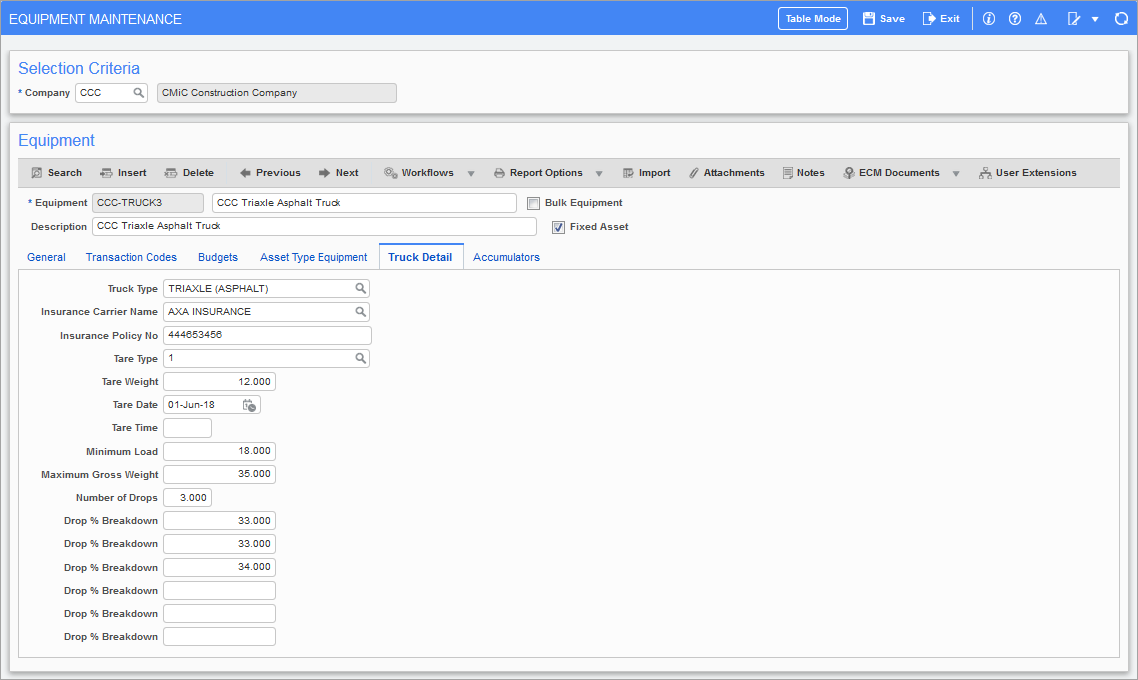
Pgm: EMEQUIP – Equipment Maintenance; standard Treeview path; Equipment Costing > Setup > Enter Equipment – Truck Detail tab
This tab applies only to customers using the Dispatch module, which has been deprecated.
Accumulators – Tab
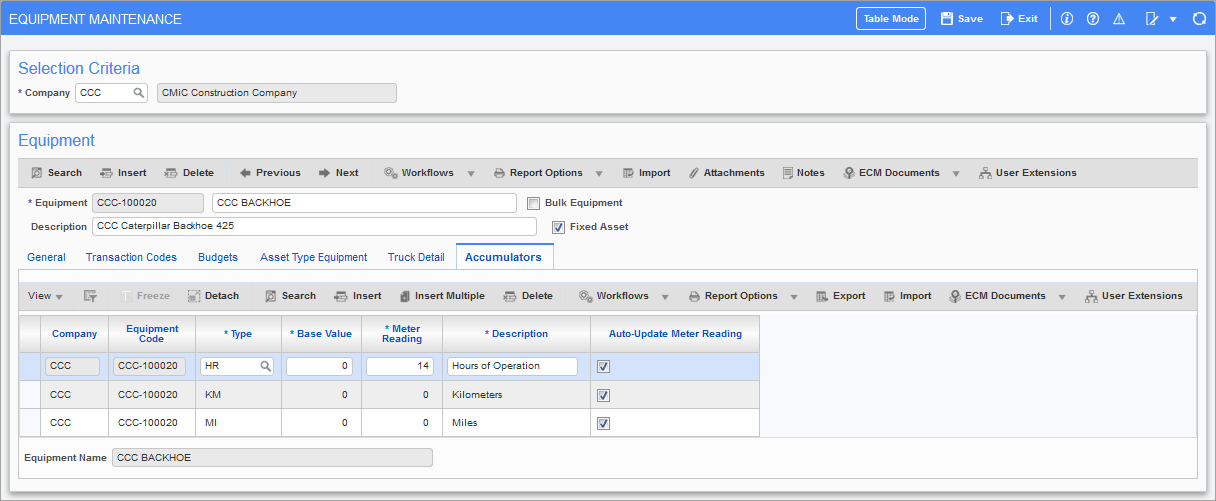
Pgm: EMEQUIP – Equipment Maintenance; standard Treeview path; Equipment Costing > Setup > Enter Equipment – Accumulators tab
Accumulators are used to track usage of equipment so that maintenance can be scheduled based on usage. For example, to schedule maintenance on an automobile every 20,000 miles, an accumulator would need to be defined for the automobile’s mileage on a periodic basis. Once set, responsibility will need to be assigned for the duty of manually updating the value of this accumulator with the automobile’s latest odometer reading.
Automatic accumulator update is available for hourly accumulators. Posting of Equipment Costing and Payroll will update hourly accumulators on the piece of equipment, providing the equipment transaction code allows for the automatic update and the equipment is using the automatic update in the accumulator screen.
If a different weight measure code is used but it has a WM conversion to hourly, the units will be converted to hourly and added to the last meter reading.
NOTE: The 'Restrict Accumulators Auto-Update' checkbox is located on the Transaction Codes screen (standard Treeview path: Equipment Costing > Setup > Local Tables > Transaction Codes). When checked, the associated accumulator will not get updated when a time charge or payroll time is entered (i.e. meter reading will not be automatically updated when the WM code matches the Transaction WM code). Unchecked, the accumulator will get updated.
Company
Company code is display-only and is associated with the equipment item.
Equipment Code
Equipment code is display-only and is associated with the equipment item.
Type
Enter/select one of the following valid types of accumulator:
-
Miles
-
KM (kilometers)
-
Hours (i.e. hours of operation)
-
Other
-
User-Defined Accumulator - This must be set up in the User Defined Accumulators screen in the Preventative Maintenance module to have them appear on the drop-down list (standard Treeview path: Preventative Maintenance > Accumulators > User Defined Accumulators).
NOTE: The user cannot define more than one accumulator of a particular type for a single piece of equipment.
Base Value
The purpose of the base value is to allow for the fact the meters in equipment can roll over, be reset, or be replaced. The actual accumulated value is taken to be the sum of the base value and the meter reading. Therefore, for a new piece of equipment, the base value will be zero. However, after a truck passes 100,000 miles and its odometer rolls over, the base value becomes 100,000. If an odometer breaks when its reading is 53,275 and is replaced by one with a reading of 25,000, the user would set the base value to be 28,275 (i.e. 53,275 – 25,000).
Meter Reading
This is the value of the most recent meter reading.
Description
This is a free text description of the accumulator.
Auto-Update Meter Reading – Checkbox
This checkbox will specify whether the meter readings for the piece of equipment will be updated at the time of equipment and payroll posting. The accumulator will automatically update when the accumulator WM code matches exactly to the transaction WM code.
The equipment transaction code used in the payroll or equipment posting must allow for the automatic accumulator update.
The setting for the checkbox will be determined first from the equipment class and then from the equipment company.
Billing Cap – Tab
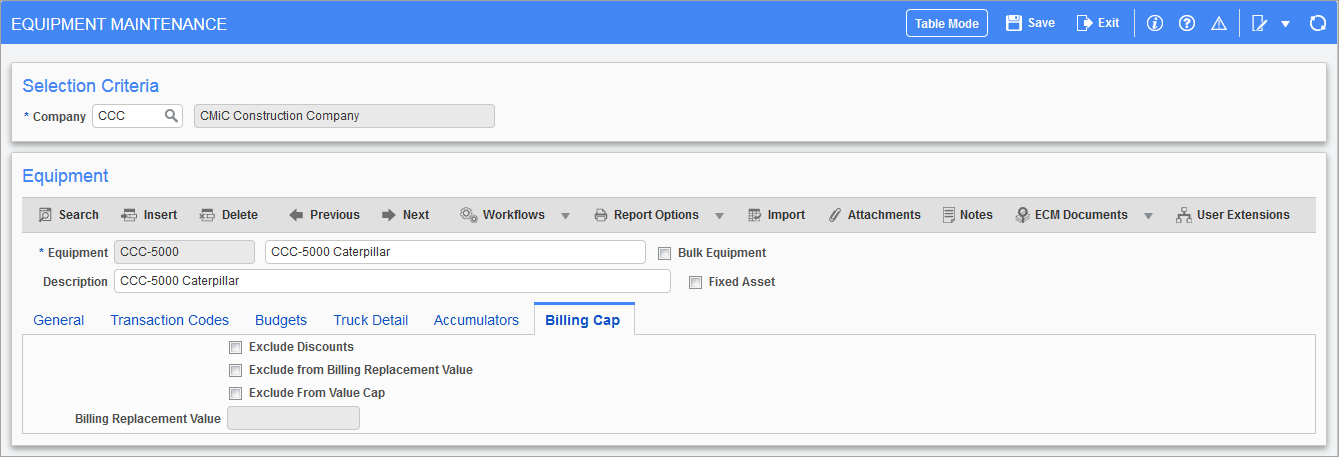
Pgm: EMEQUIP – Equipment Maintenance; standard Treeview path; Equipment Costing > Setup > Enter Equipment – Billing Cap tab
This tab is enabled when the 'Use Billing Revenue Cap' checkbox is checked on the Asset tab of the System Options screen in the System Data module (standard Treeview path: System > Setup > System Options – Assets Tab). This option is available for the standard auto-charge functionality when billing rates are used in the Equipment Costing module.
When a new piece of equipment is created, the checkboxes on this tab default from the equipment class selected in the Class field on the General tab.
Equipment classes are maintained on the Equipment Classes screen (standard Treeview path: Equipment Costing > Setup > Local Tables > Equipment Classes).