
Indexer Jobs
Indexer jobs are what create the index files used by the CMiC Search application to search for text within the selected types of documents and logs.
DISCLAIMER: CMiC Search is an administrative-level search tool that has unrestricted access to the entire software database. Access to this tool should be limited to administrators as the search does not adhere to security standards and will return results across all companies, jobs, etc.
There are two indexer jobs, one for the documents in CMiC Field and Enterprise and one for PM logs. As shown in the above screenshot, the Indexer lists the two indexer jobs, if they are scheduled to run:
-
Logs
Creates index file for PM logs of the types selected under the Logs section.
-
Documents
Creates index file for documents of the types selected under the Enterprise Documents and Project Documents sections.
NOTE: The indexer should be restarted after the application server restart.
Scheduler
When activated, the scheduler runs the indexer jobs at regular intervals. The duration of the interval for each indexer job is specified in the Minutes Interval column.
If the scheduler is active, the Indexer table shows the two indexer jobs (Logs, Documents), their intervals, their previous and next run times, and their current statuses.
NOTE: Click the [Refresh Table] button to ensure that current details are shown.
Indexer Controls
[Indexing Data Report] – Button
This button’s pop-up window displays the total number of Enterprise documents and project documents in the system under the Documents section, and it displays how many records there are for each log type under the Logs section. The Logs section’s header displays the total number of log records in the system.
This information can be used to get a sense of how much work the indexer jobs have to do and it can be used to help optimize the indexer jobs.
NOTE: This report can take a long time to generate. It is a preview only and is not required to be run.

[Turn on Debug Mode] – Button
If problems arise during indexing, users can turn on debug mode. When clicked, the URL changes and once the indexing starts, a log will display a record of database operations and any errors that may occur.
[Refresh Table] – Button
This button is used to refresh the table's information. This button should be clicked whenever current information is needed to be displayed.
[Start Indexes] – Button
This button is used to activate the scheduler and start running the indexes. If the scheduler is active, this button is disabled.
[Pause Indexes] – Button
This button is used to put the scheduler in standby mode. If an indexing job is running, it will be allowed to finish. In standby mode, the scheduler will not run the indexer jobs again until the [Start Indexes] button (available when the scheduler is in standby mode) is clicked.
[Stop Indexes] - Button
This button stops the scheduler and deletes the indexer jobs set up for it, reverting it back to its initial state.
[Rebuild Indexes] – Button
This button deletes and recreates the index files from scratch, instead of just updating the index files based on recent changes, as it does after the index files have been initially created (indexer jobs run faster after the initial run). This is required if any errors occur that would require the index files to be created from scratch.
Log and Document Types
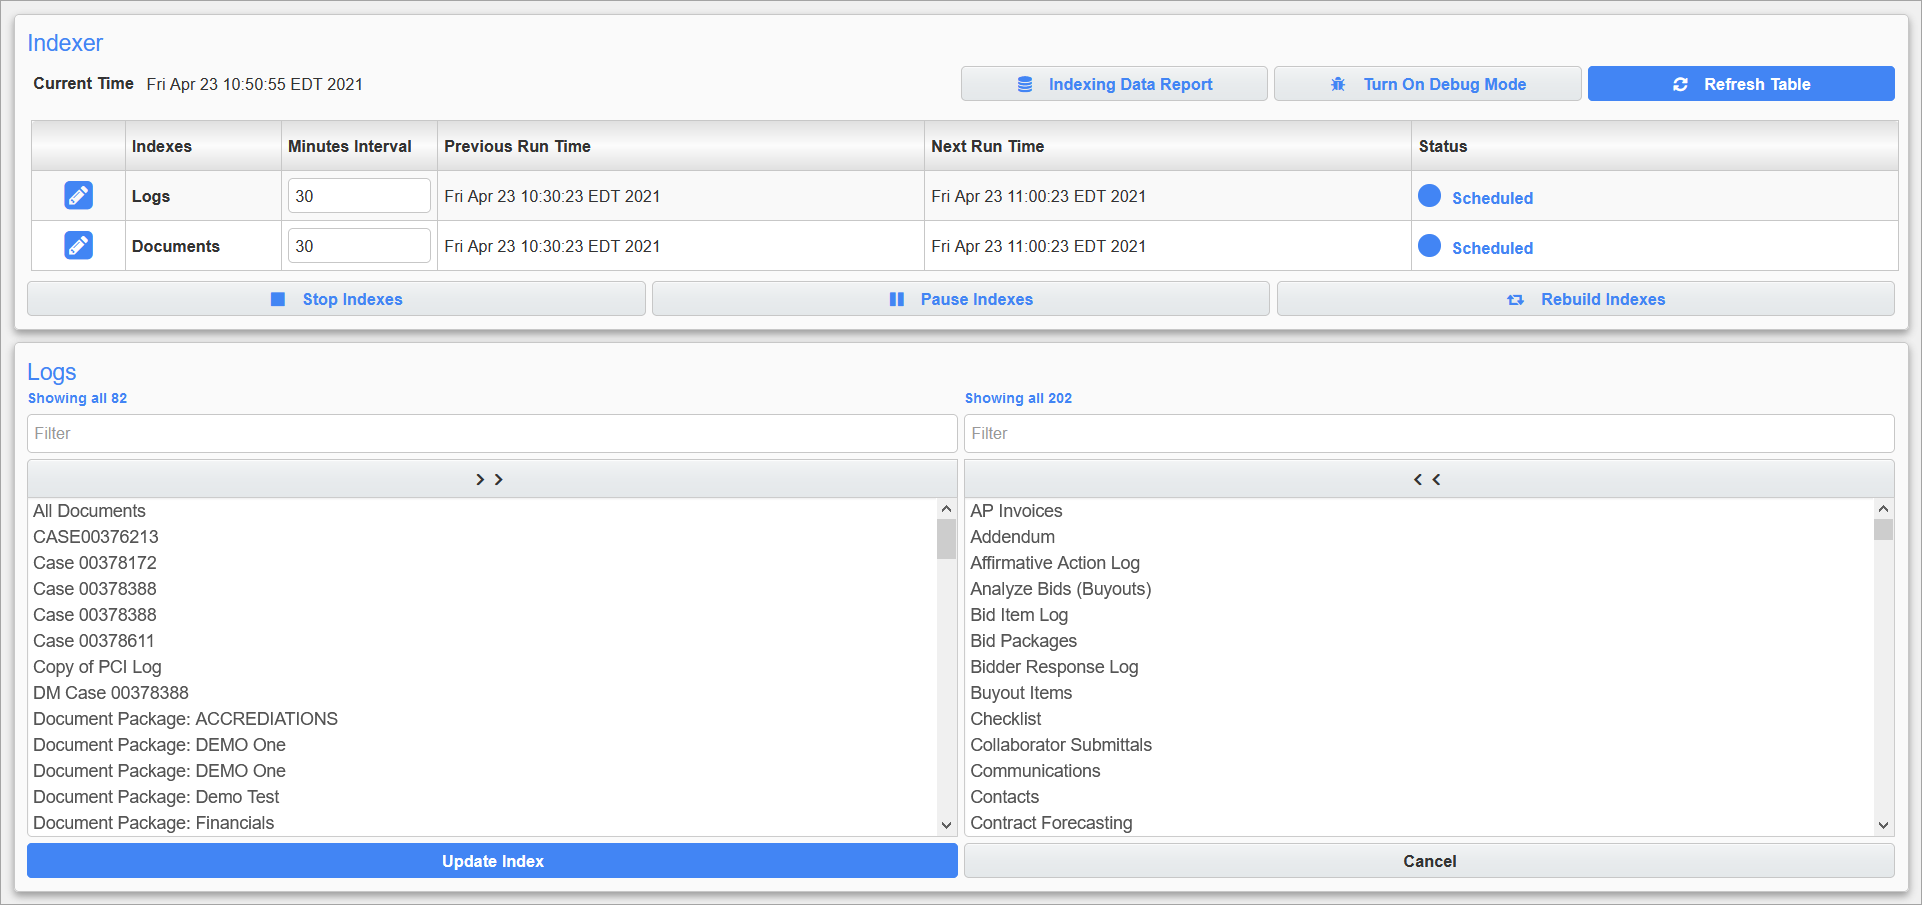
The Edit ( ) icon next to Logs or Documents under the Indexes column is used to open a list of log or document types. These are used to select which document and PM log types are to be indexed, and thus, which documents and logs are searchable via CMiC Search.
The Logs section lists the PM log types in the CMiC Field module, the Enterprise Documents section lists the document types in Enterprise, and the Project Documents section lists the document types in CMiC Field. To select a log or document type, click on the name on the left panel to move it to the right panel. To deselect it, click on it on the right panel to move it back to the left panel.
After making changes, click the corresponding [Update Index] button to commit them. If changes no longer need to be made, click the [Cancel] button to cancel the changes and close the Edit Logs section.
NOTE: For the Documents editor, the [Update Index] button can only update one of Enterprise documents or Project documents at a given time. If both document types have been updated, click the corresponding [Update Index] button under the appropriate section separately to update both types.
Setting Up Scheduler to Run Indexer Jobs
This overview is about setting up the scheduler to run the two indexer jobs when no scheduler is active. The scheduler is inactive if the [Start Indexes] button is enabled and the Status field says "Unscheduled".
Part 1: Edit the Jobs
Click on the icon next to Logs or Documents under the Indexes column to open a list of log or document types and select which ones are to be indexed. See the Select Log and Document Types section above for details.
Part 2: Change Interval
The Minutes Interval column is used to set the interval of time between the running of an indexer job by the scheduler. To set an indexer job’s interval, enter its interval (in minutes) in the input field. By default, the two indexer jobs are set to run by the scheduler every 30 minutes.
Part 3: Start the Indexer
Click the [Start Indexer] button to activate the scheduler.
Part 4: Check the Status
The Status column displays the current status of the scheduled indexer jobs. When the indexer is started, the status will be set to "Running". Once the initial indexing has finished, if an interval has been set, the status will change to "Scheduled". The Previous Run Time column displays when the indexer was last run and the Next Run Time column displays the next time the indexer will run.
NOTE: Click the [Refresh Table] button to ensure that current details are shown.