- Overview
- Meeting ID/Item ID Masks Default and Field Security
- Creating a New Meeting
- Meeting Minutes Action Item Link
- Attendees
- Entering Meeting Minutes
- Enter Meeting Notes
- Updating Existing Items
- Meeting Minutes – Printing Form Letters
- [Search PM Notes] – Button
Overview
Every project has many different types of meetings, such as Weekly Subcontractor Meetings, Safety Meetings, and Owner Meetings. CMiC Field makes the tracking of meeting information simple, by only showing meeting minutes that the current user attended. Each meeting can track attendees, courtesy copies, agenda items, and their status and responsible parties.
A meeting can either have a status code of 'Pending' or 'Submitted'. Pending means that only the creator of the meeting will be able to view and edit the meeting. 'Submitted' locks the meeting - it can no longer be updated and all attendees can view the meeting minutes. Only the creator of the meeting can 'Submit' the meeting minutes.
- To view a list of the meetings that you are party to, click on the 'Meeting Minutes' node in the Treeview. This will open a log of all meetings.
- To view the details of any meeting, click on the meeting ID field.
Meeting ID/Item ID Masks Default and Field Security
Users can define both the Meeting ID and Item ID masks via the Project Control Defaults tab as well as Project Maintenance Defaults tab. The values from the Project Control will be used as defaults for the Project level, which in turn will be used as defaults at the Meeting Track level.
Field security can also be defined on any of the fields: the Group Item, Sequence No., Restart Meeting, Meeting ID Mask, Item ID Mask and the Re-Open Meeting button which is enabled if the last meeting in a track is closed and the field security is set to "Unrestricted".
Creating a New Meeting
When a new meeting is started, the first thing that must be defined is the meeting track. Meeting tracks are used to differentiate types of meetings such as Safety, Progress and Owner meetings. All meetings within a track are sequentially numbered and each track has a frequency assigned to it. The frequency will be used to determine the Next Meeting Date.
Prior to recording specific details, a Meeting must be created.
Create a Meeting Track
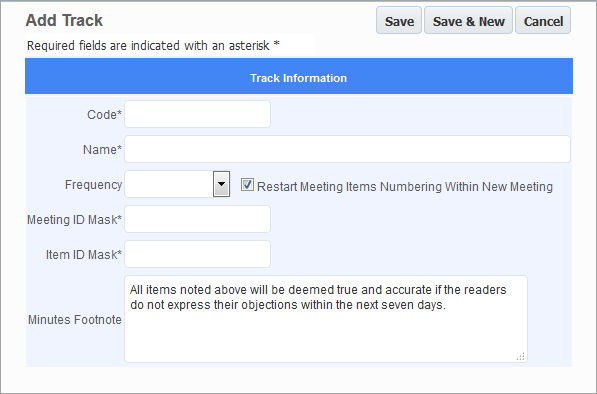
Meeting tracks are used to differentiate types of meetings such as Safety, Progress and Owner meetings. All meetings within a track are sequentially numbered and each track has a frequency assigned to it.
- From the Treeview, select Meeting Minutes.
- Press the [Add Meeting] button in top right-hand corner of the screen.
- If this is a new meeting type, then use the Add icon (
 ) next to the Track field to open the Create Track.
 - Enter a Code and Name (Description) for the Track.
- Select the meeting frequency from the drop-down list.
- Enter a Mask for the Meeting Number and the Meeting Items Numbers. For example SF*** would create Meeting Numbers of SF001, SF002 …
- Indicate if you want to restart meeting items from the number 1 for each new meeting.
- If required, you can add a Footnote that will be printed on all Meeting Documents for this particular track.
- When done, use the [Save] button to return to the Add Meeting screen. The [Cancel] button will close this window without saving the information entered, and the [Save & New] button allows the user to create multiple tracks at the same time. This feature is usually only used at the beginning of a project when you are just starting to set up the system.
Editing a Meeting Track
To edit a meeting track, click on the Edit icon (![]() ) to the left of the track assignment when in edit mode on a project meeting. The Edit Track pop-up window will then display. Make the necessary changes and click [Save].
) to the left of the track assignment when in edit mode on a project meeting. The Edit Track pop-up window will then display. Make the necessary changes and click [Save].
Deleting a Project-Level Meeting Track
The [Delete Track] button is available in Add Meeting mode as well as in View mode:

When the button is pressed, it displays the project-level meeting tracks in a pop-up window:
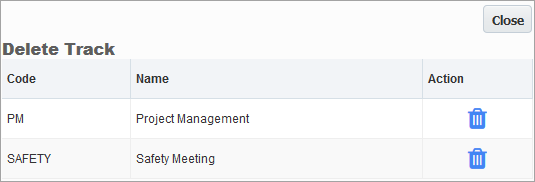
Field security can be applied to the [Delete Track] button (standard Treeview path: CMiC Field > Security > Role Maintenance – Programs/Meeting Minutes).
Enter General Meeting Information
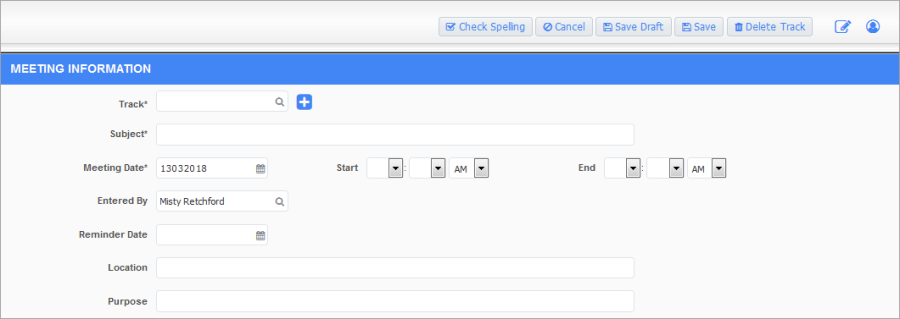
- Enter the Subject.
- Enter the Date, Time and expected duration of the meeting.
- Enter a reminder date for the meeting.
- Enter the Meeting Location and Purpose.
Entering Agenda Items

When starting a new meeting track, it is not necessary to enter agenda items, as they can be entered after the meeting, when the minutes are entered.
Agenda Items are used to track topics within a meeting. Each agenda item can have a responsible party assigned and a note saved against it.
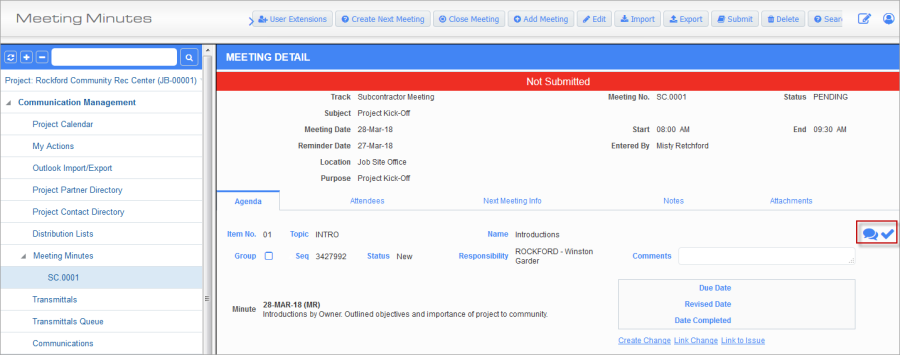
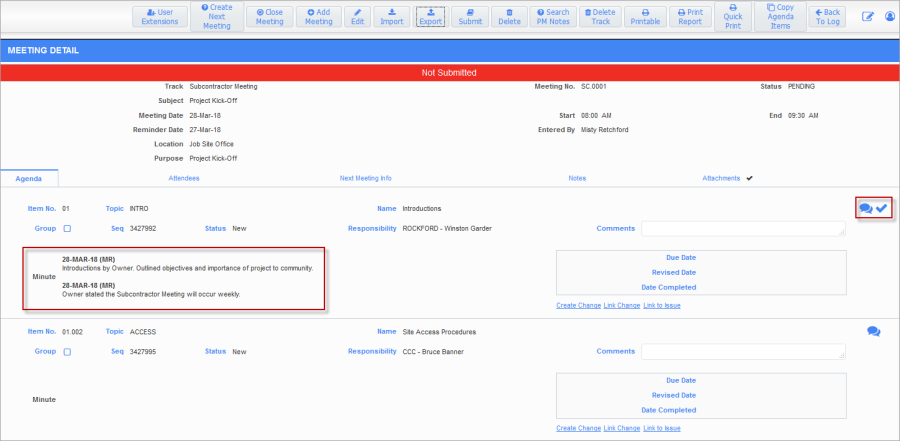
Example of Meeting Minute Agenda Item with Notes, as indicated by the notes bubble and checkmark
Agenda items when created for the first time will always have the status 'New'. Once an agenda item is moved forward to a second meeting, the status becomes open.
To add an agenda item, use the ![]() icon that is available in the Action Column of the Agenda Tab.
icon that is available in the Action Column of the Agenda Tab.
This will open up an agenda item record. Only the Name field is a mandatory field, as indicated by the Asterisk  . You may fill in the Agenda ID if you want, or if the Agenda ID is left blank, the system will automatically generate the number according to the mask applied on the track.
On all new agenda items entered, the status will default to 'New'. As this item is moved to the next meeting, the status will change to 'Open'. The user can then edit the status to be On Hold, Closed or Deferred. Closed items are not carried forward to the next meeting agenda.
NOTE: Please see the Meeting Minutes Agenda Item Statuses section in File Maintenance for further information on agenda item statuses.
Any agenda item can be a Group Item. A group will display in bold type and acts as a Title on the Agenda. A group item has all the same properties as a normal item, but it displays its name and number in bold to facilitate reading the agenda.
When done adding one agenda item, you have a choice of using the ![]() icon again to add another agenda item or to use the [Save] button. It is always possible to add more agenda items. While in edit and adding a new row, the user can also copy previous record using the
icon again to add another agenda item or to use the [Save] button. It is always possible to add more agenda items. While in edit and adding a new row, the user can also copy previous record using the ![]() icon.
icon.
When [Save Draft] is used, the record is saved but remains in edit mode, compared with [Save] in which the record is saved but then the screen changes to view mode.
In view mode, the user can link an agenda item to an Issue by using the Link to Issue link which is located to the right of the agenda item (next to the change item links).
Once the minutes are complete, you should [Submit] the minutes. This will allow all the attendees to view the meeting minutes. At any point, you can create the next meeting minutes by using the [Create Next Meeting] button.
Meeting Minutes Action Item Link

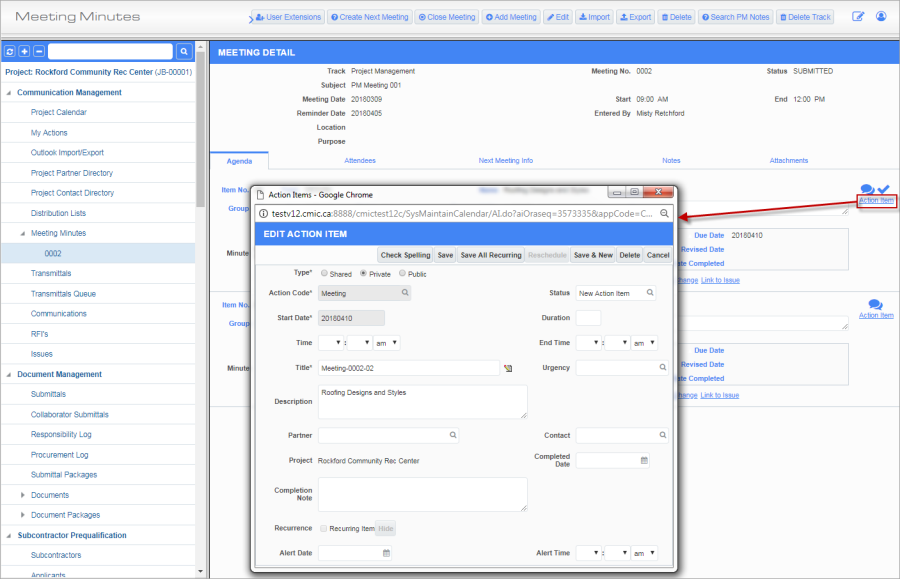
The Action Item link is used to view related action items for agenda items. This link is visible when the PM Control – Project Calendar tab flag is checked:

When this flag is checked, if Action Items are created for Meeting Minutes, the link provides a way of opening up the Action Item from within the Meeting Minutes, so that any edits made by the person responsible (from their My Actions page) are easily accessible.
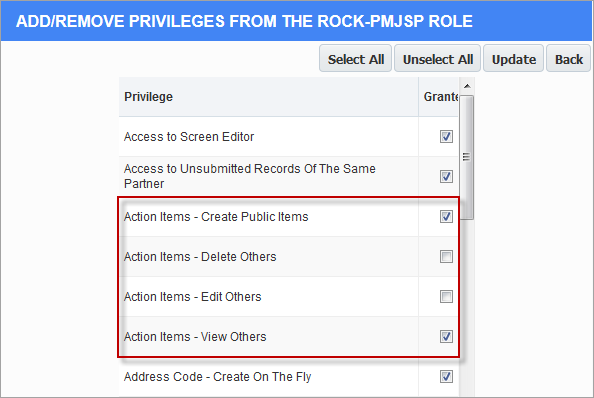
The program prevents users from modifying an action item if they are not responsible for the action item.
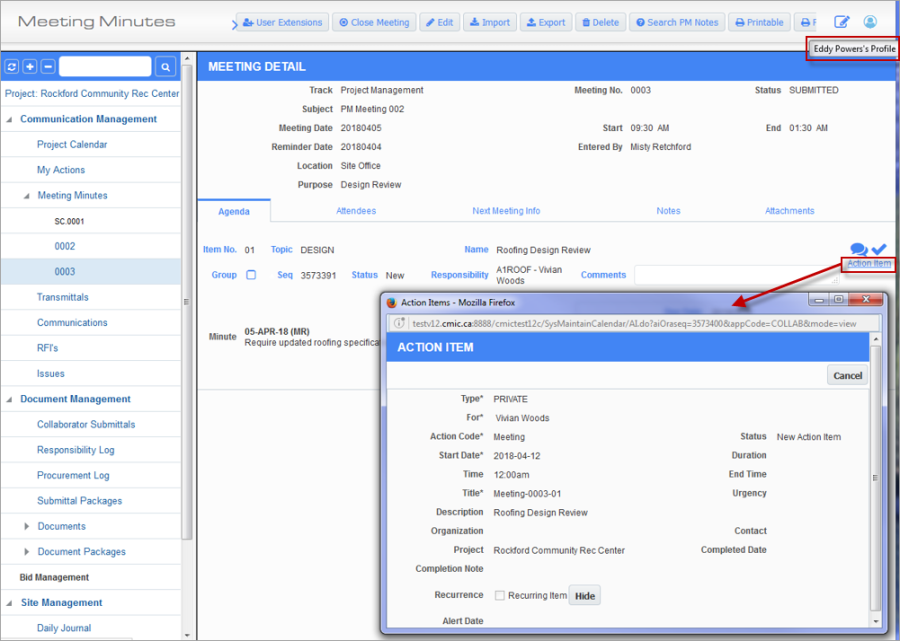
For example, after setting the privileges for the current user, in the screenshot below, the current user Eddy Powers, can view but not edit the action item that has Vivian Woods as responsible contact:
Attendees
The first time you create a meeting, you should add all parties you expect to be attending and any courtesy copied parties as well. Then each time you prepare the next meeting, all this information will roll forward automatically.
Open the Attendees tab, if the screen is not open for entering data; use the [Edit] button at the top of the screen.
- Using the
 icon.
icon. - Use the Name LOV to enter the Contact Code/Name/Company.
- Mark as Courtesy Copy only if required.
- Enter any unique Notes regarding the attendee, if required.
NOTE: Only attendees entered against the meeting will be able to view the meeting minutes.
Guests
Guests may be added by utilizing the 'Guest' checkbox. If the user checks this box, the contact LOV will be replaced by a simple text field where the name of the guest can be typed (if the previous value in the Name field was not saved, the user can uncheck the Guest flag and the original entry will resurface). The 'cc only' and 'Absent' boxes are disabled when the 'Guest' checkbox is checked.
Entering Meeting Minutes
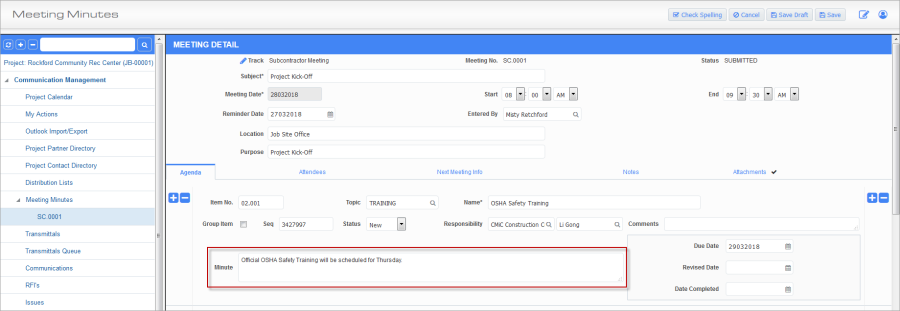
The only person who can add meeting minutes is the person who created the meeting. When the meeting has a status of 'Pending', the user will be able to add/edit or remove details from the meeting minutes.
From the Treeview Log for Meeting Minutes, click on the appropriate Meeting Number. This will open the meeting in view mode. At the top of the screen, there will be an [Edit] button. This button changes the screen from View to Edit mode. You must be in Edit mode to be able to enter the meeting minutes.
![]()
Example of pop-up window launched from Meeting Minute Note icon
Minutes can also be added using the Note icon in View mode. A pop-up window is launched where the user can set a Status on each Meeting Minute. The list of Statuses used is from the same list used for Meeting Agenda Items.
There is no link or synchronization between a Meeting Minute Status and its associated Meeting Agenda Item Status. This field is not considered mandatory and is provided for informational purposes only.
Enter Meeting Notes
Open the Notes Tab. If there are existing notes, a checkmark will appear on the tab.
Notes that have been entered previously will be available for update, submittal or deletion.
Press the [Add Note] button at the top of the screen to enter a new note.
Updating Existing Items
As meetings go forward, agenda items become complete and need to be removed from future meetings. To do this, change the status to 'Closed'. When the next meeting is created, this agenda item will not be carried forwards.
If there are also items that need to be put off until another meeting, this can be done by setting the status to 'Deferred'. These items will be brought forward to the next meeting but will have a status of Deferred.
Some of the items on the agenda may have due dates and persons responsible. These fields can also be updated at this time.
Each agenda item has a note field. This field can be updated/added as required. If adding more information to a note, you may want to start the note with the Date, so that it is easy to track chronologically what has happened to the agenda item.
When one or more Agenda Item IDs are changed, a confirmation message is displayed:

When 'Yes' is chosen, the previous agenda item IDs are not displayed in the Agenda Item Report, but if 'No' is selected, the previous agenda item IDs are displayed in the report (after Create Next Meeting, and then modifying the agenda ID), thus maintaining the previous functionality as well.
This confirmation message is only applicable to the JSP version.
Adding New Agenda Items
As with most meetings, the agenda is usually followed, however there are always new topics introduced for discussion that were not already on the agenda. Again, these items should be recorded.
The system allows you to insert a record above any existing record, or to add the new agenda item at the end of the list.
To insert a record above, use the ![]() icon in the action column of the agenda item you want to create a record above.
icon in the action column of the agenda item you want to create a record above.
To add a record to the end of the agenda list, move to the very bottom of the list and use the ![]() icon that is not associated with a record.
icon that is not associated with a record.
When an agenda Item note is added (using the note bubble icon '![]() '), then Agenda Item and Name are shown as the source in the pop-up of the Agenda Item note.
'), then Agenda Item and Name are shown as the source in the pop-up of the Agenda Item note.
Copying Agenda Items

Agenda Items are copied by first clicking the blue ![]() to insert a record. The
to insert a record. The ![]() icon is now displayed. If you hover the cursor on this icon, you will see its hint line: Copy Previous Row.
icon is now displayed. If you hover the cursor on this icon, you will see its hint line: Copy Previous Row.
The contents of the previous Agenda Item are copied into the current record when you click on the icon.
Importing and Exporting Agenda Items

The [Import] and [Export] buttons on the Meeting Minutes screen allow the importing and exporting of agenda items into the meeting currently being viewed. Field security can be added to the [Import] button (standard Treeview path: CMiC Field > Security > Role Maintenance – Programs/Meeting Minutes). The setting is 'Unrestricted' or 'Hidden'.
Importing Agenda Items
Pre-requisite for Importing: Meeting ID and Agenda Item IDs must already be defined.
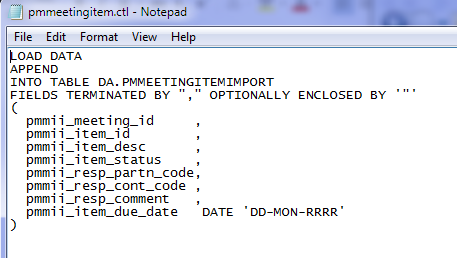
The import control file layout is:
File name = pmmeetingitem.ctl
Field Name Field Type
PMMII_MEETING_IDVARCHAR2(10)(Meeting ID)
PMMII_ITEM_IDVARCHAR2(10)(Agenda Item ID)
PMMII_ITEM_DESCVARCHAR2(4000)(Agenda Item Description)
PMMII_ITEM_STATUSVARCHAR2(1)(Agenda Item Status)
PMMII_RESP_PARTN_CODEVARCHAR2(8)(Responsible Partner/Company Code)
PMMII_RESP_CONT_CODEVARCHAR2(8)(Responsible Contact)
PMMII_RESP_COMMENTVARCHAR2(1000)(Comment)
PMMII_ITEM_DUE_DATEDATE(Agenda Item Due Date)
NOTE: Topic and Minutes (notes) have been added to the Meeting Minutes Import control file (pmmeetingitem.ctl): PMMII_TOPIC and PMMII_ITEM_NOTE.
Sample file for import:

After clicking the [Import] button and selecting the file to be imported, the user clicks the [Upload] button to pull the data into the Import Validation screen:
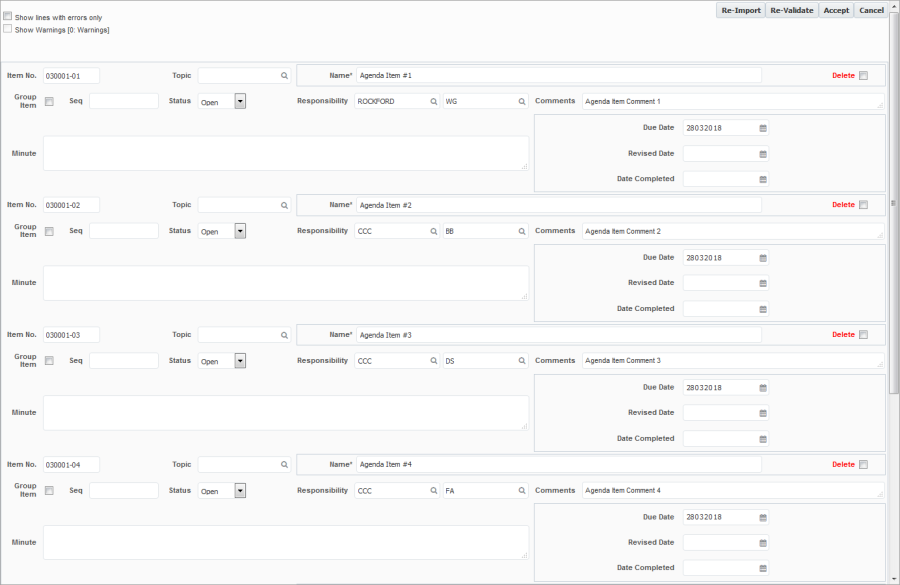
Any records marked for deletion will be collapsed and later removed after revalidation. Records selected for deletion can be unchecked if the user decides not to remove them.
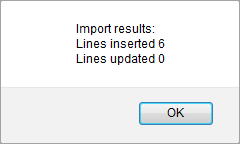
Additional changes can be made here and then revalidated before finally 'Accepting' the import into the Meeting Minutes screen. A notification is sent giving the number of records inserted and updated:
Exporting the Agenda Items
The [Export] button is used to export the agenda items to a spreadsheet.
When the user clicks the [Export] button, a confirmation message is displayed asking if the Notes are to be included:
If 'Cancel' is selected, the export file will be created without the agenda item notes.
If 'OK' is selected, the export file will include the agenda item notes (under the 'Minute' column) each separated by <BR><BR>:
For example, exporting:
And selecting 'OK' will give:

Selecting 'Cancel' will give:

Agenda Item Topics
Agenda Item topics can be maintained at both the global level, as well as at a project-specific level.
The Meeting Topic Maintenance screen (standard Treeview path: CMiC Field > File Maintenance > Local Tables > Meeting Topics) allows users to add, edit and delete meeting (agenda item) topics that can be used by any project.
To maintain project-specific meeting topics, there is a PM Role privilege 'Edit Meeting Topic' that will need to be assigned to the user in order to be able to edit and remove project-specific meeting topics.
The Topic LOV will display both global and project-specific topics. Any topic typed in by the user will automatically be stored, but only the user with the 'Edit' privilege will be able to edit or delete them.
Deleting an Agenda item
Sometimes, you may want to remove an agenda item instead of closing it. This can be done by using the 'Delete' icon in the action column of the record to be deleted. The system will confirm the delete with the user before continuing.
Sorting Agenda Items
You can sort Agenda Items by clicking on any of the agenda item fields that has blue text. The system will remember your preference and will keep the sort until you change it by clicking on another field.
Updating Next Meeting Info
As with all meetings, although they are scheduled to be every Friday at 10: am, sometimes they need to be re-scheduled. This can be done by updating the data in the Next Meeting info tab. Here you can change the meeting date, time, and location as well as change the subject and add a comment, if required.
The data entered here will be used to 'build' the next meeting minutes, and to remind the attendees about the next meeting.
Updating Attendees
Each meeting can track attendance plus you can mark persons absent and enter a comment, if required. It is also possible to add new attendees by using the icon.
Meeting Minutes – Printing Form Letters
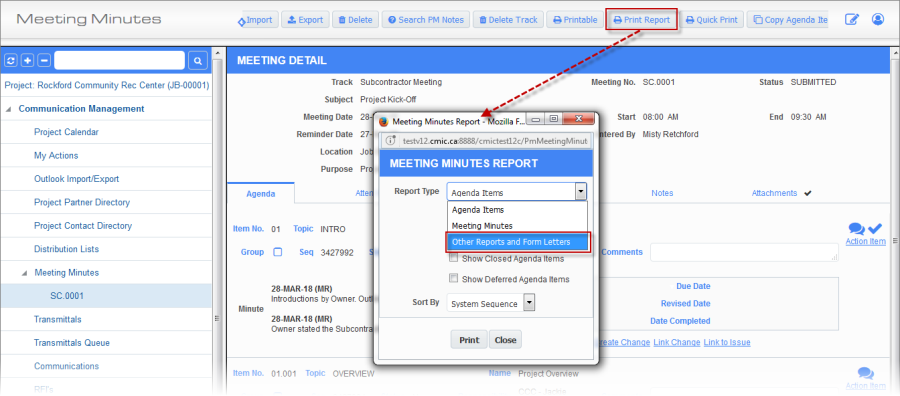
Example of pop-up window launched from [Print Report] button on the Meeting Minutes screen
In Meeting Minutes, changes have been made to the Print pop-up to allow printing of Form Letters that are defined on Meeting Minutes. The drop-down list of reports will now contain the following items:
1) Standard Reports (Agenda Items, Meeting Minutes): the functionality behind these is preserved.
2) Additional item "Other Reports and Form Letters", which will navigate to the standard report pop-up, used by all other programs where "Print" button is available.
When this option is selected, the next pop-up shows the different report types: standard, custom reports, form letter based.
[Search PM Notes] – Button
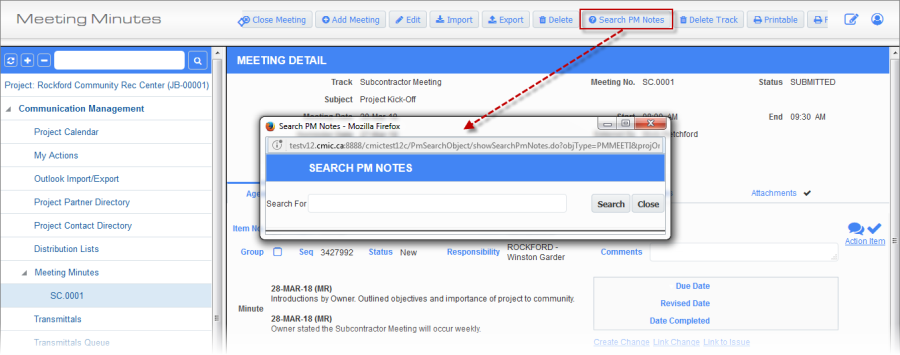
Example of pop-up window launched from [Search PM Notes] on the Meeting Minutes screen
The [Search PM Notes] functionality allows a user to search through Meeting Minutes Notes and locate items with a common search phrase. Field security can be applied to this button.